
Witches Brew Halloween Cake Jars.html! I am absolutely thrilled to present a confection that perfectly captures the enchanting spirit of the spooky season: individual dessert jars that are as visually captivating as they are irresistibly delicious. This year, let’s step beyond traditional sheet cakes and delve into the mystical world of single-serving treats, ideal for any ghoulish gathering or a cozy, autumnal evening. Halloween has long been a cherished time for delightful frights and mouth-watering concoctions, and these whimsical cake jars beautifully embody that festive tradition with a modern, convenient twist. People are utterly enchanted by this dish not only for its captivating, layered presentation, which truly screams “Halloween magic,” but also for the sheer ease and enjoyment of a perfectly portioned, portable dessert. Each jar offers a delightful exploration of vibrant flavors and intriguing textures, ensuring every spoonful is a truly spellbinding experience. We are confident that these Witches Brew Halloween Cake Jars.html will become the undisputed star of your autumn celebrations, offering a uniquely fun and utterly unforgettable treat that’s both a joy to create and an absolute pleasure to devour.

Ingredients:
-
For the Spooky Vanilla Cake Base:
- 2 ½ cups (300g) all-purpose flour, sifted
- 1 ½ teaspoons baking powder
- ½ teaspoon salt
- 1 cup (226g) unsalted butter, softened to room temperature
- 2 cups (400g) granulated sugar
- 4 large eggs, at room temperature
- 1 tablespoon pure vanilla extract (I always go for the good stuff!)
- 1 cup (240ml) buttermilk, at room temperature
- Gel food coloring: vibrant green, mystical purple, and eerie black (these gel colors really pack a punch!)
-
For the Bewitching Buttercream Frosting:
- 1 ½ cups (340g) unsalted butter, softened to room temperature
- 6-8 cups (720-960g) powdered sugar, sifted (adjust to your preferred sweetness and consistency)
- ½ cup (120ml) heavy cream or whole milk, at room temperature
- 2 teaspoons pure vanilla extract
- Pinch of salt
- Gel food coloring: more vibrant green, deep purple, and a touch of orange or black for contrast
-
For the Enchanted Decorations & Assembly:
- 10-12 half-pint (8 oz / 240ml) mason jars or other clear glass jars with lids (I find the straight-sided ones work best for layering!)
- Halloween-themed sprinkles (bats, ghosts, pumpkins, nonpareils)
- Edible glitter (green, purple, or silver for that extra sparkle)
- Gummy worms or candy “snakes”
- Candy eyeballs (they add such a fun, creepy touch!)
- Black licorice “spider legs” or pretzel sticks dipped in black candy melts
- Optional: Green or purple sparkling sugar for rimming the jars
- Optional: Small plastic spiders or witch hats for decoration on top (non-edible)
-
Essential Equipment:
- Large mixing bowls
- Electric mixer (stand mixer or hand mixer – it’s a arm-saver!)
- Rubber spatulas
- Measuring cups and spoons
- 9×13 inch baking pan (or two 8-inch round pans if you prefer thicker layers)
- Parchment paper
- Wire cooling rack
- Round cookie cutters (about 2-2.5 inches in diameter, to fit your jars)
- Piping bags with star or round tips (or just use a spoon, but piping bags make it so neat!)
Part 1: Preparing the Cake Layers – The Foundation of Your Witches’ Brew
- Preheat and Prepare Your Pan: First things first, let’s get that oven ready. Preheat your oven to a cozy 350°F (175°C). While it’s warming up, lightly grease and flour a 9×13 inch baking pan. For easy removal later, I always recommend lining the bottom with parchment paper, leaving a slight overhang on the sides. This little trick makes lifting the cooled cake out a breeze, and trust me, you’ll thank yourself for it!
- Whisk the Dry Ingredients: In a medium bowl, whisk together the sifted all-purpose flour, baking powder, and salt. Sifting the flour isn’t just a suggestion here; it really helps to prevent lumps and ensures a super light and airy cake texture, which is exactly what we want for these delicious cake jars. Set this bowl aside for a moment.
- Cream the Wet Ingredients: In a large mixing bowl, using your electric mixer, cream together the softened unsalted butter and granulated sugar on medium-high speed. You’re aiming for a light, fluffy, and pale yellow mixture. This usually takes about 3-5 minutes. Don’t rush this step, as it’s crucial for incorporating air into your cake, making it wonderfully tender. Once it’s light and fluffy, beat in the large eggs, one at a time, making sure each egg is fully incorporated before adding the next. Scrape down the sides of the bowl as needed to ensure everything gets mixed in. Finally, stir in that glorious pure vanilla extract. The aroma alone is just divine!
- Combine Wet and Dry: Now, it’s time to bring the two mixtures together. With your mixer on low speed, gradually add the dry ingredients to the wet ingredients, alternating with the buttermilk. Start and end with the dry ingredients. So, add about a third of the flour mixture, mix until just combined, then half of the buttermilk, mix, another third of the flour, the remaining buttermilk, and finally, the last third of the flour. Be careful not to overmix! Overmixing develops the gluten in the flour too much, leading to a tough, dry cake – and we definitely don’t want that for our enchanting brew. Mix just until no streaks of flour remain. A few small lumps are perfectly fine.
-
Divide and Conquer with Color: This is where the magic truly begins! Divide your beautiful cake batter evenly into three separate bowls. This will give us our three “brew” colors.
- In the first bowl, add a few drops of vibrant green gel food coloring. Mix gently until the color is consistent and stunning. You want it to look like a bubbling cauldron!
- In the second bowl, add a few drops of mystical purple gel food coloring. Mix it until you achieve a deep, bewitching hue.
- In the third bowl, add a tiny drop of black gel food coloring. You might be surprised how potent black gel color is, so start with just a pin-sized amount on a toothpick and add more if needed, mixing until you get a shadowy, eerie gray or a subtle dark shade. This will add a fantastic depth to our layers.
You can always add more coloring to achieve your desired intensity, but remember that gel colors are highly concentrated.
- Bake Your Magical Layers: Carefully spoon or pour dollops of each colored batter randomly into your prepared 9×13 inch baking pan. You can swirl them gently with a knife or a skewer if you want a marbled effect, or leave them as distinct blobs for a more mosaic-like pattern. I often find a combination of both looks fantastic. Bake for 25-30 minutes, or until a wooden skewer inserted into the center comes out clean. The exact baking time can vary depending on your oven, so keep an eye on it.
- Cool and Cut: Once baked, let the cake cool in the pan on a wire rack for about 10-15 minutes. This cooling period in the pan is important for the cake to set properly. After that, use the parchment paper overhang to carefully lift the cake out of the pan and transfer it to the wire rack to cool completely. It is absolutely crucial that the cake is completely cool before you try to cut it or it will crumble! Once cooled, use your chosen round cookie cutter (the size that fits your jars perfectly, usually 2-2.5 inches) to cut out as many cake rounds as possible. Don’t worry about the leftover cake scraps; they make for excellent taste-testing, or you can crumble them up for an extra layer in your jars if you’re feeling extra creative! You should aim for about 2-3 cake rounds per jar, so plan accordingly.
Part 2: Crafting the “Magical” Buttercream – The Sweet Elixir
- Cream the Butter: In a large mixing bowl, beat the softened unsalted butter with your electric mixer on medium speed for about 2-3 minutes until it’s super light and creamy. This aerates the butter, making for a much lighter frosting.
- Gradually Add Powdered Sugar: With the mixer on low speed, gradually add the sifted powdered sugar, one cup at a time. Mixing on low initially prevents a powdered sugar cloud from taking over your kitchen! Once most of the sugar is incorporated, increase the speed to medium-high and continue beating until light and fluffy.
- Add Liquids and Flavor: Pour in the heavy cream (or milk), pure vanilla extract, and a pinch of salt. Beat on medium-high speed for another 3-5 minutes until the buttercream is incredibly light, fluffy, and smooth. If your frosting seems too thick, add a tiny bit more cream, a teaspoon at a time, until you reach your desired consistency. If it’s too thin, add a bit more sifted powdered sugar. You want it to be spreadable but firm enough to hold its shape.
-
Color Your Bewitching Frosting: Just like with the cake batter, we’ll color our frosting to match our spooky theme. Divide the buttercream into two or three bowls.
- In one bowl, add vibrant green gel food coloring to create a bubbly “slime” effect.
- In another, add deep purple gel food coloring for a mystic look.
- If you have a third bowl, you could leave it white, or add a touch of orange or black for a striking contrast.
Mix each color until it’s fully incorporated. I love how these colors pop against each other! Transfer each colored frosting into separate piping bags fitted with your chosen tip (a round tip or a star tip works wonderfully), or just use a spoon if you prefer a more rustic look.
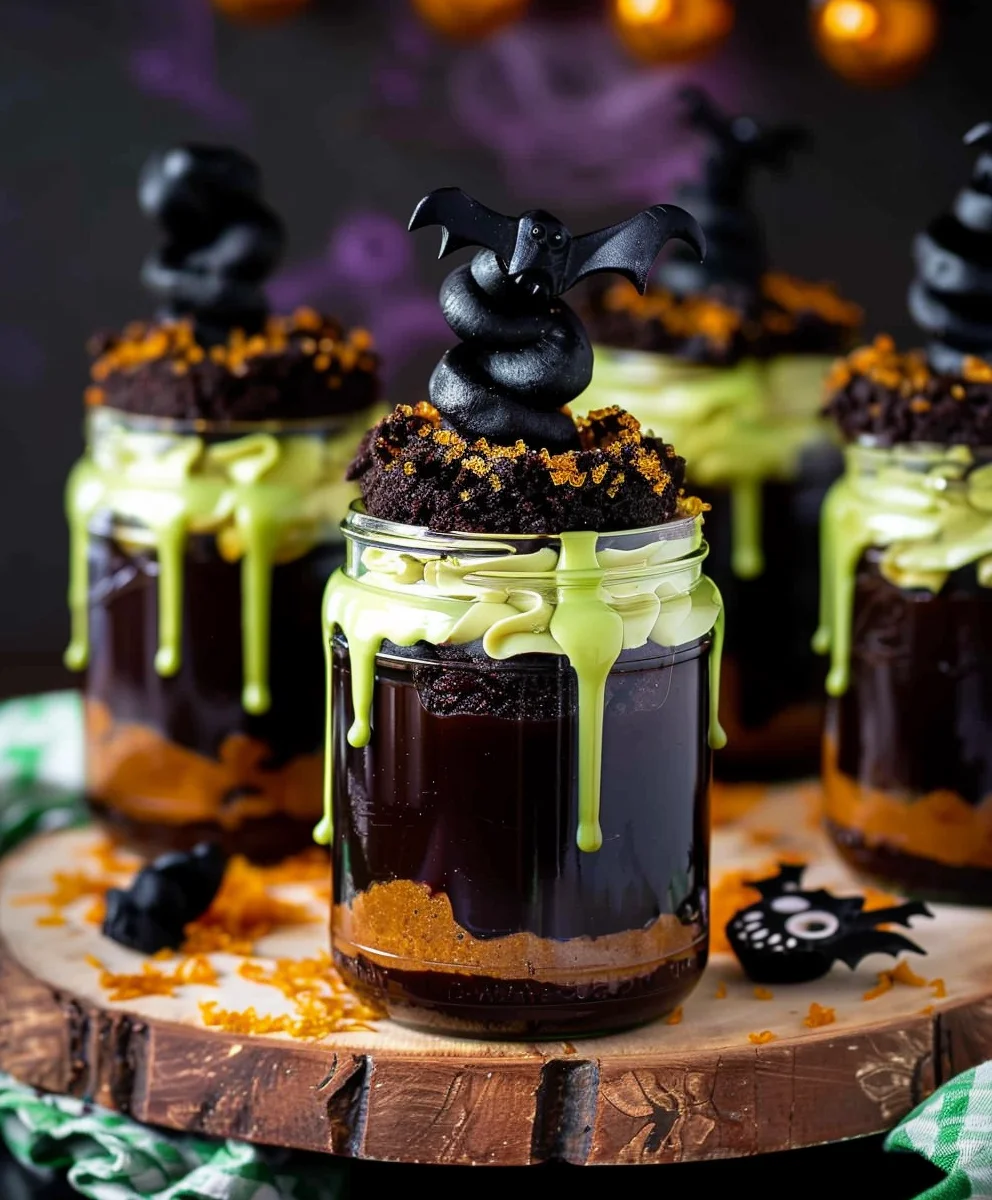
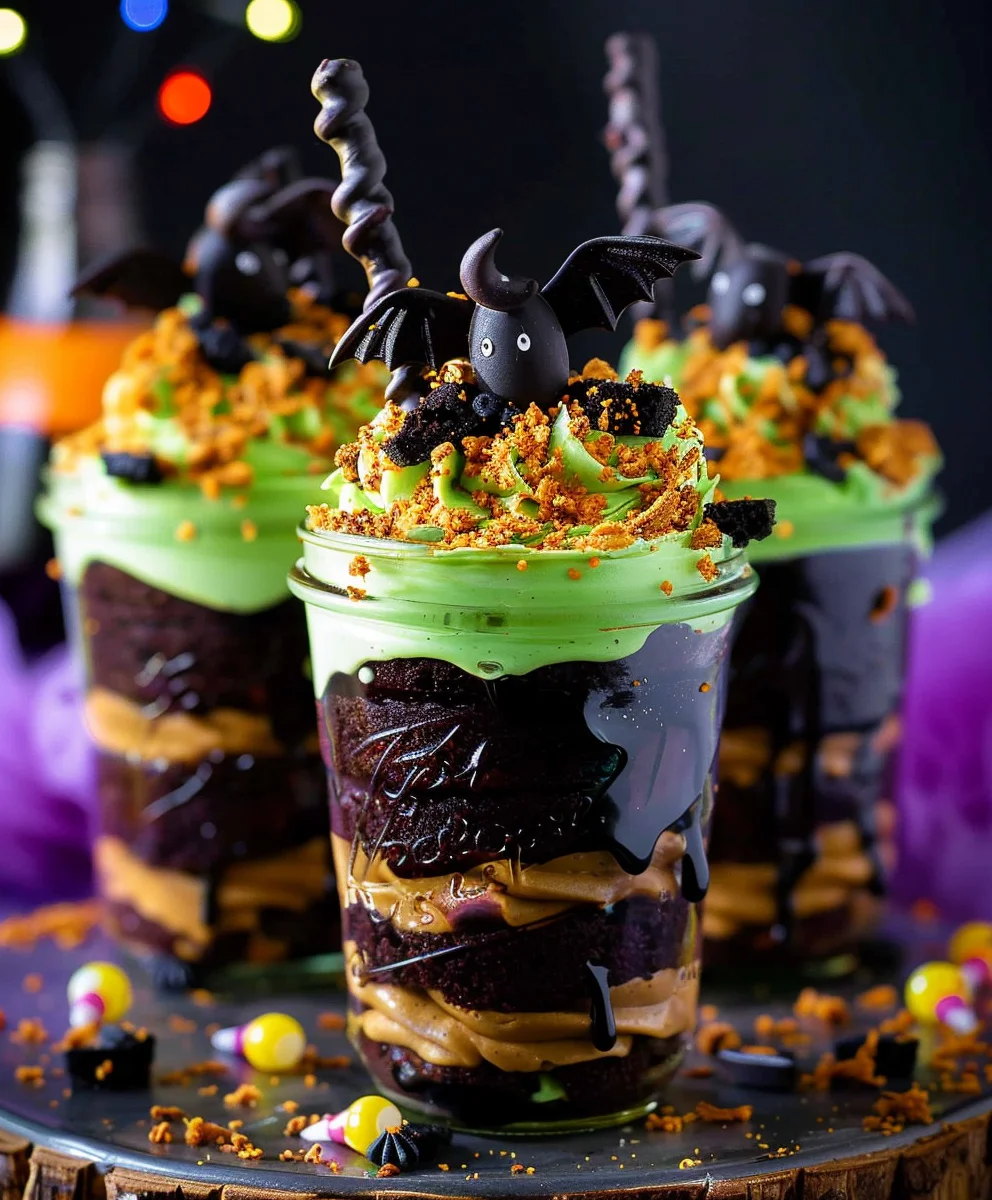
Part 3: Assembling Your Enchanting Witches Brew Halloween Cake Jars
This is where your creativity truly comes to life! Assembling these jars is so much fun, and you can really let your imagination run wild to make each one unique. Make sure all your cake rounds are cool and your frostings are ready to pipe or spoon.
- Start with a Cake Base: Take one of your clean, dry mason jars. Place one of your colorful cake rounds at the very bottom. You might need to gently press it down a little to ensure it sits flat. This forms the sturdy base of your “brew.”
- First Layer of Frosting: Pipe or spoon a generous layer of one of your colored buttercreams (let’s say purple first!) over the cake round. You want a thick enough layer to really see the color and provide a delightful creamy texture. Spread it evenly to the edges of the cake layer.
- Add Some Enchanted Sprinkles: Before adding the next cake layer, sprinkle some Halloween-themed sprinkles or edible glitter over the frosting. This adds texture, sparkle, and that magical “brew” feeling. I love using bat and ghost sprinkles here!
- Second Cake Layer: Carefully place another colorful cake round on top of the frosting and sprinkles. You can choose a different cake color than the one below to create a vibrant striped effect. Gently press it down.
- Second Layer of Frosting: Now, add a layer of a different colored buttercream – perhaps the vibrant green this time. Again, make it a nice, thick layer. This contrast in colors is what makes these jars so visually appealing and truly sets the “witches brew” theme.
- More Spooky Decorations: This is a great spot to tuck in a gummy worm or two, peeking out from the frosting. You can also add more sprinkles, or even some crushed up leftover cake crumbs for an extra textural element that looks like dirt or mysterious dust.
- Third Cake Layer (Optional): If your jars are tall enough, or if you cut thinner cake rounds, you can add a third cake layer, followed by a third frosting color (if you have one, or repeat a favorite!). The goal is to fill the jar with alternating layers of cake and frosting, making sure to leave about an inch of space from the top for the final decorations and the lid.
-
The Grand Finale – Topping It Off: For the top layer, pipe or spoon a final, generous swirl of your favorite colored frosting. This is your canvas for the most elaborate decorations!
- Carefully place a couple of candy eyeballs on top, making them look like they’re peering out of the brew.
- Drape a gummy worm over the edge or make it look like it’s wriggling out.
- Add a few black licorice “spider legs” or pretzel sticks to resemble branches or creepy appendages.
- Generously sprinkle with more Halloween sprinkles and a dusting of edible glitter for that ultimate magical sparkle. Seriously, don’t hold back on the glitter! It really makes them shine.
- Seal the Spell: Once decorated, if you plan to transport or store them, securely place the lids on your cake jars. The airtight seal helps to keep them fresh and prevents any of your magical decorations from shifting.
Part 4: Tips and Tricks for a Truly Spellbinding Treat
My goal is always for you to have the best experience, so here are a few extra tips I’ve learned along the way to make your Witches Brew Halloween Cake Jars absolutely perfect:
- Prepping Ahead is a Lifesaver: You can absolutely make these cake jars in stages! Bake the cake layers up to 2 days in advance, wrap them tightly in plastic wrap, and store them at room temperature or in the fridge. The buttercream can also be made a day or two ahead and stored in an airtight container in the fridge. Just make sure to let it come to room temperature and give it a good whip with your mixer before assembling to restore its fluffiness. Assembling the jars the day before your party works wonderfully, allowing all those flavors to meld together beautifully.
- Storage Secrets: Once assembled, these Witches Brew Halloween Cake Jars can be stored at room temperature for up to 24 hours, especially if your frosting is made with butter and not an excessive amount of dairy that requires refrigeration. However, for maximum freshness and to keep your buttercream firm, I recommend storing them in the refrigerator for up to 3-4 days. Just be sure to bring them out about 30 minutes to an hour before serving so the cake can soften up a bit and the flavors can truly shine at room temperature.
- Flavor Adventures: While I adore the vanilla cake, feel free to experiment! A rich chocolate cake would be divine with green mint buttercream for a “swamp monster” brew. Or, imagine a red velvet cake with cream cheese frosting, colored black and purple for a truly gothic potion. Don’t be afraid to try different extracts in your frosting too – almond, lemon, or even a hint of mint could add an exciting twist.
- Kid-Friendly vs. Adult-Only Brew: These are already a huge hit with kids, but you can make them even more appealing by letting them help with the decorating! Provide a spread of sprinkles, mini candies, and fun toppers. For an adult version, you could lightly brush your cake layers with a simple syrup infused with a touch of a complementary liqueur, like Chambord for the purple layers or Midori for the green ones. Just a little brush goes a long way to add a sophisticated depth of flavor.
- Decorating Variations: Beyond the sprinkles and candy eyeballs, think about edible markers to draw spiderwebs on the jar lid, or even make tiny fondant witch hats or ghosts to place on top. Edible glitter spray can give an all-over shimmer that makes them look truly magical. For a more intense “brew” effect, you could even add a thin layer of green or purple fruit gel (like a pie filling or jelly, gently warmed) between cake layers for a glossy, gooey texture.
- Presentation is Key: To really make these jars pop, consider tying a festive Halloween ribbon around the neck of each jar. You could also attach a small tag with a spooky name like “Frog’s Breath Potion,” “Eye of Newt Elixir,” or “Spider Silk Spell.” This thoughtful touch makes them perfect for party favors or gifts. Placing them on a tiered serving tray with some dry ice (safely contained in a separate bowl, of course!) for a smoky effect would create an unforgettable display at any Halloween gathering.
- Cookie Cutter Alternatives: If you don’t have round cookie cutters, don’t fret! You can use the rim of one of your mason jars to cut out the cake rounds. Just make sure it’s clean and pressed down firmly. Alternatively, you can simply crumble the cake layers and alternate with frosting for a deconstructed, rustic “messy brew” look, which is equally charming and much quicker!
I hope you have an absolutely wickedly wonderful time creating these Witches Brew Halloween Cake Jars! They are not only a feast for the eyes but a truly delicious and memorable treat that will enchant all your ghoulish guests.
Conclusion:
So, there you have it! We’ve journeyed through the enchanting process of creating what I truly believe will become your new favorite spooky season treat. This isn’t just any dessert; it’s an experience, a delightful fusion of whimsical charm and irresistible flavor that promises to bewitch anyone who takes a spoonful. The magic of these cake jars lies in their ability to combine stunning visual appeal with deeply satisfying taste, making them an absolute showstopper for any gathering. I personally adore how they capture the playful spirit of Halloween while delivering a gourmet-quality dessert that feels incredibly special. Each layer, from the moist cake to the luscious frosting and the playful sprinkles, contributes to a symphony of textures and flavors that is simply divine. It’s the kind of treat that brings a smile to your face just by looking at it, and an even bigger one once you’ve tasted its delightful layers. They are incredibly forgiving to make, allowing for creative freedom, and the individual serving size makes them perfect for parties – no messy cutting required! You’ll find yourself reaching for this recipe year after year, eager to recreate that perfect blend of spooky fun and deliciousness.
Now that you’re armed with this fantastic recipe, let’s talk about how you can elevate your serving game or even put your own unique spin on these delightful creations. For a truly eerie presentation, consider placing your ready-to-serve Witches Brew Halloween Cake Jars on a platter adorned with some dry ice (handle with care and ensure proper ventilation, of course!) to create a mysterious, smoky effect. Alternatively, arrange them artfully on a tiered serving tray, perhaps nestled amongst some faux spiderwebs or miniature pumpkins, transforming them into edible centerpieces that will undoubtedly capture everyone’s attention. They also make fantastic, personalized party favors; tie a festive ribbon around the jar and add a custom tag, and your guests will be leaving with a magical memento they can enjoy later, extending the festive spirit long after the party ends. Imagine the delight on their faces when they realize they get to take a piece of the magic home with them.
But why stop there? The beauty of this recipe is its incredible adaptability, allowing you to tailor it to your specific tastes or party theme. Feel free to experiment with different cake flavors; a rich red velvet or a spicy pumpkin cake would be equally enchanting and bring a different depth of flavor. For the frosting, a hint of mint extract could give it an even greener, more potion-like hue and a refreshing kick, or perhaps a swirl of orange cream cheese frosting for a truly autumnal twist that complements the season perfectly. Don’t shy away from varying your “brewing ingredients” – think beyond sprinkles! Crushed chocolate cookies could add a “dirt” layer, gummy worms could be emerging from the “brew,” or even edible candy eyeballs for a truly ghoulish surprise that will make everyone gasp (and then laugh!). For an adult-only gathering, a tiny splash of an orange-flavored liqueur or a coffee liqueur mixed into a layer could add an unexpected depth and a sophisticated edge to your spooky treats, making them suitable for a more grown-up Halloween bash. The possibilities for customization are truly endless, limited only by your imagination.
You’ll find immense satisfaction in crafting something so visually stunning and undeniably delicious.
So, my friends, I urge you to clear your schedule, gather your ingredients, and dive headfirst into the joyous process of creating these incredible cake jars. Don’t be afraid to get a little messy, let your imagination run wild, and most importantly, have fun with it! This recipe isn’t just about following steps; it’s about embracing the spirit of creativity and celebration. Once you’ve conjured up your very own batch of these spellbinding treats, I would absolutely love to hear all about your experience. Did you add a unique twist? What was your favorite part of the process? Did your guests rave about them? Please, share your stories, your photos, and your triumphs! Tag us on social media or drop a comment below to tell me how your ghostly concoctions turned out. I’m genuinely excited to see your magnificent creations and learn from your adventures. Happy baking, and may your Halloween be filled with delicious magic, unforgettable moments, and plenty of these amazing cake jars!
Witches Brew Halloween Cake Jars
Individual dessert jars that capture the enchanting spirit of Halloween with vibrant layers of cake and buttercream. These visually captivating and irresistibly delicious treats are perfect for any spooky gathering, offering a convenient and perfectly portioned dessert experience with delightful flavors and intriguing textures.
Ingredients
-
330g self-raising flour
-
360g granulated sugar
-
360g butter, softened
-
6 large eggs, room temperature
-
30g unsweetened black cocoa powder
-
1½ tsp baking powder
-
½ tsp salt
-
90ml milk, room temperature
-
2 tsp vanilla extract
-
Gel food coloring: vibrant green, mystical purple, eerie black (for cake)
-
400g salted butter, softened (for frosting)
-
800g powdered sugar, sifted
-
1¼ tsp vanilla extract (for frosting)
-
2 tbsp milk or cream (optional, for frosting consistency)
-
Electric green food coloring (for frosting)
-
250g Orange fondant (for decoration)
-
10-12 half-pint (8 oz) mason jars
-
Halloween-themed sprinkles
-
Edible glitter
-
Gummy worms or candy snakes
-
Candy eyeballs
-
Black licorice ‘spider legs’ or pretzel sticks
Instructions
-
Step 1
Preheat oven to 350°F (175°C). Lightly grease and flour a 9×13 inch baking pan, then line the bottom with parchment paper. In a medium bowl, whisk together the self-raising flour, baking powder, salt, and unsweetened black cocoa powder. Set aside. -
Step 2
In a large mixing bowl, cream softened butter and granulated sugar with an electric mixer on medium-high speed for 3-5 minutes until light, fluffy, and pale. Beat in eggs one at a time, ensuring each is incorporated before adding the next. Stir in vanilla extract. -
Step 3
With the mixer on low speed, gradually add the dry ingredients to the wet, alternating with the milk. Start and end with dry ingredients. Mix just until no streaks of flour remain; do not overmix. -
Step 4
Divide cake batter evenly into three separate bowls. Color one portion vibrant green, one mystical purple, and one eerie black/dark gray with gel food coloring. Carefully spoon or pour dollops of each colored batter randomly into the prepared baking pan, gently swirling if desired. Bake for 25-30 minutes, or until a wooden skewer inserted into the center comes out clean. -
Step 5
Let the cake cool in the pan on a wire rack for 10-15 minutes, then use the parchment paper overhang to lift the cake out and transfer it to the wire rack to cool completely. Once completely cool, use a 2-2.5 inch round cookie cutter (to fit your jars) to cut out as many cake rounds as possible. -
Step 6
In a large mixing bowl, beat softened salted butter with an electric mixer on medium speed for 2-3 minutes until light and creamy. With the mixer on low speed, gradually add sifted powdered sugar, then increase speed to medium-high and beat until light and fluffy. Add milk/cream (if needed) and vanilla extract. Beat for another 3-5 minutes until smooth. Color the frosting electric green with gel food coloring. Transfer to a piping bag fitted with a round or star tip (or use a spoon). Optionally, divide and color some frosting purple or orange for variety, as suggested in the original recipe’s theme. -
Step 7
Take a clean mason jar. Place one colorful cake round at the bottom. Pipe or spoon a generous layer of colored buttercream over the cake. Sprinkle with Halloween-themed sprinkles or edible glitter. -
Step 8
Carefully place another colorful cake round on top. Add a layer of a different colored buttercream (e.g., green). Tuck in a gummy worm or two, peeking out. Repeat layers, alternating cake and frosting colors, until the jar is almost full, leaving about an inch from the top for final decorations. -
Step 9
Pipe or spoon a final, generous swirl of frosting on top. Decorate with candy eyeballs, more gummy worms, black licorice ‘spider legs’ or pretzel sticks, generous Halloween sprinkles, and edible glitter for ultimate sparkle. Roll out and cut shapes from the 250g Orange fondant for additional decoration. Secure lids on the cake jars if storing or transporting.
Important Information
Nutrition Facts (Per Serving)
It is important to consider this information as approximate and not to use it as definitive health advice.
Allergy Information
Please check ingredients for potential allergens and consult a health professional if in doubt.
Leave a Comment