
Unbelievable Peanut Butter Pie – prepare yourself for a dessert experience that truly lives up to its name! I am absolutely thrilled to share a recipe that consistently leaves everyone who tries it utterly speechless. This isn’t just a pie; it’s a creamy, dreamy masterpiece that effortlessly combines the nostalgic comfort of peanut butter with an elegant, irresistible presentation. While peanut butter has been a beloved staple for generations, particularly in American kitchens, finding its way into countless comforting creations, this particular pie takes its humble origins and elevates them into something truly extraordinary, becoming a modern classic in its own right.
People adore this dish for so many reasons. Its lusciously smooth texture, the perfect balance of sweet and savory, and the delightful simplicity of its no-bake preparation make it an instant favorite. It’s the ultimate crowd-pleaser for potlucks, family gatherings, or simply a decadent treat on a quiet evening. The depth of flavor in this Unbelievable Peanut Butter Pie is truly remarkable, offering a rich, satisfying finish to any meal. Get ready to discover your new go-to dessert that’s guaranteed to impress with minimal effort but maximum flavor impact!

Ingredients:
-
For the Irresistible Cookie Crust:
- 24 ounces (approximately 36 full-sized cookies) chocolate sandwich cookies, with cream filling intact: I always reach for classic chocolate sandwich cookies with their creamy filling. The filling helps bind the crust, creating an incredibly rich and stable base for our pie. You can choose your favorite brand, but make sure they’re the standard size.
- 6 tablespoons unsalted butter, melted: Unsalted butter allows me to control the saltiness in the recipe, ensuring it complements the sweetness of the cookies perfectly. Make sure it’s fully melted but not boiling hot when you mix it in.
- 1/4 teaspoon fine sea salt (optional, but highly recommended): A tiny pinch of salt truly elevates the flavor of the crust, providing that wonderful sweet and salty contrast that makes this pie so special. Trust me on this little secret!
-
For the Creamy, Dreamy Peanut Butter Filling:
- 16 ounces (two 8-ounce blocks) full-fat cream cheese, softened to room temperature: This is the backbone of our filling, providing an essential tangy creaminess. It’s absolutely crucial that your cream cheese is completely at room temperature; otherwise, you’ll end up with lumps, and we want a silky-smooth filling. I usually leave mine out on the counter for at least an hour, sometimes two, before I start.
- 1 ½ cups creamy peanut butter: For the most luxurious texture, I highly recommend using a conventional creamy peanut butter (like Jif or Skippy). Natural peanut butters tend to separate and can result in a greasier or less stable filling for this particular recipe. This is where the magic of “Unbelievable Peanut Butter Pie” truly shines.
- 1 ½ cups powdered sugar (confectioners’ sugar), sifted: Sifting the powdered sugar is a small but mighty step that prevents any pesky lumps from forming in your incredibly smooth filling. Don’t skip it!
- 1 teaspoon pure vanilla extract: A good quality vanilla extract enhances all the other flavors in the pie, adding a warm, inviting aroma and depth.
- ¼ teaspoon fine sea salt: Another touch of salt here is vital! It balances the sweetness and really makes the peanut butter flavor pop, preventing the pie from being overly cloying.
- 1 ½ cups heavy cream, very cold: This will be folded into our peanut butter mixture to lighten it and give it that signature mousse-like texture. Ensure it’s as cold as possible for best whipping results.
-
For the Cloud-Like Whipped Topping & Garnishes:
- 1 ½ cups heavy cream, very cold: Just like for the filling, super cold heavy cream is key for a stable, fluffy whipped topping.
- ½ cup powdered sugar (confectioners’ sugar), sifted: Sweetens our topping and helps stabilize it.
- 1 teaspoon pure vanilla extract: For a delightful touch of vanilla in our topping.
- Optional garnishes:
- Chocolate shavings: Use a vegetable peeler on a block of chocolate for elegant curls.
- Mini chocolate chips: Sprinkled generously for extra chocolatey goodness.
- Chopped roasted peanuts: To add a delightful crunch and emphasize the peanut butter theme.
- A drizzle of melted peanut butter or chocolate ganache: For an artistic flourish.
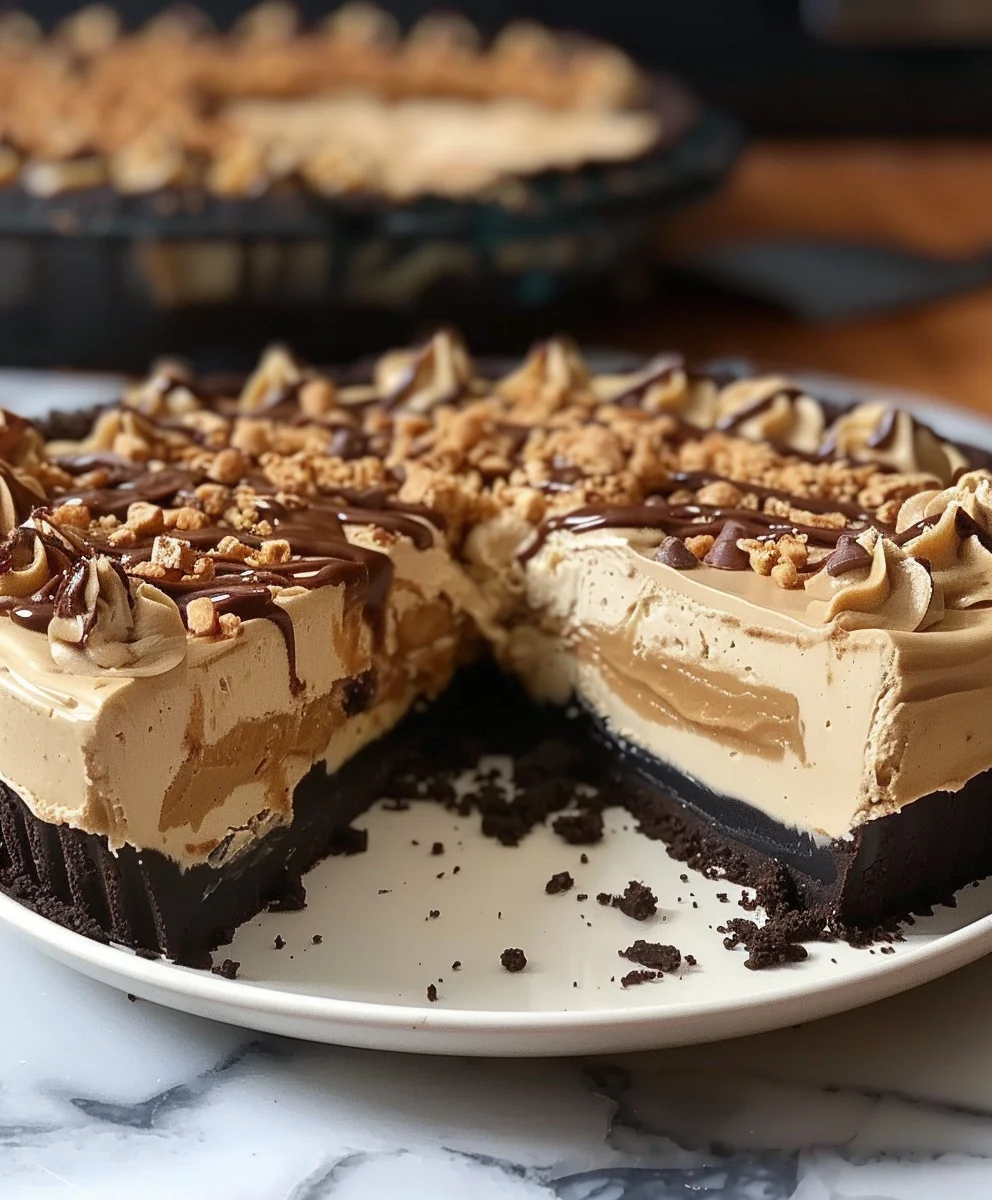
Preparing the Irresistible Cookie Crust:
Creating the perfect base for your Unbelievable Peanut Butter Pie is the first step to dessert heaven. It’s simple, but a few key details will make all the difference in achieving that ideal balance of crunch and flavor.
- Crush the Cookies to Perfection: Begin by taking your 24 ounces of chocolate sandwich cookies. I typically use a food processor for this, as it yields the most consistent and fine crumbs. Pulse the cookies until they resemble fine, sandy crumbs with no large pieces remaining. If you don’t have a food processor, you can place the cookies in a large zip-top bag, seal it, and crush them with a rolling pin or the bottom of a heavy pan. This method requires a bit more elbow grease, but it’s just as effective. Ensure the crumbs are truly fine; this helps the crust hold together beautifully and provides a uniform texture.
- Melt the Butter and Combine: Once your cookie crumbs are ready, melt your 6 tablespoons of unsalted butter. You can do this gently in the microwave or on the stovetop. Pour the melted butter over the cookie crumbs in a medium-sized mixing bowl. At this stage, I also like to add the optional ¼ teaspoon of fine sea salt. This tiny addition truly enhances the chocolate flavor and provides a lovely counterpoint to the sweetness of the cookies.
- Mix Thoroughly Until Evenly Moistened: Use a spoon or your hands (which I find works best for tactile feedback) to mix the butter and crumbs together until every single crumb is evenly moistened. The mixture should resemble wet sand. When you press a handful together, it should hold its shape. This thorough mixing is crucial for a crust that holds together and doesn’t crumble apart when sliced.
- Press into the Pie Plate: Transfer the buttery cookie mixture into a 9-inch pie plate. I find a standard glass or ceramic pie plate works wonderfully. Start by pressing the mixture firmly and evenly into the bottom of the plate. Then, work your way up the sides, creating a sturdy rim. For a really professional-looking and compact crust, use the bottom of a flat-bottomed glass or a measuring cup to firmly press the crumbs into place. The firmer you press, the more cohesive and sturdy your crust will be, which is incredibly important for supporting the rich peanut butter filling. Don’t be shy – press hard!
- Chill the Crust: Once pressed, place the pie plate with the crust into the refrigerator for at least 30 minutes. This chilling time allows the butter to solidify, binding the crumbs together even more firmly. This crucial step prevents the crust from falling apart when you add the filling and ensures a clean slice later on. While the crust chills, you can begin preparing the filling.
Crafting the Creamy, Dreamy Peanut Butter Filling:
This is where the magic truly happens, transforming simple ingredients into the star of our Unbelievable Peanut Butter Pie. The key here is patience and proper technique to achieve that unbelievably smooth, light, and incredibly rich texture.
- Cream the Softened Cream Cheese: In the bowl of a stand mixer fitted with the paddle attachment, or using a large bowl and a hand mixer, beat your two 8-ounce blocks of full-fat cream cheese. Remember, it absolutely must be at room temperature for this step! Beat on medium speed for 2-3 minutes, scraping down the sides of the bowl frequently, until the cream cheese is completely smooth, fluffy, and free of any lumps. This foundational step is paramount for a perfectly smooth filling.
- Incorporate the Peanut Butter: Add the 1 ½ cups of creamy peanut butter to the softened cream cheese. Continue beating on medium speed for another 2-3 minutes, until the peanut butter and cream cheese are fully combined and the mixture is light and uniform in color. Scrape down the sides of the bowl once or twice to ensure no streaks of cream cheese remain. You want a beautifully homogenous, light peanut butter base.
- Add Powdered Sugar, Vanilla, and Salt: Now, gradually add the 1 ½ cups of sifted powdered sugar to the peanut butter mixture. Start on low speed to avoid a sugar cloud, then increase to medium until fully incorporated. Mix in the 1 teaspoon of pure vanilla extract and the ¼ teaspoon of fine sea salt. Beat for another minute, until the mixture is smooth and creamy. The salt is truly a secret weapon here; it cuts through the sweetness and enhances the deep, nutty flavor of the peanut butter, making every bite truly unforgettable.
- Prepare the Whipped Cream for Folding: In a separate, very cold bowl (I often chill my bowl and whisk attachment for 15 minutes in the freezer beforehand), pour your 1 ½ cups of very cold heavy cream. Beat on medium-high speed until soft peaks form. This means when you lift the beaters, the cream will hold its shape but the tip will gently flop over. Be careful not to over-whip it to stiff peaks at this stage, as it will be folded into the peanut butter mixture, and we want to maintain some lightness.
- Gently Fold the Whipped Cream into the Peanut Butter Mixture: This is arguably the most delicate step. Add about one-third of the whipped cream to the peanut butter mixture. Gently fold it in using a rubber spatula, using an upward motion from the bottom of the bowl, until just combined. Be careful not to deflate the air you’ve whipped into the cream. Then, add the remaining whipped cream in two more additions, folding until no streaks of white remain and the filling is light, airy, and beautifully homogenous. The goal is a light, mousse-like consistency. Do not overmix! Overmixing will deflate the whipped cream and result in a dense filling, and we want this pie to be unbelievably light yet rich.
- Pour into the Chilled Crust and Chill Extensively: Carefully spoon or pour the creamy peanut butter filling into your prepared and chilled cookie crust. Use an offset spatula or the back of a spoon to gently spread the filling evenly across the crust, smoothing the top. Once you’re happy with the surface, place the pie back into the refrigerator. This pie requires a significant amount of chilling time to set properly. I recommend at least 4-6 hours, but for the absolute best results and a perfectly firm, sliceable pie, an overnight chill is ideal. Seriously, do not rush this step. It’s the secret to achieving that perfect, non-slumping slice of your Unbelievable Peanut Butter Pie.
Whipping Up the Dreamy Topping and Garnishing:
The crowning glory of our Unbelievable Peanut Butter Pie is a generous layer of freshly whipped cream, adorned with your favorite garnishes. This adds a beautiful contrast in texture and a fresh, light finish.
- Prepare the Whipped Topping: Just before you’re ready to serve, or up to an hour beforehand, prepare your whipped topping. In a very cold bowl with very cold beaters (again, chilling them helps tremendously!), combine the remaining 1 ½ cups of very cold heavy cream, ½ cup of sifted powdered sugar, and 1 teaspoon of pure vanilla extract. Beat on medium-high speed until firm peaks form. This means the cream should hold stiff peaks when the beaters are lifted, indicating it’s perfectly stable for piping or spreading. Be vigilant and stop beating as soon as stiff peaks are achieved to avoid over-whipping, which can turn it grainy.
- Decorate Your Masterpiece: Once your whipped cream is ready, you have a few options for application. You can spoon it generously over the top of the chilled pie, spreading it evenly with an offset spatula for a rustic look. Alternatively, for a more elegant presentation, transfer the whipped cream to a piping bag fitted with your favorite decorative tip (a star tip is always a winner for this pie!). Pipe beautiful rosettes, swirls, or a simple border around the edge, then fill in the center.
- Add the Finishing Touches (Garnishes): This is your chance to personalize your pie!
- Chocolate Shavings: For a sophisticated touch, take a block of good quality chocolate and use a vegetable peeler to create delicate chocolate curls directly over the whipped cream.
- Mini Chocolate Chips: A quick and easy way to add extra chocolate flavor and texture. Sprinkle them generously over the top.
- Chopped Roasted Peanuts: For those who love an extra crunch and to really emphasize the peanut butter theme, a sprinkle of finely chopped roasted peanuts is fantastic.
- Peanut Butter or Chocolate Drizzle: For a dramatic effect, gently melt a tablespoon or two of creamy peanut butter or a small amount of chocolate ganache. Drizzle it decoratively over the top of the whipped cream using a spoon or a piping bag with a very small hole.
Choose one or a combination of garnishes – there’s no wrong way to make your Unbelievable Peanut Butter Pie look as amazing as it tastes!
Serving Your Unbelievable Peanut Butter Pie:
After all your hard work and patient chilling, it’s time to unveil and enjoy your magnificent creation!
- Slicing for Success: To get clean slices of your perfectly set Unbelievable Peanut Butter Pie, use a sharp knife that has been run under hot water and wiped dry between each slice. This warms the blade just enough to glide through the rich filling and firm crust without dragging or tearing. This little trick makes all the difference for a picture-perfect presentation.
- Serving and Storage: Serve slices immediately for the best texture and flavor. This pie is a crowd-pleaser and rarely lasts long! If you happen to have any leftovers, cover the pie loosely with plastic wrap or transfer individual slices to an airtight container. Store it in the refrigerator for up to 3-4 days. While it’s best enjoyed fresh, the flavors deepen beautifully, and it remains absolutely delicious for a few days after preparation. For longer storage, individual slices can be frozen for up to 2-3 weeks; just be sure to wrap them tightly in plastic wrap and then aluminum foil to prevent freezer burn. Thaw in the refrigerator before serving. Each bite of this pie truly is unbelievable!
Conclusion:
And there you have it, my friends! We’ve reached the grand finale of our journey through what I truly believe is one of the most remarkable dessert experiences you’ll ever have the pleasure of creating and, more importantly, devouring. This isn’t just another dessert; it’s a statement, a celebration, and a surefire way to bring smiles to faces.
From the moment you take that first creamy, dreamy bite, you’ll understand precisely why this recipe is a non-negotiable addition to your culinary repertoire. We’ve talked about its velvety-smooth texture that practically melts on your tongue, the perfect balance of sweet and salty, and the utterly irresistible crunch of the crust that provides the ideal contrast. But honestly, words barely do it justice. This isn’t just a dessert; it’s an experience. It’s the kind of treat that silences a room, inspiring quiet awe with every spoonful. I’ve witnessed it firsthand: people’s eyes widen, a contented sigh escapes their lips, and then they inevitably ask for the recipe. This isn’t just a good recipe; it’s truly the Unbelievable Peanut Butter Pie you’ve been dreaming of. It’s simple enough for a beginner to master, yet impressive enough to wow even the most discerning dessert connoisseur. You don’t need fancy equipment or exotic ingredients; just a little time, a dash of love, and the desire to create something truly spectacular. Trust me when I say, once you’ve made this, it will become your go-to dessert for potlucks, family gatherings, or just a quiet evening when you crave something extraordinary. It’s rich without being cloyingly sweet, satisfying without being too heavy, and consistently delivers that perfect blend of nostalgic comfort and gourmet delight. Prepare yourself for compliments, because this pie definitely earns them!
Serving Suggestions for Maximum Enjoyment
While this pie is absolutely phenomenal on its own, there are a few ways you can elevate the serving experience to truly make it shine. For a classic presentation, a dollop of freshly whipped cream, perhaps lightly sweetened with a touch of vanilla, is always a winner. The lightness of the cream beautifully complements the richness of the pie, adding an ethereal touch. If you want to add a bit of chocolatey decadence (and who doesn’t?), a drizzle of warm chocolate fudge sauce or a sprinkle of mini chocolate chips would be divine. For a textural contrast, consider a light scattering of chopped roasted peanuts on top – it reinforces that beloved peanut flavor and adds a satisfying crunch, making each bite an adventure. A small sprig of fresh mint can also add a pop of color and a hint of freshness, making your pie presentation look truly professional, perfect for impressing guests. And don’t forget the coffee! A strong, hot cup of coffee or a cold glass of milk makes an excellent companion to a slice of this pie, cutting through its richness and creating a perfectly balanced dessert experience that will leave everyone feeling utterly content.
Unleash Your Creativity: Exciting Variations
One of the beautiful things about this recipe is how adaptable it is, inviting you to put your own unique spin on it. If you’re a chocolate lover, consider adding a thin, even layer of melted chocolate (milk or dark, whatever you prefer!) over the crust before adding the peanut butter filling. Chill it briefly until set, and this creates a delightful chocolate-peanut butter synergy that’s truly out of this world, adding another dimension of flavor and texture. For a more intense, rustic peanut flavor, you could swirl in a tablespoon or two of chunky peanut butter into the filling before chilling, creating tiny pockets of pure, satisfying peanut goodness. Feeling adventurous? How about a hint of spice? A tiny pinch of cayenne pepper in the chocolate drizzle or even very subtly mixed into the peanut butter filling can add an unexpected, intriguing warmth that surprisingly enhances the overall flavor profile – a subtle “kick” that keeps things interesting and sophisticated. You could also experiment with different crusts; while a classic graham cracker crust is fantastic, a crushed Oreo cookie crust would introduce a delightful chocolatey base, or even a shortbread cookie crust for a buttery, crisp foundation. Don’t be afraid to play around with toppings too! A delicate caramel drizzle, crushed toffee bits, or even a sprinkle of flaky sea salt can bring new dimensions to this already spectacular dessert, taking it from great to truly unforgettable. The possibilities are truly endless, limited only by your imagination and your cravings!
Your Turn to Create and Share!
Now that you have all the secrets to crafting this magnificent dessert, it’s your turn to step into the kitchen and bring this magic to life. I promise you, the effort (which is minimal, by the way!) is absolutely worth the reward. This pie is a crowd-pleaser, a mood-lifter, and an instant classic that will have everyone asking for the recipe. Don’t just read about it; make it! And when you do, please don’t keep the experience to yourself. I am genuinely eager to hear about your culinary adventures. Did you try a unique variation? What was your family’s reaction? Did it vanish from the dessert table in record time, leaving only crumbs? Share your stories, your photos, and your triumphs in the comments section below or tag me on social media. Your feedback and experiences are incredibly valuable, inspiring me and other home bakers to keep exploring the wonderful world of desserts. Let’s build a community around this incredible pie and spread the joy it brings. Happy baking, and get ready to indulge in something truly special – you deserve it!
Unbelievable Peanut Butter Pie
An unbelievably creamy, dreamy, and easy no-bake peanut butter pie with a chocolate cookie crust and optional chocolate ganache layer, perfect for any occasion.
Ingredients
-
22 regular Oreo cookies
-
5 tablespoons unsalted butter, melted
-
3/4 cup heavy cream (for ganache)
-
6 ounces semi-sweet chocolate, coarsely chopped
-
1 cup heavy cream, cold (for filling)
-
8 ounces full-fat brick cream cheese, softened
-
1 1/2 cups creamy peanut butter
-
3/4 cup confectioners’ sugar
-
1 teaspoon pure vanilla extract
-
Whipped cream (optional, for topping)
-
1/4 cup Reese’s Pieces, crushed (optional, for garnish)
-
1/4 cup chopped peanuts (optional, for garnish)
Instructions
-
Step 1
Crush 22 Oreo cookies into fine crumbs. Mix with 5 tablespoons of melted unsalted butter until evenly moistened. Press the mixture firmly and evenly into a 9-inch pie plate. Chill for at least 30 minutes while preparing other components. -
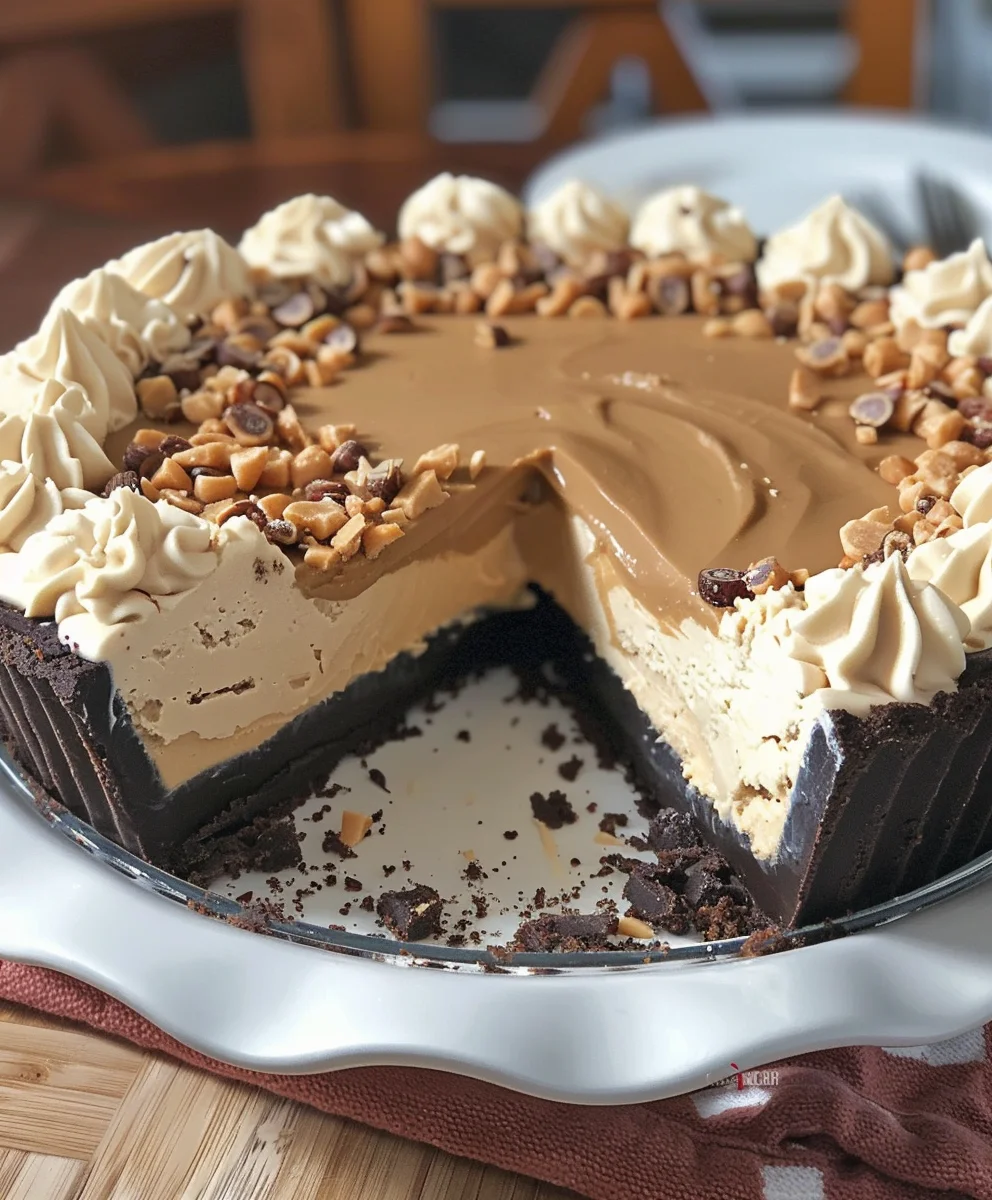
Step 2
In a small saucepan, heat 3/4 cup heavy cream until it just begins to simmer. Pour the hot cream over 6 ounces of coarsely chopped semi-sweet chocolate in a heatproof bowl. Let sit undisturbed for 5 minutes, then stir until completely smooth and glossy. Pour the ganache evenly over the chilled cookie crust. Return to the refrigerator and chill for 15-20 minutes, or until the ganache is set. -
Step 3
In a very cold bowl, beat 1 cup of cold heavy cream on medium-high speed until soft peaks form. Set aside in the refrigerator. -
Step 4
In a separate large bowl, beat 8 ounces of softened full-fat cream cheese on medium speed until smooth and fluffy. Add 1 1/2 cups of creamy peanut butter and beat until fully combined and uniform. -
Step 5
Gradually add 3/4 cup of confectioners’ sugar and 1 teaspoon of pure vanilla extract to the peanut butter mixture. Beat until the mixture is smooth and creamy, scraping down the sides of the bowl as needed. -
Step 6
Gently fold the reserved whipped cream (from Step 3) into the peanut butter mixture using a rubber spatula. Fold until no streaks of white remain and the filling is light, airy, and beautifully homogenous. Be careful not to overmix. -
Step 7
Carefully spoon the creamy peanut butter filling over the chilled ganache layer in the pie crust. Use an offset spatula or the back of a spoon to spread the filling evenly and smooth the top. Return the pie to the refrigerator and chill for at least 4-6 hours, or preferably overnight, for best results and a firm, sliceable pie. -
Step 8
Before serving, if desired, top the chilled pie with a layer of whipped cream. Garnish with crushed Reese’s Pieces, chopped peanuts, or chocolate shavings for added texture and flavor. -
Step 9
To achieve clean slices, use a sharp knife run under hot water and wiped dry between each cut. Serve slices immediately. Store any leftovers loosely covered in the refrigerator for up to 3-4 days. For longer storage, individual slices can be frozen for up to 2-3 weeks; thaw in the refrigerator before serving.
Important Information
Nutrition Facts (Per Serving)
It is important to consider this information as approximate and not to use it as definitive health advice.
Allergy Information
Please check ingredients for potential allergens and consult a health professional if in doubt.
Leave a Comment