
Gluten Free Cottage Cheese Pancakes The Ultimate Recipe is finally here to revolutionize your breakfast routine, transforming mundane mornings into culinary delights! Imagine waking up to the irresistible aroma of light, fluffy pancakes that are not only incredibly delicious but also packed with protein and completely gluten-free. For many years, pancakes have been a beloved weekend indulgence, a timeless classic enjoyed across cultures, often evolving to meet modern dietary needs. While traditional pancakes can sometimes leave you feeling heavy, cottage cheese pancakes have long stood out as a healthier, protein-rich alternative, cherished for their incredibly tender texture and satisfying nature.
What makes this particular recipe truly special is its perfect balance. It delivers that coveted fluffy interior with a delicate golden crisp exterior, all while harnessing the natural moisture and subtle tang of cottage cheese. This creates a pancake that is remarkably moist, flavorful, and incredibly fulfilling without any of the gluten. I’ve spent countless hours perfecting every detail, ensuring that this truly is Gluten Free Cottage Cheese Pancakes The Ultimate Recipe you’ll ever need, delivering consistent perfection whether you’re a seasoned chef or a beginner in the kitchen. Get ready to discover your new favorite breakfast!

Ingredients:
- 1 ½ cups (approximately 340g) full-fat cottage cheese: I personally find full-fat gives the best creamy texture and flavor to these pancakes, but low-fat can be used if preferred.
- 3 large eggs: Room temperature eggs tend to incorporate better into batters, creating a smoother mix.
- ½ cup (approximately 60g) gluten-free all-purpose flour blend: It’s important to use a blend that you trust for baking, ideally one that contains xanthan gum or has it listed as a separate ingredient below. If your blend does not contain xanthan gum, add ¼ teaspoon of pure xanthan gum to your dry ingredients. My favorite blends often include rice flour, potato starch, and tapioca flour.
- 2 tablespoons granulated sugar: This provides a subtle sweetness that balances the tang of the cottage cheese. You can adjust this to 3 tablespoons if you prefer a sweeter pancake, or even substitute with maple syrup or honey (reduce other liquids slightly if using liquid sweeteners).
- 1 teaspoon baking powder: This is our main leavening agent, ensuring fluffy, light pancakes. Make sure your baking powder is fresh for the best rise.
- ½ teaspoon pure vanilla extract: A touch of vanilla truly elevates the flavor profile, adding warmth and depth.
- ¼ teaspoon salt: Just a pinch is needed to enhance all the other flavors in the batter. Don’t skip it!
- 2-3 tablespoons unsalted butter or neutral oil (like avocado or grapeseed oil) for greasing the griddle: I find butter adds a lovely browned butter flavor to the pancake edges, but oil works just as well for a neutral option.
- Optional Toppings (for the ultimate experience!):
- Fresh berries (strawberries, blueberries, raspberries)
- Pure maple syrup or honey
- A dollop of whipped cream or crème fraîche
- A sprinkle of powdered sugar
- Chopped nuts (pecans or walnuts)
- Lemon zest for a bright finish
Preparing Your Batter: The Foundation of Flavor
- The Cottage Cheese Quandary: This is where we lay the groundwork for our “Gluten Free Cottage Cheese Pancakes The Ultimate Recipe.” In a large mixing bowl, I like to start by gently blending the cottage cheese. If you prefer a pancake with distinct curds visible, you can skip this step, but for a smoother, more uniform texture, I suggest giving the cottage cheese a quick blitz. You can either use an immersion blender right in the bowl for about 30 seconds until mostly smooth, or transfer it to a food processor for a few pulses. You’re not aiming for a completely smooth cream cheese texture, but rather to break down most of the larger curds into a finer consistency. Trust me, this small step makes a significant difference in the final mouthfeel of the pancakes. After blending, return the cottage cheese to your large mixing bowl if you used a food processor.
- Wet Ingredients Unite: To the slightly smoothed cottage cheese, crack in your three large eggs. Add the granulated sugar, pure vanilla extract, and the salt. Using a whisk, vigorously whisk these ingredients together until they are thoroughly combined and the mixture looks relatively uniform. You want the sugar to start dissolving and the eggs to be fully incorporated, giving the mixture a pale yellow hue and a slightly frothy appearance. This usually takes me about 1-2 minutes of dedicated whisking. Ensure there are no streaks of egg white remaining, as this can lead to unevenly cooked pancakes.
- Dry Ingredients’ Entrance: In a separate medium-sized bowl, measure out your gluten-free all-purpose flour blend and the baking powder. If your chosen gluten-free flour blend does not include xanthan gum, add ¼ teaspoon of pure xanthan gum to this dry mixture now. Whisk these dry ingredients together thoroughly for about 30 seconds. This step is crucial because it ensures that the leavening agent (baking powder) and the xanthan gum (if used) are evenly distributed throughout the flour. An even distribution means your pancakes will rise uniformly and have a consistent texture, which is key to an ultimate pancake experience.
- Combining for Perfection: Now, gently add the dry ingredient mixture to the wet ingredient mixture in the large bowl. Using a spatula or a wooden spoon, mix until just combined. It’s incredibly important not to overmix the batter, especially with gluten-free flours. Overmixing can develop any inherent gumminess in gluten-free blends, leading to tough or rubbery pancakes instead of the light, fluffy ones we’re aiming for. Stop mixing as soon as you no longer see streaks of dry flour. A few small lumps are perfectly fine and often preferred. The batter will be quite thick, almost like a thick yogurt or a very soft cookie dough.
- The Golden Rest Period: This is a step I never skip when making gluten-free pancakes. Cover the bowl with plastic wrap or a clean kitchen towel and let the batter rest at room temperature for at least 10-15 minutes, or even up to 30 minutes. This resting period is paramount for gluten-free flours, allowing the starches in the flour to fully hydrate and the xanthan gum to properly activate. This hydration leads to a much better texture, preventing a gritty mouthfeel and giving you those wonderfully soft and pliable pancakes we all adore. You’ll notice the batter might thicken slightly during this time.
Cooking Your Pancakes to Golden Perfection
- Preheating Your Griddle or Skillet: While your batter is resting, it’s the perfect time to set up your cooking station. Place a large non-stick griddle or a heavy-bottomed skillet (cast iron works beautifully here) over medium-low to medium heat. The key is to find that sweet spot in temperature. If it’s too hot, the pancakes will burn on the outside before cooking through, and if it’s too cool, they’ll turn out pale and tough. I usually let it preheat for a good 3-5 minutes. You can test the temperature by flicking a few drops of water onto the surface; they should sizzle and evaporate within a second or two.
- Greasing the Surface: Once your griddle is at the correct temperature, lightly grease it with about ½ to 1 tablespoon of butter or oil. You don’t want a pool of fat, just a thin, even coating. I like to use a paper towel to spread the melted butter or oil evenly and wipe off any excess. This ensures even browning and prevents sticking. You’ll need to re-grease the griddle lightly between batches as needed.
- Portioning the Pancakes: Now for the fun part! Using a ¼ cup measuring cup or a small ladle, spoon portions of the batter onto the hot griddle. I typically make pancakes about 3-4 inches in diameter, but you can adjust the size to your preference. Make sure to leave some space between each pancake, as they will spread slightly and you want to be able to flip them easily without crowding. Don’t press down on the pancakes; let them cook naturally.
- The Waiting Game and the Tell-Tale Bubbles: Cook the pancakes for about 3-4 minutes on the first side. This is where patience pays off. Look for the tell-tale signs that it’s time to flip: the edges will begin to look set, and bubbles will appear on the surface of the pancake, with some of them popping. The surface will also lose its wet, raw appearance and start to look dull. A slightly golden-brown rim around the edge is another good indicator. Resist the urge to flip them too early!
- The Flip!: Once you see those glorious bubbles and set edges, carefully slide a thin, wide spatula underneath a pancake. With a quick, confident motion, flip it over. You’re aiming for a beautiful golden-brown color on that first side. Cook the second side for another 2-3 minutes, or until it’s also golden brown and cooked through. You can gently press on the center of the pancake with your spatula; if it springs back, it’s likely done. If it feels too soft or squishy, give it another minute.
- Keeping Warm: As you cook successive batches, you’ll want to keep your finished pancakes warm. I usually preheat my oven to its lowest setting (around 200°F or 90°C) and place a baking sheet with a wire rack inside. As pancakes are done, I transfer them to the rack in the warm oven. This keeps them warm and prevents them from getting soggy, ensuring every bite of your “Gluten Free Cottage Cheese Pancakes The Ultimate Recipe” is perfect. Continue cooking, greasing the griddle as needed, until all the batter is used.
Assembling and Serving: The Ultimate Presentation
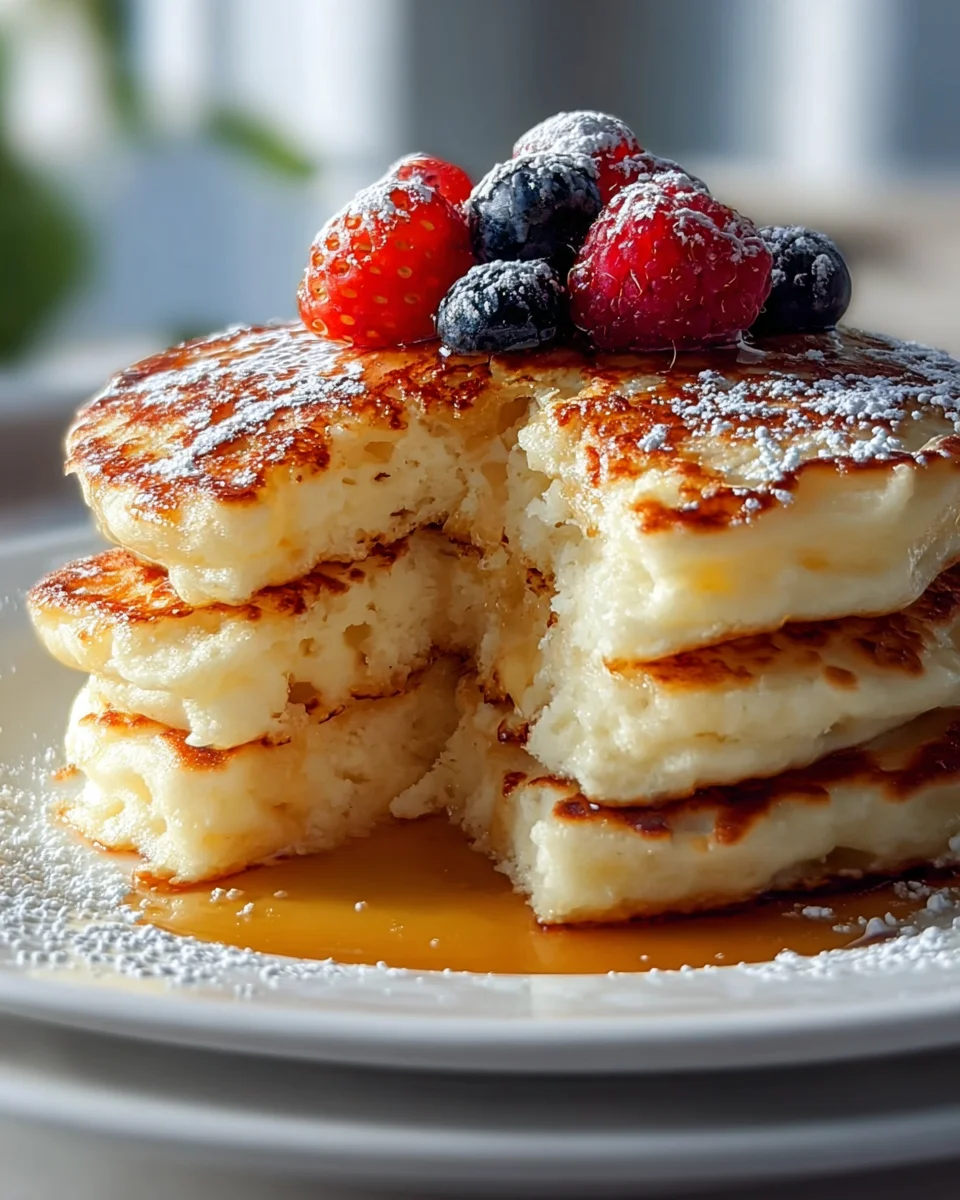
- The Stack and Garnish: Now that your golden-brown cottage cheese pancakes are ready and warm, it’s time for the grand finale! I love to create an impressive stack on a large plate or individual serving plates. A stack of 3-4 pancakes per person is usually a good starting point. This presentation alone makes them feel like a special treat.
- The Ultimate Toppings Experience: This is where you truly make these pancakes “ultimate.” While plain maple syrup is always a classic, I encourage you to get creative. Drizzle generously with pure maple syrup – the real stuff makes a huge difference. Then, add a vibrant burst of color and freshness with a generous handful of fresh berries. Strawberries, blueberries, and raspberries are my go-to choices, providing a lovely tart contrast to the rich pancakes. For an extra touch of indulgence, add a dollop of freshly whipped cream or a spoonful of tangy crème fraîche. A light dusting of powdered sugar through a fine-mesh sieve adds a professional and elegant finish. For a bit of crunch, consider sprinkling some chopped pecans or walnuts over the top. Finally, a little lemon zest grated over the finished stack can add an incredibly bright and refreshing aroma that truly elevates the entire dish.
- Serve Immediately and Enjoy!: These Gluten Free Cottage Cheese Pancakes are best enjoyed hot off the griddle, or at least warm from the oven. Gather your family and friends and savor every fluffy, tender bite. The texture is truly unique – a delightful balance between a traditional pancake and something richer, almost like a blintz without the wrapping. They make for a truly satisfying breakfast or brunch, and I’ve even been known to make them for a light dinner.
- Storing Leftovers (If Any!): Should you be so lucky as to have any leftovers, allow the pancakes to cool completely before storing them in an airtight container in the refrigerator for up to 3-4 days. For longer storage, you can freeze them in a single layer on a baking sheet until solid, then transfer them to a freezer-safe bag or container for up to 2 months. To reheat, simply pop them in a toaster, toaster oven, microwave, or warm them gently in a skillet until heated through. They retain their delicious texture surprisingly well, making them perfect for a quick breakfast on busy mornings!
Conclusion:
Well, my friends, we’ve reached the sweet end of our journey with what I truly believe is a breakfast revelation. I’ve poured my heart into sharing Gluten Free Cottage Cheese Pancakes The Ultimate Recipe with you, and now it’s your turn to experience the magic firsthand. This isn’t just another pancake recipe; it’s a testament to how simple, wholesome ingredients can come together to create something truly extraordinary. If you’ve been searching for a way to enjoy a satisfying, protein-packed breakfast without the bloat or the guilt often associated with traditional pancakes, then your quest ends here. I’m genuinely excited for you to discover the light, fluffy texture, the subtle tang from the cottage cheese, and the sheer delight of a pancake that actually keeps you feeling full and energized, rather than leading to a mid-morning crash. This recipe truly redefines what a pancake can be, transforming a classic comfort food into a powerhouse of nutrition and flavor.
I can’t emphasize enough why these pancakes are an absolute must-try. They’re incredibly easy to whip up, making them perfect for busy mornings or a relaxed weekend brunch. The combination of being gluten-free and rich in protein means they cater beautifully to various dietary needs without sacrificing an ounce of flavor or the classic pancake experience. Imagine biting into a stack of golden-brown pancakes, each one soft, tender, and bursting with a delicate flavor that pairs perfectly with just about any topping you can dream of. They manage to be both indulgent and virtuous, a rare and wonderful balance in the culinary world. This recipe isn’t just about eating; it’s about feeling good about what you eat, fueling your body with quality ingredients, and starting your day with a smile.
Elevate Your Pancake Experience: Serving Suggestions & Creative Variations
Now, let’s talk about taking your pancake game to the next level. While these pancakes are absolutely divine on their own, the possibilities for customization are endless, and that’s part of their charm! For a classic sweet treat, a generous drizzle of pure maple syrup, a scattering of fresh berries (think vibrant blueberries, juicy raspberries, or sliced strawberries), and perhaps a dollop of homemade whipped cream or Greek yogurt are always winners. If you prefer a richer experience, a spoonful of lemon curd or a sprinkle of toasted pecans or walnuts can add incredible depth and texture. For those who love a touch of warmth and spice, a dusting of cinnamon sugar or a drizzle of honey infused with a hint of vanilla can transform your breakfast into an aromatic delight.
But don’t stop there! These versatile pancakes can also lean into the savory side, offering a delightful twist for brunch or even a light dinner. Try topping them with a poached egg, a sprinkle of fresh chives, and a slice of avocado for a gourmet experience. Or, for something truly unique, consider a smear of herbed cream cheese and a few slices of smoked salmon – trust me, it’s surprisingly delicious and elegant! You can also play with the batter itself:
- Fruity Fun: Gently fold in a quarter cup of mashed banana or grated apple into the batter for an extra layer of sweetness and moisture.
- Citrus Zest: Add a teaspoon of lemon or orange zest to the batter to brighten the flavor profile and give it an invigorating zing.
- Chocolate Lover’s Dream: For an indulgent treat, stir in a handful of mini chocolate chips before cooking.
- Spice It Up: A pinch of nutmeg or a dash of pumpkin pie spice can make these perfect for a cozy autumn morning.
And for those who like to plan ahead, these pancakes freeze beautifully! Simply cool them completely, layer with parchment paper, and store them in an airtight container or freezer bag. Reheat them gently in a toaster, microwave, or a warm oven for a quick and easy breakfast any day of the week. This makes them an excellent option for meal prepping, ensuring you always have a healthy, delicious breakfast ready to go.
Your Culinary Adventure Awaits!
So, what are you waiting for? I wholeheartedly encourage you to carve out some time this weekend, gather your ingredients, and give Gluten Free Cottage Cheese Pancakes The Ultimate Recipe a try. I promise you won’t be disappointed. It’s a recipe that delivers on its promises: fantastic flavor, wonderful texture, and a satisfyingly wholesome start to your day. There’s something truly special about creating delicious food from scratch, and these pancakes are particularly rewarding. I’m confident that once you taste them, they’ll earn a permanent spot in your breakfast rotation.
I would absolutely love to hear about your experience! Did you stick to the classic toppings, or did you venture into some exciting new variations? Did you add a secret ingredient that blew your mind? Please share your triumphs, your photos, and your feedback in the comments section below. Your insights and creativity inspire not only me but also our entire community of home cooks. Let’s celebrate delicious, healthy eating together. Happy cooking, and enjoy every single bite!
Ultimate Gluten Free Cottage Cheese Pancakes Recipe!
Revolutionize your breakfast with this ultimate gluten-free cottage cheese pancakes recipe! Enjoy incredibly light, fluffy, and protein-packed pancakes with a perfect balance of texture and flavor, transforming mundane mornings into culinary delights.
Ingredients
Instructions
Important Information
Nutrition Facts (Per Serving)
It is important to consider this information as approximate and not to use it as definitive health advice.
Allergy Information
Please check ingredients for potential allergens and consult a health professional if in doubt.
Leave a Comment