
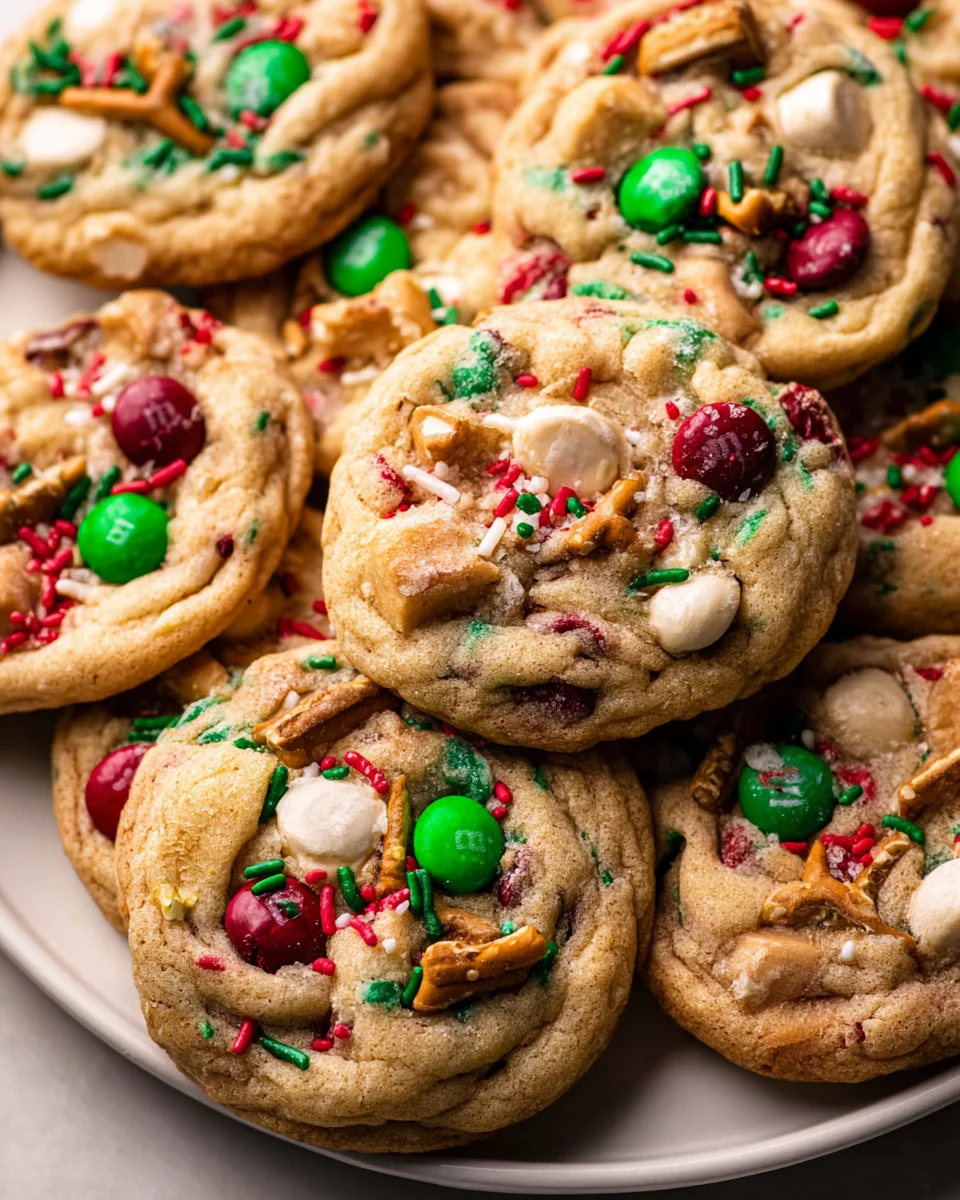
Christmas Kitchen Sink Cookies are, without a doubt, my absolute favorite way to embrace the festive season in the kitchen! Imagine a cookie that holds a delightful secret in every single bite – a symphony of sweet, salty, crunchy, and chewy textures all wrapped up in one magnificent package. I simply adore how these cookies embody the true spirit of holiday generosity and resourcefulness, making them a cornerstone of my annual baking tradition.
The charm of “kitchen sink” baking dates back to a time-honored tradition of using up all the wonderful odds and ends from your pantry, especially during busy celebratory periods. It’s a testament to resourceful creativity, turning a collection of diverse ingredients into something truly spectacular, minimizing waste while maximizing flavor and fun. People absolutely fall head over heels for this particular type of cookie because it offers an unparalleled adventure for your taste buds. One moment you might encounter a burst of chocolate, the next a salty pretzel crunch, followed by a chewy caramel or a hint of peppermint – the possibilities are endless!
They are incredibly versatile, making them a fantastic solution for those leftover holiday candies, nuts, and chocolate chips from other festive baking projects. It’s this delightful unpredictability and the sheer joy of discovery that makes each batch of Christmas Kitchen Sink Cookies so special and so loved. I promise you, these aren’t just cookies; they’re a celebration of holiday abundance, perfect for sharing joy with family and friends.

Ingredients:
- 2 ½ cups (300g) all-purpose flour
- 1 teaspoon baking soda
- ½ teaspoon salt
- 1 cup (226g) unsalted butter, softened to room temperature
- ¾ cup (150g) granulated sugar
- ¾ cup (150g) packed light brown sugar
- 2 large eggs, at room temperature
- 2 teaspoons pure vanilla extract
- 1 cup (170g) white chocolate chips
- 1 cup (170g) milk chocolate chips
- ½ cup (85g) dark chocolate chunks or chopped dark chocolate bar
- 1 cup (100g) crushed pretzel twists (about 2 cups whole pretzels)
- ½ cup (50g) dried cranberries or dried cherries
- ½ cup (60g) chopped pecans or walnuts
- ½ cup (100g) festive Christmas sprinkles (jimmies or nonpareils work great)
- Optional: ½ teaspoon ground cinnamon or a pinch of nutmeg for extra warmth
Preparing Your Dough Base for Christmas Kitchen Sink Cookies
1. Gather All Your Ingredients and Equipment: Before you even think about mixing, take a moment to read through the entire recipe. Trust me, this small step saves a lot of hassle later! Make sure your butter is truly softened to room temperature – not melted, but easily yielding to a gentle poke. Your eggs should also be at room temperature; this helps them emulsify better with the butter and sugar, leading to a smoother, more uniform dough. Prepare your mixing bowls, measuring cups, and spoons. I always find a stand mixer with a paddle attachment makes this process a breeze, but a hand mixer works beautifully too. This initial organization sets the stage for baking the most incredible Christmas Kitchen Sink Cookies.
2. Combine the Dry Ingredients: In a medium-sized bowl, whisk together your all-purpose flour, baking soda, and salt. If you’re using the optional ground cinnamon or nutmeg, now’s the time to add it in here. Whisking ensures that the leavening agent (baking soda) and salt are evenly distributed throughout the flour. This prevents pockets of unmixed ingredients, which could result in an uneven rise or flavor in your finished cookies. Set this bowl aside for now; we’ll incorporate it into our wet ingredients shortly.
3. Cream the Butter and Sugars: This is a crucial step for achieving that signature chewy-soft cookie texture. In the bowl of your stand mixer fitted with the paddle attachment (or a large bowl with a hand mixer), cream together the softened unsalted butter, granulated sugar, and light brown sugar. Beat them on medium speed for about 2-3 minutes, or until the mixture becomes wonderfully light, fluffy, and noticeably paler in color. During this process, tiny air pockets are incorporated into the butter and sugar, which will expand during baking, giving your cookies that delightful lift and tenderness. Don’t skimp on this step! It’s the secret to a truly great cookie. Scrape down the sides of the bowl once or twice to ensure everything is thoroughly combined.
4. Add Eggs and Vanilla: With your mixer on low speed, add the eggs one at a time, beating well after each addition. Make sure each egg is fully incorporated into the butter-sugar mixture before adding the next. This prevents the mixture from curdling and ensures a smooth batter. Once both eggs are mixed in, stir in the pure vanilla extract. Vanilla is a flavor enhancer, and in these Christmas Kitchen Sink Cookies, it perfectly complements all the diverse mix-ins we’re about to add. Beat for another minute until the mixture is light and well combined, scraping down the sides as needed.
Bringing Together the Festive Mix-Ins
5. Gradually Incorporate Dry Ingredients: With the mixer on the lowest speed, slowly add the dry ingredient mixture (flour, baking soda, salt, and optional spices) into the wet ingredients. Mix just until the flour streaks have almost disappeared. It’s incredibly important not to overmix at this stage. Overmixing develops the gluten in the flour too much, which can lead to tough, dense cookies instead of the soft, chewy ones we’re aiming for. A few streaks of flour are perfectly fine; we’ll finish mixing by hand in the next step.
6. Fold in the “Kitchen Sink” Goodies: Now for the fun part – adding all the glorious mix-ins that make these Christmas Kitchen Sink Cookies so special! Remove the bowl from the mixer and, using a sturdy spatula or a wooden spoon, fold in the white chocolate chips, milk chocolate chips, dark chocolate chunks, crushed pretzels, dried cranberries, and chopped nuts. Fold gently until everything is evenly distributed throughout the dough. You want every bite of your cookie to be an exciting surprise! I always like to reserve about a quarter cup of each chocolate chip and some extra sprinkles to press onto the tops of the cookie dough balls right before baking. This makes them look extra inviting and festive.
7. Stir in the Christmas Sprinkles: Finally, gently fold in the Christmas sprinkles. I recommend adding these last and folding them in quickly, as prolonged mixing can cause their colors to bleed into the dough, especially with some softer varieties of sprinkles. You want those vibrant festive colors to pop when your cookies are baked! This step truly transforms them into proper Christmas Kitchen Sink Cookies.
8. Chill the Cookie Dough (Crucial Step!): This step is non-negotiable if you want thick, chewy, flavorful cookies. Cover the bowl with plastic wrap and refrigerate the cookie dough for at least 1 hour, or preferably 2-4 hours. You can even chill it overnight! Chilling the dough solidifies the butter, which helps prevent the cookies from spreading too much in the oven, ensuring they stay thick. More importantly, it allows the flavors to meld and deepen, resulting in a much richer, more complex taste. This also makes the dough easier to handle and scoop.
Baking Your Perfect Christmas Kitchen Sink Cookies
9. Preheat Oven and Prepare Baking Sheets: About 15-20 minutes before you’re ready to bake, preheat your oven to 375°F (190°C). Line two large baking sheets with parchment paper or silicone baking mats. Parchment paper is fantastic because it prevents sticking and makes cleanup a breeze. It also helps with even baking.
10. Scoop and Arrange the Dough: Using a 2-tablespoon cookie scoop or by rolling the dough with your hands, form individual cookie dough balls. For a truly generous cookie, you can even use a 3-tablespoon scoop. Place the dough balls about 2 inches apart on the prepared baking sheets. Remember those reserved chocolate chips and sprinkles from step 6? Now’s the time to gently press a few extra onto the tops of each dough ball. This isn’t just for looks; it makes for incredibly appealing cookies straight out of the oven, showcasing all the delicious treasures hidden within your Christmas Kitchen Sink Cookies.
11. Bake to Golden Perfection: Bake one baking sheet at a time in the preheated oven for 10-14 minutes. Baking times can vary slightly depending on your oven, so keep an eye on them. You’re looking for edges that are set and lightly golden brown, but the centers should still look slightly soft and underbaked. This is the secret to a chewy interior! If they look fully baked and firm in the middle while still in the oven, they will likely be dry and crispy once cooled.
12. Cool and Enjoy: Once baked, remove the baking sheets from the oven and let the cookies cool on the sheets for about 5-10 minutes. This crucial cooling time allows the centers to finish setting up and prevents them from breaking apart when you transfer them. After this initial cooling, carefully transfer the cookies to a wire rack to cool completely. As they cool, the flavors will continue to develop, and their texture will achieve that perfect chewy-soft balance.
13. Storage and Sharing: These Christmas Kitchen Sink Cookies are best enjoyed warm, straight from the oven, with a glass of milk or a cup of hot cocoa. However, they store wonderfully too! Once completely cooled, store them in an airtight container at room temperature for up to 5-7 days. If you want to extend their freshness, you can also freeze the baked cookies for up to 3 months. Just thaw them at room temperature, or pop them in the microwave for a few seconds for a warm, fresh-baked treat. These cookies also make a fantastic homemade gift for friends, family, and neighbors during the holiday season. The sheer variety of textures and flavors makes them incredibly memorable and a true highlight of any Christmas cookie platter.
Conclusion:
If there’s one recipe I urge you to add to your baking repertoire, it’s this one. I truly believe that these cookies are more than just a sweet treat; they’re an experience, a canvas for creativity, and a surefire way to bring smiles to faces, especially during the festive season. We’ve explored the magic of combining all those seemingly disparate yet ultimately harmonious ingredients, resulting in a cookie that is chewy, crunchy, sweet, and salty all at once – a symphony of textures and flavors that will tantalize your taste buds with every single bite. The joy derived from baking a batch of these is immense, not only because of the incredible aroma that fills your home but also from the sheer delight of discovering a new favorite flavor combination in each unique cookie.
What makes these particular cookies a standout is their incredible adaptability and the element of surprise they offer. No two cookies are ever precisely alike, making each one a miniature adventure. They embody the spirit of generosity and abundance that defines the holidays, and trust me, they disappear faster than snow on a warm day! I can’t express enough how genuinely excited I am for you to experience the sheer delight that comes from pulling a tray of these golden-brown beauties from your oven.
Serving Suggestions & Creative Variations: Endless Possibilities!
Once your magnificent batch of these Christmas Kitchen Sink Cookies has cooled sufficiently, the serving options are as boundless as your imagination. Of course, a classic pairing with a tall glass of cold milk is always a winner, especially for the younger ones (and the young at heart!). But don’t stop there! Imagine them alongside a steaming mug of hot cocoa, perhaps with a dollop of whipped cream and a sprinkle of cinnamon, for the ultimate cozy winter indulgence. They also make a fantastic accompaniment to your morning coffee or afternoon tea, adding a touch of festive sweetness to your daily ritual.
For a truly elegant presentation, consider arranging them on a beautiful dessert platter with other holiday treats. Their varied colors and textures make them visually appealing, and they’re sure to be a conversation starter. Gifting a handful of these cookies is also a wonderful gesture; package them in a pretty tin or cellophane bag tied with a festive ribbon, and you have a thoughtful, homemade present that anyone would appreciate.
And for those who love to experiment, the “kitchen sink” concept is your playground! Want to make them even more indulgent? Try drizzling melted white chocolate or dark chocolate over the cooled cookies, or even a sprinkle of edible glitter for extra holiday sparkle. For flavor variations, consider swapping out some of the chocolate chips for butterscotch chips, or adding a handful of dried cranberries for a tart counterpoint. Chopped pecans or walnuts can introduce another layer of crunch, while a hint of orange zest or peppermint extract can elevate the festive factor even further. If you’re catering to dietary needs, don’t hesitate to experiment with gluten-free flour blends or dairy-free chocolate chips – the core recipe is robust enough to handle thoughtful substitutions. These cookies are truly designed for personalization!
Your Culinary Adventure Awaits!
Now, it’s your turn. Don’t just take my word for it; gather your ingredients, fire up your oven, and embark on this delicious baking adventure. I promise you, the aroma alone is worth the effort, and the first bite will confirm that you’ve made the right decision. These Christmas Kitchen Sink Cookies are more than just a recipe; they are an invitation to create memories, to share joy, and to revel in the simple pleasure of a perfectly baked treat. I can’t wait for you to experience the magic firsthand!
After you’ve whipped up your own batch, I wholeheartedly encourage you to share your experience. What were your favorite mix-ins? Did you discover a new serving suggestion? How did your friends and family react? Your insights and photos will inspire others in our wonderful baking community. Let’s celebrate the joy of baking together. Happy baking, and may your kitchen be filled with the sweet scent of success and happiness!
Christmas Kitchen Sink Cookies
Imagine a cookie that holds a delightful secret in every single bite – a symphony of sweet, salty, crunchy, and chewy textures all wrapped in one magnificent package. These cookies embody the true spirit of holiday generosity and resourcefulness, perfect for using up leftover holiday candies, nuts, and chocolate chips.
Ingredients
Instructions
Important Information
Nutrition Facts (Per Serving)
It is important to consider this information as approximate and not to use it as definitive health advice.
Allergy Information
Please check ingredients for potential allergens and consult a health professional if in doubt.
Leave a Comment