
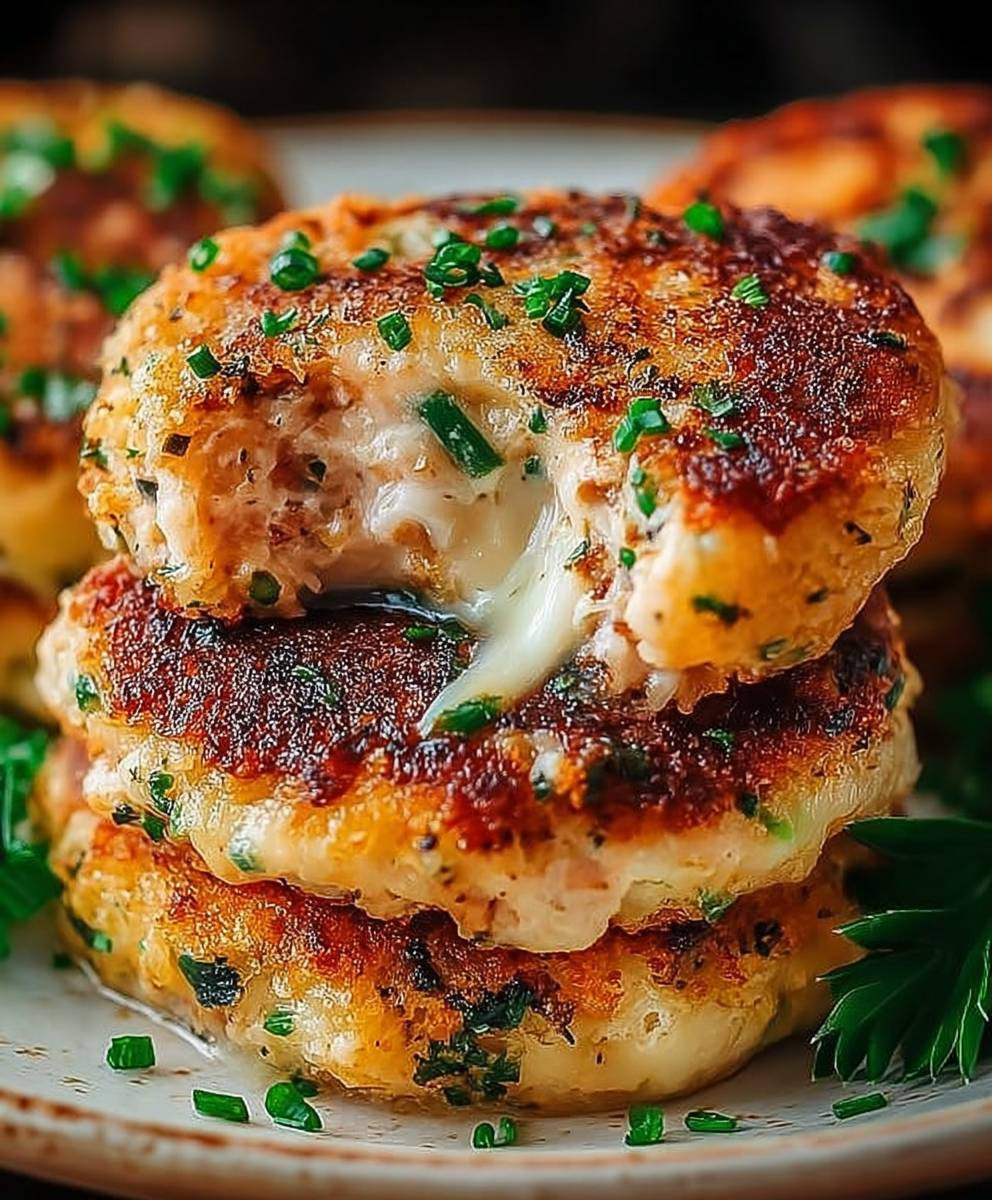
Tuna Melt Patties: Prepare to experience a delightful twist on a classic comfort food! Forget everything you thought you knew about the humble tuna melt because we’re transforming it into a crispy, golden-brown patty that’s perfect for lunch, dinner, or even a satisfying snack. Imagine biting into a crunchy exterior, giving way to a warm, cheesy, tuna-filled center – it’s pure bliss!
The tuna melt, in its original sandwich form, has a surprisingly rich history, believed to have originated in the early 20th century as a way to elevate the simple tuna salad sandwich. It quickly gained popularity in diners and lunch counters across America, becoming a beloved staple. Our tuna melt patties take that nostalgic charm and give it a modern, fun, and incredibly delicious upgrade.
What makes this dish so irresistible? Well, it’s the perfect combination of textures and flavors. The creamy, savory tuna filling, the gooey melted cheese, and the satisfying crunch of the patty create a symphony in your mouth. Plus, these patties are incredibly convenient to make! They’re a fantastic way to use pantry staples and can be whipped up in under 30 minutes. So, if you’re looking for a quick, easy, and utterly delicious meal, look no further. These tuna melt patties are guaranteed to become a new family favorite!

Ingredients:
- 12 ounces canned tuna in water, drained well
- 1/2 cup mayonnaise
- 1/4 cup finely chopped red onion
- 1/4 cup finely chopped celery
- 2 tablespoons Dijon mustard
- 1 tablespoon lemon juice
- 1 teaspoon Worcestershire sauce
- 1/2 teaspoon black pepper
- 1/4 teaspoon salt (or to taste)
- 1/2 cup panko breadcrumbs
- 1/4 cup grated Parmesan cheese
- 2 tablespoons olive oil, divided
- 4 slices cheddar cheese
- 4 hamburger buns, split
- Optional toppings: lettuce, tomato slices, pickles
Preparing the Tuna Mixture
Okay, let’s get started! First, we need to create the base for our delicious tuna melt patties. This is where all the flavor comes together, so pay close attention to the details.
- Drain the Tuna: This is crucial! You want to make sure your tuna is as dry as possible. Excess water will make the patties soggy and difficult to form. I usually press the tuna against the side of the strainer with a spoon to squeeze out any remaining liquid.
- Combine Wet Ingredients: In a large bowl, add the mayonnaise, red onion, celery, Dijon mustard, lemon juice, and Worcestershire sauce. Whisk these ingredients together until they are well combined. This mixture will act as the binder and flavor base for our patties.
- Add Tuna and Spices: Gently flake the drained tuna into the bowl with the wet ingredients. Be careful not to overmix, as you want to maintain some texture. Add the black pepper and salt. Remember, you can always adjust the seasoning later, so start with a smaller amount and taste as you go.
- Incorporate Binders: Now, it’s time to add the panko breadcrumbs and Parmesan cheese. These ingredients will help bind the mixture together and give the patties a nice texture. Gently fold them into the tuna mixture until everything is evenly distributed. Again, avoid overmixing.
- Chill the Mixture: Cover the bowl with plastic wrap and refrigerate the tuna mixture for at least 30 minutes. This will allow the flavors to meld together and the mixture to firm up, making it easier to form the patties. Trust me, this step is worth the wait!
Forming the Tuna Melt Patties
Now that our tuna mixture has chilled, it’s time to shape it into patties. This is a pretty straightforward process, but there are a few things to keep in mind to ensure they hold together well during cooking.
- Divide the Mixture: Remove the tuna mixture from the refrigerator. Using your hands or a large spoon, divide the mixture into four equal portions.
- Shape into Patties: Gently shape each portion into a patty about 3/4 inch thick. Try to make them as uniform in size and shape as possible so they cook evenly. I like to gently pat them down to flatten them slightly.
- Prepare for Cooking: Place the formed patties on a plate or baking sheet lined with parchment paper. This will prevent them from sticking and make them easier to transfer to the skillet.
Cooking the Tuna Melt Patties
This is where the magic happens! We’re going to cook these patties until they’re golden brown and heated through. The key is to use medium heat and avoid overcrowding the pan.
- Heat the Oil: Heat 1 tablespoon of olive oil in a large skillet over medium heat. Make sure the skillet is hot before adding the patties. You can test this by flicking a drop of water into the pan; if it sizzles, it’s ready.
- Cook the First Side: Carefully place two patties in the hot skillet. Cook for about 4-5 minutes per side, or until they are golden brown and heated through. Avoid moving the patties around too much while they are cooking, as this can prevent them from browning properly.
- Add Cheese: During the last minute of cooking, place a slice of cheddar cheese on top of each patty. Cover the skillet with a lid to help the cheese melt quickly and evenly.
- Remove and Repeat: Once the cheese is melted and the patties are cooked through, carefully remove them from the skillet and set them aside. Add the remaining 1 tablespoon of olive oil to the skillet and repeat the cooking process with the remaining two patties.
Assembling the Tuna Melt Patties
Almost there! Now it’s time to assemble our delicious tuna melt patties. This is where you can get creative and add your favorite toppings.
- Toast the Buns (Optional): If you like, you can lightly toast the hamburger buns. This will add a nice crunch and prevent them from getting soggy.
- Assemble the Sandwiches: Place a tuna melt patty with melted cheese on the bottom half of each bun.
- Add Toppings (Optional): Add your favorite toppings, such as lettuce, tomato slices, and pickles. I personally love a little bit of crisp lettuce and a juicy tomato slice on mine.
- Serve Immediately: Top with the other half of the bun and serve immediately. Enjoy your homemade tuna melt patties!
Tips and Variations
Here are a few extra tips and variations to make these tuna melt patties even more amazing:
- Use Different Cheese: Feel free to experiment with different types of cheese, such as Swiss, provolone, or pepper jack.
- Add Some Spice: If you like a little heat, add a pinch of red pepper flakes to the tuna mixture.
- Grill the Patties: For a smoky flavor, you can grill the patties instead of cooking them in a skillet.
- Serve on Different Bread: Instead of hamburger buns, you can serve the patties on toasted sourdough or rye bread.
- Add Avocado: Sliced avocado adds a creamy and healthy element to the tuna melt.
- Make it Gluten-Free: Use gluten-free breadcrumbs and buns to make this recipe gluten-free.
- Use Fresh Herbs: Add finely chopped fresh dill or parsley to the tuna mixture for a burst of flavor.
- Add a Fried Egg: Top the tuna melt patty with a fried egg for an extra protein boost and a runny yolk that adds richness.
Storage Instructions
If you have any leftover tuna melt patties, you can store them in the refrigerator for up to 2 days. Reheat them in a skillet or microwave before serving. Keep in mind that the buns may become a bit soggy during storage, so it’s best to assemble the sandwiches just before serving.
Nutritional Information (Approximate)
Please note that the nutritional information is an estimate and may vary depending on the specific ingredients used.
- Calories: Approximately 450-550 per patty
- Protein: 30-35 grams
- Fat: 25-35 grams
- Carbohydrates: 20-30 grams
Enjoy your delicious and easy-to-make tuna melt patties! I hope you love them as much as I do.
Conclusion:
And there you have it! These Tuna Melt Patties are more than just a quick lunch; they’re a flavor explosion waiting to happen. Seriously, if you’re looking for a satisfying, easy-to-make meal that’s a step above your average tuna sandwich, this is it. The crispy exterior, the melty cheese, and the savory tuna filling all combine to create a truly unforgettable bite. I know I’ve made them countless times, and they’re always a hit!
But why are these patties a must-try? Well, beyond the incredible taste, they’re incredibly versatile. Need a speedy weeknight dinner? These patties are ready in under 30 minutes. Looking for a fun appetizer for your next gathering? Cut them into smaller portions and serve them with a dipping sauce. Want to impress your friends with your culinary skills without spending hours in the kitchen? These Tuna Melt Patties are your secret weapon.
Now, let’s talk about serving suggestions and variations because the possibilities are endless! I personally love serving them on toasted brioche buns with a side of crispy coleslaw and dill pickles. The sweetness of the brioche complements the savory tuna perfectly, and the coleslaw adds a refreshing crunch. But don’t feel limited to buns! You can also serve them on top of a bed of mixed greens for a lighter meal, or even crumble them over a baked potato for a hearty and satisfying dinner.
For variations, consider adding a touch of spice with a pinch of red pepper flakes to the tuna mixture. Or, if you’re a fan of dill, add a generous amount of fresh dill to the patties for a brighter, more herbaceous flavor. You could also experiment with different types of cheese. Instead of cheddar, try using Gruyere for a nutty and sophisticated twist, or pepper jack for a spicy kick. If you’re feeling adventurous, you could even add some chopped jalapenos to the tuna mixture for an extra layer of heat.
Another great variation is to use different types of breading. Instead of panko breadcrumbs, try using crushed potato chips for a salty and crunchy coating. Or, if you’re looking for a gluten-free option, use almond flour or crushed gluten-free crackers.
Don’t be afraid to get creative and experiment with different flavors and ingredients to create your own signature Tuna Melt Patties. The most important thing is to have fun and enjoy the process!
I truly believe that this recipe is a winner, and I can’t wait for you to try it. So, go ahead, gather your ingredients, and get cooking! I promise you won’t be disappointed.
And finally, I’d love to hear about your experience making these Tuna Melt Patties. Did you try any of the variations I suggested? Did you come up with your own unique twist? Share your photos and comments in the section below. I’m always looking for new ideas and inspiration, and I’m sure other readers would love to hear about your culinary adventures as well. Happy cooking!
Tuna Melt Patties: The Ultimate Guide to Deliciousness
Flaked tuna, red onion, celery, Dijon, lemon juice, and Worcestershire are combined with panko and Parmesan, formed into patties, and cooked until golden. Topped with melted cheddar and served on toasted buns.
Ingredients
Instructions
Recipe Notes
- Use different cheese, such as Swiss, provolone, or pepper jack.
- Add a pinch of red pepper flakes to the tuna mixture.
- Grill the patties instead of cooking them in a skillet.
- Serve the patties on toasted sourdough or rye bread.
- Sliced avocado adds a creamy and healthy element to the tuna melt.
- Use gluten-free breadcrumbs and buns to make this recipe gluten-free.
- Add finely chopped fresh dill or parsley to the tuna mixture for a burst of flavor.
- Top the tuna melt patty with a fried egg for an extra protein boost and a runny yolk that adds richness.
- Leftover tuna melt patties can be stored in the refrigerator for up to 2 days. Reheat them in a skillet or microwave before serving.
Leave a Comment