
Tennessee Onions Better Than Onion Rings – that’s a bold claim, I know, but trust me when I say this recipe will revolutionize your perception of humble fried onions. Forget those greasy, often soggy, deep-fried rings; what I’m about to share is a revelation of flavor and texture that truly stands out. While not steeped in centuries of folklore, this style of preparing onions has become a cherished staple across many Southern tables, particularly in Tennessee, where simplicity meets incredible taste. It’s a testament to how traditional Southern cooking can transform basic ingredients into something extraordinary, embodying the heart and soul of Southern comfort food.
Why You’ll Fall in Love with Tennessee Onions
I’ve discovered that people absolutely adore this dish because it offers a crispiness that rivals the best onion rings, yet with a distinct, savory depth that keeps you coming back for more. The magic lies in a unique preparation method that ensures each bite is perfectly tender on the inside with an irresistible crunch on the outside. They are incredibly versatile, serving as an ideal companion to grilled meats, a hearty burger, or even as a standalone snack. Once you taste them, you’ll understand exactly why I confidently declare these Tennessee Onions Better Than Onion Rings – they are that good!

Ingredients:
- 3 large sweet onions (such as Vidalia or Walla Walla), about 1.5-2 pounds total
- 3 cups buttermilk (or milk with 3 tablespoons lemon juice/white vinegar, allowed to sit for 5-10 minutes)
- 2 cups all-purpose flour, plus 1/2 cup for initial dredging
- 1/2 cup cornstarch
- 2 teaspoons baking powder
- 1 tablespoon granulated sugar
- 1 teaspoon salt, plus more for seasoning
- 1/2 teaspoon black pepper
- 1/4 teaspoon cayenne pepper (optional, for a little kick)
- 1 1/2 cups cold sparkling water or club soda
- Vegetable oil, canola oil, or peanut oil, for deep frying (about 6-8 cups, depending on your pot size)
- Optional: Your favorite dipping sauces (ranch, comeback sauce, spicy mayo)
Equipment You’ll Need:
Before we dive into making these incredible Tennessee Onions, which I promise you are even better than traditional onion rings, it’s a good idea to gather all your tools. Having everything ready to go will make the cooking process smooth and enjoyable, especially when dealing with hot oil. You’ll want a sturdy cutting board and a sharp chef’s knife for those beautiful onion slices. A large mixing bowl for our wet batter and a couple of shallow dishes for your dry flour dredge are essential for setting up an efficient coating station. For frying, a heavy-bottomed pot or Dutch oven, capable of holding several inches of oil, is non-negotiable for safety and even cooking. A reliable deep-fry thermometer is perhaps the most crucial piece of equipment here; maintaining the correct oil temperature is key to achieving that perfect golden-brown crispness without burning the onions or making them greasy. Don’t forget a spider strainer or slotted spoon for safely retrieving your cooked onions, and a wire rack set over a baking sheet for draining excess oil and keeping them crisp. Paper towels are also handy for a final blot. Having these items at the ready will set you up for success in creating the most delicious Tennessee Onions you’ve ever tasted!
Preparation is Key: Getting Ready to Make Your Tennessee Onions
Friends, the secret to achieving those incredibly crispy, flavorful Tennessee Onions that are truly better than any onion rings you’ve ever encountered starts long before they hit the hot oil. It’s all in the preparation. Taking the time for these initial steps will guarantee a superior texture and taste, so please don’t skip them!
Preparing the Onions: The Foundation of Flavor
- First things first, let’s get those beautiful onions ready. I always start by peeling my sweet onions carefully, removing not just the papery outer skin but also any tougher layers that might not become tender when cooked. We want tender, sweet onion with every bite.
- Next, for slicing, I recommend cutting the onions into rings about 1/4 to 1/3 inch thick. Why this specific thickness? If they’re too thin, they can become brittle and burn quickly, losing that satisfying onion texture. If they’re too thick, they might not cook through properly or achieve the same level of crispness. A consistent thickness is vital for even frying, so take your time with this step. Use a sharp knife for clean cuts, or if you have one, a mandoline can be a fantastic tool for achieving uniform slices quickly and safely.
- Once sliced, gently separate the rings. You’ll find a mix of sizes, which is perfectly fine – we want variety! I like to keep the larger, more robust rings for a really substantial bite, but even the smaller inner rings are delicious and add great textural contrast.
- Now, here’s a step that truly elevates our Tennessee Onions: we’re going to soak them in buttermilk. Place all your separated onion rings into a large bowl. Pour the buttermilk over them, ensuring all the rings are submerged. If you don’t have buttermilk, don’t worry! You can easily make your own by adding 3 tablespoons of lemon juice or white vinegar to regular milk, stirring, and letting it sit for about 5-10 minutes until it slightly curdles. The acidity in the buttermilk helps to tenderize the onions ever so slightly, mellows their pungent flavor, and most importantly, it acts as a fantastic adhesive for our batter. This soak is what gives these Tennessee Onions a unique depth of flavor that truly sets them apart, making them undeniably better than most onion rings. I usually let them soak for at least 30 minutes, or even up to 2 hours in the refrigerator if I have the time. This extended soak also ensures the batter really clings well.
- While the onions are soaking, you can prepare the rest of your dredging station.
Setting Up Your Dredging Station: The Path to Perfection
An organized dredging station is your best friend when frying. Trust me, it makes the process so much cleaner and more efficient. We’re going for a three-part setup: dry flour, wet batter, and back to dry flour for an extra crispy coating. This double-dredging technique is one of the secrets behind why these Tennessee Onions are consistently better than even the best onion rings you’ve had.
- In a shallow dish or pie plate, place 1/2 cup of all-purpose flour. This will be our initial dry dredge, designed to give the buttermilk-soaked onions something extra to cling to before they meet the batter.
- In a second shallow dish, we’ll prepare our dry batter mix. Whisk together the remaining 2 cups of all-purpose flour, 1/2 cup cornstarch, 2 teaspoons baking powder, 1 tablespoon granulated sugar, 1 teaspoon salt, and 1/2 teaspoon black pepper. If you’re feeling adventurous and want a little kick, now’s the time to add that 1/4 teaspoon of cayenne pepper. The cornstarch is crucial here as it contributes significantly to the ultimate crispiness that makes these Tennessee Onions so much better than your average onion ring. The baking powder helps lighten the batter, making it airy and delightful.
- You’ll keep the bowl of buttermilk-soaked onions handy as the first step in your line.
- Make sure you have your empty wire rack set over a baking sheet ready next to your frying station for draining.
Prepping the Frying Oil: Heat Management is Non-Negotiable
- Pour your chosen frying oil (vegetable, canola, or peanut oil) into a large, heavy-bottomed pot or Dutch oven. You’ll need enough oil to ensure the onion rings can float freely without touching the bottom, usually about 3 to 4 inches deep, depending on your pot. Be careful not to fill it more than halfway to prevent spills and boil-overs.
- Place the pot over medium-high heat. Attach your deep-fry thermometer to the side of the pot, making sure the tip is submerged in the oil but not touching the bottom. We’re aiming for a consistent oil temperature of 350°F (175°C). Maintaining this exact temperature is absolutely vital for making Tennessee Onions that are perfectly golden, crisp, and never greasy. If the oil is too cool, the batter will absorb too much oil and become soggy. If it’s too hot, the batter will burn before the onion cooks through, leading to a bitter taste. Patience is key here; let the oil come up to temperature slowly and steadily.
Crafting the Batter: The Secret to Crispy Tennessee Onions
The batter is where the magic truly happens, transforming simple onions into what I confidently declare are Tennessee Onions better than any onion rings you’ve ever had. This recipe uses a special blend of ingredients to create a light, airy, and incredibly crispy coating that adheres beautifully to the sweet onion slices. Get ready for a revelation in texture and flavor!
- First, retrieve the shallow dish containing our dry batter mix (2 cups all-purpose flour, 1/2 cup cornstarch, 2 teaspoons baking powder, 1 tablespoon granulated sugar, 1 teaspoon salt, 1/2 teaspoon black pepper, and optional cayenne pepper) that we prepared earlier. You might be wondering why we’re making a dry batter mix first. This is a crucial step! By preparing the dry ingredients separately, we ensure they are perfectly combined and ready to receive the wet components without overmixing, which can lead to a tough batter.
- Now, gradually pour the 1 1/2 cups of cold sparkling water or club soda into the dry batter mix. I emphasize cold sparkling water because the effervescence and chill contribute significantly to the batter’s lightness and crispiness. The bubbles create air pockets that expand during frying, resulting in that delightful, airy crunch that makes these Tennessee Onions so superior.
- Whisk the wet and dry ingredients together until just combined. You’re looking for a relatively thin batter, almost like pancake batter, but it’s okay if there are a few small lumps. In fact, a slightly lumpy batter is often preferred as it indicates you haven’t overmixed, which can develop the gluten in the flour too much and lead to a chewier, less crisp result. We want light and crisp! Avoid the temptation to whisk vigorously until perfectly smooth. A few swirls are all you need.
- Set this incredible batter aside. It’s now ready to coat our buttermilk-soaked onion rings, forming the glorious crust that defines these amazing Tennessee Onions.
The Frying Process: Achieving Golden Perfection
This is it – the moment of truth where our Tennessee Onions come to life, transforming into those irresistibly crispy, golden-brown delights that are undeniably better than any onion rings! Frying requires your full attention to ensure perfect results, so let’s walk through it carefully.
- First, make sure your oil is at a steady 350°F (175°C). This temperature is absolutely critical. Use your deep-fry thermometer and adjust your heat as needed. If it drops too low after adding onions, gently increase the heat. If it gets too hot, reduce it. Consistency is key for uniform cooking and preventing greasy or burnt results.
- While the oil is heating, retrieve your bowl of buttermilk-soaked onion rings. Drain them well, shaking off any excess buttermilk. We don’t want them dripping wet.
- Now, we begin the dredging process. Take a few onion rings (don’t overcrowd them yet) and toss them gently in that initial 1/2 cup of plain flour we set aside earlier. This dry layer helps absorb any lingering moisture and provides a textured surface for our amazing batter to cling to. Shake off any excess flour.
- Next, transfer these floured rings to your prepared wet batter. Dip them fully, ensuring they are completely coated. Don’t worry if the batter seems a little thin; it’s designed to be light. Lift them out, letting any major excess batter drip back into the bowl.
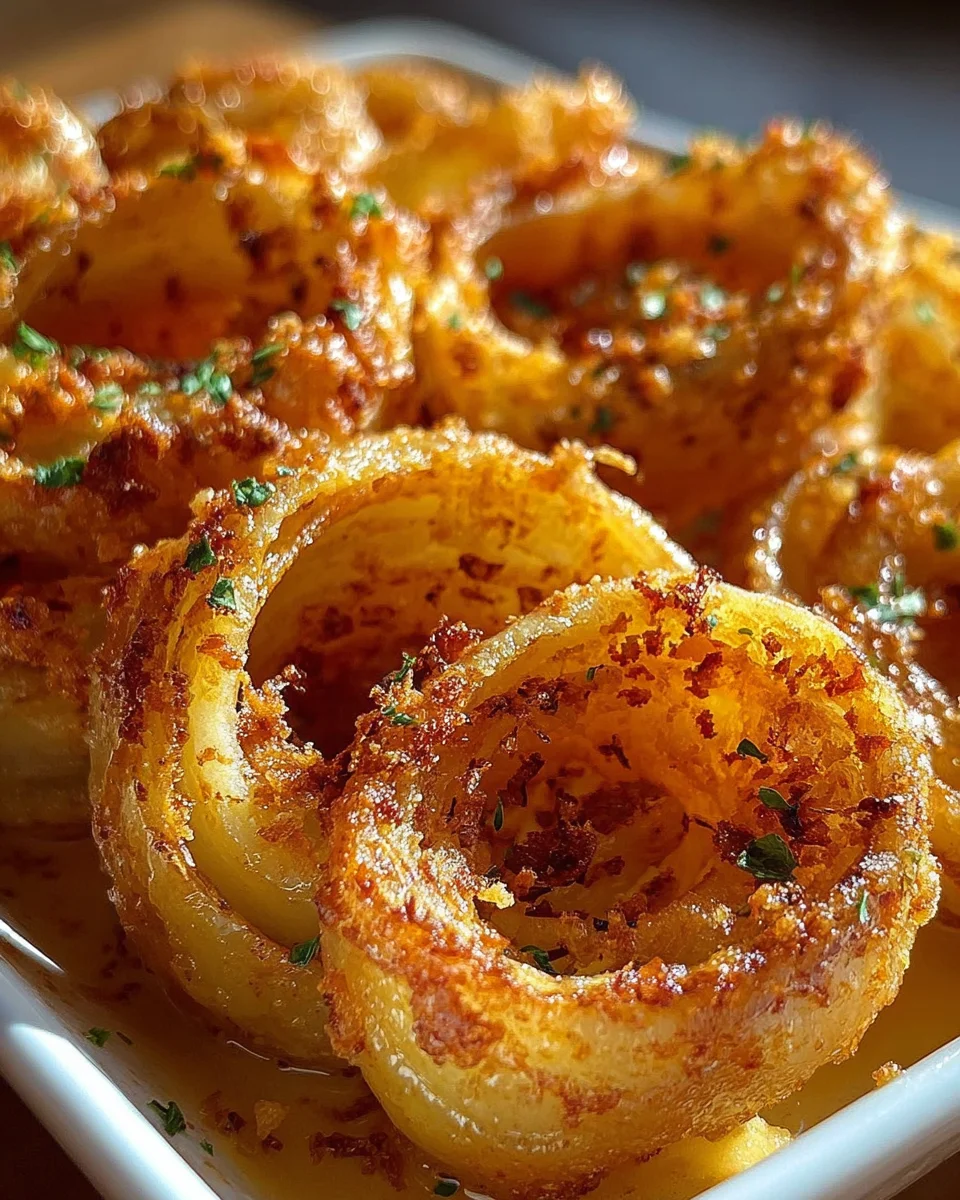
- Immediately transfer the wet-battered rings back into the second shallow dish, which contains our dry batter mix (the one with cornstarch, baking powder, etc.). Gently toss and press the dry mix onto the wet batter until the rings are fully coated. This double-dredge system is what creates that incredible, craggy, super-crispy exterior that truly makes these Tennessee Onions a cut above traditional onion rings. Shake off any major excess.
- Working in small batches, carefully place the coated onion rings into the hot oil. I usually aim for no more than 4-6 rings at a time, depending on the size of my pot. Overcrowding the pot will drastically drop the oil temperature, leading to soggy, sad onions. We want glorious, crisp ones!
- Fry the Tennessee Onions for about 2-4 minutes per batch, or until they are beautifully golden brown and wonderfully crisp. You’ll see them puff up slightly and take on that inviting golden hue. Use your spider strainer or slotted spoon to gently turn them a couple of times during frying to ensure even browning.
- Once they’ve reached that perfect golden-brown crispness, carefully remove the Tennessee Onions from the hot oil using your spider strainer. Hold them over the pot for a moment to let any major excess oil drip off.
- Transfer the fried onions immediately to the wire rack set over a baking sheet. This setup is crucial for allowing air to circulate around them, preventing them from steaming and losing their precious crispness.
- As soon as they are on the rack, generously sprinkle them with a little extra salt. Seasoning hot food right out of the fryer helps the salt adhere beautifully and penetrate the food, enhancing the flavor. A fine-grained salt like popcorn salt works wonderfully here, or a flaky sea salt for a gourmet touch.
- Allow the oil to return to 350°F (175°C) between batches before adding the next set of coated onion rings. This step is non-negotiable for consistently perfect results. If your oil is too cool, the onions will be greasy; too hot, and they’ll burn before cooking through.
- Repeat the dredging and frying process until all your glorious Tennessee Onions are cooked to golden perfection. I find that frying in batches takes a little longer, but the reward of perfectly crispy, “better than onion rings” goodness is absolutely worth every extra moment.
Serving Suggestions and Enjoying Your Tennessee Onions
You’ve done it! You’ve just created a batch of the most incredible Tennessee Onions, truly better than any onion rings you’ve ever had. Now comes the best part: enjoying them!
- Serve your Tennessee Onions immediately while they are still hot and at their crispiest. There’s nothing quite like the crunch of a freshly fried onion ring, and these are designed for instant gratification.
- While they are phenomenal on their own, a good dipping sauce can elevate the experience even further. My personal favorites include a classic homemade ranch dressing, a zesty comeback sauce, or a simple spicy mayo (just mix mayonnaise with a dash of sriracha and a squeeze of lime). You could also try a BBQ sauce or even a honey mustard. Don’t be shy about experimenting with your favorite condiments!
- These Tennessee Onions make an excellent appetizer or a fantastic side dish for so many meals. Imagine them alongside a juicy burger, a perfectly grilled steak, or even a hearty sandwich. They’re also absolutely perfect for game day gatherings, backyard barbecues, or just a delightful weekend treat.
- While these are best enjoyed fresh, if you happen to have any leftovers (which I highly doubt!), you can try reheating them in an air fryer at 350°F (175°C) for a few minutes until crisp, or in a conventional oven on a wire rack at 375°F (190°C) for about 5-7 minutes. Microwaving is generally not recommended as it will make them soggy.
- Savor every bite! The sweetness of the onion, combined with that incredibly light, airy, and seasoned crust, truly sets these Tennessee Onions apart. They offer a depth of flavor and a superior texture that, in my opinion, makes them better than even the best gourmet onion rings. You’ve earned this delicious reward!
Conclusion:
And there you have it, friends! We’ve journeyed through the simple steps to create a truly exceptional dish that I am so passionate about. If you’ve been searching for that perfect side, an irresistible appetizer, or simply something wonderfully different to tantalize your taste buds, then this recipe for our special onions is an absolute non-negotiable must-try. I truly believe you’ll understand exactly why I am so enthusiastic once you take that first glorious bite.
What makes this recipe stand out in a crowded culinary world? It’s the delightful combination of textures and flavors that dance across your palate. The onions themselves, transformed by a magical cooking process, achieve an unparalleled sweetness and tenderness, perfectly complemented by a satisfyingly crisp exterior. This isn’t just another fried side; it’s an experience. Unlike some other onion preparations that can be greasy or bland, our method ensures each piece is infused with incredible depth of flavor without feeling heavy. They strike that perfect balance between savory and subtly sweet, making them incredibly addictive. You’ll find them effortlessly easy to prepare, requiring no complex techniques or obscure ingredients, yet yielding a result that tastes as though it came from a gourmet kitchen. This simplicity, coupled with their phenomenal taste, is precisely why I’m convinced these are the Tennessee Onions Better Than Onion Rings you’ve ever encountered, hands down. They offer a unique profile that sets them leagues apart from the usual deep-fried contenders, delivering a more nuanced and utterly satisfying crunch and flavor.
Now, let’s talk about how to enjoy these culinary gems! While they are absolutely divine eaten straight from the skillet, piping hot and glistening, their versatility truly shines. I love serving them as a dynamic side dish alongside a juicy grilled steak or a perfectly seared pork chop; their sweetness beautifully cuts through the richness of the meat. Imagine them piled high on your favorite burger or tucked into a hearty sandwich, adding that irresistible crunch and flavor dimension that elevates an ordinary meal to extraordinary. For a casual gathering, they make an incredible appetizer. Simply arrange them on a platter with a sprinkle of fresh parsley and perhaps a tangy dipping sauce – think a homemade comeback sauce, a spicy aioli, or even just a simple seasoned ranch. They vanish quickly, believe me! If you’re feeling adventurous, consider variations to personalize your batch. A pinch of smoked paprika or cayenne pepper added to the dredge can introduce a delightful smoky or spicy kick. For a cheesy twist, a finely grated Parmesan or Pecorino Romano mixed into the breading takes them to another level of indulgence. You could even experiment with different herbs like thyme or rosemary if you’re looking for an earthy aroma. And for those with dietary considerations, a gluten-free flour blend can easily be substituted for a equally crispy and delicious outcome, ensuring everyone can partake in this delightful experience.
So, my dear food enthusiasts, I implore you: don’t just read about these magnificent onions, go forth and create them! Roll up your sleeves, gather your ingredients, and prepare to be amazed. I promise you, this recipe will not disappoint. It’s an opportunity to bring a little bit of extraordinary into your everyday cooking. Once you’ve whipped up a batch and savored every last bite, I would absolutely love to hear about your experience. Did you serve them with a special meal? Did you try a unique variation? Please, share your stories, your triumphs, and even your photos! Connect with me and let’s celebrate the joy of good food together. Happy cooking, and get ready to fall in love with your new favorite way to enjoy onions!
Tennessee Onions: So Good, They Beat Onion Rings!
Forget greasy, soggy deep-fried rings; this recipe for cheesy, baked Tennessee Onions is a revelation of flavor and texture that truly stands out. A cherished Southern staple, transforming humble onions into something extraordinary with tender sweet onions and a rich, cheesy topping. It’s a testament to how simple ingredients can create extraordinary Southern comfort food.
Ingredients
Instructions
Important Information
Nutrition Facts (Per Serving)
It is important to consider this information as approximate and not to use it as definitive health advice.
Allergy Information
Please check ingredients for potential allergens and consult a health professional if in doubt.
Leave a Comment