
Salted Caramel Butter Bars Tasty Irresistible – just the name itself promises a dessert experience that will captivate your senses. Have you ever craved that perfect balance of sweet, salty, and utterly rich indulgence, all wrapped up in a convenient, shareable square? Prepare to embark on a culinary journey that will satisfy every last bit of that longing. Bar cookies, a beloved staple in American baking, have long been cherished for their ease of preparation and their ability to feed a crowd. They’re often found at family gatherings, potlucks, and bake sales, bringing comfort and joy to everyone who tries them.
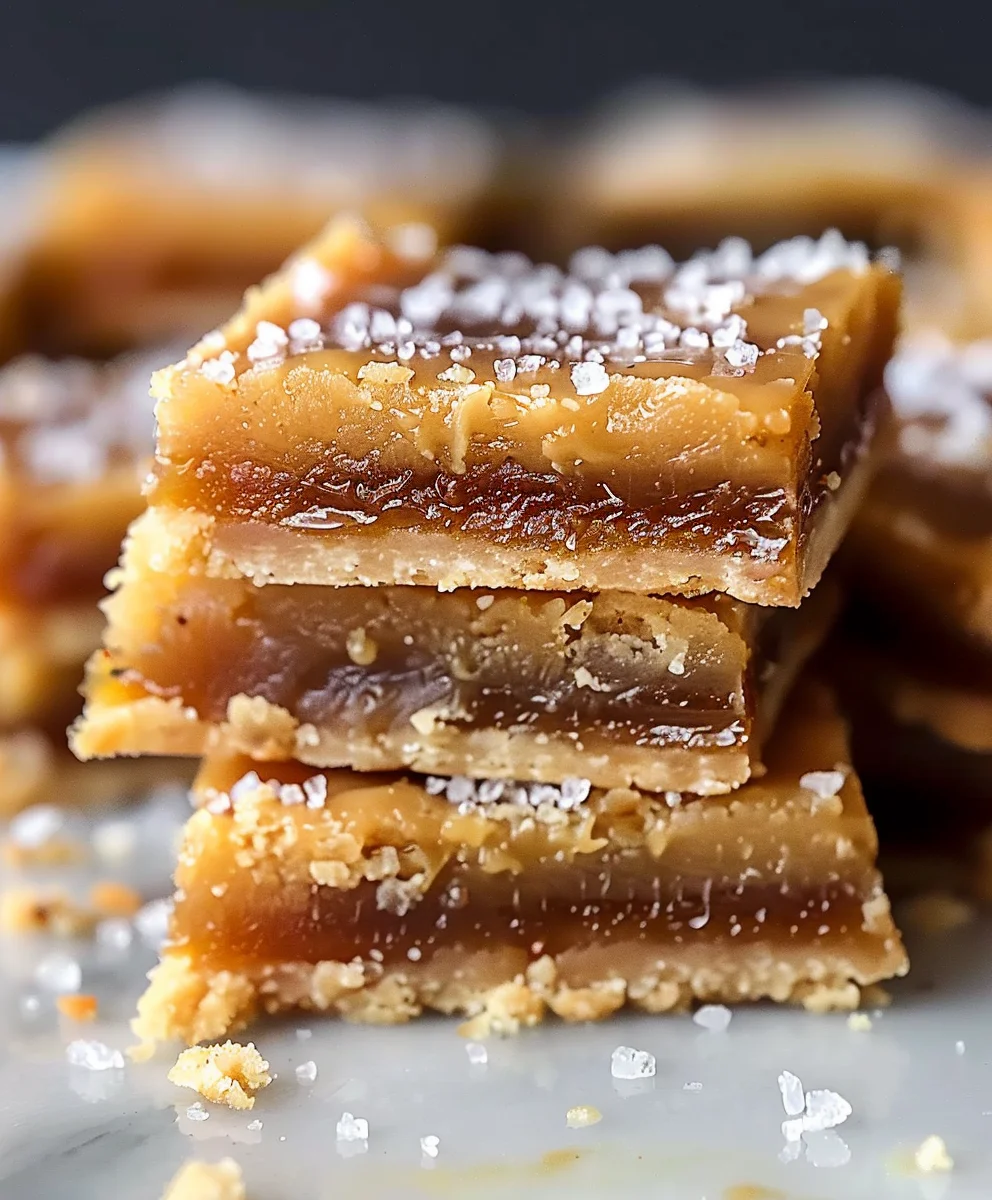
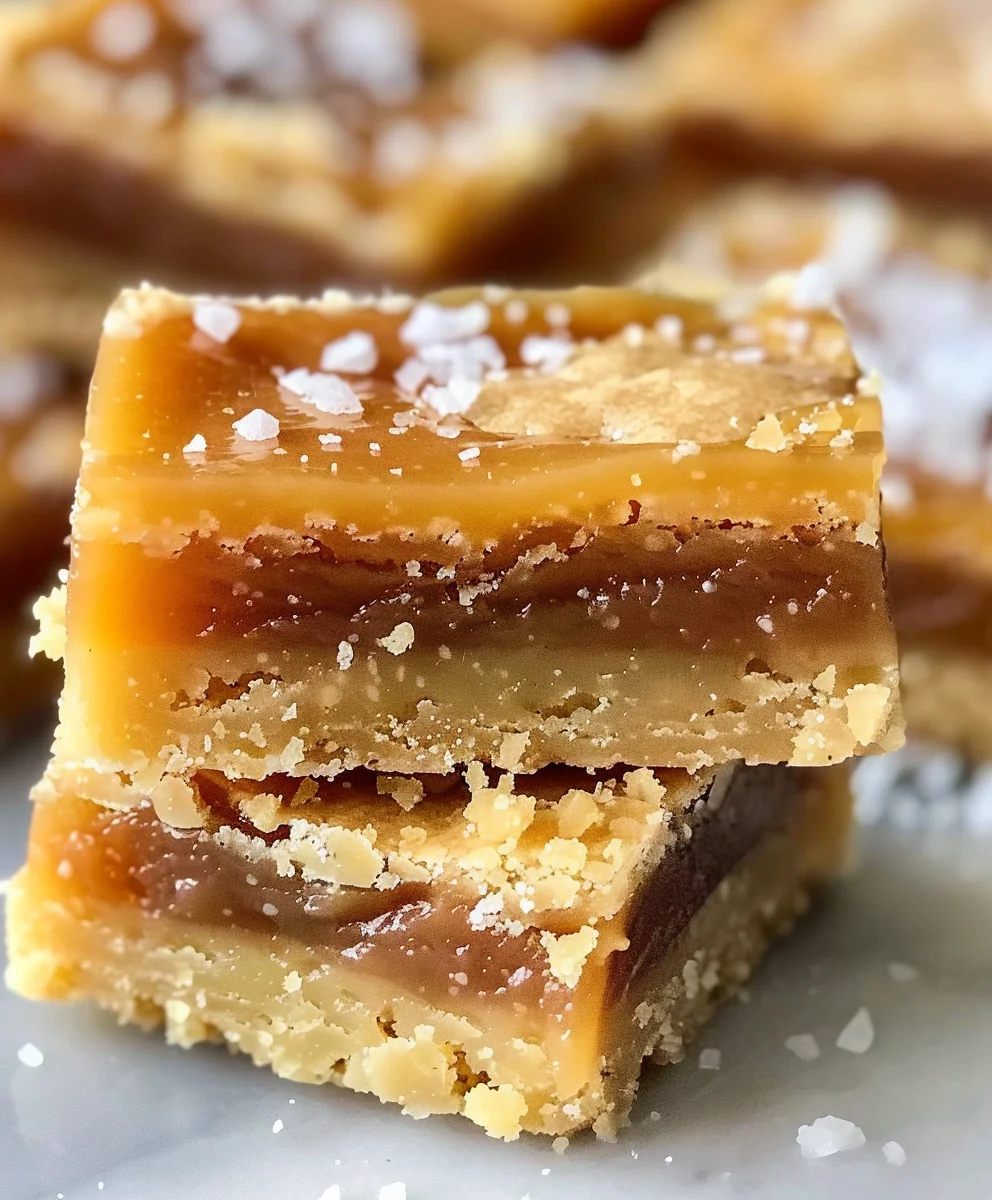
What makes this particular recipe stand out is the harmonious marriage of a tender, buttery shortbread-like base, a gooey, golden salted caramel layer, and a delicate crumble topping. It’s a symphony of textures and flavors that dance on your palate.
Why Everyone Adore These Salted Caramel Butter Bars
People adore these bars not only for their incredibly satisfying chewiness and melt-in-your-mouth quality but also for the sophisticated interplay between the deep sweetness of caramel and the subtle pop of sea salt, which elevates the entire treat. Each bite offers a blissful escape, proving once again why these Salted Caramel Butter Bars Tasty Irresistible treats have earned their place as a true favorite among dessert enthusiasts. I promise, once you try them, you’ll understand exactly what all the fuss is about!

Ingredients:
Before we embark on this delightful baking journey to create the most incredible Salted Caramel Butter Bars, let’s gather our high-quality ingredients. Using good quality butter and a rich vanilla extract will truly elevate these bars from simply delicious to absolutely irresistible. I always recommend weighing your flour for precision, as it makes a significant difference in the final texture of our glorious shortbread crust.
- For the Buttery Shortbread Crust and Streusel Topping:
- 2 ½ cups (300g) all-purpose flour, sifted
- 1 cup (226g) unsalted butter, softened to room temperature
- ¾ cup (150g) granulated sugar
- ¼ cup (50g) light brown sugar, packed
- 1 teaspoon baking powder
- ½ teaspoon fine sea salt
- 1 teaspoon pure vanilla extract
- For the Silky Salted Caramel Filling:
- 1 cup (226g) unsalted butter
- 1 cup (200g) light brown sugar, packed
- 1 (14-ounce/397g) can sweetened condensed milk
- ¼ cup (60ml) light corn syrup (this helps prevent crystallization and adds a lovely chewiness)
- 1 teaspoon fine sea salt (or more, to taste, for that perfect salted caramel balance)
- 1 teaspoon pure vanilla extract
- For Finishing:
- 1-2 teaspoons flaky sea salt, for sprinkling (the texture and burst of saltiness are divine!)
Preparing Your Workspace and Oven for Baking Bliss
- Preheat with Precision: Begin by preheating your oven to a steady 350°F (175°C). Achieving the correct oven temperature from the start is paramount for even baking and prevents your bars from becoming either undercooked or overly browned. A properly preheated oven ensures that when the baking pan enters, the crust begins to set immediately, preventing a greasy or uneven texture.
- Prepare Your Pan: Select a standard 9×13-inch (23×33 cm) baking pan. This size is ideal for the quantities provided and will yield bars of a good height. Line it meticulously with parchment paper, ensuring that the paper extends over the edges on both long sides. This thoughtful step creates “slings” that will make lifting the cooled bars out of the pan incredibly easy and mess-free. You want the parchment to cover the bottom and two opposing sides of the pan. A little spray with non-stick cooking spray before laying the parchment down can help keep it in place, though it’s not strictly necessary if you press it down firmly. This small preparation saves a lot of potential frustration when it’s time to slice and serve your finished Salted Caramel Butter Bars Tasty Irresistible treats.
- Gather Your Tools: Have your stand mixer with the paddle attachment ready, or a large mixing bowl and a handheld electric mixer if you’re mixing by hand. Also, prepare a heavy-bottomed saucepan for the caramel, and all your measuring cups and spoons. Ensure you have a rubber spatula or heat-proof spoon for stirring the caramel and an offset spatula for spreading the filling evenly. Having everything organized before you start mixing will make the process flow smoothly and enjoyable, allowing you to focus on the nuances of each step and ensuring perfect results.
Crafting the Irresistible Shortbread Crust and Streusel
The foundation of our Salted Caramel Butter Bars is a rich, tender shortbread crust that doubles as a delightful streusel topping. This part of the process is wonderfully tactile and brings together simple ingredients to form something truly special. The balance of butter and flour here is key to achieving that melt-in-your-mouth texture.
- Combine Dry Ingredients: In a large mixing bowl, or the bowl of your stand mixer, whisk together the sifted all-purpose flour, granulated sugar, light brown sugar, baking powder, and ½ teaspoon of fine sea salt. Whisking ensures that the leavening agent (baking powder) and salt are evenly distributed throughout the flour, contributing to a consistent texture in your crust. The combination of granulated and brown sugar adds both crispness and a subtle molasses note, enhancing the overall flavor profile.
- Introduce the Butter: Add the softened unsalted butter to the dry ingredients. If using a stand mixer, begin mixing on low speed with the paddle attachment until the butter is fully incorporated and the mixture resembles coarse sand or fine crumbs. If mixing by hand, you can use a pastry blender or your fingertips to cut the cold butter into the flour mixture until a crumbly texture is achieved. Be gentle and work quickly to prevent overworking the dough, which can activate the gluten and lead to a tough, rather than tender, crust. The goal here is small, even butter distribution, encapsulating the flour particles.
- Add Vanilla: Stir in the pure vanilla extract. Continue mixing until the dough starts to come together and forms moist clumps. It won’t be a smooth, cohesive dough like a typical cookie dough, but rather a shaggy, crumbly mixture that holds together when squeezed. This stage is crucial: do not overmix, as this can develop the gluten too much, resulting in a less tender shortbread. You want a texture that you can easily press together with your hands, but that still looks visibly crumbly.
- Press the Crust: Take approximately two-thirds of the shortbread mixture and evenly press it into the bottom of your prepared 9×13-inch baking pan. Use the back of a spoon, your fingers, or a flat-bottomed measuring cup to press firmly and evenly across the entire base of the pan. Pay special attention to the corners and edges to ensure a uniform thickness, which promotes even baking and prevents any thin spots that might allow caramel to seep through. This forms the perfect, sturdy base for our luxurious caramel layer, providing a delightful contrast in texture.
- Reserve Streusel: Set aside the remaining one-third of the shortbread mixture. This will become our gorgeous, crumbly streusel topping, adding another layer of delightful texture and visual appeal to our finished bars. Loosely cover it and set it aside at room temperature; there’s no need to chill it.
- Partial Bake the Crust: Place the pan with the pressed crust into your preheated oven. Bake for 15 to 18 minutes, or until the edges are lightly golden and the crust feels set and appears slightly dry on the surface. This partial baking step, often referred to as blind baking, is essential to prevent the crust from becoming soggy once the caramel filling is added. It also ensures the crust is perfectly cooked through, providing that signature buttery shortbread snap that we all love.
- Cool Slightly: Once the crust is partially baked, remove the pan from the oven and place it on a wire rack to cool slightly while you prepare the caramel filling. Keeping the crust warm enough for the caramel to spread easily, but cool enough not to cook the caramel too quickly upon contact, is key to the seamless assembly of these incredibly good bars.
The Heart of the Bars: Silky Salted Caramel Filling
Now for the star of the show – the rich, luscious, and perfectly Salted Caramel filling. This component transforms these butter bars into something truly extraordinary. Patience and attention are your best friends in this step; rushing can lead to a less than ideal caramel. The depth of flavor we’re building here is what makes these bars so incredibly moreish.
- Combine Caramel Ingredients (Except Vanilla): In a heavy-bottomed saucepan, combine the 1 cup of unsalted butter, 1 cup of packed light brown sugar, the can of sweetened condensed milk, and the ¼ cup of light corn syrup. Using a heavy-bottomed saucepan is important as it distributes heat more evenly, significantly reducing the risk of scorching the caramel. The light corn syrup is a crucial addition; it helps prevent the sugar from crystallizing, ensuring a smooth, velvety texture, and also contributes to the delightful chewiness of the finished caramel.
- Melt and Stir: Place the saucepan over medium heat. Stir constantly with a whisk or a heat-proof spatula until the butter has melted and the sugar has completely dissolved. Continue stirring as the mixture comes to a gentle boil. Constant stirring is vital in the early stages to ensure everything melts together smoothly and uniformly, preventing sugar from sticking to the bottom of the pan and burning.
- Simmer and Thicken: Once boiling, reduce the heat to medium-low and continue to simmer, stirring frequently to prevent sticking and burning. This simmering process should take approximately 5 to 7 minutes. During this time, the caramel will thicken considerably. You’re looking for a consistency where it coats the back of a spoon and when you drag your spatula through it, it leaves a trail for a few seconds before the caramel fills it in. If you have a candy thermometer, you’re aiming for 220°F (104°C) – the soft-ball stage. However, it’s entirely achievable without one by observing the texture and thickness. Do not rush this step; proper cooking ensures a chewy, set caramel, not a runny one. The caramel should be visibly thicker and a deeper golden-brown color.
- Remove from Heat and Finish: Once the caramel has reached the desired thickness, immediately remove the saucepan from the heat. Stir in the 1 teaspoon of fine sea salt and the 1 teaspoon of pure vanilla extract. Stir until they are fully incorporated. The salt is crucial here; it provides the beautiful contrast that makes these “Salted Caramel” Butter Bars so incredibly balanced and addictive. The vanilla adds depth and warmth to the rich caramel flavor, complementing its sweetness without overpowering it.
Assembling Your Delicious Salted Caramel Butter Bars
With our perfectly baked crust and velvety caramel ready, it’s time to bring all the elements together to create these truly tasty irresistible bars. This is where the magic really starts to happen, layering textures and flavors.
- Pour the Caramel: Carefully and evenly pour the warm salted caramel filling over the partially baked shortbread crust in the pan. Use an offset spatula or the back of a spoon to gently spread the caramel to cover the crust from edge to edge. Work quickly but gently, as the caramel will start to set as it cools. Ensure an even layer so that every bite of your bar has a consistent ratio of caramel.
- Crumble the Streusel Topping: Take the reserved shortbread crumble mixture (your streusel) and sprinkle it evenly over the caramel layer. Don’t press it down; simply let the crumbles fall naturally. The varied sizes of the crumbles will bake up beautifully, creating pockets of crisp, buttery texture against the soft caramel. Aim for good, even coverage across the entire surface of the caramel.
- Add Flaky Sea Salt: This is a step I never skip, and it truly distinguishes these bars! Generously sprinkle 1 to 2 teaspoons of flaky sea salt over the streusel topping. The larger crystals of flaky sea salt not only add a beautiful visual appeal but also provide delightful bursts of intense saltiness that perfectly cut through the sweetness of the caramel, making every bite a complex dance of flavors. This is what truly makes them Salted Caramel Butter Bars, elevating them from good to truly exceptional!
Baking to Golden Perfection
The final baking stage ensures that the caramel sets perfectly, the streusel becomes golden and crisp, and all the flavors meld together harmoniously. This last stretch in the oven brings everything together into a cohesive, delicious treat.
- Return to the Oven: Carefully place the assembled pan back into your preheated 350°F (175°C) oven. Ensure it’s positioned on the middle rack for optimal heat distribution, promoting even baking of both the streusel and the caramel.
- Bake Until Golden: Bake for an additional 20 to 25 minutes, or until the streusel topping is a beautiful golden brown and the caramel filling appears set, with perhaps just a slight jiggle in the very center when you gently shake the pan. The edges of the caramel may bubble slightly, which is perfectly normal. Keep a close eye on the bars as oven temperatures can vary significantly. If you notice one side browning faster than the other, rotate the pan halfway through baking to ensure uniform golden perfection across the entire surface.
- Visual Cues for Doneness: The streusel will be visibly browned and crisp, providing textural contrast. The caramel underneath will look firm, not watery or overly liquid, indicating it has properly set and will hold its shape once cooled. A toothpick inserted into the streusel (avoiding the caramel layer itself) should come out clean.
Cooling and Slicing Your Tasty Irresistible Treats
Patience is perhaps the hardest, yet most important, ingredient at this stage. Proper cooling is absolutely essential for perfectly set, clean-cut bars that maintain their integrity and deliver the best possible eating experience.
- Cool Completely on a Wire Rack: Once baked, remove the pan from the oven and place it on a wire rack. Let the bars cool completely at room temperature for at least 2 to 3 hours. Resist the urge to cut them while warm! The caramel needs ample time to cool down and firm up. If you try to slice them too early, the caramel will ooze out, making a sticky mess and preventing neat squares. This extended cooling period is critical for the structural integrity of your Salted Caramel Butter Bars Tasty Irresistible, ensuring that delightful chewy texture without being runny.
- Chill for Easier Slicing: For the cleanest cuts, once the bars have cooled completely to room temperature, transfer the pan to the refrigerator and chill for at least 1 to 2 hours, or even overnight. This chilling step firms up both the buttery crust and the caramel even further, making them much easier to slice without crumbling or sticking to your knife. This ensures beautifully defined edges for each bar.
- Lift and Slice: Once thoroughly chilled, use the parchment paper overhangs (your handy slings!) to carefully lift the entire slab of bars out of the pan and transfer it to a sturdy cutting board. This method completely eliminates the struggle of trying to pry bars out of the pan and keeps them intact.
- The Perfect Cut: Use a large, sharp knife to slice the bars. For the neatest slices, I like to warm my knife under hot water, wipe it completely clean and dry, and then make a single, decisive cut. Repeat this warming and wiping process for each slice. This technique prevents the caramel from sticking to the knife and creates beautifully defined, clean-edged pieces. You can cut them into 24 squares (4 rows by 6 rows) or even smaller bite-sized pieces, depending on your preference and how many people you plan to share these glorious treats with. Each piece will be a little bite of pure joy!
- Storage: Store your finished Salted Caramel Butter Bars in an airtight container at room temperature for up to 3-4 days, or in the refrigerator for up to a week. If storing in the refrigerator, allow them to come to room temperature for about 15-20 minutes before serving for optimal texture. They can also be frozen for longer storage (up to 2-3 months); just thaw at room temperature before serving. They maintain their delightful chewiness and intense flavor wonderfully, making them perfect for preparing ahead of time for gatherings or simply for enjoying as a spontaneous treat.
And there you have it! A batch of truly Salted Caramel Butter Bars Tasty Irresistible, ready to be devoured. The perfect contrast between the crisp, buttery shortbread, the rich, chewy salted caramel, and the crunchy streusel, all finished with a delicate sprinkle of flaky sea salt, creates an unforgettable dessert experience. This is a recipe that will undoubtedly become a treasured favorite. Enjoy every single glorious bite!
Conclusion:
Well, we’ve reached the sweet end of our journey, and I genuinely hope you’re feeling as excited as I am about these incredible treats. If there’s one recipe you absolutely have to add to your baking repertoire this year, it’s this one. What makes these bars so phenomenal, you ask? It’s that perfect alchemy of rich, buttery shortbread crust, yielding just the right amount of delightful chewiness, paired with a gooey, luscious caramel center that practically melts in your mouth. Then, just when you think it couldn’t get any better, a delicate sprinkle of sea salt cuts through the sweetness, elevating every single bite into an experience of pure bliss. I’ve made countless desserts in my time, but these truly stand out. They’re not just a dessert; they’re an event, a comforting hug in food form, and an instant mood lifter. The balance of textures and flavors is simply unparalleled, making them universally loved by anyone lucky enough to try them. I promise you, these are the kind of bars that disappear from the plate in record time, leaving everyone asking for the recipe. They are, in every sense of the word, a masterpiece of home baking.
Now, while these bars are absolutely divine straight out of the pan once cooled, allow me to share a few ways to elevate your experience even further. For an ultimate indulgence, try serving them slightly warm, perhaps after a quick zap in the microwave. The caramel becomes even gooier, and the butter crust softens just enough to create an incredibly tender bite. Imagine pairing that with a scoop of premium vanilla bean ice cream, allowing the cold creaminess to contrast beautifully with the warm, salty-sweet bar. Oh, my goodness, it’s truly heavenly! A dollop of fresh whipped cream also works wonders, adding another layer of light, airy sweetness. And for the coffee lovers out there, these bars are the quintessential accompaniment to a freshly brewed cup of espresso or a creamy latte. The robust bitterness of coffee is the perfect foil to the bar’s delightful sweetness.
Feeling adventurous? There are so many ways you can customize these to make them uniquely yours. Consider stirring in a handful of toasted pecans or walnuts into the caramel layer before baking for an added textural crunch and nutty flavor dimension. You could also experiment with different chocolate drizzles – a dark chocolate drizzle would add a sophisticated bitter note, while a white chocolate drizzle would enhance the creamy sweetness. For a subtle spice kick, a tiny pinch of cinnamon or cardamom mixed into the shortbread dough can introduce an unexpected warmth. And for those with dietary considerations, this recipe is surprisingly adaptable. You can often achieve excellent results using gluten-free all-purpose flour blends in the crust, and with a bit of research, dairy-free butter substitutes and condensed coconut milk can transform this into a treat for everyone. Don’t be afraid to play around; that’s where the real magic of home baking happens!
So, there you have it. My heartfelt plea to you is this: please, please give these a try. Don’t let the simplicity of the ingredients fool you; the result is nothing short of spectacular. Baking should be a joyful, rewarding experience, and I promise you, seeing the smiles on the faces of those who taste these will be your greatest reward. There’s a certain magic that happens when simple ingredients come together to create something truly extraordinary, and these bars embody that magic perfectly. Once you’ve baked your batch, I would absolutely love to hear about your experience. Did you stick to the recipe, or did you put your own unique spin on it? Share your photos, your triumphs, and your delightful anecdotes in the comments below or on social media. Let’s spread the joy of these truly special treats far and wide! I am confident that once you’ve experienced them for yourself, you’ll agree these are truly the Salted Caramel Butter Bars Tasty Irresistible everyone needs in their life. Happy baking, my friends!
Tasty Salted Caramel Butter Bars: Simply Irresistible!
These Salted Caramel Butter Bars offer a perfect balance of sweet, salty, and rich indulgence. Featuring a tender, buttery shortbread-like base, a gooey, golden salted caramel layer, and a delicate crumble topping, they are incredibly satisfying and a true favorite among dessert enthusiasts.
Ingredients
-
1 lb (2 cups) unsalted butter, softened
-
1 cup granulated sugar
-
1 ½ cups powdered sugar
-
2 tablespoons vanilla extract
-
4 cups all-purpose flour
-
1 (14 oz) bag caramel candies, unwrapped (or 2 cups soft caramel bits)
-
⅓ cup heavy cream
-
½ to 1 teaspoon coarse sea salt (for caramel)
-
1-2 teaspoons coarse sea salt (for topping)
Instructions
-
Step 1
Preheat oven to 350°F (175°C). Line a 9×13-inch baking pan with parchment paper, leaving overhangs on two sides. -
Step 2
In a large bowl, cream together 1 cup softened unsalted butter, 1 cup granulated sugar, and ½ cup powdered sugar until light. Beat in 1 tablespoon vanilla extract. Gradually add 4 cups all-purpose flour and ½ tsp of the coarse sea salt, mixing until a crumbly dough forms. -
Step 3
Press two-thirds of the dough evenly into the prepared pan for the crust. Bake for 15-18 minutes until lightly golden. Reserve the remaining one-third of the dough for the streusel topping. -
Step 4
In a heavy-bottomed saucepan, melt the remaining 1 cup unsalted butter with the remaining 1 cup powdered sugar. Stir in the unwrapped caramel candies and ⅓ cup heavy cream. Cook over medium-low heat, stirring until caramels are completely melted and smooth. Remove from heat and stir in 1 tablespoon vanilla extract and ½ to 1 teaspoon coarse sea salt. -
Step 5
Pour the warm caramel filling evenly over the partially baked crust. Crumble the reserved dough mixture (streusel) evenly over the caramel layer. Generously sprinkle 1-2 teaspoons of coarse sea salt over the streusel. -
Step 6
Return the pan to the oven and bake for an additional 20-25 minutes, or until the streusel is golden brown and the caramel is set. Cool completely on a wire rack for 2-3 hours. For cleaner cuts, chill in the refrigerator for 1-2 hours or overnight. -
Step 7
Lift the cooled slab from the pan using the parchment paper overhangs. Slice into 24 squares using a sharp knife, warming and wiping the knife between cuts for best results. Store in an airtight container.
Important Information
Nutrition Facts (Per Serving)
It is important to consider this information as approximate and not to use it as definitive health advice.
Allergy Information
Please check ingredients for potential allergens and consult a health professional if in doubt.
Leave a Comment