
Spooky Baked Halloween Chips are here to elevate your holiday snacking experience from simply delightful to absolutely enchanting! As October approaches, we all look for ways to infuse that festive, eerie spirit into every corner of our celebrations, especially when it comes to food. While Halloween has a rich history steeped in ancient traditions and modern trick-or-treating, the joy of sharing themed treats remains a timeless delight. I’ve discovered that these unique chips capture the very essence of the season, transforming a simple snack into a memorable occasion.
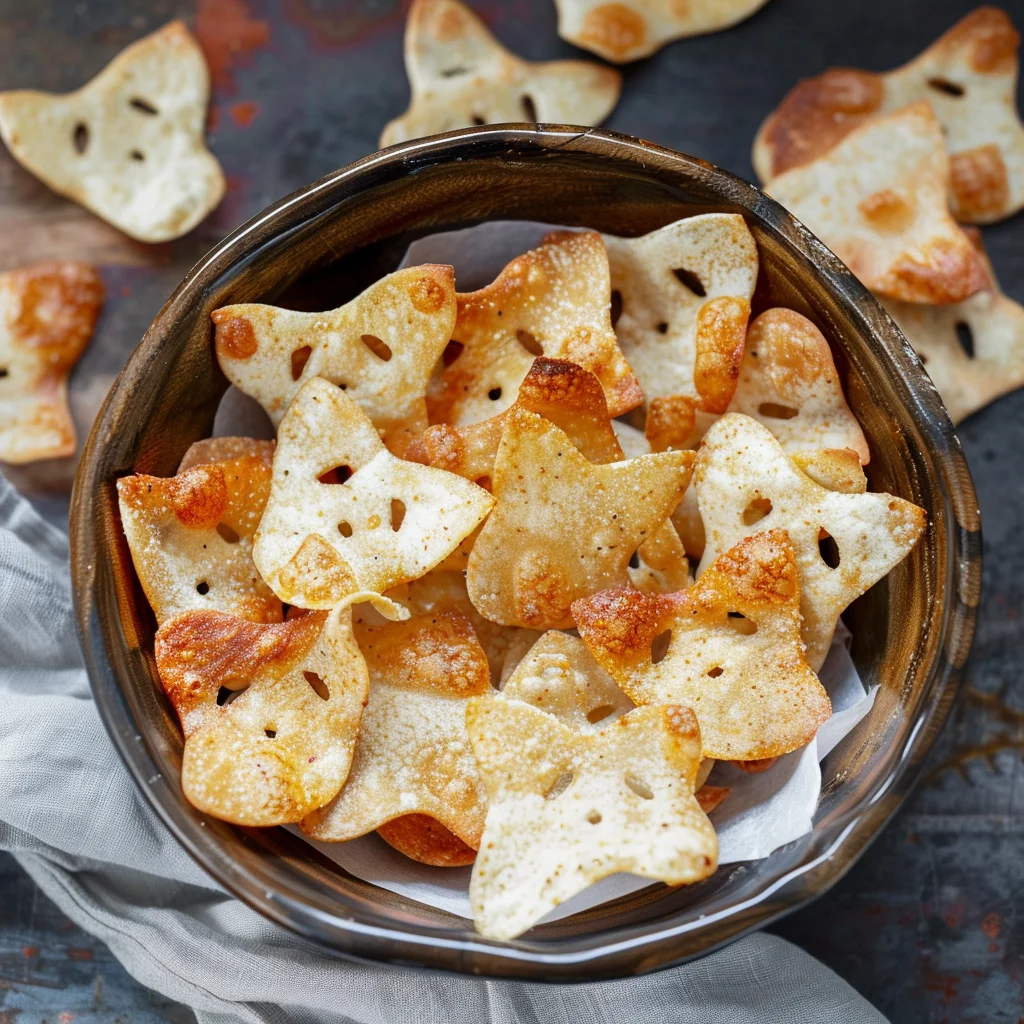
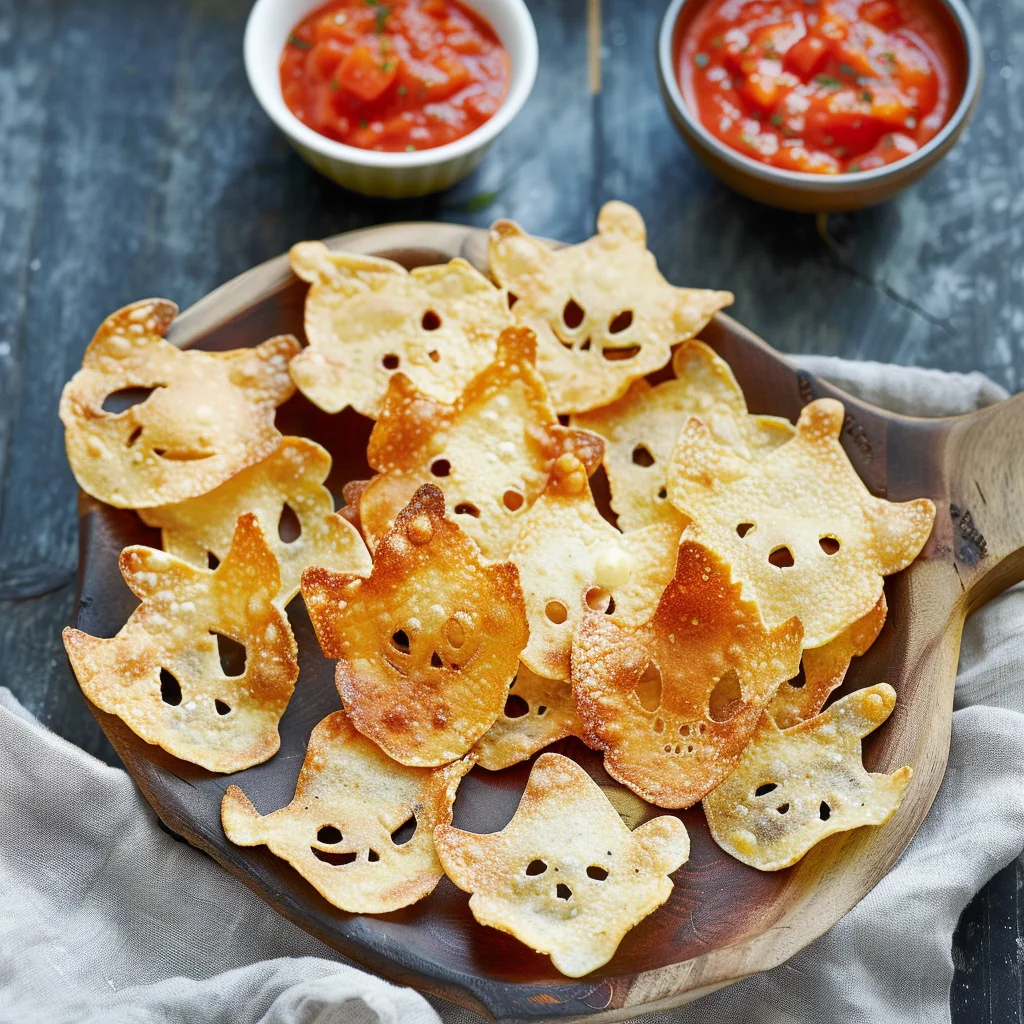
People absolutely adore these chips not just for their incredibly satisfying crunch and delicious, customizable flavors, but primarily for their undeniable charm and visual appeal. Imagine little ghosts, bats, or pumpkins peeking out from your snack bowl, inviting both kids and adults alike to dive in! They offer a fantastic, savory alternative to traditional sugary confections, providing a crispy, satisfying treat that’s surprisingly easy to prepare. Whether you’re hosting a ghoulish gathering or simply enjoying a scary movie night at home, these Spooky Baked Halloween Chips are an absolute must-have for their convenience, festive spirit, and irresistible taste.

Ingredients:
- 12-16 large (10-inch) flour tortillas: I find these work wonderfully for making a generous batch of chips, and their size allows for cutting plenty of spooky shapes. You can also use smaller ones for variety, just adjust your yield expectations.
- 2-3 tablespoons olive oil or neutral vegetable oil: This is our magic ingredient for crispiness and carrying flavor. I often lean towards olive oil for its subtle depth, but any neutral oil you have on hand will do the trick beautifully.
- 1 teaspoon fine sea salt: Essential for bringing out all the savory goodness. Fine salt adheres well and distributes evenly.
- ½ teaspoon garlic powder: A foundational flavor that truly elevates the chips. Don’t skip this one!
- ½ teaspoon onion powder: Complements the garlic powder perfectly, adding another layer of savory deliciousness.
- ¼ teaspoon smoked paprika: I adore the rich, smoky warmth this adds. Sweet paprika is also a great choice if you prefer a less smoky profile.
- ¼ teaspoon chili powder: For a very mild, approachable hint of warmth. Adjust to your preference – you can increase it or even add a pinch of cayenne for more kick!
- ¼ teaspoon ground cumin: This spice brings an earthy, aromatic note that makes these chips incredibly moreish.
- Optional: Gel food coloring (black, orange, purple, or green): For that truly “Spooky Baked Halloween Chips” vibe! Gel colors are best as they are highly concentrated and won’t thin out your oil too much.
Equipment You’ll Need:
- Halloween-themed cookie cutters: Think ghosts, pumpkins, bats, skulls, witches’ hats – let your imagination run wild! A variety of sizes adds to the fun.
- Large baking sheets: You’ll need at least two, possibly more, to ensure you can bake your chips in a single layer.
- Parchment paper: An absolute lifesaver for non-stick baking and easy cleanup. Trust me, you’ll thank yourself for using it!
- Pastry brush or spray bottle: For evenly coating your tortilla shapes with oil. I find a brush gives me more control over the distribution.
- Small bowls: Handy for mixing your oil and spice blends, especially if you’re making different colored batches.
- Wire cooling racks: Crucial for allowing your chips to cool completely and maintain maximum crispness.
Phase 1: Preparing Your Spooky Shapes
-
Preheat and Prepare Your Baking Stations:
Before we even think about cutting, let’s get our oven ready. I always start by preheating my oven to 375°F (190°C). This ensures a consistent temperature from the moment your chips go in, which is key for even baking. While the oven preheats, I line two large baking sheets with parchment paper. This simple step makes cleanup a breeze and prevents any sticking, which is especially important when dealing with delicate tortilla shapes. Make sure the parchment paper lies flat against the pan for the best results.
-
Unleash Your Inner Artist with Tortilla Cutting:
Now for the fun part! Lay one flour tortilla flat on a clean work surface. Grab your assortment of Halloween-themed cookie cutters. I like to start with the largest cutters first to maximize the number of shapes I can get from each tortilla. Press firmly to cut out your shapes. Try to get as many shapes as possible from each tortilla by placing your cutters close together, but be careful not to overlap them. I typically get anywhere from 5-10 shapes per large tortilla, depending on the size of my cutters. Gather the tortilla scraps; while they don’t reroll well for more chips, they can be fried or baked separately into savory croutons for soup if you’re feeling adventurous. Repeat this process with all your tortillas until you have a mountain of spooky shapes ready for their transformation. This stage is fantastic for involving kids (with supervision, of course!), as they love picking out the shapes.
-
Arrange Your Shapes for Optimal Baking:
Carefully transfer your cut tortilla shapes to the prepared baking sheets, arranging them in a single layer. This is a crucial step for achieving uniformly crispy chips. If your shapes are overlapping or too crowded, they will steam instead of crisp, leading to soft spots. I always give each shape a little breathing room, about ½ to 1 inch apart. Depending on the size of your shapes and baking sheets, you will likely need to use both prepared sheets and possibly bake in batches. Don’t rush this part; patience here pays off in perfectly crunchy chips!
Phase 2: Flavoring and Coloring Your Chips
-
Crafting the Savory Seasoning Blend:
In a small bowl, I combine the olive oil (or vegetable oil) with all of our wonderful dry seasonings: the fine sea salt, garlic powder, onion powder, smoked paprika, chili powder, and ground cumin. Give this mixture a good stir with a fork or a small whisk until all the spices are thoroughly incorporated into the oil. The oil acts as a carrier, ensuring the flavors adhere beautifully to our tortilla shapes. This blend is the heart of our “Spooky Baked Halloween Chips” flavor profile, delivering a delicious, savory punch that is universally appealing.
-
Adding the Spooky Colors (Optional but Highly Recommended!):
If you’re going for that extra visual Halloween punch, this is where the magic happens! If you want different colored chips, you’ll need to divide your oil and spice mixture into separate small bowls. For example, if I want black and orange chips, I’ll pour half of my oil mixture into one bowl and the other half into another. Then, add a small drop or two of your chosen gel food coloring to each bowl. Remember, a little gel goes a very long way! Stir each colored mixture thoroughly until the color is evenly distributed and vibrant. I personally love making a batch of “pitch black” chips and another of “vibrant orange” for that classic Halloween contrast. You could also do eerie purples or slimy greens!
-
Brushing on the Flavor and Color:
Now it’s time to coat our tortilla shapes. Using a pastry brush, I gently and evenly brush a thin layer of the seasoned oil mixture over the top surface of each tortilla shape. Make sure every part of the chip gets a light coating. You don’t want to drench them, as too much oil can make them greasy, but enough to carry the flavor and ensure crispiness. If you’re using multiple colors, be mindful to keep your brushes separate for each color, or clean thoroughly between uses, to avoid mixing. Alternatively, if you don’t have a pastry brush, you can put the seasoned oil in a clean spray bottle and lightly mist the chips, but I find the brush gives better, more even coverage, especially with the added food coloring. Flip the chips over and repeat the brushing process on the other side. Ensuring both sides are coated evenly is crucial for consistent crispness and flavor throughout the entire chip.
Phase 3: Baking Your Halloween Chips to Perfection
-
Into the Oven They Go:
Carefully place your baking sheets, laden with their colorful and spiced spooky shapes, into your preheated 375°F (190°C) oven. If you’re baking multiple sheets at once, I like to place one on the upper rack and one on the lower rack to promote even circulation.
-
The Initial Bake for Crispness:
Allow your chips to bake for 8-10 minutes. During this initial phase, they will start to firm up and lightly crisp. I always peek through the oven door or quickly open it to check on their progress around the 7-minute mark. You’re looking for them to start turning a very light golden brown around the edges, or for the colored ones, to simply look dry and set. This is not the final stage, but an important foundational bake.
-
The Crucial Flip and Final Bake:
After the initial 8-10 minutes, carefully remove the baking sheets from the oven. Using tongs or a small spatula, gently flip each chip over. This step is incredibly important for ensuring both sides get equal exposure to the heat, leading to that coveted, uniform crispness. Once flipped, return the baking sheets to the oven for another 5-8 minutes. Keep a very close eye on them during this final stage, as tortillas can go from perfectly golden to burnt very quickly. Look for them to be a deeper golden brown and feel firm when gently pressed. If some are smaller or thinner, they might be ready sooner than others, so don’t hesitate to remove any perfectly crispy chips from the oven as they finish. The key here is vigilance!
-
Cooling for Ultimate Crunch:
Once your Spooky Baked Halloween Chips are beautifully golden, firm, and thoroughly crispy, carefully transfer them from the hot baking sheets to wire cooling racks. This is another step you absolutely do not want to skip! Cooling on a wire rack allows air to circulate around all sides of the chips, preventing condensation from forming on the bottom and making them soggy. As they cool, they will become even crispier. Allow them to cool completely, which usually takes about 15-20 minutes, before serving or storing. I often find myself sneaking a warm one right off the rack, but the full crunch develops once they’ve had time to cool down.
Phase 4: Serving Your Spooky Baked Halloween Chips
-
Presenting Your Spooky Snack:
Once completely cooled, your Spooky Baked Halloween Chips are ready to be the star of your Halloween party spread! I love to arrange them artfully on a large platter or in a spooky-themed bowl. Mix and match your colors and shapes for an even more visually appealing display. These chips are not just delicious; they are a conversation starter and a feast for the eyes. They are perfect served alongside your favorite Halloween-themed dips! Imagine vibrant green guacamole, a blood-red salsa, or even a creamy orange queso. While I’m not providing dip recipes here, just know that these chips are robust enough to handle any dip you throw their way.
-
Storage for Future Haunts:
If by some miracle you have any leftover chips (which rarely happens in my house!), they can be stored in an airtight container at room temperature for up to 3-4 days. To maintain their crispness, I sometimes add a paper towel to the bottom of the container to absorb any residual moisture. While they are always best enjoyed fresh out of the oven, they will still be delightfully crunchy for a few days. If they lose a bit of their crispness, a quick 3-5 minute refresh in a 300°F (150°C) oven can bring them back to life. Just let them cool on a wire rack afterward to re-crisp.
Tips for the Ultimate Spooky Snack:
- Don’t Overcrowd the Pan: I cannot stress this enough! Giving your chips space on the baking sheet is the single most important factor for achieving maximum crispiness. Overlapping chips will steam, leading to a chewy rather than crunchy texture. If you have a lot of shapes, bake in multiple batches.
- Thin Tortillas are Your Friend: While large flour tortillas work well, I find that thinner tortillas generally yield crispier chips. If you have a choice, opt for the thinner variety.
- Experiment with Spice Blends: My provided spice blend is a fantastic starting point, but don’t be afraid to make it your own! A little smoked paprika adds a wonderful depth, or you could go spicier with a touch of cayenne pepper. For a sweeter Halloween treat, skip the savory spices and instead brush with oil, then sprinkle with cinnamon sugar before baking.
- Listen to Your Oven: Every oven is a little different, so the baking times are approximate. Keep a close watch, especially during the last few minutes. If you smell them before you see them, they might be getting too dark!
- Cool Completely: As mentioned, cooling on a wire rack is non-negotiable for the best texture. Resist the urge to snack on them all right away!
- The Power of the Brush: A good pastry brush allows for an even, thin coating of oil and spices. This is key to getting uniform flavor and crunch across every chip. If you don’t have one, try using the back of a spoon to spread a very small amount of oil, then sprinkle the spices, but the brush is genuinely superior for this task.
Troubleshooting Common Chip Baking Issues:
- My Chips Are Soggy/Chewy: This is almost always due to overcrowding the baking sheet or not baking them long enough. Ensure they are in a single layer with space between them. Also, make sure they are thoroughly baked until firm and slightly browned, and always cool them on a wire rack. High humidity in your kitchen can also contribute; if it’s a very humid day, they might take a few extra minutes in the oven.
- My Chips Are Burnt on the Edges but Soft in the Middle: Your oven might be too hot, or you might have left them in too long without flipping. Try reducing the temperature by 25°F and ensure you flip them midway through baking. Smaller chips will cook faster, so remove them as soon as they are done.
- My Spices Aren’t Sticking: Make sure your oil coating is even and applied to both sides. The oil is the “glue” for your spices. If the tortillas are too dry, the spices won’t adhere properly. Also, make sure the oil isn’t too thick, as excess oil can cause spices to clump.
- My Colors Aren’t Vibrant: Gel food coloring is essential for deep, rich colors without adding too much liquid. If using liquid food coloring, you’ll need significantly more, and it might make your chips a bit less crisp. Ensure your coloring is fully mixed into the oil before brushing.
Unleashing Your Creativity with Spooky Baked Halloween Chips:
Beyond the basic recipe, there’s so much room to play and truly make these Spooky Baked Halloween Chips your own. Here are a few ideas to spark your imagination:
- Flavor Variations Galore:
- Spicy Fiend Chips: Amp up the heat by adding a ¼ teaspoon of cayenne pepper or even a dash of ghost pepper powder (use with extreme caution!). You could also sprinkle them with a little chipotle powder for a smoky, spicy kick.
- Herb Garden Ghoul Chips: Instead of the chili powder and cumin, try incorporating dried herbs like a pinch of dried oregano, a touch of thyme, or even some Italian seasoning for a different profile.
- Cheesy Phantom Chips: For a cheesy twist, after brushing with oil, sprinkle a very fine grating of Parmesan cheese before baking. Be careful, as cheese can brown quickly. Alternatively, a sprinkle of nutritional yeast can give a cheesy flavor without dairy.
- Sweet & Spooky Cinnamon Sugar Chips: Skip all the savory spices. Instead, after oiling, sprinkle generously with a mixture of cinnamon and sugar (about 2 teaspoons sugar to ½ teaspoon cinnamon). These are fantastic with a fruit salsa or a cream cheese dip!
- Dip Pairings that Delight and Fright:
- Classic Guacamole: The green of fresh guacamole is naturally eerie and delicious with these chips.
- Salsa Roja “Blood” Dip: A homemade or store-bought salsa looks wonderfully like blood and provides a fantastic counterpoint to the savory chips.
- Pumpkin Patch Queso: A warm, cheesy queso, perhaps tinted orange with a tiny bit of food coloring or made with real pumpkin puree, would be an irresistible pairing.
- Spiderweb Dip: Layer a creamy dip (like a sour cream and onion dip) in a shallow bowl, then pipe concentric circles of black olive tapenade or balsamic glaze on top. Drag a toothpick from the center outwards to create a spiderweb design. Your spooky chips will be perfect for scooping!
- Serving Suggestions for a Hauntingly Good Party:
- Chip and Dip Graveyard: Arrange your chips upright in a platter of your favorite dip, making them look like tombstones in a graveyard.
- Mummy Dogs Wrapper: Use longer, strip-cut chips to wrap around mini hot dogs, baking them together for “mummy dogs” – though that’s a different recipe, the concept of using these as a component is fun!
- Edible Decorations: Use your spooky shapes as edible garnishes for other Halloween dishes, like sticking a small bat chip into a bowl of chili or a ghost chip onto a deviled egg.
There you have it! A comprehensive guide to creating the most festive and delicious Spooky Baked Halloween Chips that are sure to be a hit at any ghoulish gathering. Happy baking, and happy Halloween!
Conclusion:
As we wrap up our culinary adventure, I truly hope you’re feeling as inspired as I am about these incredible Spooky Baked Halloween Chips. I genuinely believe this recipe is an absolute game-changer for your Halloween festivities, and honestly, for any time you crave a uniquely flavored, wonderfully crunchy, and visually striking snack. Forget those store-bought, often greasy, alternatives; my version offers a wholesome, yet utterly addictive, crunch that will have everyone reaching for more. What makes these chips a definitive must-try is not just their playful, festive appearance, which is undeniably charming and perfect for setting a Halloween mood, but also their incredible versatility and the sheer joy they bring to the table.
Why These Chips Are a Must-Try Treat!
They’re remarkably simple to prepare, making them an ideal project for even novice bakers or a fantastic activity to share with younger family members eager to get involved in the kitchen. Imagine the delight on faces as they discover these curiously shaped, perfectly seasoned bites! It’s a fantastic way to add a personalized, homemade touch to your celebration, moving beyond the usual sweets and offering something savory that truly stands out. Every single bite delivers a burst of flavor that perfectly complements the satisfying crispness, making them an instant crowd-pleaser and a standout addition to any snack spread. The aroma filling your kitchen as these bake is an added bonus, setting a wonderfully festive atmosphere even before the first chip is crunched. They embody everything a great snack should be: easy, delicious, and undeniably fun. These aren’t just chips; they’re an experience, a conversation starter, and a delightful way to celebrate the spooky season with flair.
Unleash Your Creativity: Serving Suggestions and Delicious Variations
But the magic of these chips doesn’t stop at their initial deliciousness. One of my favorite aspects is how incredibly adaptable they are, offering endless possibilities for serving and customization. For a truly unforgettable experience, I highly recommend pairing your freshly baked chips with a vibrant, homemade guacamole – the creamy, zesty freshness provides a beautiful contrast to the savory crunch of the chips. A robust salsa, whether mild or spicy, also makes an excellent companion, adding a juicy, tangy counterpoint that elevates every bite. Don’t shy away from a warm, bubbly cheese dip; a rich, gooey cheddar or a spicy queso would transform these into a truly indulgent treat, perfect for a cozy movie night or a lively party. For those who love a bit of culinary adventure, consider turning them into individual nacho platters! Simply arrange your chips, sprinkle with shredded cheese, a dollop of chili, diced tomatoes, and maybe a few jalapeño slices, then pop them under the broiler until the cheese is melted and bubbly.
You can even experiment with sweet variations if you’re feeling adventurous – perhaps a sprinkle of cinnamon sugar post-baking, served with a fruit dip, creating a delightful dessert chip that’s just as captivating. Think about dipping them into a smooth, decadent chocolate ganache for a truly unexpected Halloween dessert. The shapes themselves invite creativity; beyond traditional Halloween motifs, consider using cookie cutters for other holidays or themes – stars for patriotic events, hearts for Valentine’s, or even mini pumpkins for Thanksgiving! The spices can also be tweaked: a touch of smoked paprika for depth, a pinch of garlic powder for a savory kick, or even a dash of cayenne for a fiery edge. You could even incorporate dried herb blends for an earthy flavor profile. The beauty is in making them truly yours, tailoring them to your taste preferences and the specific occasion. These chips are a blank canvas for your culinary imagination, making every batch a unique creation.
Your Turn to Create and Share!
So, now that you’re armed with all the tips and tricks, I implore you to roll up your sleeves and give these fantastic chips a try! There’s something incredibly rewarding about seeing your culinary creations come to life, especially when they’re as fun and flavorful as these. I promise you, the effort is minimal, but the payoff in terms of taste and visual appeal is immense. Imagine the compliments you’ll receive when you unveil a platter of these homemade delights! Don’t just take my word for it; experience the magic yourself. When you do embark on this delightful baking journey, I would absolutely love to hear all about it. Share your successes, your creative twists, and especially your photos! Seeing your unique interpretations and the joy these chips bring to your celebrations truly makes my day. Whether you serve them at a grand Halloween bash or enjoy them during a quiet spooky movie night, these chips are guaranteed to be a hit. Please feel free to share your experiences and how your family and friends reacted. Happy baking, happy snacking, and most importantly, have a wonderfully delicious and spectacularly spooky Halloween!
Spooky Baked Halloween Chips: Crispy & Easy Party Snack!
Spooky Baked Halloween Chips are a fun, easy, and crispy snack perfect for holiday parties or movie nights. These charming, custom-shaped chips offer a savory alternative to sugary treats, delighting both kids and adults with their festive appeal and irresistible crunch.
Ingredients
-
4 large flour tortillas (gluten-free or grain-free, as needed)
-
Avocado or olive oil spray
-
1/2 teaspoon fine sea salt
Instructions
-
Step 1
Preheat oven to 375°F (190°C) and line baking sheets with parchment paper. -
Step 2
Using Halloween cookie cutters, cut shapes from tortillas. Arrange them in a single layer on prepared baking sheets, ensuring space between each. -
Step 3
Lightly spray both sides of each tortilla shape with oil and sprinkle with salt. -
Step 4
Bake for 8-10 minutes. -
Step 5
Flip chips, then bake for another 5-8 minutes, watching closely until crispy and lightly golden. -
Step 6
Cool completely on a wire rack for maximum crispness. -
Step 7
Serve with your favorite dips or store in an airtight container for up to 3-4 days.
Important Information
Nutrition Facts (Per Serving)
It is important to consider this information as approximate and not to use it as definitive health advice.
Allergy Information
Please check ingredients for potential allergens and consult a health professional if in doubt.
Leave a Comment