
Samoa Cookie Protein Balls: Craving the irresistible flavors of a Samoa cookie but want a healthier, protein-packed alternative? Look no further! These no-bake energy bites capture the essence of those beloved caramel, coconut, and chocolate treats in a convenient and guilt-free snack. Imagine sinking your teeth into a chewy, coconutty ball, bursting with rich caramel notes and a hint of decadent dark chocolate – all while fueling your body with wholesome ingredients.
While the Girl Scout Samoa cookie doesn’t have a long, storied history, its impact on American culture is undeniable. First introduced in 1975, it quickly became a fan favorite, and its unique combination of textures and flavors has inspired countless desserts and treats. These Samoa Cookie Protein Balls pay homage to that iconic cookie, offering a healthier twist that you can enjoy anytime, anywhere.
People adore this dish, or rather, these bite-sized wonders, for several reasons. First, the taste is simply divine – a perfect balance of sweet, salty, and nutty. Second, the texture is incredibly satisfying, with the chewy coconut and smooth chocolate creating a delightful contrast. And finally, they are incredibly convenient. No baking required! Just a few simple ingredients, a quick mix, and you have a batch of delicious and nutritious snacks ready to power you through your day. Whether you’re a fitness enthusiast, a busy parent, or simply someone who loves a good treat, these protein balls are sure to become a new favorite.

Ingredients:
- 1 cup rolled oats
- ½ cup unsweetened shredded coconut, plus more for rolling
- ½ cup vanilla protein powder (whey or plant-based)
- ¼ cup almond butter
- ¼ cup honey or maple syrup
- 2 tablespoons unsweetened cocoa powder
- 2 tablespoons coconut oil, melted
- 1 teaspoon vanilla extract
- ¼ teaspoon sea salt
- 2-3 tablespoons milk (dairy or non-dairy), as needed
- Optional: ¼ cup chopped sugar-free chocolate chips
Preparing the Base:
- Combine Dry Ingredients: In a large mixing bowl, I start by adding the rolled oats, shredded coconut, and vanilla protein powder. Make sure to use a protein powder that you enjoy the taste of, as it will significantly impact the overall flavor of the protein balls. I like to use a whey protein isolate for a smoother texture, but a plant-based protein powder works just as well. Give these ingredients a good stir to ensure they are evenly distributed.
- Add Wet Ingredients: Next, I add the almond butter, honey (or maple syrup), melted coconut oil, vanilla extract, and sea salt to the bowl. The almond butter provides a healthy dose of fats and helps bind the ingredients together. The honey or maple syrup adds sweetness and also contributes to the binding process. The melted coconut oil adds a subtle coconut flavor and helps create a smooth texture. And don’t forget the sea salt! A pinch of salt enhances the sweetness and balances the flavors.
- Mix Thoroughly: Now comes the fun part – mixing everything together! I usually start with a spatula to combine the wet and dry ingredients. As the mixture starts to come together, it will become quite thick. Don’t be afraid to get your hands in there! Using your hands, knead the mixture until it forms a cohesive dough. If the mixture seems too dry and crumbly, add milk one tablespoon at a time until it reaches a workable consistency. You want the dough to be slightly sticky but not overly wet.
- Incorporate Cocoa Powder and Chocolate Chips (Optional): This is where we start to get that Samoa cookie flavor! I sprinkle the cocoa powder over the dough and knead it in until it’s evenly distributed. The cocoa powder adds a rich, chocolatey flavor that complements the coconut perfectly. If you’re using chocolate chips, now is the time to add them as well. Gently fold them into the dough until they are evenly dispersed.
Forming the Protein Balls:
- Prepare for Rolling: I like to prepare a clean surface for rolling the protein balls. I usually use a cutting board or a large plate. I also put some extra shredded coconut in a small bowl for coating the protein balls. This step is crucial for getting that classic Samoa cookie look and texture.
- Scoop and Roll: Using a small cookie scoop or a spoon, I scoop out about 1-2 tablespoons of the dough. Then, I roll the dough between my palms to form a smooth, round ball. The size of the protein balls is entirely up to you, but I find that this size is perfect for a quick and satisfying snack.
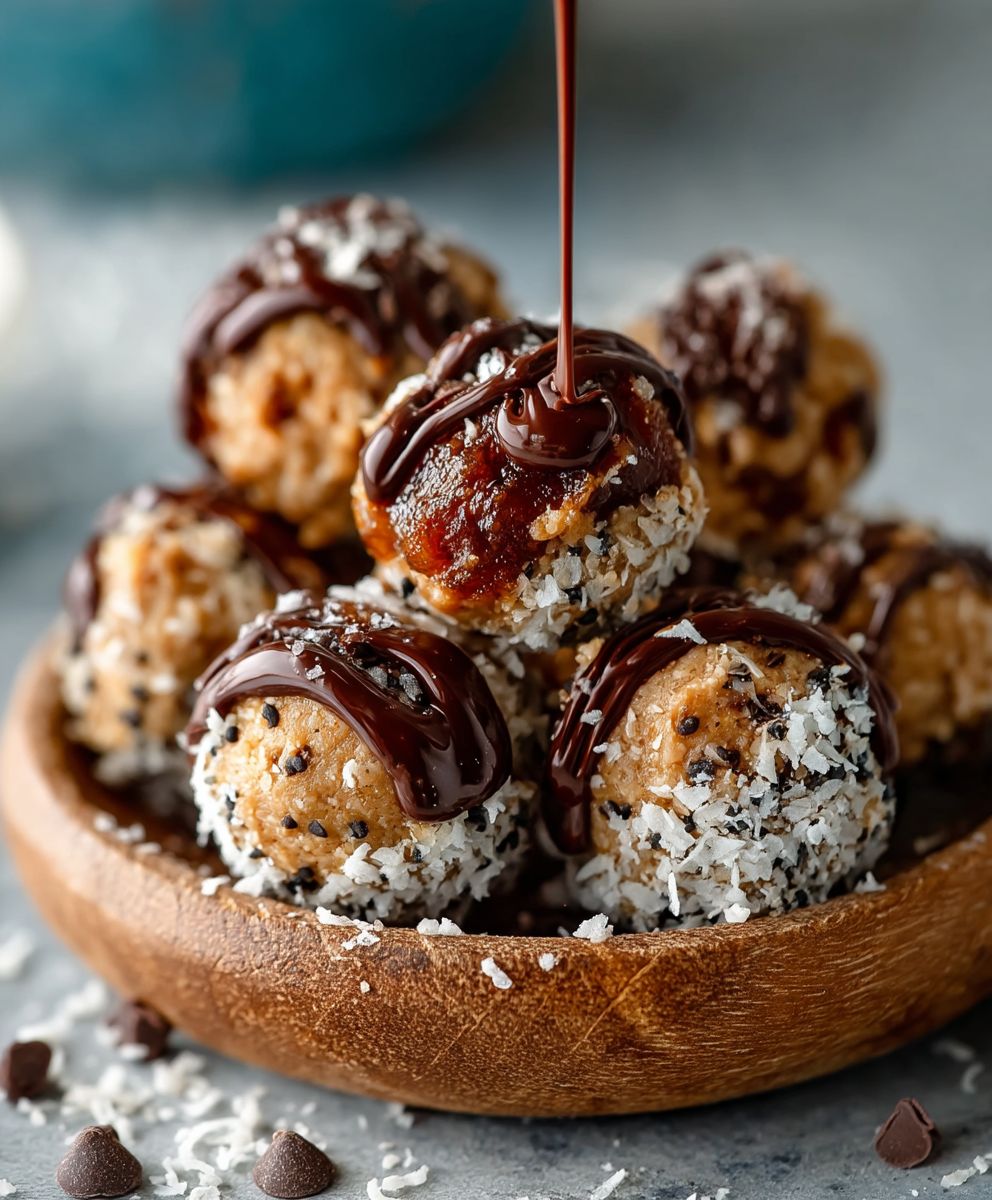
- Coat with Coconut: Once the protein ball is formed, I immediately roll it in the shredded coconut, making sure to coat it evenly on all sides. Press the coconut gently into the protein ball to ensure it adheres properly. The coconut coating not only adds flavor and texture but also helps prevent the protein balls from sticking together.
- Repeat: Repeat steps 2 and 3 until all of the dough has been used. As you form and coat the protein balls, place them on a plate or baking sheet lined with parchment paper. This will prevent them from sticking to the surface.
Chilling and Storing:
- Chill for Firming: Once all of the protein balls have been formed and coated, I place them in the refrigerator to chill for at least 30 minutes. Chilling helps the protein balls firm up and allows the flavors to meld together. This step is especially important if you live in a warm climate, as the coconut oil can soften at room temperature.
- Storing for Freshness: After chilling, I transfer the protein balls to an airtight container. They can be stored in the refrigerator for up to a week or in the freezer for up to a month. If freezing, I recommend placing the protein balls in a single layer on a baking sheet lined with parchment paper until they are frozen solid. Then, transfer them to a freezer-safe bag or container. This will prevent them from sticking together.
Tips and Variations:
- Adjusting Sweetness: If you prefer a sweeter protein ball, you can add more honey or maple syrup to the recipe. Alternatively, you can use a flavored protein powder to add sweetness and flavor.
- Nut Butter Options: While I love using almond butter in this recipe, you can easily substitute it with other nut butters, such as peanut butter, cashew butter, or sunflower seed butter. Each nut butter will impart a slightly different flavor to the protein balls.
- Adding Texture: For added texture, you can add chopped nuts, seeds, or dried fruit to the dough. Some popular options include chopped almonds, walnuts, pecans, chia seeds, flax seeds, and dried cranberries.
- Chocolate Drizzle: For an extra touch of indulgence, you can drizzle the protein balls with melted chocolate. I recommend using dark chocolate or sugar-free chocolate to keep the recipe healthy. Simply melt the chocolate in the microwave or over a double boiler, then drizzle it over the protein balls using a spoon or a piping bag.
- Coconut Flakes: Toasting the coconut flakes before adding them to the recipe can enhance their flavor and texture. To toast the coconut, spread it in a single layer on a baking sheet and bake at 350°F (175°C) for 5-7 minutes, or until golden brown. Watch it carefully, as it can burn easily.
- Protein Powder Substitutions: If you don’t have vanilla protein powder on hand, you can use other flavors, such as chocolate, coconut, or salted caramel. Just be sure to adjust the other ingredients accordingly to balance the flavors.
- Vegan Option: To make this recipe vegan, use a plant-based protein powder and maple syrup instead of honey.
- Gluten-Free Option: Ensure that the rolled oats you use are certified gluten-free if you have a gluten intolerance.
Nutritional Information (Approximate):
Please note that the nutritional information is an estimate and may vary depending on the specific ingredients used.
- Serving Size: 1 protein ball
- Calories: 100-120
- Protein: 6-8 grams
- Fat: 5-7 grams
- Carbohydrates: 8-10 grams
- Fiber: 1-2 grams
- Sugar: 3-5 grams
Enjoy Your Homemade Samoa Cookie Protein Balls!
I hope you enjoy making and eating these delicious and healthy Samoa Cookie Protein Balls! They are the perfect snack for satisfying your sweet cravings while providing a boost of protein and energy. Feel free to experiment with different variations and ingredients to create your own unique version. Happy snacking!
Conclusion:
So, there you have it! These Samoa Cookie Protein Balls are truly a must-try for anyone craving that iconic caramel, coconut, and chocolate flavor combination, but wants a healthier, protein-packed alternative. I’m telling you, they’re dangerously delicious! The chewy dates, crunchy coconut flakes, and rich chocolate chips perfectly mimic the beloved cookie, while the added protein powder keeps you feeling full and satisfied. Forget those store-bought protein bars loaded with artificial ingredients; these homemade treats are the real deal.
Why are these Samoa Cookie Protein Balls a game-changer? They’re incredibly easy to make, requiring minimal ingredients and no baking whatsoever. Plus, they’re completely customizable to your dietary needs and preferences. Need a gluten-free option? Simply ensure your protein powder and chocolate chips are certified gluten-free. Want to boost the protein content even further? Add a tablespoon of chia seeds or hemp seeds to the mix. The possibilities are endless!
Serving Suggestions and Variations:
These protein balls are incredibly versatile. Enjoy them as a pre-workout snack to fuel your energy, a post-workout recovery treat to replenish your muscles, or a guilt-free dessert to satisfy your sweet tooth. They’re also perfect for packing in lunchboxes, taking on hikes, or simply keeping on hand for those moments when cravings strike.
Here are a few serving suggestions and variations to get you started:
* Drizzle with extra melted chocolate: For an even more decadent experience, drizzle the finished protein balls with melted dark chocolate or milk chocolate.
* Add a sprinkle of sea salt: A pinch of sea salt enhances the sweetness and adds a delightful salty-sweet contrast.
* Roll in chopped nuts: Before the chocolate sets, roll the protein balls in chopped pecans, almonds, or walnuts for added crunch and flavor.
* Make mini protein balls: For smaller, bite-sized treats, simply reduce the size of each ball.
* Add a touch of spice: A pinch of cinnamon or nutmeg adds warmth and depth of flavor.
* Coconut overload: For the ultimate coconut lover, toast the coconut flakes before adding them to the mixture for a richer, more intense coconut flavor. You can also roll the finished balls in extra toasted coconut.
I truly believe that these Samoa Cookie Protein Balls will become a staple in your healthy snacking routine. They’re the perfect balance of indulgence and nutrition, and they’re guaranteed to satisfy your cravings without derailing your health goals.
So, what are you waiting for? Gather your ingredients, follow the simple steps, and prepare to be amazed by these little bites of heaven. I’m confident that you’ll love them as much as I do!
And now, for the most important part: I want to hear from you! Once you’ve tried this recipe, please share your experience in the comments below. Did you make any variations? What did you think of the flavor? What are your favorite ways to enjoy these protein balls? Your feedback is invaluable, and I can’t wait to see your creations! Happy snacking!
Samoa Cookie Protein Balls: The Ultimate No-Bake Recipe
Healthy and delicious snack that tastes like Samoa Girl Scout cookies! Packed with protein, healthy fats, and a touch of sweetness, perfect for satisfying cravings without the guilt.
Ingredients
Instructions
Recipe Notes
- Adjusting Sweetness: Add more honey or maple syrup, or use a flavored protein powder.
- Nut Butter Options: Substitute almond butter with peanut butter, cashew butter, or sunflower seed butter.
- Adding Texture: Add chopped nuts, seeds, or dried fruit.
- Chocolate Drizzle: Drizzle with melted dark chocolate or sugar-free chocolate.
- Coconut Flakes: Toast the coconut flakes before adding them to the recipe can enhance their flavor and texture.
- Protein Powder Substitutions: If you don’t have vanilla protein powder on hand, you can use other flavors, such as chocolate, coconut, or salted caramel. Just be sure to adjust the other ingredients accordingly to balance the flavors.
- Vegan Option: Use plant-based protein powder and maple syrup instead of honey.
- Gluten-Free Option: Ensure rolled oats are certified gluten-free.
Leave a Comment