
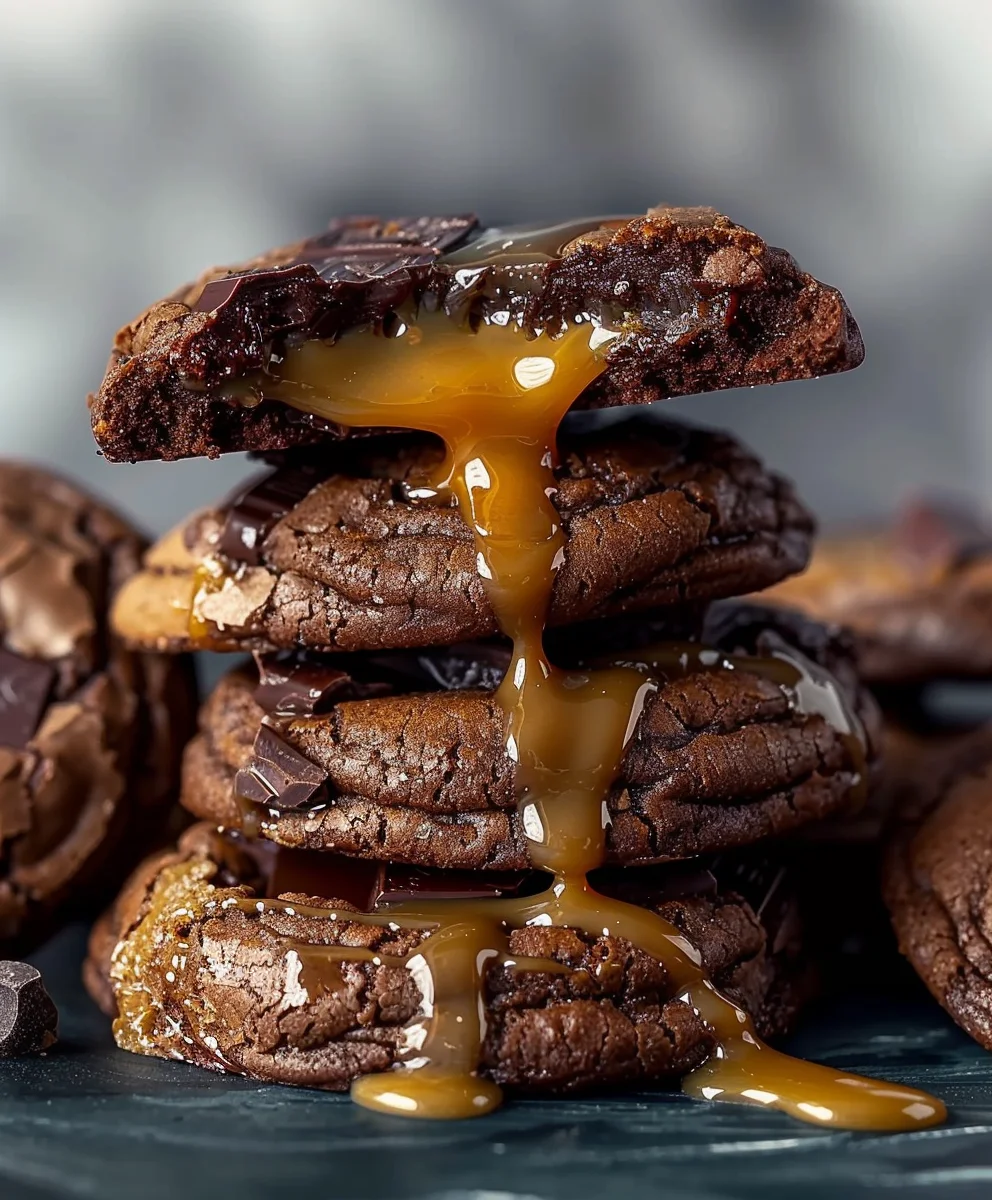
Salted Caramel Chocolate Cookies are more than just a dessert; they are an experience, a symphony of flavors that will captivate your taste buds from the very first bite. I am incredibly excited to share this recipe with you, as it truly represents the pinnacle of cookie perfection. Imagine sinking your teeth into a soft, chewy chocolate cookie, generously studded with rich chocolate chips, only to discover pockets of luscious, gooey caramel, perfectly balanced by a delicate sprinkle of sea salt. This divine combination, where the sweetness of caramel and chocolate meets the intriguing zing of salt, has taken the culinary world by storm in recent years, evolving from a gourmet restaurant staple to a beloved home baking sensation.
There’s a reason why people absolutely adore this particular treat. It’s the harmonious dance between contrasting elements: the deep, comforting cocoa, the buttery sweetness of caramel, and that essential salty edge that elevates every note, preventing it from being overly sweet. These aren’t just any cookies; they are a celebration of indulgence, offering a sophisticated twist on a classic. Crafting these Salted Caramel Chocolate Cookies allows you to bring that luxurious, bakery-quality experience right into your own kitchen, promising smiles and satisfied cravings for everyone who tries them.

Ingredients:
-
For the Luscious Salted Caramel Filling:
- 1 cup (200g) granulated sugar
- 1/4 cup (60ml) water
- 1/2 cup (120ml) heavy cream, warmed slightly (you can gently warm it in the microwave or a small saucepan)
- 4 tablespoons (56g) unsalted butter, cut into small pieces
- 1/2 teaspoon flaky sea salt (I love using a good quality one here, it makes all the difference!)
-
For the Rich Chocolate Cookie Dough:
- 2 1/4 cups (270g) all-purpose flour
- 3/4 cup (75g) unsweetened cocoa powder (I highly recommend Dutch-processed cocoa for that deep, rich chocolate flavor and dark color)
- 1 teaspoon baking soda
- 1 teaspoon fine sea salt
- 1 cup (226g) unsalted butter, softened to room temperature (this means it should yield slightly when pressed, but not be greasy or melted)
- 3/4 cup (150g) granulated sugar
- 1 cup (200g) packed light brown sugar
- 2 large eggs, at room temperature
- 2 teaspoons pure vanilla extract (the good stuff!)
- 1 1/2 cups (255g) semi-sweet chocolate chips or chopped chocolate chunks (use your favorite kind, sometimes I even mix milk and dark chocolate)
-
For the Finishing Touch:
- Extra flaky sea salt, for sprinkling
Equipment You’ll Need:
- Heavy-bottomed saucepan (essential for caramel making)
- Heatproof spatula or wooden spoon
- Whisk
- Candy thermometer (highly recommended for precise caramel making, but not strictly mandatory if you have a good eye)
- Stand mixer with paddle attachment, or a robust electric hand mixer
- Several large mixing bowls
- Measuring cups and spoons
- Rubber spatula
- Two large baking sheets
- Parchment paper or silicone baking mats
- Small cookie scoop (about 1.5 to 2 tablespoon capacity)
- Wire cooling racks
Prepping Our Caramel Filling:
Making caramel might sound intimidating, but trust me, with a little patience and attention, you’ll create a beautiful, rich, and salty-sweet filling that truly elevates these Salted Caramel Chocolate Cookies. This step is crucial, so let’s take our time.
- First things first, gather all your caramel ingredients: granulated sugar, water, warmed heavy cream, butter pieces, and the flaky sea salt. Having everything prepped and ready to go is key, as the caramel-making process moves quickly once it starts. I like to gently warm my heavy cream in a microwave-safe bowl for about 30-45 seconds, just until it’s warm to the touch but not boiling. This prevents the caramel from seizing up when you add it later.
- In your heavy-bottomed saucepan, combine the granulated sugar and water. Give it a gentle stir just to ensure all the sugar is moistened. We’re looking for a thick, slushy consistency here. Place the saucepan over medium heat.
- Now, here’s the important part: resist the urge to stir the sugar mixture once it begins to boil. Stirring can cause the sugar crystals to clump together, leading to grainy caramel. Instead, you can gently swirl the pan occasionally to ensure even cooking. If you notice sugar crystals forming on the sides of the pan, you can use a pastry brush dipped in a little water to gently wash them down.
- Watch the sugar mixture carefully as it boils. It will first become clear, then start to bubble more vigorously, and eventually, the edges will begin to turn a light amber color. Continue to cook, swirling the pan every so often, until the entire mixture turns a beautiful, rich amber or deep golden-brown color. This usually takes about 8-12 minutes. If you’re using a candy thermometer, you’re aiming for a temperature of 340-350°F (170-175°C). Don’t let it get too dark, or it will taste burnt, but don’t pull it off too early, or it won’t have that deep caramel flavor.
- Once you’ve achieved that perfect amber color, immediately remove the saucepan from the heat. This is where you need to be cautious, as the mixture is incredibly hot. Carefully and slowly pour in the warmed heavy cream while whisking constantly. The mixture will bubble up violently and steam, so be careful not to stand directly over the pot. Continue whisking until the cream is fully incorporated and the mixture is smooth.
- Next, add the cut-up pieces of unsalted butter and the flaky sea salt to the hot caramel. Whisk continuously until the butter has completely melted and is fully incorporated, making the caramel smooth and glossy. The salt will dissolve and infuse that wonderful salty balance we’re looking for.
- Pour the finished salted caramel into a heatproof bowl or jar and let it cool completely to room temperature. This will take at least 1-2 hours, or you can speed up the process by placing it in the refrigerator once it’s no longer piping hot. It’s absolutely essential that the caramel is cool and thick before you attempt to fill the cookies, otherwise, it will just melt out during baking. I often make my caramel the day before and store it in the fridge overnight. If refrigerated, let it sit out at room temperature for about 30 minutes before using, or warm it briefly in the microwave for 10-15 seconds to make it scoopable but still firm.
Crafting the Cookie Dough:
Now that our magnificent salted caramel is cooling, let’s turn our attention to the heart of these treats: the rich, chocolatey cookie dough. This dough is designed to be sturdy enough to hold the caramel filling while still baking up soft and chewy.
- In a medium bowl, whisk together the all-purpose flour, unsweetened cocoa powder, baking soda, and fine sea salt. I always sift my cocoa powder, especially Dutch-processed, to ensure there are no lumps and that it incorporates smoothly into the dough. Set this dry ingredient mixture aside.
- In the large bowl of your stand mixer, fitted with the paddle attachment, or using an electric hand mixer, cream together the softened unsalted butter, granulated sugar, and packed light brown sugar. Beat on medium speed for about 2-3 minutes, until the mixture is light in color, fluffy, and well combined. This creaming process is vital; it incorporates air into the butter and sugar, which contributes to the cookies’ texture. Scrape down the sides of the bowl with a rubber spatula halfway through to ensure everything is evenly mixed.
- Add the large eggs, one at a time, beating well after each addition until fully incorporated. After the eggs, stir in the pure vanilla extract. Continue to beat for another minute or so, until the mixture is smooth and cohesive. It might look a little curdled at first, but keep beating, and it will come together beautifully.
- With the mixer on low speed, gradually add the dry ingredient mixture to the wet ingredients. Mix only until just combined and no streaks of flour remain. Be careful not to overmix the dough once the flour is added, as this can develop the gluten too much, leading to tough cookies. As soon as the last bits of flour disappear, stop the mixer.
- Finally, gently fold in the semi-sweet chocolate chips or chopped chocolate chunks using your rubber spatula. You want them distributed throughout the dough, providing that delightful burst of chocolate in every bite of our Salted Caramel Chocolate Cookies.
Assembling and Chilling Our Salted Caramel Chocolate Cookies:
This is where the magic really starts to happen! The assembly process requires a bit of finesse, but it’s incredibly rewarding. Chilling the dough is an essential step that not only helps the cookies hold their shape but also deepens their flavor. Trust me, don’t skip the chill time!
- Line your two baking sheets with parchment paper or silicone baking mats. This prevents sticking and ensures even baking.
- Using a small cookie scoop (I prefer one that holds about 1.5 to 2 tablespoons of dough), scoop out portions of the chocolate cookie dough. For each portion, flatten it slightly in the palm of your hand, creating a disc shape. You don’t want it paper-thin, but wide enough to cradle our precious caramel.
- Take about 1/2 to 1 teaspoon of the cooled and thickened salted caramel filling. Place it right in the center of your flattened cookie dough disc. The amount of caramel is key here; too much, and it will be difficult to seal, too little, and you won’t get that wonderful gooey center.
- Carefully bring the edges of the cookie dough up and over the caramel, pinching and pressing them together to completely seal the caramel inside. You want to make sure there are no visible seams or openings, otherwise, your caramel might leak out during baking. Roll the dough gently between your palms to form a smooth ball. This step might feel a bit messy at first, especially with the sticky caramel, but you’ll get the hang of it!
- Place the sealed cookie dough balls onto your prepared baking sheets, leaving about 2 inches of space between each one to allow for spreading during baking.
- Once all your cookies are assembled, cover the baking sheets loosely with plastic wrap. Refrigerate the cookie dough balls for a minimum of 2 hours, or preferably overnight. This chilling period is critical. It allows the butter to firm up, preventing the cookies from spreading too much in the oven, and also gives the flavors a chance to meld and deepen, resulting in a more flavorful and perfectly textured cookie. If you’re planning ahead, you can even freeze these unbaked dough balls for up to a month in an airtight container; just add a few extra minutes to the baking time if baking from frozen.
Baking Our Irresistible Cookies:
The moment of truth! Baking these Salted Caramel Chocolate Cookies to perfection ensures they come out with crisp edges, a soft, chewy center, and a gooey caramel surprise. Let’s get them into the oven!
- Preheat your oven to 375°F (190°C) with racks in the upper and lower thirds of the oven. If you only have one baking sheet of cookies, feel free to use just one rack.
- While the oven preheats, remove one baking sheet of chilled cookie dough balls from the refrigerator. If you’ve chilled them overnight or for longer, let them sit at room temperature for about 10-15 minutes just to take the chill off slightly, though it’s not strictly necessary.
- Arrange the cookie dough balls on the prepared baking sheets, ensuring they are still spaced about 2 inches apart.
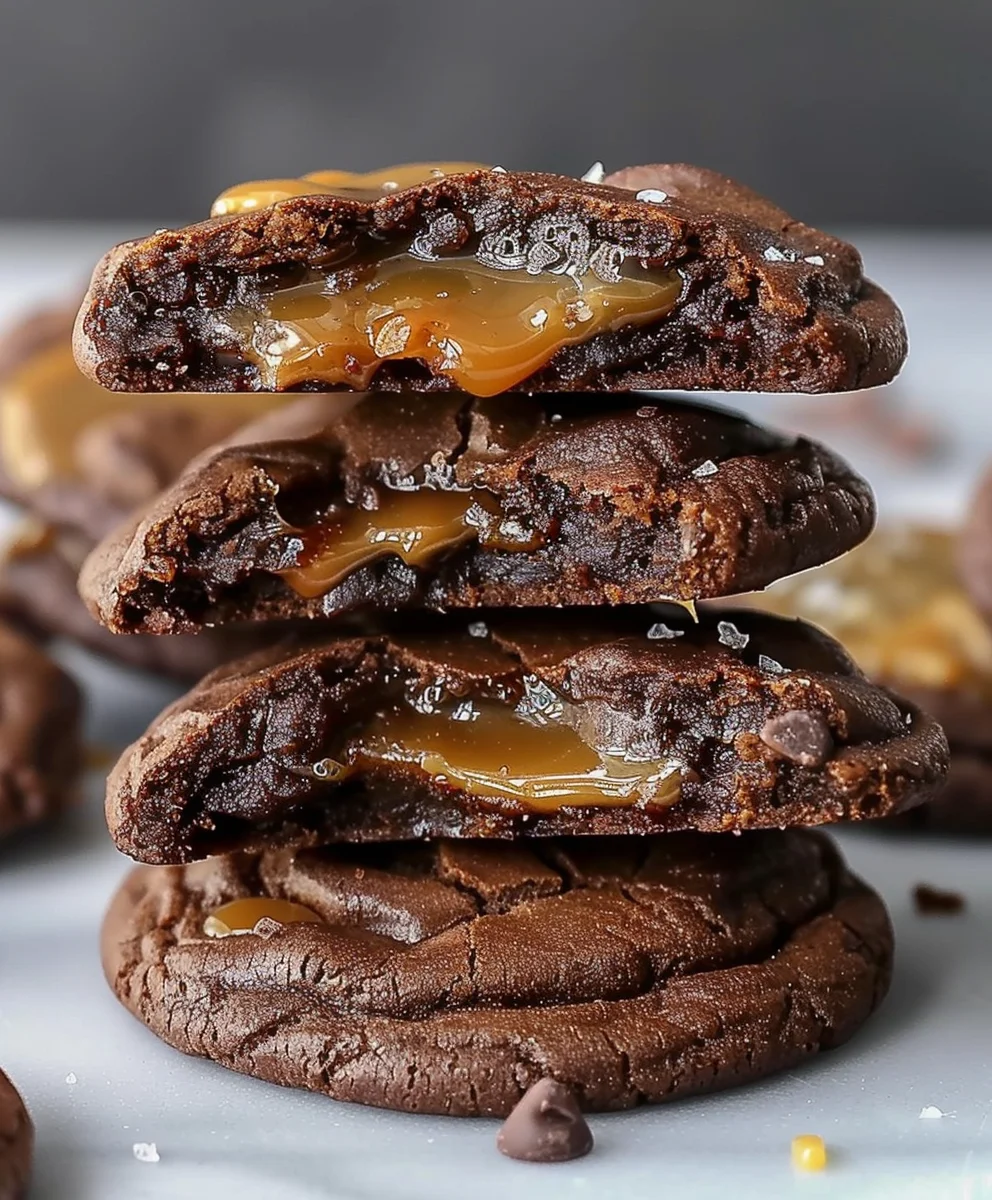
- Bake for 10-12 minutes, or until the edges are set and slightly firm, but the centers still look soft and a little underbaked. This is crucial for that soft, chewy texture and gooey caramel interior. Overbaking will result in a dry cookie and hard caramel. If you’re baking two sheets at once, rotate them halfway through the baking time (top to bottom, and front to back) to ensure even cooking.
- Once baked, remove the baking sheets from the oven. Do not touch the cookies immediately! The caramel inside will be extremely hot and molten. Let the cookies cool on the baking sheets for at least 5-10 minutes. This allows the cookies to firm up and the caramel to slightly set, preventing breakage when you transfer them.
- After their initial cool-down on the baking sheets, carefully transfer the cookies to a wire cooling rack to cool completely. The caramel will continue to cool and become wonderfully soft and gooey as the cookies come to room temperature.
Finishing Touches and Enjoying Your Creation:
Almost there! A final sprinkle of flaky sea salt and then it’s time to savor the incredible flavor of your homemade Salted Caramel Chocolate Cookies. This simple garnish truly elevates the experience.
- While the cookies are still slightly warm (but not piping hot from the oven), or even after they’ve cooled a bit, sprinkle a little extra flaky sea salt over the top of each cookie. The salt not only looks beautiful but enhances the flavor of both the chocolate and the caramel, creating that irresistible sweet and salty balance. I like to use a good quality, coarse flaky sea salt for this.
- Once the cookies have cooled completely, or at least to a comfortable warm temperature, they are ready to be devoured! I find them absolutely divine when they are still slightly warm, with the caramel still soft and molten.
- Store any leftover Salted Caramel Chocolate Cookies in an airtight container at room temperature for up to 3-4 days. If you find the caramel has firmed up too much, a quick 10-15 second zap in the microwave will bring back that gooey, melty center, making them taste freshly baked. These cookies are so delightful, I doubt they’ll last that long, though!
- Serve these beauties with a cold glass of milk, a hot cup of coffee, or simply enjoy them on their own as a truly decadent treat. Each bite offers a symphony of rich chocolate, gooey salted caramel, and a delightful textural contrast that makes these cookies utterly addictive. Enjoy the fruits of your labor!
Conclusion:
Well, my friends, we’ve reached the sweet end of our journey, but truly, it’s just the beginning of your delicious adventure with these incredible cookies. If you’ve followed along, you’ll understand why I’ve been so enthusiastic about this recipe, and why it’s become a staple in my kitchen – and I truly believe it will become one in yours too! These aren’t just any cookies; they are an experience, a symphony of textures and flavors that dance on your palate. Imagine biting into a perfectly baked cookie: first, that satisfying slight crispness on the edge, quickly giving way to a gorgeously soft, chewy, and rich center. Then, the explosion of deep, decadent chocolate, sometimes in gooey pockets, sometimes as luscious chips, perfectly balanced by the sweet, buttery, and slightly salty embrace of homemade (or high-quality store-bought!) caramel. It’s that glorious, unexpected sprinkle of sea salt on top that truly elevates these to something extraordinary, cutting through the sweetness and highlighting every single flavor note. This isn’t just a dessert; it’s a moment of pure bliss, a gourmet treat that feels incredibly special yet is surprisingly achievable in your own kitchen. Trust me, the sheer delight of these particular Salted Caramel Chocolate Cookies is something you simply have to taste to believe. They are an absolute game-changer for anyone who appreciates the finer things in life, especially when those things involve chocolate, caramel, and a touch of sea salt magic. They’re impressive enough for a special occasion, yet comforting enough for a cozy night in. Each bite offers a harmonious contrast – the intense sweetness grounded by the subtle savory hint, the firm exterior yielding to an irresistibly tender interior. This isn’t just a recipe; it’s an invitation to elevate your baking repertoire and impress everyone fortunate enough to get their hands on one of these masterpieces.
Elevating Your Cookie Experience: Serving Suggestions & Creative Variations
Now that you’re armed with the knowledge to bake these beauties, let’s talk about how to truly make them shine or even adapt them to your unique tastes. These cookies are, without a doubt, phenomenal on their own, perhaps with a simple glass of cold milk or a robust cup of freshly brewed coffee, creating a comforting, indulgent ritual. For a truly decadent dessert experience, try serving them warm with a scoop of premium vanilla bean ice cream or, for an extra layer of flavor, a scoop of coffee or caramel ice cream. The melting ice cream mingling with the warm, gooey cookie is pure heaven. You could even create elegant cookie sandwiches by spreading a thin layer of cream cheese frosting, a dollop of extra caramel, or even a rich chocolate ganache between two cookies. For a stunning presentation at your next gathering, consider baking them slightly smaller to create delightful mini versions, perfect for a dessert platter.
But why stop there? The beauty of a great recipe lies in its adaptability. For those who love a bit of crunch, consider folding in a handful of toasted pecans or walnuts into the dough – their earthy notes would complement the caramel and chocolate beautifully. Experiment with different kinds of chocolate chips too! While I typically use a mix of semi-sweet and dark, milk chocolate chips would make them even sweeter and creamier, or white chocolate chips could add another interesting flavor dimension. Don’t be afraid to play with the type of salt you use for sprinkling; delicate flaky sea salt is my top pick for its texture and burst of flavor, but a smoked sea salt could add an intriguing depth. If you’re feeling adventurous, try making your own homemade caramel from scratch – it’s a rewarding process that truly elevates the flavor profile, though using a good quality store-bought caramel sauce is absolutely fine and saves time. For those with dietary considerations, a good quality gluten-free all-purpose flour blend can often be substituted, though you might notice a slight change in texture; just be sure it contains xanthan gum or add a little if it doesn’t. While I haven’t tested a full vegan version, substituting plant-based butter and a flax egg might work, but results may vary. The core magic, however, lies in that glorious balance of sweet and salty, rich and chewy.
Your Turn to Bake and Share!
My greatest hope is that you’re now feeling inspired, maybe even a little excited, to tie on your apron and get baking! These Salted Caramel Chocolate Cookies are more than just a treat; they’re a testament to the joy of homemade goodness and the simple pleasure of indulging in something truly spectacular. Don’t be intimidated; follow the steps, enjoy the process, and prepare to be amazed by the results. Once you pull that tray of golden-brown perfection from the oven, filling your home with the most intoxicating aroma, you’ll know exactly what I mean. I truly encourage you to give this recipe a try, whether it’s for a special occasion, a thoughtful gift for a loved one, or simply to treat yourself because, let’s be honest, you deserve it! And when you do, please don’t keep it to yourself! I would absolutely love to hear about your baking experience. Did you try any of the variations? What did your family and friends think? Share your successes, your little tweaks, and even your questions in the comments below. Let’s build a community of enthusiastic bakers who aren’t afraid to embrace the delicious decadence that these cookies offer. So go forth, bake with passion, and prepare to fall head over heels for the ultimate combination of sweet, salty, and utterly irresistible!
Salted Caramel Chocolate Cookies: Your New Favorite Dessert!
Salted Caramel Chocolate Cookies are an experience, a symphony of flavors that will captivate your taste buds. Imagine sinking your teeth into a soft, chewy chocolate cookie, generously studded with rich chocolate chips, only to discover pockets of luscious, gooey caramel, perfectly balanced by a delicate sprinkle of sea salt. This divine combination offers a sophisticated twist on a classic and brings a luxurious, bakery-quality experience right into your own kitchen.
Ingredients
-
1 cup granulated sugar (for caramel)
-
1/4 cup water (for caramel)
-
1/2 cup heavy cream, warmed (for caramel)
-
4 tbsp unsalted butter, cubed (for caramel)
-
1/2 tsp flaky sea salt (for caramel)
-
2 cups all-purpose flour
-
1/2 cup unsweetened cocoa powder
-
1 tsp baking soda
-
1/2 tsp salt
-
1 cup unsalted butter, softened
-
1/2 cup granulated sugar
-
1 cup light brown sugar, packed
-
2 large eggs
-
1 tsp vanilla extract
-
1 cup semi-sweet chocolate chips
-
Extra flaky sea salt (for topping)
Instructions
-
Step 1
Gather all caramel ingredients and warm heavy cream. In a heavy saucepan, combine 1 cup granulated sugar and 1/4 cup water over medium heat. Bring to a boil without stirring; swirl occasionally until mixture turns rich amber (340-350°F / 170-175°C). Remove from heat; slowly whisk in warmed heavy cream (mixture will bubble). Add 4 tbsp butter and 1/2 tsp flaky sea salt; whisk until smooth. Pour into a heatproof bowl and cool completely (1-2 hrs or refrigerate) until thick. This is essential for filling the cookies. -
Step 2
In a medium bowl, whisk together 2 cups all-purpose flour, 1/2 cup unsweetened cocoa powder, 1 tsp baking soda, and 1/2 tsp salt. In a stand mixer, cream 1 cup softened unsalted butter, 1/2 cup granulated sugar, and 1 cup packed light brown sugar for 2-3 minutes until light and fluffy. Beat in 2 large eggs one at a time, then 1 tsp vanilla extract until smooth. Gradually add dry ingredients to wet, mixing on low speed until just combined. Fold in 1 cup semi-sweet chocolate chips. -
Step 3
Line two baking sheets with parchment paper. Scoop 1.5-2 tbsp of cookie dough, flatten slightly. Place 1/2-1 tsp of the cooled, thickened salted caramel in the center. Carefully seal the dough around the caramel, pinching edges to enclose completely and forming a smooth ball. Place on prepared baking sheets, 2 inches apart. Cover and refrigerate for a minimum of 2 hours, or preferably overnight. Chilling is critical for shape and flavor. -
Step 4
Preheat oven to 375°F (190°C). Arrange chilled cookie dough balls on baking sheets. Bake for 10-12 minutes, until edges are set but centers still look soft. Do not overbake to ensure soft, chewy texture and gooey caramel. If baking two sheets, rotate halfway. Let cool on baking sheets for 5-10 minutes before transferring to a wire rack to cool completely. -
Step 5
While cookies are still slightly warm, sprinkle extra flaky sea salt over the top of each. Enjoy once cooled to a comfortable warm temperature. Store any leftovers in an airtight container at room temperature for 3-4 days. A quick 10-15 second zap in the microwave will restore a gooey, melty center.
Important Information
Nutrition Facts (Per Serving)
It is important to consider this information as approximate and not to use it as definitive health advice.
Allergy Information
Please check ingredients for potential allergens and consult a health professional if in doubt.
Leave a Comment