
Rice Krispies Brains – the very name conjures images of delightfully ghoulish Halloween feasts, and I am absolutely thrilled to share the ultimate guide to creating these iconic, spooky treats! Imagine the gasps of delight and perhaps a few playful shudders as your guests encounter a platter adorned with these surprisingly realistic, yet utterly delicious, edible brains. While the beloved classic Rice Krispies treat has long been a staple for its comforting simplicity and irresistible texture, this particular iteration elevates it into a true seasonal spectacle, making it an indispensable part of any Halloween celebration. It’s a creative twist that perfectly captures the spirit of the holiday, transforming a nostalgic favorite into a show-stopping centerpiece.
Why This Spooky Treat Is a Must-Make
People simply adore this dish for its brilliant blend of the familiar and the fantastically gruesome. The irresistible combination of crispy puffed rice cereal, sweet, gooey marshmallows, and rich butter creates a textural masterpiece that is crunchy, chewy, smooth, and melt-in-your-mouth delightful all at once. What truly sets these Rice Krispies Brains apart, however, is their incredible visual impact – they are a fantastic conversation starter and a testament to creative culinary fun. Moreover, they are wonderfully convenient; a no-bake wonder that comes together with ease, leaving you more time to enjoy the spooky festivities and impress your guests with minimal effort.

Ingredients:
- 6 tablespoons (85g) unsalted butter: I always recommend unsalted butter so you can control the salt content yourself, though for a sweet treat like this, a touch of saltiness can actually enhance the flavor! Make sure it’s good quality; it makes a difference.
- 1 (10-ounce) bag mini marshmallows (about 40 cups or 280g): Mini marshmallows melt so much faster and more evenly than their larger counterparts, which is a huge time-saver. If you only have large marshmallows, you’ll need about 6 cups, but be prepared for a slightly longer melting time. Fresh marshmallows are key for that perfect gooey texture.
- 1/2 teaspoon vanilla extract: This might seem like a small amount, but vanilla really elevates the flavor beyond just sweet and marshmallow-y. It adds a warmth and depth that makes these Rice Krispies Brains truly irresistible.
- Red or Pink Gel Food Coloring: Gel food coloring is absolutely essential here because it’s highly concentrated and won’t thin out your mixture like liquid food coloring can. You’ll want a vibrant, slightly unsettling pinkish-red hue to achieve that realistic brain color. I suggest having both red and pink on hand to mix until you get the perfect shade.
- 6 cups Rice Krispies cereal: The star of the show! Fresh cereal is a must for that signature crispy crunch. Stale cereal will result in a chewy, sad brain, and nobody wants that.
- Red decorating gel (in a tube with a fine tip): This is for our “bloody” embellishments! A good quality decorating gel will give you that shiny, slightly viscous look of fresh gore, which really sells the gruesome aesthetic of our Rice Krispies Brains.
- Non-stick cooking spray or extra butter: Essential for greasing your hands and any tools you’ll use during the shaping process. Trust me, this mixture is incredibly sticky, and a little grease goes a long way in preventing frustration.
Preparing the Ghoulish Brain Base Mixture
- Prepare Your Workspace and Tools: Before you even think about melting, let’s get organized! Lay out a large piece of parchment paper or wax paper on your counter. This will be your non-stick surface for cooling and shaping. Have your Rice Krispies cereal measured out and ready in a very large bowl. Time is of the essence once the marshmallows are melted, so you want everything within arm’s reach. Lightly spray a rubber spatula or wooden spoon with non-stick cooking spray; this will make stirring much easier.
- Melt the Butter: Grab a large, heavy-bottomed pot or Dutch oven. I find a heavy-bottomed pot prevents scorching, which is crucial for perfect Rice Krispies Brains. Place your 6 tablespoons of unsalted butter into the pot. Melt the butter over medium-low heat. You want it to melt gently, not brown or sizzle too aggressively. Swirl the pot occasionally to ensure even melting. This usually takes about 2-3 minutes.
- Introduce the Marshmallows: Once the butter is fully melted and clear, add the entire bag of mini marshmallows to the pot. Stir them gently with your greased spatula, making sure they’re coated in the melted butter. Continue to cook over medium-low heat, stirring constantly, until the marshmallows are completely melted and smooth. This step requires a bit of patience and continuous stirring to prevent sticking to the bottom of the pot. It typically takes about 5-7 minutes. You’ll know they’re ready when there are no lumps left, and the mixture is a glossy, gooey liquid. Do not overheat them, as this can make your final treats hard instead of delightfully chewy.
- Infuse with Flavor and Color: Remove the pot from the heat as soon as the marshmallows are perfectly melted. Now, stir in your 1/2 teaspoon of vanilla extract. Oh, that aroma! Then, it’s time for the magic: adding the food coloring. Start with a few drops of pink gel food coloring, mixing it in thoroughly. Add a drop or two of red gel food coloring. Continue adding drops of pink and red, mixing well after each addition, until you achieve a vibrant, somewhat unsettling, fleshy pink-red color. You’re aiming for something that looks authentically (and deliciously) ghoulish. Don’t be shy with the color; it’s what truly transforms these into convincing Rice Krispies Brains. I usually end up using a fair amount to get that deep, opaque hue.
- Combine with Cereal: Immediately pour the colored marshmallow mixture over the waiting Rice Krispies cereal in your large bowl. Using your greased spatula, gently but quickly fold the cereal into the marshmallow mixture. The key here is to coat every single piece of cereal evenly without crushing it. Work from the bottom up, turning the cereal over into the sticky goodness. This process needs to be done with some speed, as the mixture will start to cool and become harder to mix. Keep folding until all the cereal is thoroughly coated in that wonderfully gooey, pinkish-red marshmallow.
Shaping the Rice Krispies Brains
- Cool Slightly for Handling: Now comes the fun, albeit sticky, part! Let the mixture cool in the bowl for about 5-10 minutes. It needs to be cool enough to handle without burning your hands, but still warm and pliable enough to shape. If it cools too much, it will become stiff and difficult to mold. This is a critical window for crafting the perfect Rice Krispies Brains.
- Prepare Your Hands: Lightly spray your hands with non-stick cooking spray or grease them generously with a little butter. This step is absolutely non-negotiable! Without greased hands, you’ll end up with more sticky marshmallow on your fingers than on the brains themselves. You might need to re-grease your hands periodically throughout the shaping process.
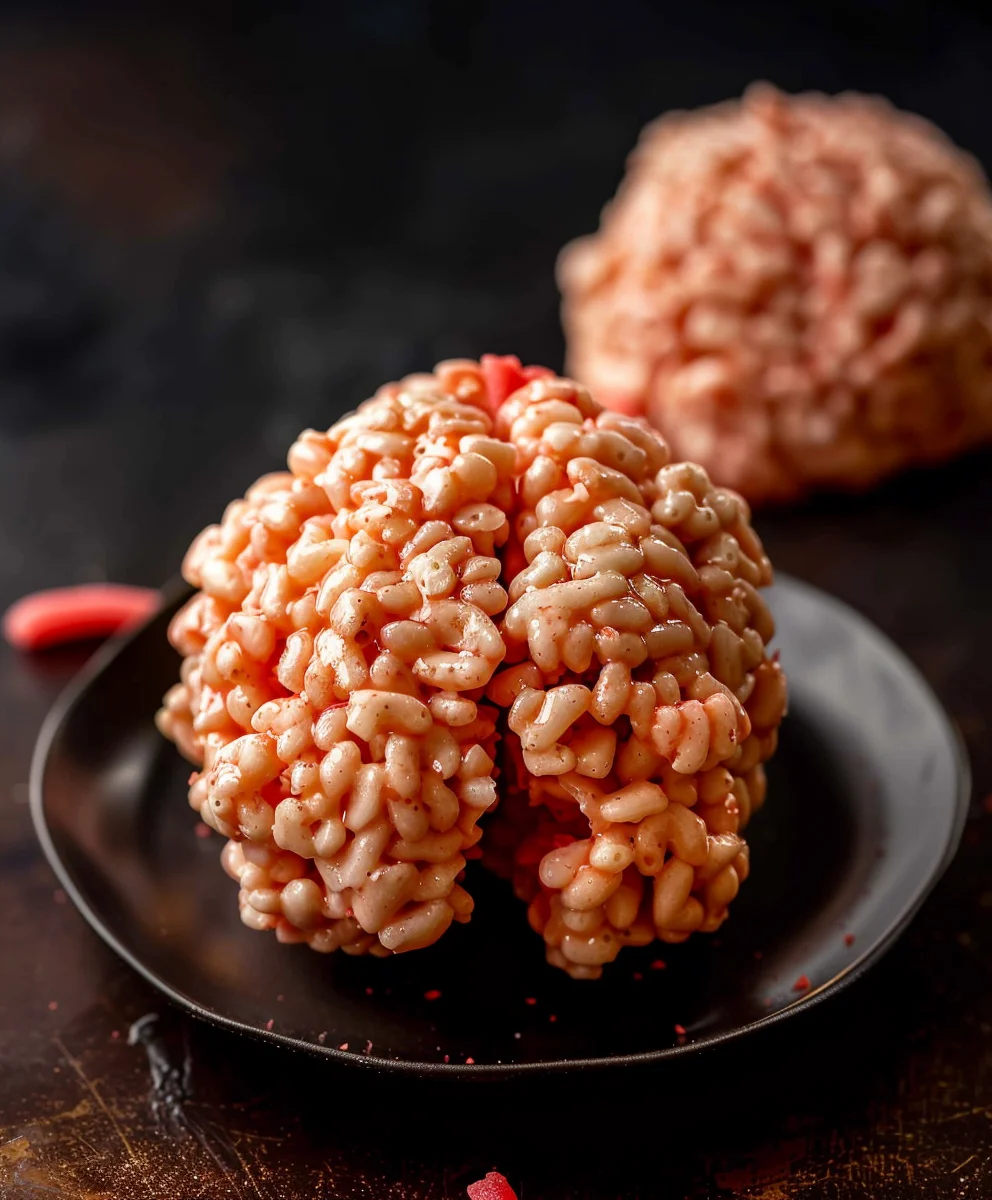
- Form the Basic Brain Shape: Scoop out about 1/2 to 3/4 cup of the mixture for each brain. This size creates a realistic, albeit miniature, brain. Gently press and mold the mixture into an oval-like shape in the palm of your hand. It should be slightly flattened on the bottom, with a rounded top, much like a small, plump potato. Aim for a consistent size for your brains, though a little variation can add to the charm. This initial shaping creates the foundation for your detailed Rice Krispies Brains.
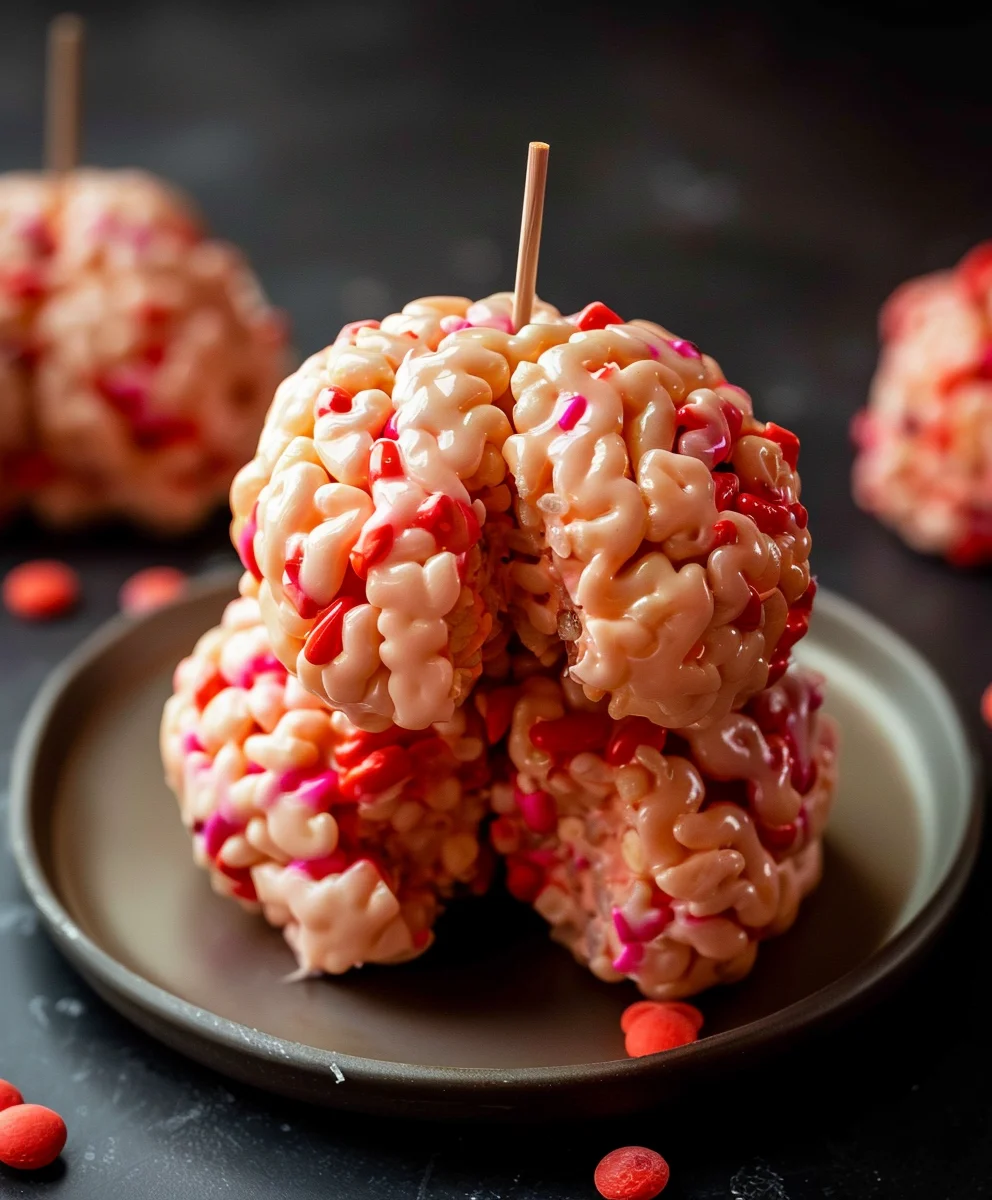
- Create the Central Sulcus: Once you have your basic oval, use your thumb or the side of your index finger to gently press a shallow indentation down the center, lengthwise, across the top of the brain. This creates the prominent “central sulcus” that divides the brain into two hemispheres. Don’t press too deeply, just enough to create a clear separation.
-
Sculpt the Convolutions (Gyri and Sulci): This is where the artistry comes in and truly makes these look like convincing Rice Krispies Brains! Using the sides of your fingers (your index finger and middle finger work great), gently pinch, push, and create wavy ridges (gyri) and grooves (sulci) all over the surface of each hemisphere. Think about the squiggly, folded appearance of a real brain. You don’t need to be anatomically perfect; just aim for a dense network of folds.
- Technique Tip: Gently press your finger into the mixture, then pull it slightly to create a ridge. Repeat this process, working your way around each hemisphere, creating a complex, winding pattern. Don’t be afraid to get detailed here. The more folds and crevices you create, the more realistic and gruesome your Rice Krispies Brains will appear.
- Patience and Precision: Take your time with each brain. The mixture is forgiving while warm, allowing you to reshape and refine. If a brain starts to get too cool and stiff, you can gently warm it in your hands for a moment or two, but it’s best to work efficiently.
- Varying Sizes: While consistency is good, making a few slightly smaller or larger brains can add visual interest to your platter of ghoulish delights. Imagine a mad scientist’s lab – not every specimen is identical!
- Place on Parchment: As you finish shaping each Rice Krispies Brain, carefully place it on your prepared parchment paper. Allow them to set at room temperature for at least 30 minutes, or until they are firm to the touch. This setting time is important for them to hold their shape, especially once we add the “blood.”
Decorating and Finishing Your Ghoulish Brains
- Prepare Your “Blood”: Take your tube of red decorating gel. If it’s a bit stiff, you can gently roll the tube between your hands for a minute to warm it slightly, making it easier to squeeze out. The fine tip of the tube is perfect for precise application, giving you control over where your “blood” goes.
-
Apply the Gory Details: Once your Rice Krispies Brains are firm, it’s time for the final, gruesome touch! Starting with one brain, hold the decorating gel tube over one of the prominent grooves or crevices. Gently squeeze to release a thin line of red gel, letting it trickle down into the folds of the brain.
- Strategic Dripping: Focus on making the “blood” look like it’s naturally seeping from the convolutions. You can create small pools in deeper grooves or let thin rivulets run down the sides.
- Less Is More (Sometimes): You can choose to be subtle with just a few drops and drips, or go all out for a truly blood-soaked brain. I find that a mix of both looks most effective – some brains heavily drenched, others with just a hint of gore.
- Embrace the Mess: Don’t strive for perfection; blood isn’t usually neat! A few slightly messy streaks will only enhance the macabre realism of your Rice Krispies Brains. Imagine them freshly extracted!
Continue this process with all your shaped brains, making each one uniquely gory.
- Allow “Blood” to Set: Let the decorated Rice Krispies Brains sit at room temperature for at least another 15-30 minutes, or until the decorating gel has formed a slight skin and is no longer excessively wet to the touch. This prevents smudging when handling and serving.
-
Serving Suggestions and Storage:
- Presentation: These Rice Krispies Brains are fantastic served on a dark platter for maximum contrast, perhaps nestled among some dry ice (if you’re feeling extra dramatic) or even a bed of “dirt” (crumbled Oreo cookies). Their shocking appearance makes them a fantastic centerpiece for any Halloween spread.
- Storage: Store your finished Rice Krispies Brains in an airtight container at room temperature. They are best enjoyed within 2-3 days while they are at their peak crispiness and chewiness. After that, they tend to get a bit harder, though still delicious! Make sure to layer them with parchment paper to prevent the decorating gel from sticking to each other.
And there you have it – your very own batch of deliciously disgusting Rice Krispies Brains, ready to shock and delight your guests (or just yourself!). Happy haunting!
Conclusion:
So, you’ve reached the end of our delightful journey through this recipe, and I truly hope you’re feeling inspired and excited to roll up your sleeves and get started! This isn’t just another treat; it’s an experience, a conversation starter, and an absolute triumph of simple ingredients transformed into something extraordinary. Why is this recipe an absolute must-try? For starters, its unparalleled ease of preparation means you can whip up a batch in surprisingly little time, making it perfect for last-minute party contributions or an impromptu creative baking session with the kids. The combination of the irresistible, crispy texture from the puffed rice cereal and the perfectly sweet, gooey marshmallow binder creates a sensory delight that is genuinely addictive. Every bite offers that satisfying crunch followed by a tender, melt-in-your-mouth sweetness that simply leaves you wanting more. It’s a testament to the fact that sometimes, the most memorable creations come from the humblest beginnings.
But beyond the delightful taste and texture, what truly sets this recipe apart is its incredible versatility and visual appeal. Imagine the delighted gasps when you present these unique creations to your guests! They’re not just food; they’re edible art, ready to be customized to suit any occasion or theme. While they absolutely shine during Halloween festivities, becoming the undisputed stars of any spooky spread, their charm isn’t limited to a single holiday. Consider them for a quirky mad scientist-themed birthday party, a fun surprise for a movie night with friends, or even as a unique gift for someone who appreciates a good laugh and a delicious snack. The creativity you can pour into shaping and decorating these treats is limitless, making each batch a truly personal masterpiece. I find immense joy in seeing the expressions on people’s faces when they first encounter these treats – a mixture of curiosity, amusement, and then pure delight once they take that first delicious bite.
Endless Serving Suggestions and Creative Variations:
When it comes to serving, presentation can elevate these treats from merely delicious to truly spectacular. Arrange them artfully on a dark, contrasting platter to make their distinct features truly pop, or nestle them amongst other themed snacks for a cohesive display. For individual servings, try placing each treat in a clear cellophane bag, tied with a decorative ribbon, to make them perfect party favors or lunchbox surprises. You could even use small, decorative stands or pedestals to give them an extra touch of grandeur at a dessert table. They are incredibly robust, making them ideal for transporting to potlucks, school events, or family gatherings without worry.
Now, let’s talk about the exciting world of variations! This is where you can truly let your imagination run wild. Don’t feel constrained by the original design; think of it as a launching pad for your own culinary adventures. For an added layer of flavor, try stirring in a teaspoon of your favorite extract – almond for a sophisticated twist, peppermint for a festive holiday feel, or even a touch of orange zest for a burst of citrusy brightness. Chocolate lovers, rejoice! You can easily incorporate mini chocolate chips into the mixture before it sets, or for a more dramatic effect, drizzle melted dark, milk, or white chocolate over the finished treats. A dusting of edible glitter or some brightly colored sprinkles can also add an extra touch of whimsy and sparkle, perfect for making them suitable for non-spooky occasions. For those who enjoy a bit of texture, crushed nuts like walnuts or pecans can be mixed in, adding a delightful crunch. If you’re feeling particularly adventurous, experiment with different food colorings. Imagine vibrant green, electric blue, or even multi-hued treats created by swirling different colored marshmallow mixtures together before adding the cereal. You could also press the mixture into various cookie cutters once it’s slightly cooled but still pliable, creating an array of fun shapes beyond our featured design. The possibilities are genuinely boundless, and each variation offers a chance to make the recipe uniquely your own. This adaptability is precisely why I consider this recipe a core pillar in my dessert repertoire; it never gets boring, and it always manages to surprise and delight.
Your Turn to Create and Share!
I genuinely believe that once you’ve experienced the joy of making and sharing these delectable treats, they will quickly become a cherished favorite in your own home. There’s something profoundly satisfying about crafting something so delightful and seeing the smiles it brings to the faces of your loved ones. So, I wholeheartedly encourage you to dive in! Gather your ingredients, put on some cheerful music, and get ready to create some magic in your kitchen. This recipe is an open invitation to embrace creativity and share delicious moments. Once you’ve made your batch, I would absolutely, truly love to hear about your experience! Did you stick to the classic preparation, or did you unleash your inner artist and create some wild new variations? Perhaps you even came up with a new topping or a unique serving suggestion? Please, please, please don’t hesitate to leave a comment below and share your photos with us. Seeing your wonderful creations and hearing about your triumphs in the kitchen genuinely makes my day and inspires me to keep sharing more exciting recipes. There’s a wonderful community built around food, and I can’t wait for you to be a part of it. These Rice Krispies Brains are more than just a recipe; they are an experience waiting to happen. Happy creating, happy sharing, and most importantly, happy eating!
Rice Krispies Brains: Spooky & Fun Halloween Treat!
Create delightfully ghoulish Rice Krispies Brains for a spooky Halloween feast! These surprisingly realistic, yet utterly delicious, treats are made with crispy puffed rice cereal, gooey marshmallows, and butter, transformed into a creepy, show-stopping centerpiece.
Ingredients
-
5 cups (132g) Rice Krispies or crispy rice cereal
-
¼ cup (57g) unsalted butter
-
1 10-oz bag (283g) mini marshmallows (about 8 cups)
-
Red food coloring
Instructions
-
Step 1
Have Rice Krispies cereal measured in a large bowl. Line a surface with parchment paper for cooling and shaping. -
Step 2
In a large, heavy-bottomed pot, melt butter over medium-low heat. Add mini marshmallows and stir constantly until completely melted and smooth. Remove from heat. -
Step 3
Stir in red food coloring until a vibrant, unsettling pink-red hue is achieved, resembling brain tissue. -
Step 4
Immediately pour the colored marshmallow mixture over the Rice Krispies cereal. Using a greased spatula, quickly fold until all cereal is evenly coated. -
Step 5
Let the mixture cool in the bowl for 5-10 minutes, until warm enough to handle without burning but still pliable. Lightly grease your hands for shaping. -
Step 6
Scoop 1/2 to 3/4 cup of mixture for each brain. Mold into an oval shape in your palm. Press a shallow indentation lengthwise down the center to divide into two hemispheres. -
Step 7
Using your fingers, gently pinch, push, and create wavy ridges and grooves (convolutions) all over the surface of each hemisphere, mimicking a brain’s folded appearance. -
Step 8
Place the shaped Rice Krispies Brains on the prepared parchment paper. Allow them to set at room temperature for at least 30 minutes until firm. -
Step 9
Serve the Rice Krispies Brains on a platter. Store any leftovers in an airtight container at room temperature for 2-3 days, layering with parchment paper to prevent sticking.
Important Information
Nutrition Facts (Per Serving)
It is important to consider this information as approximate and not to use it as definitive health advice.
Allergy Information
Please check ingredients for potential allergens and consult a health professional if in doubt.
Leave a Comment