
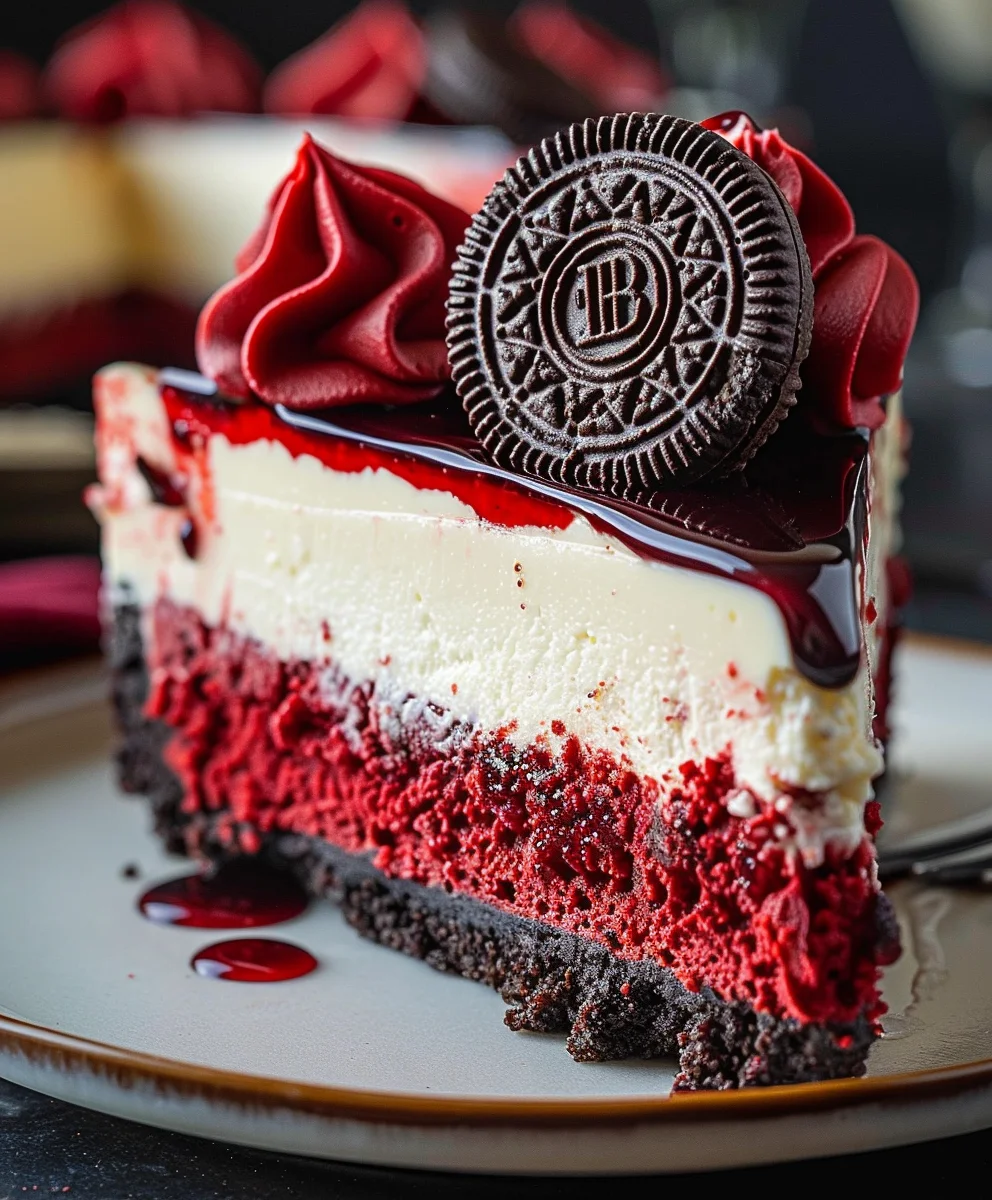
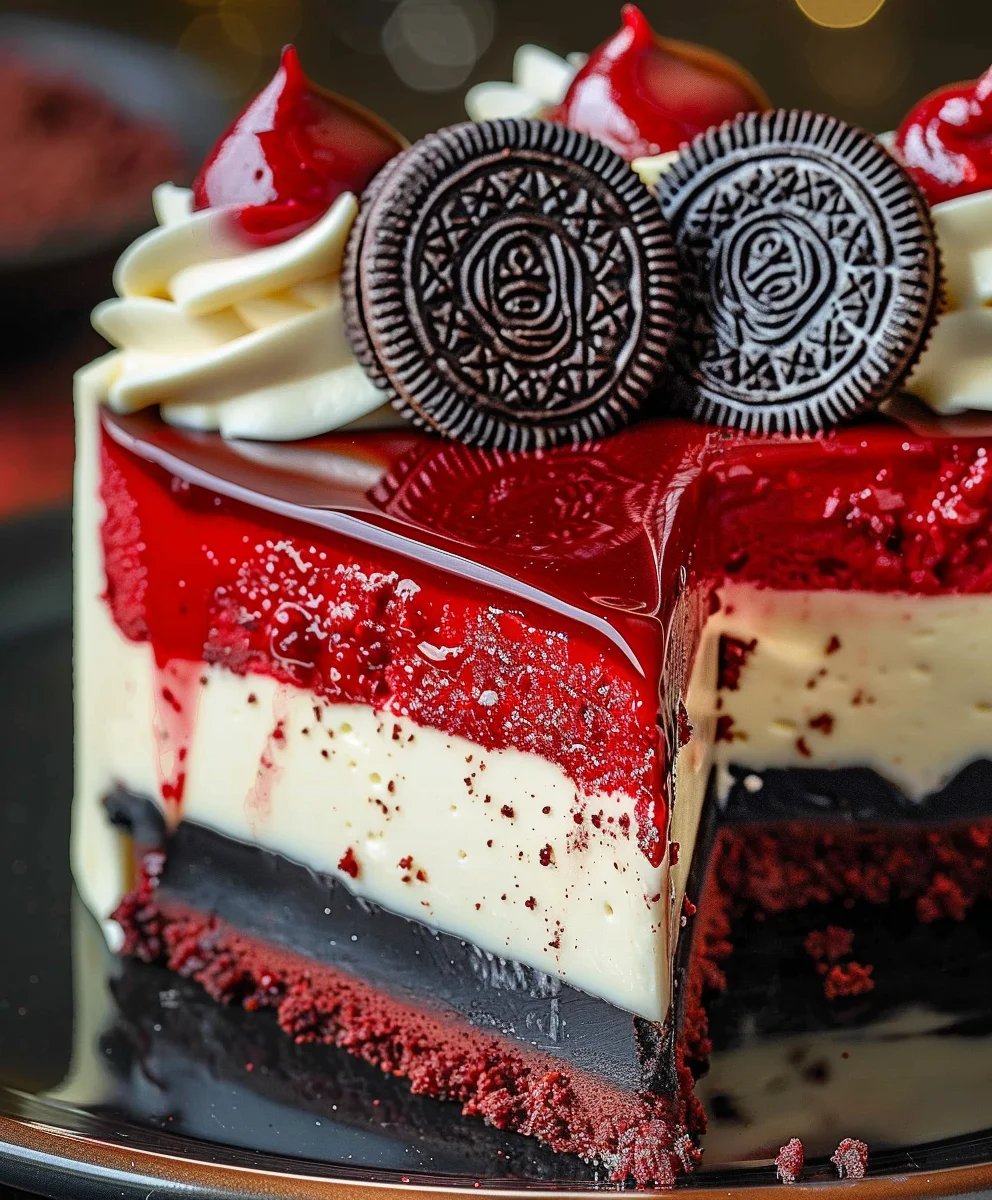
Red Velvet Oreo Cheesecake – just hearing those words evokes a symphony of flavors and textures, doesn’t it? As an avid baker and dessert enthusiast, I’ve always been captivated by the magic that happens when classic favorites merge into something extraordinary. Imagine the velvety richness of a traditional Red Velvet cake, with its subtle cocoa notes and vibrant hue, perfectly married with the creamy, tangy delight of a baked cheesecake, all elevated by the unmistakable crunch of America’s favorite cookie, the Oreo. This isn’t just a dessert; it’s a celebration on a plate, a truly decadent experience that promises to impress your taste buds and delight your guests.
While Red Velvet cake itself boasts a fascinating history, evolving from a simple ‘velvet’ cake to the iconic red-hued sensation we know today, and cheesecake holds ancient origins, this particular fusion, the Red Velvet Oreo Cheesecake, represents a modern culinary masterpiece. It’s born from a shared love for indulgence and the joy of combining beloved treats into something uniquely spectacular. People adore this dish because it offers the best of all worlds: the elegant moistness of red velvet, the irresistible creaminess of cheesecake, and the playful, crunchy texture of an Oreo crust and topping. It’s a showstopper, a conversation starter, and an absolute treat that satisfies every craving. Prepare to fall head over heels for this incredible dessert!

Ingredients:
- For the Oreo Red Velvet Crust:
- 36 Oreo cookies (the regular kind, about 1 standard package)
- 6 tablespoons (85g) unsalted butter, melted
- For the Red Velvet Cheesecake Filling:
- 32 ounces (907g) cream cheese, full-fat, softened to room temperature (that’s four 8-ounce blocks)
- 1 ¾ cups (350g) granulated sugar
- 4 large eggs, room temperature
- ½ cup (120g) full-fat sour cream, room temperature
- 2 tablespoons unsweetened cocoa powder (natural or Dutch-processed, either works beautifully)
- 1 tablespoon vanilla extract (pure vanilla is always best!)
- 2 teaspoons red liquid food coloring (I prefer gel food coloring for a deeper, more vibrant hue – about 1-2 teaspoons, depending on brand)
- ½ teaspoon salt
- 12-15 Oreo cookies, roughly chopped (for incorporating into the red velvet batter)
- For the Cream Cheese Frosting Topping:
- 8 ounces (226g) cream cheese, full-fat, softened to room temperature (one 8-ounce block)
- ½ cup (113g) unsalted butter, softened to room temperature
- 3 cups (360g) powdered sugar (also known as confectioners’ sugar), sifted
- 1 teaspoon vanilla extract
- 2-3 tablespoons heavy cream or milk, as needed for consistency
- For Garnish (Optional but highly recommended!):
- 6-8 Oreo cookies, coarsely chopped or crumbled
- Additional chocolate shavings or a drizzle of melted chocolate
Preparing the Perfect Oreo Red Velvet Crust: The Foundation of Flavor
Every fantastic cheesecake starts with an equally fantastic crust, and for our Red Velvet Oreo Cheesecake, we’re building a truly delightful foundation. This crust brings a wonderful textural contrast and an extra layer of chocolatey goodness that perfectly complements the rich cheesecake above.
- First things first, let’s get our oven ready. Preheat your oven to 325°F (160°C). Then, prepare a 9-inch springform pan. I always recommend lightly greasing the bottom and sides of the pan, and for extra security against leaks (especially if you’re using a water bath, which I highly recommend for cheesecakes), wrap the bottom and sides of the springform pan tightly with two layers of heavy-duty aluminum foil. This creates a protective barrier and ensures a perfectly smooth finish on your cheesecake.
- Now, for the stars of our crust: the Oreo cookies! Place all 36 Oreo cookies, cream filling and all, into a food processor. Pulse them until they are finely ground crumbs. You want them to be uniform in size, like coarse sand. If you don’t have a food processor, you can place the cookies in a large Ziploc bag, seal it, and crush them with a rolling pin or the bottom of a heavy pan. Just make sure they are very finely crushed.
- Melt your 6 tablespoons of unsalted butter. You can do this in a microwave-safe bowl in 15-second intervals, stirring in between, or in a small saucepan over low heat. Once melted, pour the butter over the crushed Oreo crumbs in a medium bowl.
- Mix the butter and cookie crumbs together thoroughly until the crumbs are evenly moistened. It should resemble wet sand and hold together when you pinch it. This step is crucial because the butter acts as the binding agent, ensuring your crust is firm and doesn’t crumble when sliced.
- Press the mixture firmly and evenly into the bottom of the prepared springform pan. You can use the back of a spoon, the bottom of a flat glass, or even your clean hands. Make sure it’s a compact, even layer. I like to press it up the sides a tiny bit, just about ¼ inch, for a neater edge, but it’s not strictly necessary.
- Bake the crust in the preheated oven for 8-10 minutes. This quick bake helps to set the crust, making it sturdier and less prone to getting soggy once the cheesecake filling is added. After baking, remove it from the oven and let it cool completely on a wire rack while you prepare the cheesecake filling. A cool crust is key before adding your batter!
Crafting the Velvety Red Velvet Cheesecake Filling: The Star of the Show
This is where the magic truly happens! The rich, tangy, and subtly chocolatey flavor of the red velvet combined with the creamy texture of cheesecake is what makes this Red Velvet Oreo Cheesecake so incredibly special. Patience and proper ingredient preparation are your best friends here.
- In a very large mixing bowl, using an electric mixer (either a stand mixer with the paddle attachment or a hand-held mixer), beat the softened cream cheese on medium speed until it is completely smooth and creamy, about 2-3 minutes. Make sure there are no lumps at all. Using room temperature cream cheese is non-negotiable for a lump-free batter!
- Gradually add the granulated sugar to the cream cheese, beating on low speed until just combined. Then increase the speed to medium and beat for another 2-3 minutes, scraping down the sides of the bowl frequently. You want the mixture to be light and fluffy.
- Reduce the mixer speed to low. Add the sour cream, vanilla extract, and salt. Mix until just incorporated. Sour cream adds a lovely tang and helps to create that signature rich, dense, and creamy cheesecake texture.
- In a small bowl, whisk together the cocoa powder and red food coloring until a smooth paste forms. This ensures the cocoa powder is fully dissolved and distributes evenly, preventing streaks of unmixed powder in your final cheesecake.
- Add the cocoa-red food coloring paste to the cream cheese mixture. Beat on low speed until the color is uniformly distributed and the batter is a gorgeous, vibrant red. Scrape down the sides of the bowl as needed to ensure everything is fully combined.
- Now, add the eggs one at a time, mixing on very low speed just until each egg is incorporated. Do not overmix at this stage! Overmixing once the eggs are added can incorporate too much air into the batter, which can lead to cracks in your cheesecake during baking. Mix just until the yolk disappears.
- Finally, gently fold in the 12-15 roughly chopped Oreo cookies. I like to do this by hand with a spatula to ensure they are evenly distributed without crushing them too much, preserving some of their wonderful texture. These cookie pieces will be delightful surprises in every bite of your Red Velvet Oreo Cheesecake.
- Pour the red velvet cheesecake batter over the cooled Oreo crust in the springform pan. Gently tap the pan on the counter a few times to release any large air bubbles.
Assembling and Baking Your Cheesecake Masterpiece: Precision for Perfection
Baking a cheesecake perfectly often involves a water bath, and for this luxurious Red Velvet Oreo Cheesecake, it’s a technique I swear by. A water bath creates a humid environment in the oven, which helps the cheesecake bake evenly, prevents cracks, and yields that wonderfully creamy, custardy texture we all crave.
- Carefully place the foil-wrapped springform pan with the cheesecake batter into a larger roasting pan.
- Pour hot water into the roasting pan, ensuring it comes halfway up the sides of the springform pan. Be careful not to splash any water into the cheesecake batter itself! This is the water bath.
- Carefully transfer the roasting pan, with the cheesecake nestled inside, to the preheated 325°F (160°C) oven.
- Bake for 60-75 minutes. The baking time can vary slightly depending on your oven. You’ll know your cheesecake is done when the edges are set and appear slightly puffed, but the center (about a 2-inch diameter) still has a slight jiggle to it when you gently shake the pan. It’s important not to overbake! The cheesecake will continue to set as it cools.
- Once baked, turn off the oven, but leave the cheesecake inside the water bath with the oven door propped open slightly (I use a wooden spoon) for one hour. This gradual cooling process helps prevent sudden temperature changes that can lead to cracks.
Cooling and Chilling: The Patience Game for the Best Texture
This phase is arguably just as important as the baking itself for achieving the perfect texture for your Red Velvet Oreo Cheesecake. Resist the urge to rush it!
- After the hour of cooling in the oven, carefully remove the roasting pan from the oven. Then, lift the springform pan out of the water bath. Remove the foil from around the springform pan.
- Place the cheesecake on a wire rack and let it cool completely to room temperature. This can take anywhere from 2-3 hours. Once it’s completely cooled, cover the cheesecake loosely with plastic wrap.
- Transfer the covered cheesecake to the refrigerator and chill for a minimum of 6 hours, but ideally overnight. This extended chilling time allows the cheesecake to firm up, develop its full flavor, and become perfectly sliceable. True cheesecake perfection requires patience!
The Grand Finale: Cream Cheese Frosting and Garnish
No Red Velvet Oreo Cheesecake would be complete without a luscious cream cheese frosting topping. It’s the classic accompaniment to red velvet and adds another layer of irresistible creaminess and tang. Plus, we’ll make it look absolutely stunning!
- Once your cheesecake is fully chilled, it’s time to prepare the cream cheese frosting. In a large mixing bowl, using an electric mixer, beat the softened cream cheese and softened unsalted butter together on medium speed until smooth and creamy, about 2-3 minutes. Again, ensuring these ingredients are at room temperature will prevent lumps and ensure a silky-smooth frosting.
- Gradually add the sifted powdered sugar, one cup at a time, beating on low speed until combined after each addition. Once all the sugar is added, increase the speed to medium-high and beat for another 2-3 minutes until the frosting is light and fluffy.
- Beat in the vanilla extract. If the frosting seems too thick, add heavy cream or milk, one tablespoon at a time, until it reaches your desired spreadable consistency. You want it firm enough to hold its shape but soft enough to spread easily.
- Remove the sides of the springform pan from the chilled cheesecake. If you find it sticking, run a thin, sharp knife around the edge of the cheesecake before removing the ring.
- Spread the cream cheese frosting evenly over the top of the chilled Red Velvet Oreo Cheesecake. You can make decorative swirls with the back of a spoon or use an offset spatula for a smoother finish.
- For the ultimate presentation, garnish with additional coarsely chopped or crumbled Oreo cookies. You can sprinkle them all over the top or arrange them decoratively around the edge. A drizzle of melted chocolate or some elegant chocolate shavings would also elevate this dessert beautifully.
- Slice and serve your magnificent Red Velvet Oreo Cheesecake! I recommend using a sharp knife dipped in hot water and wiped clean between each slice for the cleanest cuts. Store any leftovers in an airtight container in the refrigerator for up to 5-7 days. Enjoy every single glorious bite!
Conclusion:
And there you have it, my friends – the grand finale to our culinary adventure! When I set out to create this recipe, I truly wanted something that transcended the ordinary, a dessert that wasn’t just sweet but told a story with every bite. I believe we’ve achieved just that with this incredible Red Velvet Oreo Cheesecake. This isn’t just another dessert; it’s a celebration of textures and flavors, a symphony of rich, deep cocoa notes from the iconic red velvet, harmoniously blended with the creamy, tangy perfection of a classic cheesecake. Then, just when you think it couldn’t get any better, the familiar, beloved crunch of Oreo cookies steps in, providing that delightful contrast that elevates each spoonful into an unforgettable experience. It’s truly a showstopper, a dessert that demands attention and always delivers smiles. The vibrant red hue against the stark white of the cheesecake, dotted with dark cookie pieces, makes it as visually stunning as it is delicious, guaranteeing a gasp of delight from anyone lucky enough to receive a slice.
What makes this particular recipe a must-try, in my humble opinion, is its masterful balance. We’re not just throwing ingredients together; we’re crafting a culinary masterpiece where each component plays a vital role. The velvety smoothness of the cheesecake melts in your mouth, perfectly complemented by the slightly bitter undertones of the red velvet cake crumb, and then, that satisfying crunch from the Oreo base and the scattered pieces within. It’s a multi-sensory journey that few desserts can replicate. Whether you’re a seasoned baker looking for your next challenge or someone who simply appreciates a truly exceptional dessert, I promise you, this recipe will not disappoint. It’s robust enough to stand up to any special occasion, yet comforting enough to be the perfect indulgence after a long week. Seriously, prepare for rave reviews and requests for the recipe every single time you make it.
Elevate Your Serving Experience:
While this magnificent cheesecake is an absolute star on its own, I’ve found that a few simple additions can truly enhance the serving experience. A generous dollop of freshly whipped cream, lightly sweetened with a hint of vanilla, makes for an ethereal cloud that complements the richness of the cheesecake beautifully. For an extra touch of elegance, consider garnishing each slice with a sprinkle of delicate chocolate shavings or a few fresh raspberries. The tartness of the berries provides a wonderful counterpoint to the sweet creaminess, cleansing the palate and inviting another bite. A glass of cold milk or a robust cup of coffee makes for the perfect beverage pairing, cutting through the richness and highlighting the complex flavors. For those who love a bit more decadence, a drizzle of warm chocolate fudge or a swirl of salted caramel sauce over the top just before serving can turn an already amazing dessert into an out-of-this-world experience. Remember, presentation is key – a beautifully plated dessert always tastes even better!
Creative Variations to Inspire You:
One of the joys of baking is the ability to personalize and experiment, and this recipe is wonderfully adaptable. Don’t be afraid to make it your own! If you’re looking for variations, consider switching up the crust. While the Oreo crust is divine, a classic chocolate graham cracker crust or even a crushed shortbread cookie base could offer a different texture and flavor profile. For an extra layer of chocolatey goodness, you could gently fold in a handful of mini chocolate chips into the cheesecake batter before baking. Another exciting idea is to swirl a tablespoon or two of a raspberry or cherry puree into the red velvet layer just before baking, creating a beautiful marbled effect and adding a fruity zing. For those who enjoy a bit of a kick, a tiny dash of espresso powder can deepen the cocoa flavor without making the cheesecake taste like coffee. And if you’re feeling particularly ambitious, a homemade cream cheese frosting, artfully piped on top, can truly elevate the visual appeal and add another layer of classic red velvet flavor. Don’t let dietary restrictions hold you back either; with a gluten-free cookie crust and appropriate sugar substitutes, you can adapt this masterpiece for almost anyone!
Your Baking Journey Begins Now!
My greatest hope is that this detailed guide inspires you to roll up your sleeves and dive into the wonderful world of baking this exceptional Red Velvet Oreo Cheesecake. There’s a profound satisfaction that comes from creating something so beautiful and delicious from scratch, something that brings joy to those you share it with. Don’t be intimidated by the layers or the steps; each one is simple to follow, and the end result is so incredibly worth the effort. Imagine the look on your family’s or friends’ faces when you present them with this magnificent creation – pure bliss, I guarantee it!
So, please, take the leap! Give this incredible Red Velvet Oreo Cheesecake a try in your own kitchen. I am truly excited for you to experience the magic of this dessert firsthand. And once you’ve conquered it, I would absolutely love to hear about your baking adventure! Please share your thoughts, your photos, and any creative variations you came up with in the comments below. Your feedback and experiences are incredibly valuable, and they help build a wonderful community of enthusiastic home bakers. Let’s celebrate the joy of baking together. Happy baking, everyone!
Red Velvet Oreo Cheesecake: Easy, Rich & Irresistible!
Indulge in this decadent Red Velvet Oreo Cheesecake, a celebration of flavors and textures. It combines the velvety richness of red velvet cake, the creamy tang of baked cheesecake, and the irresistible crunch of Oreo cookies, creating a truly irresistible and show-stopping dessert.
Ingredients
-
2 ½ cups Oreo cookie crumbs (about 25-30 cookies, crushed)
-
5 tbsp unsalted butter, melted
-
16 oz (2 blocks) cream cheese, softened
-
¾ cup granulated sugar
-
¼ cup sour cream
-
2 large eggs
-
1 ½ tbsp cocoa powder
-
1 ½ tsp vanilla extract
-
1 tbsp red food coloring
-
16 oz (2 blocks) cream cheese, softened
-
¾ cup granulated sugar
-
¼ cup sour cream
-
2 large eggs
-
1 ½ tsp vanilla extract
-
½ cup heavy cream
Instructions
-
Step 1
Preheat oven to 325°F (160°C). Grease a 9-inch springform pan; wrap bottom and sides with two layers of foil. Combine 2 ½ cups Oreo cookie crumbs with 5 tbsp melted unsalted butter. Press mixture firmly into the pan bottom. Bake for 8-10 minutes, then let cool completely on a wire rack. -
Step 2
In a large bowl, beat the first 16 oz softened cream cheese until smooth. Gradually add the first ¾ cup granulated sugar, beating until light and fluffy. Mix in the first ¼ cup sour cream and the first 1 ½ tsp vanilla extract. Whisk 1 ½ tbsp cocoa powder and 1 tbsp red food coloring into a smooth paste; add to cream cheese mixture and beat until vibrant red and uniform. Beat in the first 2 large eggs one at a time on low speed, mixing just until incorporated. Pour batter over the cooled Oreo crust; gently tap pan to release air bubbles. -
Step 3
Place the foil-wrapped springform pan into a larger roasting pan. Pour hot water into the roasting pan to come halfway up the sides of the springform pan (water bath). Carefully transfer to the preheated 325°F (160°C) oven. Bake for 60-75 minutes, until edges are set but the center (about 2-inch diameter) still has a slight jiggle. Turn off oven, prop door open, and leave cheesecake inside water bath for 1 hour for gradual cooling. -
Step 4
After cooling in the oven, remove springform from water bath and foil. Let cool completely to room temperature on a wire rack (2-3 hours). Cover loosely with plastic wrap and chill in the refrigerator for a minimum of 6 hours, ideally overnight, for best texture. -
Step 5
For the frosting, beat the second 16 oz softened cream cheese until smooth. Gradually add the second ¾ cup granulated sugar and the second 1 ½ tsp vanilla extract, beating until light and fluffy. Mix in ½ cup heavy cream until desired spreadable consistency. Remove springform sides from chilled cheesecake. Spread frosting evenly over top. Garnish with coarsely chopped Oreo cookies or chocolate shavings (optional). Slice with a sharp knife dipped in hot water and wiped clean between each cut. Store leftovers refrigerated.
Important Information
Nutrition Facts (Per Serving)
It is important to consider this information as approximate and not to use it as definitive health advice.
Allergy Information
Please check ingredients for potential allergens and consult a health professional if in doubt.
Leave a Comment