
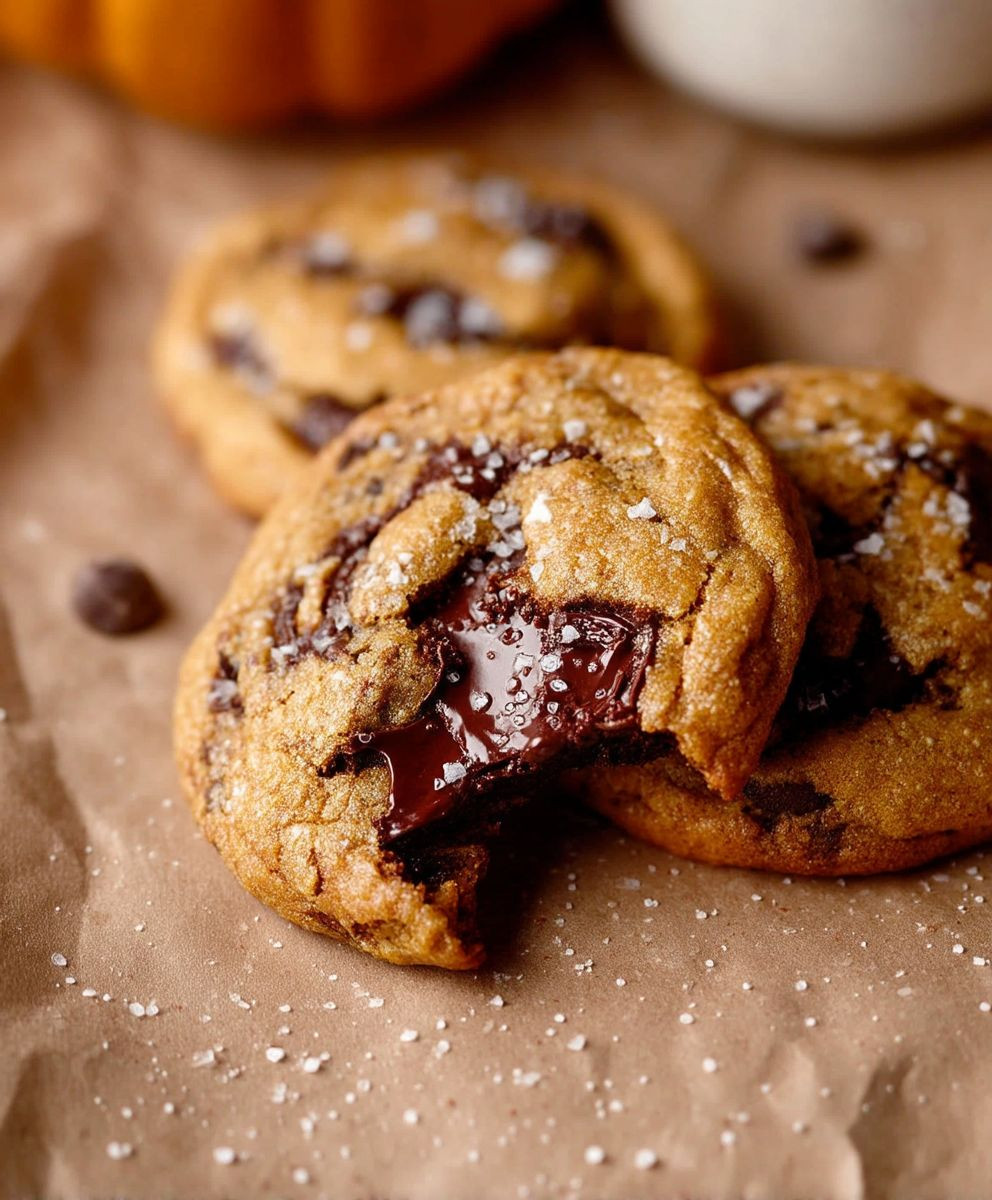
Pumpkin Chocolate Chip Cookies: Prepare to be utterly captivated by the most delightful autumn treat you’ll bake all season! Imagine sinking your teeth into a soft, chewy cookie, bursting with the warm spice of pumpkin and the irresistible sweetness of chocolate chips. It’s a symphony of flavors and textures that will have you reaching for seconds (and thirds!).
Pumpkin spice, as we know it today, has roots in the colonial era, where resourceful cooks utilized readily available pumpkins and warming spices like cinnamon, nutmeg, and ginger to create comforting dishes. While the modern pumpkin spice craze might seem like a recent phenomenon, the combination of these flavors has been cherished for generations, evoking feelings of home and hearth.
What makes Pumpkin Chocolate Chip Cookies so universally loved? It’s the perfect marriage of comforting familiarity and exciting seasonal flair. The moist, tender crumb, thanks to the pumpkin puree, is simply divine. The chocolate chips add a delightful burst of sweetness that perfectly complements the earthy pumpkin spice. Plus, they are incredibly easy to make, making them ideal for busy weeknights or weekend baking sessions. Whether you’re a seasoned baker or a novice in the kitchen, these cookies are guaranteed to be a crowd-pleaser. Get ready to experience the magic of fall in every single bite!

Ingredients:
- 1 cup (2 sticks) unsalted butter, softened
- 1 cup granulated sugar
- 1 cup packed brown sugar
- 2 large eggs
- 1 teaspoon vanilla extract
- 1 cup pumpkin puree (not pumpkin pie filling)
- 2 1/2 cups all-purpose flour
- 1 teaspoon baking soda
- 1 teaspoon ground cinnamon
- 1/2 teaspoon ground nutmeg
- 1/4 teaspoon ground cloves
- 1/2 teaspoon salt
- 2 cups chocolate chips (semi-sweet or milk chocolate, or a mix!)
Preparing the Dough:
Alright, let’s get started! First things first, we need to cream together the butter and sugars. This is a crucial step, so don’t rush it!
- In a large bowl (or the bowl of your stand mixer), cream together the softened butter, granulated sugar, and brown sugar until light and fluffy. This usually takes about 3-5 minutes with an electric mixer. You’ll know it’s ready when the mixture is noticeably lighter in color and has a smoother texture. Scrape down the sides of the bowl occasionally to ensure everything is evenly incorporated. If you’re using a hand mixer, make sure your butter is *really* soft, but not melted.
- Beat in the eggs one at a time, mixing well after each addition. This helps to emulsify the mixture and create a smooth batter. Again, scrape down the sides of the bowl to make sure everything is combined properly.
- Stir in the vanilla extract and pumpkin puree. Mix until just combined. Be careful not to overmix at this stage. Overmixing can lead to tough cookies. The pumpkin puree adds moisture and that wonderful pumpkin flavor, so it’s important to incorporate it evenly.
Combining the Dry Ingredients:
Now, let’s move on to the dry ingredients. This step is important for ensuring that the baking soda and spices are evenly distributed throughout the dough.
- In a separate medium bowl, whisk together the all-purpose flour, baking soda, cinnamon, nutmeg, cloves, and salt. Whisking helps to break up any clumps in the flour and ensures that the baking soda and spices are evenly distributed. This is much more effective than just stirring them together.
- Gradually add the dry ingredients to the wet ingredients, mixing on low speed until just combined. Be careful not to overmix! Overmixing develops the gluten in the flour, which can result in tough cookies. Mix until the flour is just incorporated, and then stop. A few streaks of flour are okay at this point.
- Fold in the chocolate chips. Use a spatula to gently fold in the chocolate chips until they are evenly distributed throughout the dough. Again, be careful not to overmix.
Chilling the Dough (Optional but Recommended):
Chilling the dough is an optional step, but I highly recommend it! Chilling the dough allows the flavors to meld together and prevents the cookies from spreading too much during baking. It also makes the dough easier to handle.
- Cover the bowl with plastic wrap and refrigerate for at least 30 minutes, or up to 2 hours. The longer you chill the dough, the more flavorful and less spread-out your cookies will be. If you’re short on time, 30 minutes is fine, but I find that an hour or two yields the best results.
Baking the Cookies:
Okay, the moment we’ve all been waiting for! Let’s bake these delicious cookies!
- Preheat your oven to 375°F (190°C). Make sure your oven rack is in the center position.
- Line baking sheets with parchment paper or silicone baking mats. This will prevent the cookies from sticking and make cleanup a breeze. Parchment paper is my go-to for even baking and easy removal.
- Drop rounded tablespoons of dough onto the prepared baking sheets, leaving about 2 inches between each cookie. This is important because the cookies will spread as they bake. Using a cookie scoop helps to ensure that all the cookies are the same size, which will help them bake evenly.
- Bake for 9-11 minutes, or until the edges are golden brown and the centers are set. The baking time will vary depending on your oven, so keep a close eye on the cookies. You want them to be golden brown around the edges but still slightly soft in the center.
- Remove the baking sheets from the oven and let the cookies cool on the baking sheets for a few minutes before transferring them to a wire rack to cool completely. This allows the cookies to firm up slightly and prevents them from breaking when you transfer them.
Tips and Variations:
Here are a few tips and variations to help you customize these cookies to your liking:
- Spice it up: Add a pinch of ground ginger or allspice to the dry ingredients for an extra layer of flavor.
- Nutty addition: Fold in 1/2 cup of chopped walnuts or pecans for added texture and flavor.
- White chocolate chips: Substitute some or all of the semi-sweet chocolate chips with white chocolate chips for a sweeter flavor.
- Cream cheese frosting: Once the cookies are completely cooled, top them with a cream cheese frosting for an extra decadent treat.
- Brown butter: Brown the butter before creaming it with the sugars for a richer, nuttier flavor. Be careful not to burn the butter!
- Storage: Store the cookies in an airtight container at room temperature for up to 3 days.
- Freezing: You can freeze the cookie dough for up to 2 months. Simply scoop the dough onto a baking sheet and freeze until solid. Then, transfer the frozen dough balls to a freezer bag. When you’re ready to bake, simply bake the frozen dough balls for a few minutes longer than the recipe calls for. You can also freeze the baked cookies for up to 2 months.
Troubleshooting:
Sometimes things don’t go exactly as planned. Here are a few common problems and how to fix them:
- Cookies are too flat: This could be due to several factors, including using melted butter, not chilling the dough, or using too much sugar. Make sure your butter is softened but not melted, chill the dough for at least 30 minutes, and measure your ingredients accurately.
- Cookies are too dry: This could be due to overbaking or using too much flour. Make sure you don’t overbake the cookies, and measure your flour accurately. Spoon the flour into the measuring cup and level it off with a knife, rather than scooping it directly from the bag.
- Cookies are too tough: This is usually caused by overmixing the dough. Be careful not to overmix the dough, especially after adding the flour. Mix until the flour is just incorporated, and then stop.
Enjoy!
I hope you enjoy these delicious pumpkin chocolate chip cookies! They’re perfect for fall gatherings, holiday parties, or just a cozy night in. Happy baking!
Conclusion:
So, there you have it! These Pumpkin Chocolate Chip Cookies are truly a must-bake this season, and honestly, any time you’re craving a little bit of autumn sunshine in cookie form. The combination of warm pumpkin spice, the rich sweetness of chocolate chips, and that perfectly soft, chewy texture is simply irresistible. I promise, one bite and you’ll be hooked!
But why are these cookies so special? It’s more than just the delicious flavor profile. It’s the ease of the recipe, the comforting aroma that fills your kitchen as they bake, and the sheer joy of sharing them with loved ones. They’re the perfect treat for a cozy night in, a festive gathering, or even just a little afternoon pick-me-up. Plus, they’re surprisingly simple to make, even for beginner bakers. You don’t need any fancy equipment or complicated techniques, just a few basic ingredients and a little bit of love.
These cookies are more than just a dessert; they’re an experience.
And the best part? You can easily customize them to your liking! Feel free to experiment with different types of chocolate chips – dark chocolate, white chocolate, or even a mix of both would be fantastic. For a little extra crunch, add some chopped walnuts or pecans to the batter. Or, if you’re feeling adventurous, try adding a teaspoon of cinnamon or nutmeg for an even warmer, spicier flavor.
Here are a few serving suggestions to elevate your Pumpkin Chocolate Chip Cookie experience:
* Warm and Gooey: Serve them fresh out of the oven, still warm and gooey, with a scoop of vanilla ice cream. The contrast of the warm cookie and the cold ice cream is heavenly.
* Coffee Companion: Enjoy them with a cup of hot coffee or tea for a perfect afternoon treat. The warm spices in the cookies pair beautifully with the rich flavors of coffee.
* Milk and Cookies: A classic for a reason! Dunking these cookies in a glass of cold milk is a simple yet satisfying pleasure.
* Cookie Sandwiches: Make cookie sandwiches with a layer of cream cheese frosting or pumpkin spice buttercream in between. This is a decadent and delicious way to enjoy these cookies.
* Gift Giving: Package them up in a cute box or tin and give them as a thoughtful homemade gift to friends, family, or neighbors. They’re sure to appreciate the effort and the deliciousness!
I truly believe that everyone should experience the joy of baking and enjoying these incredible cookies. So, I urge you to give this recipe a try. Don’t be intimidated by the thought of baking; it’s a fun and rewarding experience, and these cookies are a great place to start.
Once you’ve made them, I would absolutely love to hear about your experience! Did you make any variations? Did you enjoy them as much as I do? Share your photos and stories on social media using #PumpkinChocolateChipCookieMagic or tag me in your posts. I can’t wait to see your creations and hear your feedback.
Making these Pumpkin Chocolate Chip Cookies is a decision you won’t regret. They are the perfect embodiment of fall flavors and are guaranteed to bring a smile to your face. Happy baking, and I hope you enjoy every single bite! Let me know what you think!
Pumpkin Chocolate Chip Cookies: The Ultimate Fall Baking Recipe
Soft, chewy pumpkin chocolate chip cookies with warm spices and melty chocolate. Perfect fall baking!
Ingredients
Instructions
Recipe Notes
- Spice it up: Add a pinch of ground ginger or allspice to the dry ingredients for an extra layer of flavor.
- Nutty addition: Fold in 1/2 cup of chopped walnuts or pecans for added texture and flavor.
- White chocolate chips: Substitute some or all of the semi-sweet chocolate chips with white chocolate chips for a sweeter flavor.
- Cream cheese frosting: Once the cookies are completely cooled, top them with a cream cheese frosting for an extra decadent treat.
- Brown butter: Brown the butter before creaming it with the sugars for a richer, nuttier flavor. Be careful not to burn the butter!
- Storage: Store the cookies in an airtight container at room temperature for up to 3 days.
- Freezing: You can freeze the cookie dough for up to 2 months. Simply scoop the dough onto a baking sheet and freeze until solid. Then, transfer the frozen dough balls to a freezer bag. When you’re ready to bake, simply bake the frozen dough balls for a few minutes longer than the recipe calls for. You can also freeze the baked cookies for up to 2 months.
- Cookies are too flat: This could be due to several factors, including using melted butter, not chilling the dough, or using too much sugar. Make sure your butter is softened but not melted, chill the dough for at least 30 minutes, and measure your ingredients accurately.
- Cookies are too dry: This could be due to overbaking or using too much flour. Make sure you don’t overbake the cookies, and measure your flour accurately. Spoon the flour into the measuring cup and level it off with a knife, rather than scooping it directly from the bag.
- Cookies are too tough: This is usually caused by overmixing the dough. Be careful not to overmix the dough, especially after adding the flour. Mix until the flour is just incorporated, and then stop.
Leave a Comment