
Pumpkin Cheese Ball is an absolute showstopper, a culinary delight that perfectly captures the spirit of autumn in every creamy, flavorful bite. Are you ready to elevate your seasonal entertaining with an appetizer that’s as charming to behold as it is irresistible to taste? I’m thrilled to share a recipe that promises to become the star of your next gathering, whether it’s a cozy family get-together or a festive holiday party.
Why the Pumpkin Cheese Ball is a Seasonal Sensation
While the concept of a cheese ball has graced appetizer tables for decades, the pumpkin variation brings a modern, festive twist, making it particularly popular during the fall season, Halloween, and Thanksgiving. It’s more than just a dip; it’s a conversation starter, often artfully shaped like a miniature pumpkin and adorned with a pretzel stem. People adore this dish not only for its incredibly rich and savory flavor profile – a masterful blend of cream cheese, cheddar, and subtle pumpkin spices – but also for its delightful spreadable texture. It’s wonderfully convenient, allowing you to prepare it ahead of time, freeing you up to enjoy your guests. I believe the sheer joy of presenting such a visually appealing and delicious Pumpkin Cheese Ball is truly what makes it a perennial favorite year after year. Let’s dive into creating this festive masterpiece together!

Ingredients:
- For the Pumpkin Cheese Ball:
- 2 (8-ounce) packages full-fat cream cheese, softened to room temperature
- 1/2 cup pure pumpkin puree (ensure it’s not pumpkin pie filling, just plain pumpkin)
- 1/2 cup shredded sharp cheddar cheese, finely shredded for best texture
- 1/4 cup cooked and crumbled bacon bits (about 3-4 strips of bacon)
- 2 tablespoons finely chopped fresh chives, plus more for garnish if desired
- 2 tablespoons finely chopped pecans or walnuts, toasted for enhanced flavor
- 1 teaspoon ground cinnamon
- 1/2 teaspoon ground nutmeg
- 1/4 teaspoon ground ginger
- 1/8 teaspoon ground cloves (or a tiny pinch)
- 1/2 teaspoon salt, or to taste
- 1/4 teaspoon black pepper, freshly ground if possible
- For the Coating and Garnish:
- 1/2 cup finely crushed buttery crackers (like Ritz) OR finely chopped pecans/walnuts for a nuttier coating
- 1 teaspoon paprika (for color, optional but recommended for that “pumpkin” hue)
- 1 small pretzel stick, cinnamon stick, or a small piece of bell pepper (for the “stem”)
- A few fresh parsley leaves or a bay leaf (for the “leaves,” optional)
- For Serving (Suggestions):
- Assorted crackers (butter crackers, whole wheat crackers, water crackers)
- Pretzel crisps or small pretzel twists
- Apple slices or pear slices (especially good for a sweet and savory contrast)
- Celery sticks or carrot sticks
- Toasted baguette slices
- Ginger snaps or other spiced cookies for a unique pairing
Preparing the Pumpkin Cheese Ball Mixture:
-
Ensure Cream Cheese is Properly Softened:
The very first step, and arguably one of the most crucial for a perfectly smooth and lump-free cheese ball, is to make sure your cream cheese is at a true room temperature. I can’t stress this enough! If your cream cheese is even slightly cool, it will be incredibly difficult to incorporate with the other ingredients evenly, leading to a clumpy texture that no one wants in a delicious cheese ball. Ideally, I take my cream cheese out of the refrigerator at least an hour, or even two, before I plan to start mixing. You want it pliable, almost spreadable right out of the wrapper. If you’re in a pinch, you can carefully microwave it for 10-15 seconds at a time on low power, checking and flipping it until it reaches that desired softness, but be very cautious not to melt it or cook it.
-
Cream Together the Base:
In a large mixing bowl, using either a hand mixer or a stand mixer fitted with the paddle attachment, beat the softened cream cheese on medium speed until it’s light, fluffy, and completely smooth. This usually takes about 1-2 minutes. The goal here is to aerate it slightly and ensure there are no lumps whatsoever before we start adding the other components. A well-beaten cream cheese base provides the perfect canvas for all the wonderful flavors to come.
-
Incorporate the Pumpkin Puree and Savory Elements:
Now it’s time to introduce that delightful pumpkin flavor! Add the pure pumpkin puree to the beaten cream cheese. Mix on low speed until the pumpkin is fully incorporated and the mixture is a uniform pale orange color. Scrape down the sides of the bowl as needed to ensure everything is thoroughly combined. Next, gently fold in the finely shredded sharp cheddar cheese. I recommend shredding your own cheese from a block if possible; it melts and incorporates much better than pre-shredded varieties, which often contain anti-caking agents. After the cheddar, add the cooked and crumbled bacon bits. Make sure your bacon is crispy but not burnt, and drain off any excess grease before crumbling. Then, stir in the finely chopped fresh chives and the toasted pecans or walnuts. The chives add a wonderful oniony freshness, while the toasted nuts provide a crucial textural contrast and depth of flavor. Mix these in just until evenly distributed; overmixing at this stage can break down the other ingredients too much.
-
Season with Spices and Salt:
This is where the “pumpkin pie spice” magic happens for our savory cheese ball. Add the ground cinnamon, nutmeg, ginger, and cloves to the mixture. While these are traditionally sweet spices, in combination with the savory elements like cream cheese, cheddar, and bacon, they lend a warm, earthy, and incredibly inviting aroma and taste that perfectly complements the pumpkin. Don’t be shy with the spices, but always start with the recommended amount and remember you can always add more, but you can’t take it away! Also, add the salt and black pepper. The salt is essential for enhancing all the other flavors, while the fresh black pepper adds a subtle bite. Mix everything thoroughly on low speed until all the spices are evenly distributed throughout the cheese ball mixture. Give it a good scrape down of the bowl to ensure no pockets of unmixed spices remain.
-
Taste Test and Adjust:
This is my favorite part! Before shaping, always, always taste your mixture. Take a small spoonful and really savor it. Does it need a little more salt to brighten the flavors? Perhaps a tiny pinch more cinnamon or nutmeg to boost that autumnal warmth? Maybe a bit more pepper for an extra kick? Don’t be afraid to adjust until it tastes just right to your palate. Remember, the flavors will meld and deepen as it chills, but the base taste should be spot on now. It’s much easier to adjust seasonings at this stage than after it’s been chilled and shaped.
Forming and Chilling the Cheese Ball:
-
Shape the Cheese Ball:
Once you’re satisfied with the flavor, it’s time to give our Pumpkin Cheese Ball its characteristic shape. I find the easiest way to do this is to transfer the entire mixture onto a large piece of plastic wrap or parchment paper. Gather the edges of the wrap/paper around the mixture and begin to gently press and mold it into a firm, round ball. If you want a more distinct “pumpkin” shape, you can use the edge of a ruler or even a dull knife to gently press indentations from the top center down to the bottom center, all around the ball, creating those iconic pumpkin ridges. Be careful not to press too hard and break the ball apart. Smooth out any major cracks as you go. The tighter and firmer you can form the ball at this stage, the better it will hold its shape after chilling.
-
Chill Thoroughly:
After shaping, wrap the cheese ball tightly in the plastic wrap, ensuring it’s completely sealed off from the air in the refrigerator to prevent it from absorbing any unwanted odors. Place it in the refrigerator for a minimum of 2-3 hours. Frankly, longer is better if you have the time! An overnight chill is absolutely ideal. Why is chilling so important? Several reasons: firstly, it allows the cheese ball to firm up significantly, making it much easier to handle, coat, and serve without it becoming a gooey mess. Secondly, and perhaps even more importantly, chilling allows all those wonderful flavors – the sharp cheddar, the creamy pumpkin, the smoky bacon, the fresh chives, and all those warm spices – to meld and deepen. The taste experience will be far superior after a good chill, allowing the individual notes to harmonize into one incredible symphony of flavor. Don’t skip this step; it’s truly essential for the best Pumpkin Cheese Ball.
Coating and Garnishing for the “Pumpkin” Effect:
-
Prepare the Coating Mixture:
While your cheese ball is chilling, or just before you’re ready to serve, prepare your coating. In a shallow dish or a wide, flat plate, combine your finely crushed buttery crackers and the paprika. The crushed crackers will provide a wonderful crunchy texture and a slightly salty, buttery flavor that complements the cheese ball beautifully. The paprika, while optional, is highly recommended because it imparts a beautiful, vibrant orange hue to the coating, further enhancing the “pumpkin” visual appeal. If you’re opting for a nuttier coating, simply use finely chopped toasted pecans or walnuts instead of crackers, or a combination of both. You could even add a tiny pinch of cinnamon to the nut coating for extra warmth. Mix these coating ingredients thoroughly so the paprika is evenly distributed, creating a consistent color.
-
Coat the Chilled Cheese Ball:
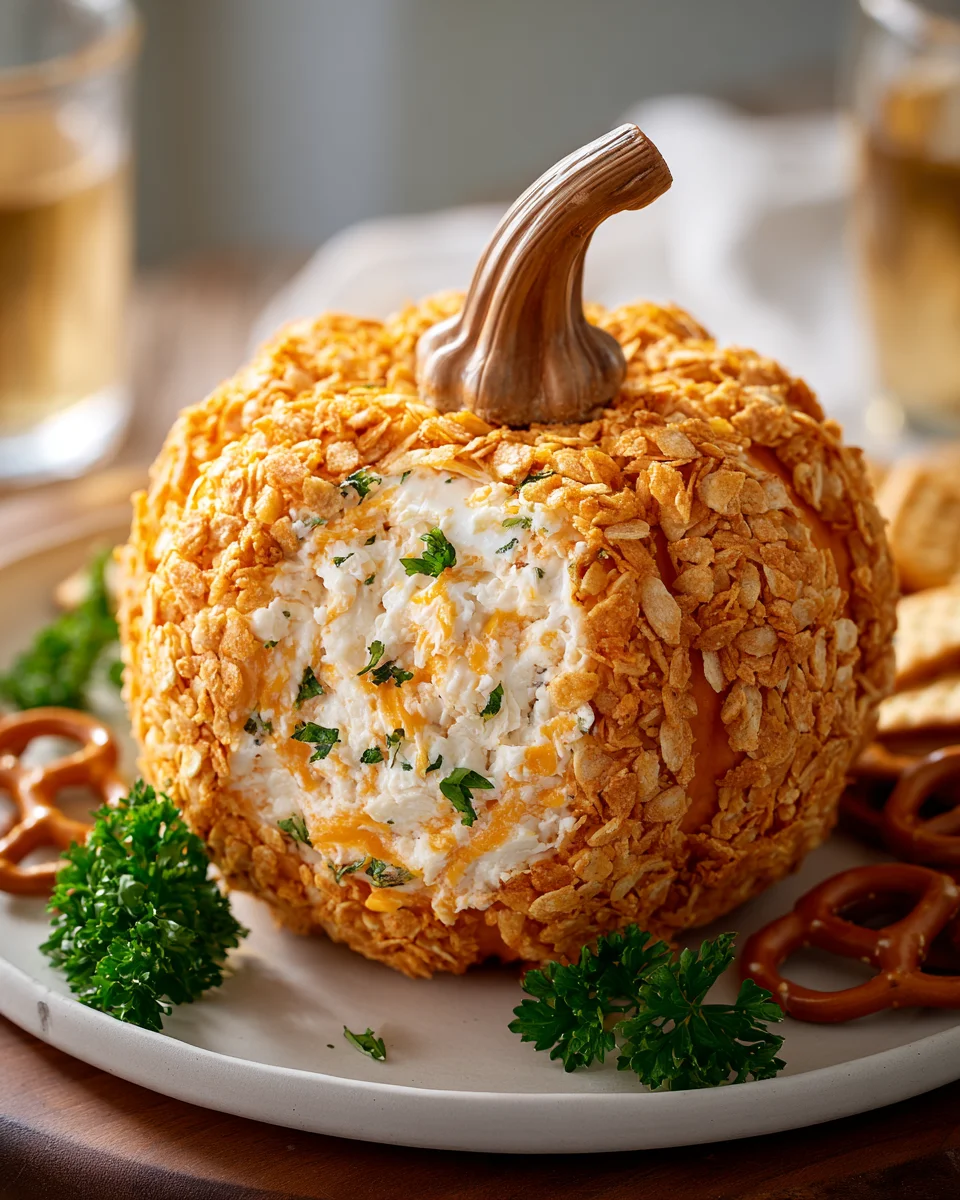
Once your cheese ball has thoroughly chilled and is firm, unwrap it carefully. Gently roll the entire ball in the prepared coating mixture, pressing lightly to ensure the crackers and paprika (or nuts) adhere evenly to all sides. Make sure to cover the entire surface, pressing the coating into those pumpkin ridges you might have created. You want a generous, even layer that completely encases the cheese ball. This coating not only adds flavor and texture but also helps to hold the shape and makes for a more appealing presentation. If any spots are sparse, gently press more coating onto them until you’re satisfied with the coverage.
-
Add the “Stem” and “Leaves”:
Now for the fun part: turning your cheese ball into an undeniable pumpkin masterpiece! Carefully insert your chosen “stem” into the very top center of the coated cheese ball. A small pretzel stick is my go-to choice because it’s edible and adds a touch of saltiness, but a cinnamon stick (adds a lovely aroma) or even a small, cleaned piece of bell pepper stem can work wonderfully too. Be gentle as you insert it to avoid cracking the cheese ball. Then, for an extra touch of realism and a pop of green, tuck a few fresh parsley leaves or a small bay leaf next to the base of the “stem.” These small details truly elevate the presentation and make your “Pumpkin Cheese Ball” instantly recognizable and incredibly charming for any fall gathering or holiday spread. The visual appeal is almost as important as the taste, and these garnishes absolutely nail it.
Serving Your Delicious Pumpkin Cheese Ball:
-
Presentation on Your Serving Platter:
Once your Pumpkin Cheese Ball is beautifully coated and garnished, it’s ready for its grand debut! Carefully transfer it to the center of your chosen serving platter. Think about the overall aesthetic – a rustic wooden board, a crisp white ceramic platter, or even a festive fall-themed plate can all enhance the presentation. The cheese ball itself is the star, so make sure it’s prominently displayed. You might want to place it on a small bed of fresh parsley or a few artfully arranged fall leaves (non-toxic, of course, if using real ones for decoration only, not consumption) to further emphasize the autumnal theme.
-
Arrange Your Accompaniments:
This is where you can really get creative and cater to diverse tastes. Surround your Pumpkin Cheese Ball with an abundant array of dippers. For crackers, I always offer a variety: buttery crackers for classic appeal, whole wheat or multi-grain crackers for those who prefer something heartier, and plain water crackers for a neutral base that lets the cheese ball’s flavors shine. Pretzel crisps are fantastic because their sturdy structure handles a good scoop of cheese ball, and the saltiness is a perfect complement. Don’t forget the fresh elements! Crisp apple slices (Granny Smith or Honeycrisp are great for this), pear slices, or even thinly sliced bell peppers add a refreshing contrast and a welcome crunch. Celery sticks and carrot sticks are also excellent for dipping, offering a healthy option. For something a little more substantial, toasted baguette slices provide a nice chew and absorb the cheese ball beautifully. And for a truly unique and surprising pairing, consider ginger snaps or other spiced cookies; the sweet and spicy notes can be an unexpected but delightful match with the savory pumpkin flavors. Lay out your accompaniments attractively around the cheese ball, making sure they are easily accessible for your guests.
-
Storage Instructions:
If by some miracle you have any leftover Pumpkin Cheese Ball (which rarely happens in my experience!), proper storage is key to maintaining its freshness and flavor. Wrap any remaining portion tightly in plastic wrap, pressing the wrap directly against the surface of the cheese ball to prevent air exposure. Then, place it in an airtight container. Stored this way in the refrigerator, the cheese ball will stay fresh and delicious for up to 3-4 days. While the coating might soften slightly over time, the flavors will remain excellent. Just be sure to bring it back to a slightly softened, but still firm, consistency before serving again.
-
Make-Ahead Tips:
One of the best things about this Pumpkin Cheese Ball recipe is how wonderfully it lends itself to advance preparation, making it a fantastic stress-free appetizer for entertaining. You can prepare the entire cheese ball mixture, shape it, and chill it (steps 1-7) up to 2 days in advance. Just ensure it’s tightly wrapped in plastic wrap and stored in the refrigerator. On the day of your event, all you have to do is unwrap it, roll it in the coating, add the stem and leaves, and arrange it on your platter with dippers. This makes party day so much smoother, allowing you more time to enjoy your guests and less time scrambling in the kitchen. Just remember to allow it about 15-20 minutes at room temperature before serving to slightly soften and allow the flavors to truly bloom, though it should still be firm enough to hold its shape beautifully.
Conclusion:
So, there you have it! I truly believe this
Pumpkin Cheese Ball
is more than just a recipe; it’s an experience waiting to happen in your kitchen. I’ve poured my heart into perfecting this balance of creamy, savory, and subtly sweet flavors, ensuring that every bite delivers a delightful surprise. It’s incredibly easy to make, yet it presents itself as if you’ve spent hours in the kitchen, making it my absolute go-to for effortless entertaining. The vibrant color and the festive appeal instantly elevate any spread, making it a conversation starter and a guaranteed crowd-pleaser. I promise you, once you try this recipe, it will become a cherished part of your culinary repertoire, a testament to how simple ingredients can come together to create something truly magical and memorable.Now, let’s talk about how to truly make this dish shine when serving it up. For me, the ideal companions are a mix of crunchy and soft textures, providing a delightful contrast to the smooth, rich cheese ball. Think about a beautiful platter adorned with an assortment of hearty, artisan crackers – perhaps some whole wheat for a rustic touch, some sea salt for a classic pairing, and even a few gluten-free options to cater to all your guests’ dietary needs. Beyond crackers, I absolutely love to serve it with crispy pita chips, toasted baguette slices brushed with a little olive oil, or even savory pretzel thins for that satisfying salty counterpoint. For a touch of freshness and sweetness that brilliantly cuts through the richness, consider arranging crisp apple slices (Granny Smith or Honeycrisp are excellent choices for their tart-sweet balance), elegant pear wedges, and even some juicy red or green grapes around your
Pumpkin Cheese Ball
. The fruit offers a palate-cleansing effect, creating a perfect flavor harmony that keeps guests coming back for more. Don’t forget a generous sprinkle of fresh parsley, chives, or a sprig of rosemary on top of the ball itself just before serving – it adds a vital pop of color and an aromatic finish that really ties the whole presentation together, making it look as good as it tastes. For an extra special touch, a tiny bowl of fig jam or apple butter served alongside can offer another layer of complementary flavor.But the fun doesn’t stop there! This recipe is wonderfully adaptable, allowing you to put your own creative spin on it and truly make it your own. If you’re looking to dial up the savory notes, a pinch of smoked paprika or a tiny dash of cayenne pepper mixed into the cream cheese base can add a fantastic depth or a subtle kick that will intrigue your guests. For those who enjoy a nuttier profile, finely chopped toasted pecans or walnuts are classic choices for the outer coating, providing a lovely crunch and earthy flavor. However, I’ve also had great success with toasted pumpkin seeds for an extra autumnal touch and added texture, or even sunflower seeds for a delicious and safe nut-free alternative. If you want to lean into the sweeter side, a delicate drizzle of maple syrup or honey over the finished ball just before serving, perhaps with a sprinkle of dried cranberries or chopped dates, can transform it into a slightly different, equally delightful treat that almost borders on dessert. You could also experiment with different types of cream cheese, like a whipped version for an even airier texture, or even add a tablespoon of softened goat cheese for a tangier complexity that brightens the overall flavor. And remember, while I adore the classic ball shape for its elegance, you could easily mold this mixture into a festive log or even individual mini cheese balls for a more personalized and easy-to-grab appetizer experience. The beauty truly is in its flexibility and your imagination!
I truly hope that reading about this delightful
Pumpkin Cheese Ball
has sparked your culinary curiosity and inspired you to get into the kitchen. I am so confident that once you whip this up in your own home, you’ll understand why it’s become such a beloved and highly requested staple in my entertaining repertoire. It’s incredibly rewarding to see your friends and family gather around a beautiful platter and thoroughly enjoy something you’ve made with love and effort. So, please, don’t hesitate! Gather your ingredients, let your creativity flow, and make this recipe your own. I absolutely cannot wait to hear about your experiences. Did you try a unique new coating? Did you serve it with an unexpected dip or a particularly interesting cracker? Please, share your stories, your photos, and your feedback with me. Your culinary adventures inspire me greatly, and I’m always eager to see how you bring these recipes to life in your own special way. Happy cooking, and get ready to impress everyone with this truly outstanding and versatile appetizer!Pumpkin Cheese Ball: Easy & Crowd-Pleasing Appetizer
An easy, crowd-pleasing appetizer, this Cheese Ball is perfect for fall entertaining. Artfully shaped like a miniature pumpkin and coated in savory crackers or pecans, it’s a delightful spreadable blend of cream cheese, cheddar, sour cream, and savory spices, perfect for fall gatherings, Halloween, and Thanksgiving.
Ingredients
Instructions
Important Information
Nutrition Facts (Per Serving)
It is important to consider this information as approximate and not to use it as definitive health advice.
Allergy Information
Please check ingredients for potential allergens and consult a health professional if in doubt.
Leave a Comment