
Pizza Pot Pies The Ultimate Comfort Food Mash Up
Ever found yourself torn between the gooey, cheesy delight of a pizza and the warm, comforting hug of a pot pie? I know I have! And that’s exactly why I’m so incredibly excited to share with you my recipe for Pizza Pot Pies The Ultimate Comfort Food Mash Up. This isn’t just another dinner idea; it’s a culinary stroke of genius, marrying two beloved classics into one unbelievably satisfying dish.
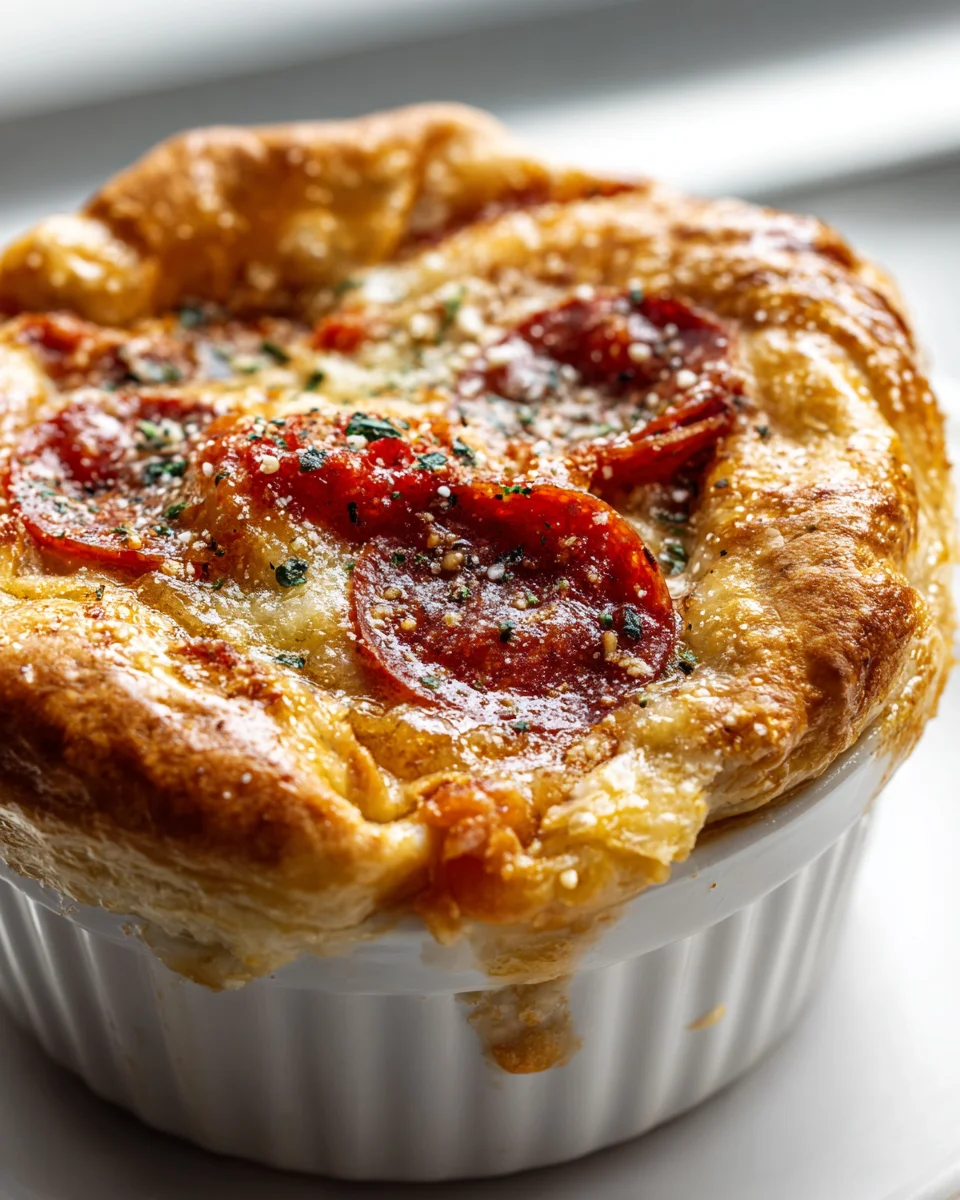
What makes these Pizza Pot Pies so special? It’s the ingenious combination! We’re taking everything you adore about a classic pizza – the tangy tomato sauce, the savory ground beef (seasoned to perfection!), the generous layers of melty mozzarella and your favorite vibrant vegetables – and tucking it all into individual ramekins. But here’s the pot pie twist: instead of a traditional pizza base, we crown this rich, bubbly filling with a glorious, golden, flaky crust. Each spoonful (or forkful!) delivers that familiar pizza punch wrapped in the cozy embrace of a hearty pot pie.
You’ll absolutely love these because they’re the epitome of comfort food elevated. They’re fun, surprisingly simple to assemble, and deliver a huge payoff in flavor and pure contentment. Perfect for a cozy family night, a gathering with friends, or whenever you need a little extra warmth and deliciousness in your life. Get ready to ditch the delivery menu and dive into a truly unique, utterly scrumptious experience that will have everyone asking for seconds!

Pizza Pot Pies: The Ultimate Comfort Food Mash Up
Oh boy, have I got a treat for you! We’re taking two of the most beloved comfort foods – classic pizza and a cozy pot pie – and smashing them together into something truly magical: Pizza Pot Pies! Imagine a rich, bubbly pizza filling, loaded with all your favorite toppings, nestled under a golden, flaky crust. It’s individual-sized perfection, making dinner feel like a special occasion every time. This recipe is designed to be super adaptable, so you can truly make it your own. Let’s dive in!
Ingredient Notes
When I’m whipping up these delightful Pizza Pot Pies, I like to think about what makes both pizza and pot pie so irresistible. Here are some key ingredients I lean on, along with my favorite ways to tweak them:
- The Crust: Puff Pastry is My Secret Weapon! For that gorgeous, flaky top, I always reach for store-bought puff pastry. It bakes up beautifully golden and provides that satisfying crunch against the gooey filling. You’ll typically find it in the frozen section. Just remember to thaw it in the refrigerator beforehand. If you’re feeling extra ambitious, you could absolutely use your favorite homemade pie crust recipe, or even biscuit dough for a softer, chewier top.
- The Meat: Flavorful Ground Beef and Zesty Pepperoni. For a hearty filling, I love using lean ground beef. It browns up perfectly and really anchors the “pizza” flavor profile. Remember, we’re substituting any pork suggestions with delicious beef! As for pepperoni, I often opt for mini pepperoni slices because they distribute so nicely throughout the filling, giving you a burst of flavor in every bite. If you prefer, you can dice larger pepperoni slices or even use other beef-based cured meats.
- The Sauce: Marinara or Pizza Sauce. This is where the pizza magic truly begins! A good quality marinara sauce or a classic pizza sauce forms the flavorful base for our filling. I usually pick one that’s robust and rich. If you have a homemade sauce you adore, absolutely use it! For a little extra kick, I sometimes stir in a teaspoon of dried oregano or a pinch of red pepper flakes.
- The Cheese: A Melty Mozzarella & Parmesan Combo. What’s pizza without cheese? I use a generous amount of shredded mozzarella – low-moisture, part-skim works wonderfully for meltiness without excessive grease. A little grated Parmesan cheese mixed into the filling or sprinkled on top before baking adds a lovely salty, umami depth. Don’t be shy with the cheese!
- The Veggies: Your Pizza, Your Rules! My go-to veggies for these pot pies usually include diced onion, minced garlic, sliced mushrooms, and colorful bell peppers. They add texture, freshness, and a boost of nutrients. But truly, this is where you can let your imagination run wild! Sliced black olives, sautéed spinach (make sure to squeeze out excess water!), or even some finely chopped zucchini would be fantastic additions.
- Seasonings: Italian Herb Blend. A good quality Italian seasoning blend brings all those familiar pizza parlor aromas and flavors right into your kitchen. Salt and freshly ground black pepper are, of course, essential to taste.
- Optional Thickener: A Little Flour. Sometimes, depending on how juicy your sauce and veggies are, I like to whisk in a tablespoon of all-purpose flour into the meat and veggie mixture after it’s cooked and before adding the sauce. This helps to create a slightly thicker, more cohesive filling that won’t be too watery under the crust. It’s not strictly necessary, but it makes for a perfectly scoopable pie!
Step-by-Step Instructions
Creating these Pizza Pot Pies is surprisingly straightforward, and the aroma filling your kitchen will be pure bliss! Here’s how I bring them to life:
- Prep for Success: First things first, I preheat my oven to 400°F (200°C) and grab four 10-ounce ramekins or oven-safe bowls. If your puff pastry is frozen, I make sure it’s thawed in the fridge according to package directions. I also lightly grease the ramekins – a quick spray of cooking oil does the trick.
- Brown the Beef: In a large skillet over medium-high heat, I brown the ground beef, breaking it apart with a spoon as it cooks. Once it’s fully cooked and no longer pink, I drain off any excess fat. This prevents a greasy filling.
- Sauté the Aromatics and Veggies: I add the diced onion and minced garlic to the skillet with the cooked beef and cook for about 3-4 minutes until the onion softens and becomes translucent. Then, I toss in the sliced mushrooms and bell peppers, continuing to cook for another 5-7 minutes until the vegetables are tender-crisp. If I’m adding a little flour for thickening, I sprinkle it over the beef and veggies here and cook for another minute, stirring constantly.
- Build the Pizza Filling: Now for the good stuff! I pour in the marinara or pizza sauce, add the Italian seasoning, salt, pepper, and those yummy mini pepperoni slices. I give it all a good stir to combine and let it simmer gently for 5-7 minutes, allowing the flavors to meld and the sauce to thicken slightly. I taste it at this point and adjust seasonings if needed.
- Prepare the Puff Pastry Lids: While the filling is simmering, I unroll the thawed puff pastry sheet onto a lightly floured surface. Using a round cutter or even an upside-down bowl that’s about 1/2 inch larger than the rim of my ramekins, I cut out four circles.
- Assemble the Pot Pies: I spoon the hot pizza filling evenly into each prepared ramekin, making sure not to overfill them (leaving about a 1/2-inch gap from the rim). Then, I sprinkle a generous handful of shredded mozzarella cheese over the top of the filling in each ramekin – this helps create that essential gooey cheese layer.
- Top with Pastry and Bake: I carefully place one puff pastry circle over each ramekin, gently pressing the edges down to seal it against the rim. Sometimes I use a fork to crimp the edges for a decorative touch. To allow steam to escape and prevent the crust from puffing up too much, I cut a small slit or two in the center of each pastry lid. For a beautiful golden sheen, I often brush the pastry with a simple egg wash (one egg beaten with a tablespoon of water).
- Bake to Golden Perfection: I transfer the ramekins to a baking sheet (just in case of any bubbly overflow!) and bake for 20-25 minutes, or until the puff pastry is gorgeously golden brown and puffed, and the filling is hot and bubbling.
- Cool and Serve: The hardest part! I let the Pizza Pot Pies cool for 5-10 minutes before serving. That filling gets incredibly hot, and a little rest time helps it set and prevents burned tongues. Enjoy your ultimate comfort food!
Tips & Suggestions
I’ve made these Pizza Pot Pies countless times, and over the years, I’ve picked up a few tricks and suggestions to make them even better and more versatile for you:
- Embrace Customization: Think of your favorite pizza! This recipe is incredibly forgiving. Want a spicier kick? Add more red pepper flakes to the filling. Love black olives? Toss them in! Fancy some green onions or fresh basil? Sprinkle them on top after baking. You can even make different pies with different toppings for a personalized pot pie party!
- Prevent a Soggy Bottom (of the crust, that is!): While the puff pastry is only on top, sometimes the filling can make the very bottom of the crust (where it touches the filling) a little soft. To combat this, I often sprinkle a small layer of shredded mozzarella directly into the bottom of the ramekin before adding the filling. This creates a little cheese barrier that can help.
- Perfect Pastry Pointers: When cutting your puff pastry, aim for circles that are about 1/2 to 1 inch wider than your ramekin opening. This gives you enough pastry to securely crimp around the rim. Also, ensure your puff pastry is cold but pliable when you’re working with it – if it gets too warm, it becomes sticky and hard to handle. If it does, pop it back in the fridge for a few minutes.
- Make Ahead Magic: These are fantastic for meal prep! You can prepare the entire filling mixture up to 2-3 days in advance and store it in an airtight container in the refrigerator. When you’re ready to bake, simply reheat the filling gently on the stovetop, assemble the pot pies with fresh puff pastry, and bake as directed.
- Serving Suggestions: While these are a meal in themselves, I love to serve them alongside a crisp green salad with a light vinaigrette. It provides a refreshing contrast to the rich pot pies. A side of garlic bread or breadsticks would also be a delicious complement for scooping up any extra sauce.
- Individual vs. Family Style: While I love the individual ramekins for their charm, you could absolutely make a larger, family-sized Pizza Pot Pie in an oven-safe casserole dish. Just be sure to adjust the baking time (it will likely take longer) and ensure the filling is hot and the crust is golden all over.
- Don’t Forget the Vent! Cutting a small slit or two in the puff pastry before baking is crucial. It allows steam to escape from the bubbling filling, preventing your beautiful crust from deflating or bursting open in an uncontrolled way.
Storage
I find these Pizza Pot Pies are so delicious, you might not have many leftovers, but if you do, or if you’re planning to make them ahead, here’s how I store them:
- Refrigerating Leftovers: Once the Pizza Pot Pies have cooled completely, I cover any remaining individual pot pies tightly with plastic wrap or transfer the filling (without the crust, if you’ve already baked and eaten the crust) to an airtight container. They will keep well in the refrigerator for up to 3-4 days.
- Reheating for Best Results: To reheat baked pot pies, I find the oven is always the best choice for reviving that crispy crust. I preheat my oven to 350°F (175°C) and place the pot pies (uncovered) on a baking sheet. I bake them for about 15-20 minutes, or until the filling is heated through and the crust has crisped up again. If you’re in a hurry, the microwave will work, but be warned: the pastry crust will likely become soft and lose its flakiness. Microwave for 1-2 minutes until heated through.
- Freezing for Future Comfort:
- Unbaked: You can assemble the pot pies (filling in ramekins, topped with unbaked puff pastry) and then flash freeze them uncovered until solid. Once solid, wrap each pot pie tightly in plastic wrap, then in foil, and store in the freezer for up to 2-3 months. When ready to bake, unwrap and bake from frozen at 400°F (200°C) for about 40-50 minutes, or until the crust is golden and the filling is bubbly and heated through. You might need to loosely tent them with foil partway through to prevent over-browning of the crust.
- Baked (Filling Only): If you prefer to freeze just the filling, let it cool completely, then transfer it to a freezer-safe airtight container or freezer bags. It will keep for up to 3 months. Thaw overnight in the refrigerator, then reheat gently on the stovetop before assembling and baking with fresh puff pastry.
Final Thoughts
I truly hope you’re as excited as I am about trying out Pizza Pot Pies The Ultimate Comfort Food Mash Up! This isn’t just another dinner; it’s a culinary hug, a brilliant fusion that brings together everything we love about pizza and the heartwarming embrace of a pot pie. Imagine that golden, flaky crust meeting a bubbly, cheesy pizza filling, complete with your favorite savory beef and rich, flavorful sauce. It’s an absolute game-changer for family dinners, cozy nights in, or whenever you need a little extra comfort.
I promise you, once you taste the delightful synergy of these two classics, you’ll understand why Pizza Pot Pies The Ultimate Comfort Food Mash Up is an absolute must-make. So go ahead, gather your ingredients, and prepare to create a dish that’s sure to become a cherished favorite in your home. You won’t regret diving into this ultimate comfort food experience!

Pizza Pot Pies: Your Ultimate Beefy Comfort Food Mashup!
- Total Time: 45 minutes
- Yield: 4 servings 1x
Description
Experience the delightful fusion of pizza and pot pie with these individual Pizza Pot Pies. Each bite is a warm, cheesy hug that brings comfort and satisfaction to your dinner table.
Ingredients
- Puff Pastry (store-bought, thawed)
- 1 lb lean ground beef
- Mini pepperoni slices
- 1 cup marinara or pizza sauce
- 1 teaspoon Italian seasoning
- Salt to taste
- Freshly ground black pepper to taste
- 1 cup shredded mozzarella cheese (low-moisture, part-skim)
- 1/4 cup grated Parmesan cheese
- 1 diced onion
- 2 minced garlic cloves
- 1 cup sliced mushrooms
- 1 cup colorful bell peppers (sliced)
- 1 tablespoon all-purpose flour (optional)
- Red pepper flakes (optional, for extra kick)
Instructions
- Preheat the oven to 400°F (200°C) and prepare four 10-ounce ramekins by lightly greasing them.
- In a large skillet over medium-high heat, brown the ground beef, breaking it apart as it cooks. Drain any excess fat.
- Add the diced onion and minced garlic to the skillet and cook for about 3-4 minutes until the onion softens. Then add the sliced mushrooms and bell peppers, cooking for another 5-7 minutes until tender-crisp.
- Pour in the marinara or pizza sauce, add the Italian seasoning, salt, pepper, and mini pepperoni slices. Stir to combine and let simmer for 5-7 minutes.
- Unroll the thawed puff pastry on a lightly floured surface and cut out four circles using a round cutter or bowl that is about 1/2 inch larger than the ramekins.
- Spoon the hot pizza filling evenly into each ramekin, leaving about a 1/2-inch gap from the rim. Sprinkle shredded mozzarella cheese over the top.
- Place one puff pastry circle over each ramekin, pressing the edges to seal. Cut small slits in the center of each pastry lid to allow steam to escape and brush with an egg wash.
- Transfer the ramekins to a baking sheet and bake for 20-25 minutes until the pastry is golden brown and the filling is bubbling.
- Let the Pizza Pot Pies cool for 5-10 minutes before serving.
- Prep Time: 15 mins
- Cook Time: 30 mins
- Category: Dinner
- Method: Baking
- Cuisine: Italian
Nutrition
- Serving Size: 1 ramekin
- Calories: 450
- Sugar: 4 g
- Sodium: 800 mg
- Fat: 25 g
- Saturated Fat: 10 g
- Unsaturated Fat: 10 g
- Trans Fat: 0 g
- Carbohydrates: 30 g
- Fiber: 2 g
- Protein: 25 g
- Cholesterol: 70 mg
Keywords: Customize your pot pies with your favorite pizza toppings. To prevent a soggy bottom, sprinkle a layer of shredded mozzarella at the bottom of the ramekin before adding the filling.
Leave a Comment