
Pizza Pot Pies The Ultimate Comfort Food Mash Up is here to revolutionize your dinner table! Have you ever found yourself torn between the cheesy, savory goodness of a classic pizza and the heartwarming, flaky-crusted embrace of a traditional pot pie? Well, prepare to have your culinary dreams come true, because I’ve discovered a truly ingenious creation that brings the best of both worlds together in one delightful package. This innovative dish takes everything we adore about a piping hot slice of pizza – the gooey cheese, the rich sauce, and your favorite toppings – and nestles it under a golden, buttery pastry crust, much like a savory pot pie. It’s a delightful surprise with every single bite.
There’s a reason why both pizza and pot pies have stood the test of time as beloved staples across cultures; they embody the very essence of comfort. Pizza, with its humble beginnings in Italy, has conquered the globe, while pot pies offer that nostalgic, cozy feeling of home-cooked warmth, often enjoyed during colder months. Now, imagine combining that universal appeal into a single, irresistible serving. People adore this dish not just for its novelty, but for the incredible symphony of textures and flavors: the robust pizza filling, the indulgent melted cheese, and that perfectly baked, tender crust. It’s convenient, utterly satisfying, and surprisingly simple to assemble for a meal that feels truly special.
Why This Mash-Up Is a Must-Try
I genuinely believe that Pizza Pot Pies The Ultimate Comfort Food Mash Up is destined to become a new favorite in your recipe repertoire. It’s perfect for family dinners, a cozy night in, or even a fun twist on party food. Get ready to dive into a recipe that promises warmth, flavor, and a whole lot of cheesy happiness!

Ingredients:
- For the Filling:
- 1 tablespoon olive oil
- 1 pound Italian sausage, mild or hot, casings removed
- 1 large yellow onion, finely diced (about 1.5 cups)
- 2 cloves garlic, minced
- 1 green bell pepper, finely diced
- 1 (28-ounce) can crushed tomatoes
- 1 (6-ounce) can tomato paste
- 1/2 cup chicken or vegetable broth (or red wine for extra depth)
- 1 tablespoon dried oregano
- 1 teaspoon dried basil
- 1/2 teaspoon red pepper flakes (optional, for a little kick)
- 1 teaspoon granulated sugar (to balance acidity)
- Salt and freshly ground black pepper to taste
- 1/2 cup finely chopped pepperoni (or your favorite pizza meat topping)
- 1/2 cup sliced black olives (optional)
- 1/2 cup sautéed mushrooms (optional)
- For the Cheese:
- 2 cups shredded mozzarella cheese, divided
- 1/2 cup grated Parmesan cheese, divided
- 1/4 cup shredded provolone cheese (optional, for extra flavor)
- For the Crust:
- 2 sheets (approximately 17.3 ounces total) frozen puff pastry, thawed according to package directions
- 1 large egg, beaten (for egg wash)
- 1 tablespoon water (for egg wash)
- Semolina flour or all-purpose flour, for dusting work surface
- Equipment:
- 4-6 individual oven-safe ramekins or small baking dishes (about 10-12 ounce capacity each)
- Large skillet or Dutch oven
- Rolling pin
- Pastry brush
Preparing the Flavorful Filling for Your Pizza Pot Pies
Let’s dive right into creating the heart of our Pizza Pot Pies The Ultimate Comfort Food Mash Up! The key to an outstanding pot pie is a filling that’s rich, savory, and bursting with flavor, much like your favorite pizza. This process is all about building layers of deliciousness.
- Brown the Italian Sausage: Begin by heating the olive oil in a large skillet or Dutch oven over medium-high heat. Once shimmering, add the Italian sausage, breaking it up with a spoon as it cooks. You want to brown the sausage thoroughly, ensuring it develops a beautiful caramelized crust. This browning step is absolutely crucial for creating a deep, umami flavor base that will permeate the entire dish. Cook for about 5-7 minutes until no pink remains. Once browned, transfer the cooked sausage to a plate lined with paper towels to drain any excess fat, leaving about 1 tablespoon of fat in the skillet. If your sausage was particularly lean, you might need to add a touch more olive oil.
- Sauté the Aromatics: Reduce the heat to medium. Add the finely diced yellow onion and green bell pepper to the skillet with the reserved sausage fat. Cook, stirring occasionally, for about 6-8 minutes, or until the vegetables have softened significantly and the onion becomes translucent and fragrant. This gentle sautéing sweetens the vegetables and builds another layer of foundational flavor.
- Infuse with Garlic: Add the minced garlic to the softened vegetables. Cook for just 1 minute more, stirring constantly, until the garlic is fragrant. Be careful not to burn the garlic, as it can turn bitter very quickly. The kitchen should now be smelling absolutely wonderful!
- Build the Sauce Base: Stir in the tomato paste. Cook the tomato paste for 2-3 minutes, stirring it into the vegetables. This step, known as cooking out the tomato paste, helps to deepen its flavor and remove any raw, metallic taste, resulting in a richer, more complex sauce.
- Add Liquids and Seasonings: Pour in the crushed tomatoes and chicken or vegetable broth (or red wine, if you’re using it for that extra touch of sophistication). Stir well to combine everything. Now, it’s time to add our key seasonings: dried oregano, dried basil, red pepper flakes (if using, for that perfect pizza zing), and granulated sugar. The sugar helps to balance the acidity of the tomatoes, creating a smoother, more rounded flavor profile. Season generously with salt and freshly ground black pepper to taste.
- Simmer to Perfection: Bring the sauce to a gentle simmer. Once simmering, reduce the heat to low, cover the skillet, and let it cook for at least 20-25 minutes. This slow simmer is vital; it allows all the flavors to meld together beautifully and the sauce to thicken slightly. Stir occasionally to prevent sticking. The longer it simmers, the more developed and delicious your sauce will become.
- Incorporate Remaining Fillings: After the sauce has simmered, return the browned Italian sausage to the skillet. Stir in the chopped pepperoni, sliced black olives, and sautéed mushrooms, if you’re including them. Give it a good stir to ensure all the components are evenly distributed within the rich sauce. Taste the filling and adjust seasonings one last time if needed. You want it to be vibrant and well-seasoned, a true reflection of your favorite pizza toppings.
Assembling Your Individual Pizza Pot Pies
Now that our incredible filling is ready, it’s time for the fun part: assembling these delightful individual Pizza Pot Pies The Ultimate Comfort Food Mash Up! This stage is where everything comes together, preparing them for their grand debut in the oven.
- Prepare the Ramekins: Preheat your oven to 400°F (200°C). Lightly grease your individual oven-safe ramekins or small baking dishes. A quick spray of cooking oil or a thin smear of butter will do the trick, ensuring your pot pies release easily after baking.
- Layer the Cheese Base: Spoon a small amount of the shredded mozzarella and a sprinkle of Parmesan into the bottom of each prepared ramekin. This creates a wonderful cheesy base that will slightly melt and prevent the pastry from becoming soggy on the bottom, as well as providing that classic pizza pull.
- Fill with the Pizza Mixture: Carefully spoon the hot, aromatic pizza filling into each ramekin, filling them about two-thirds to three-quarters full. Make sure not to overfill, as you need room for the cheese and the puff pastry crust to puff up beautifully. Distribute the chunky bits evenly so every bite is packed with deliciousness.
- Add More Cheese: Top the filling in each ramekin with a generous layer of the remaining shredded mozzarella, Parmesan, and provolone (if using). This cheese layer will melt down into the filling, creating that irresistible gooey texture we all love in a pizza.
Crafting the Golden Puff Pastry Top and Baking
The crown jewel of our Pizza Pot Pies The Ultimate Comfort Food Mash Up is undoubtedly the golden, flaky puff pastry crust. This is where we elevate a simple pizza filling into a true comfort food masterpiece.
- Prepare the Puff Pastry: Lightly dust your work surface with semolina flour or all-purpose flour. Carefully unroll one sheet of thawed puff pastry. Using a rolling pin, gently roll out the pastry just slightly, enough to smooth out any creases and make it a bit larger, ensuring it will comfortably cover your ramekins. You want the pastry to be cold but pliable. If it gets too warm, it becomes sticky and difficult to work with.
- Cut the Pastry Lids: Using a knife or a round cookie cutter that is slightly larger than the top opening of your ramekins (allowing for overhang), cut out individual circles or squares from the puff pastry. You’ll need one pastry lid per pot pie. Gather and gently re-roll any scraps to cut additional lids if necessary.
- Create the Egg Wash: In a small bowl, whisk together the beaten egg and 1 tablespoon of water. This egg wash will give our pastry a beautiful golden-brown, glossy finish.
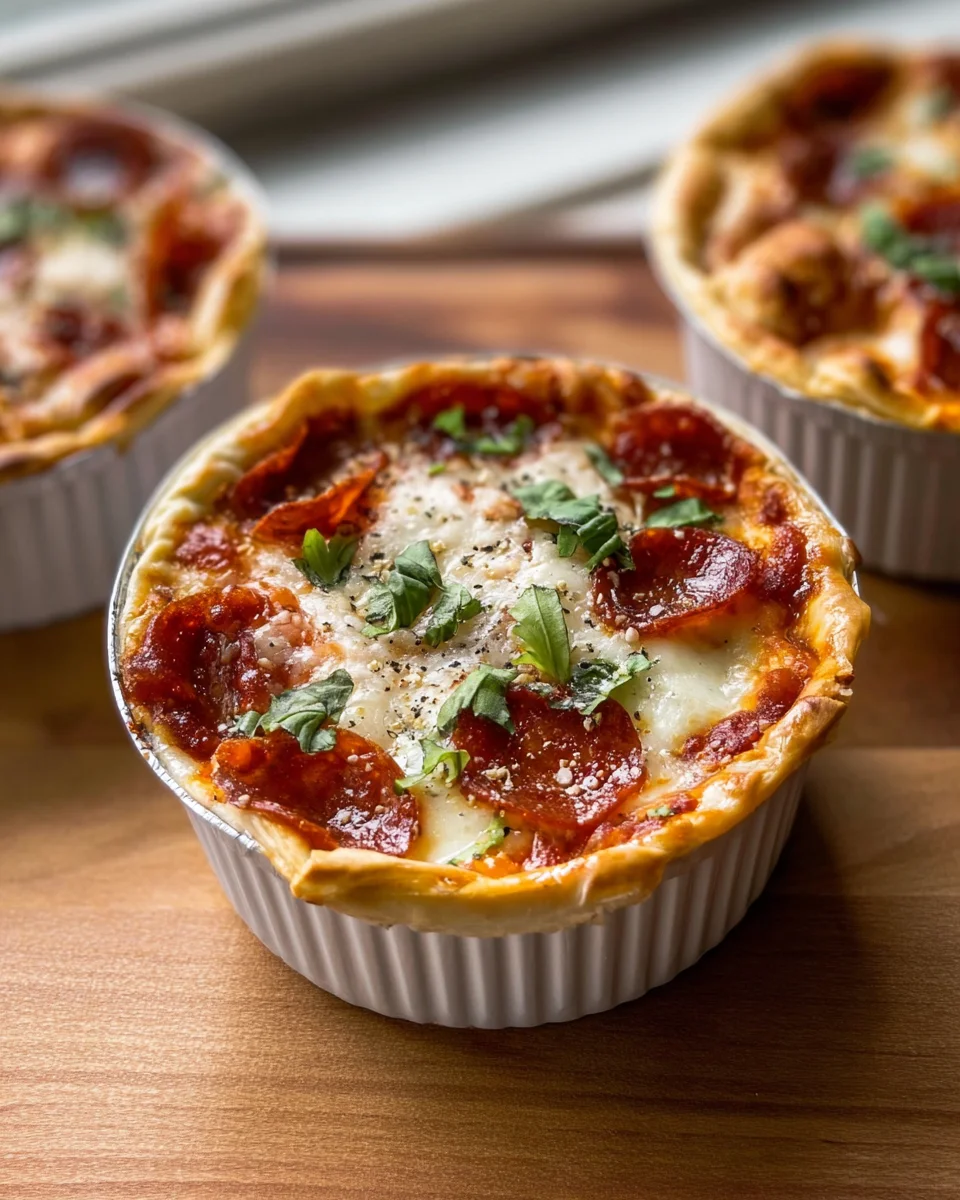
- Top the Pot Pies: Carefully place one puff pastry lid over the top of each filled ramekin. Gently press the edges of the pastry onto the rim of the ramekin to seal it, creating a rustic, crimped edge. You can use a fork to press down firmly if you want a more defined crimp. This sealing helps to trap the steam inside, ensuring a moist filling and a perfectly puffed crust.
- Vent and Brush: Using a small sharp knife, cut a few small slits or a cross in the center of each pastry lid. These vents are crucial for allowing steam to escape during baking, which prevents the pastry from becoming soggy and helps it to puff up evenly. Brush the tops of the pastry generously with the egg wash. This is what will give your pot pies their stunning, golden-brown sheen.
- Bake to Golden Perfection: Place the assembled ramekins on a baking sheet. This makes it easier to transfer them to and from the oven, and also catches any potential bubbling-over filling (though it’s usually not an issue if filled correctly). Bake in the preheated 400°F (200°C) oven for 20-25 minutes.
- Check for Doneness: The pot pies are ready when the puff pastry is beautifully puffed, deeply golden brown, and the filling is visibly bubbling around the edges. If the pastry starts to brown too quickly, you can loosely tent the pot pies with aluminum foil for the last few minutes of baking. The aroma filling your kitchen right now will be absolutely intoxicating!
Resting and Serving Your Ultimate Comfort Food Mash Up
The final step, and one that is often overlooked but incredibly important, is allowing your Pizza Pot Pies The Ultimate Comfort Food Mash Up to rest. This ensures the filling sets beautifully and prevents accidental burns from the super-hot cheesy goodness.
- Allow to Rest: Once baked, carefully remove the baking sheet with the ramekins from the oven. Place them on a wire rack and let them rest for at least 5-10 minutes before serving. This resting period is crucial! It allows the intensely hot filling to settle and thicken slightly, preventing it from spilling out and burning your mouth. It also allows the cheese to set just enough to be wonderfully gooey without being liquid.
- Serve and Enjoy: These individual Pizza Pot Pies are best served hot, straight from the ramekins. Be mindful that the ramekins themselves will be very hot. You can serve them with a simple side salad to cut through the richness, or just enjoy them on their own as a complete, comforting meal. Each bite will deliver that incredible combination of flaky crust, savory pizza filling, and gooey melted cheese, truly living up to its name as the ultimate comfort food mash-up. Enjoy every single satisfying spoonful!
Conclusion:
Well, there you have it! We’ve journeyed through the simple steps to create a dish that I genuinely believe will become a cherished staple in your home. This isn’t just another meal; it’s an experience, a delightful fusion that takes everything you love about two classic comfort foods and elevates them into something truly spectacular. I’ve found immense joy in perfecting this recipe, and I’m so excited for you to discover the magic for yourself. The crispy, golden-brown crust, the bubbling, cheesy interior, and the rich, savory filling come together in a symphony of flavors and textures that simply can’t be beaten. It’s a dish that warms you from the inside out, perfect for those chilly evenings or whenever you just need a little culinary hug. The ease of assembly combined with the profound satisfaction of each bite makes this a standout in any home cook’s repertoire.
What makes this particular recipe a true must-try isn’t just its innovative concept, but also its incredible adaptability and surprisingly straightforward preparation. Forget complicated techniques or obscure ingredients; this recipe champions flavor and ease above all else. You’re essentially building a personal-sized powerhouse of deliciousness, layering familiar tastes in a brand-new, exciting format that truly shines. The aroma alone as these bake in your oven is enough to make your mouth water, promising a meal that delivers on every front. It’s the kind of dish that brings smiles to faces around the dinner table, sparking conversations and creating lasting memories. Trust me when I say, once you’ve experienced the sheer delight of breaking through that flaky crust to reveal the molten, cheesy goodness beneath, you’ll be hooked on the ingenious simplicity and delicious payoff.
I can confidently say that these aren’t just good; they’re an absolute game-changer for your weeknight dinner rotation, game day spread, or even a cozy weekend treat. They embody everything wonderful about homemade food – fresh ingredients, customizable flavors, and that unmistakable touch of love that only comes from preparing something special for those you care about. This recipe truly is what I lovingly call Pizza Pot Pies The Ultimate Comfort Food Mash Up, because it perfectly captures the spirit of both beloved dishes while forging its own unique identity. It combines the customizable fun of pizza with the hearty, satisfying warmth of a pot pie, resulting in a culinary masterpiece that appeals to everyone from picky eaters to gourmet enthusiasts. You’re not just making food; you’re crafting an edible celebration of comfort and creativity.
Now, let’s talk about enjoying your magnificent creations! While these pot pies are undoubtedly delicious on their own, a simple green salad with a light vinaigrette makes for a fantastic accompaniment, cutting through the richness beautifully and adding a fresh counterpoint. A bowl of classic tomato soup or a side of steamed broccoli are also wonderful options if you’re looking to add more vegetables to your meal without overwhelming the main event. For a truly indulgent experience, consider a sprinkle of fresh basil or a drizzle of chili oil over the top right before serving to add an extra layer of flavor and visual appeal, elevating the dish even further. They’re fantastic straight from the oven, piping hot and ready to delight, but leftovers (if you’re lucky enough to have any!) also reheat surprisingly well, making them perfect for lunch the next day when you need a quick, comforting bite.
The beauty of this recipe also lies in its endless possibilities for variation. Don’t feel constrained by my suggestions; let your culinary imagination run wild and truly make it your own! If you’re a meat-lover, think about adding cooked crumbled sausage, diced pepperoni, or even leftover shredded chicken to your filling for an extra protein punch. For our vegetarian friends, roasted bell peppers, mushrooms, olives, or spinach would be incredible additions, bringing vibrant flavors and textures. Experiment with different cheese blends – a smoked mozzarella, some provolone, or even a sharp cheddar could bring new dimensions of flavor and a unique melty quality. You could also try different types of crusts; while I adore the classic, a whole wheat crust or even a gluten-free puff pastry would work beautifully. Make it your own, tailor it to your family’s preferences, and discover your new favorite combination that reflects your personal taste.
So, what are you waiting for? I wholeheartedly encourage you to roll up your sleeves, gather your ingredients, and embark on this delicious adventure. You’ll be so glad you did. There’s something incredibly satisfying about creating a meal from scratch that brings so much joy, and this recipe delivers that in spades. Once you’ve pulled your golden-brown pot pies from the oven, filling your kitchen with an irresistible aroma, and taken that first glorious bite, I just know you’ll understand why I’m so passionate about them. Please, after you’ve made these incredible pot pies, come back and share your experience with me! I’d love to hear about your triumphs, your variations, and most importantly, how much you and your loved ones enjoyed this truly special and utterly delightful meal. Your feedback and stories inspire me, and I can’t wait to see what amazing creations you conjure up. Happy cooking, and may your kitchen be filled with deliciousness!
Pizza Pot Pies: The Ultimate Comfort Food Mash Up!
Have you ever found yourself torn between the cheesy, savory goodness of a classic pizza and the heartwarming, cozy embrace of a traditional pot pie? Well, prepare to have your culinary dreams come true, because this ingenious creation brings the best of both worlds together! This innovative dish takes everything we adore about a piping hot slice of pizza – the gooey cheese, the rich sauce, and your favorite toppings – and nestles it under a golden, savory crust, much like a traditional pot pie. It’s a delightful surprise with every single bite.
Ingredients
Instructions
Important Information
Nutrition Facts (Per Serving)
It is important to consider this information as approximate and not to use it as definitive health advice.
Allergy Information
Please check ingredients for potential allergens and consult a health professional if in doubt.
Leave a Comment