
No Bake Pumpkin Cheesecake Balls Bite Sized Fall Treats are here to revolutionize your autumn dessert game! I’m absolutely thrilled to share a recipe that perfectly captures the essence of the season without requiring you to even turn on your oven. Imagine the rich, creamy flavor of pumpkin cheesecake, infused with warm spices, all rolled into adorable, convenient bite-sized portions. These delightful treats are not just a dessert; they’re a statement of effortless elegance and pure autumnal bliss. While traditional pumpkin desserts like pies and cheesecakes have graced our tables for generations, these modern, no-fuss balls offer a fresh, exciting take on beloved fall flavors. People adore these No Bake Pumpkin Cheesecake Balls Bite Sized Fall Treats because they embody the ideal blend of indulgent taste and incredible convenience. They are perfect for holiday gatherings, potlucks, or simply as a cozy snack, providing that unmistakable taste of fall with every single bite. Their smooth texture and delightful sweetness make them an irresistible addition to any festive occasion, promising smiles and satisfied palates all around.

Ingredients:
- For the Creamy Cheesecake Mixture:
- 16 ounces (two 8-ounce blocks) full-fat cream cheese, completely softened to room temperature
- 1/2 cup granulated sugar
- 1 teaspoon pure vanilla extract (I always opt for a good quality extract; it makes a difference!)
- 1 teaspoon ground cinnamon
- 1/2 teaspoon ground nutmeg
- 1/4 teaspoon ground ginger
- A generous pinch of ground cloves (optional, but highly recommended for that classic pumpkin pie depth)
- For the Pumpkin Puree:
- 1/2 cup pumpkin puree (crucial: ensure this is 100% pure pumpkin, not pumpkin pie filling, which is already sweetened and spiced)
- For the Graham Cracker Binder:
- 1 1/2 cups finely crushed graham cracker crumbs (this usually translates to about 10-12 full graham cracker sheets)
- 1/4 cup unsalted butter, melted
- For the Delicious Coating:
- 1 cup confectioners’ sugar (also known as powdered sugar or icing sugar)
- 1 tablespoon pumpkin pie spice (or you can create your own mix: 1.5 teaspoons cinnamon, 0.5 teaspoon ginger, 0.25 teaspoon nutmeg, 0.125 teaspoon cloves)
- 1/2 cup finely chopped pecans or walnuts (optional, but they add a fantastic textural contrast and nutty flavor)
- A tiny sprinkle of flaky sea salt (optional, but truly enhances the sweetness and spice, giving a sophisticated finish)
Preparing the Ultra-Smooth Cheesecake Base
- First things first, let’s get that cream cheese perfectly ready. It is absolutely paramount that your full-fat cream cheese is softened to room temperature. This isn’t just a suggestion; it’s a critical step to achieve that incredibly smooth, lump-free texture we’re aiming for in our No Bake Pumpkin Cheesecake Balls Bite Sized Fall Treats. If your cream cheese is cold, it simply won’t mix properly, leaving you with small, unappetizing lumps. I usually take mine out of the refrigerator at least two hours before I plan to start, or if I’m in a hurry, I’ll cut it into smaller cubes and let it sit for about 30-45 minutes. Once it’s soft enough to easily indent with a finger, unwrap the blocks and place them into a large mixing bowl.
- Now, let’s get whipping! Using an electric hand mixer or a stand mixer fitted with the paddle attachment, begin to beat the softened cream cheese on medium speed. You want to whip it thoroughly for a good 3-4 minutes, or until it becomes incredibly light, airy, and completely smooth. As you’re mixing, be sure to stop occasionally and scrape down the sides and bottom of the bowl with a rubber spatula. This ensures that every bit of cream cheese gets properly aerated and no unmixed pockets remain. This initial whipping step is the secret to making our cheesecake balls melt-in-your-mouth creamy.
- With our cream cheese base beautifully smooth, it’s time to introduce the sweetness and those essential fall spices. Add the granulated sugar, pure vanilla extract, ground cinnamon, ground nutmeg, and ground ginger to the whipped cream cheese. If you’ve decided to include that delightful pinch of ground cloves, add it in now as well. These spices will immediately begin to infuse the mixture with that quintessential warm, comforting aroma and taste profile that truly defines autumn.
- Continue to beat the mixture on medium-low speed for another 2-3 minutes, or until the sugar is fully dissolved and all the spices are perfectly incorporated and evenly distributed. The mixture should now be thick, glossy, and smell absolutely heavenly. Again, don’t forget to scrape down the sides of the bowl to catch any stray ingredients. This robust, perfectly spiced mixture is the decadent heart of our no-bake pumpkin cheesecake balls, promising rich flavor in every bite.
Infusing with Pumpkin Goodness and Building Structure
- Alright, it’s time for the star ingredient to make its grand entrance! Gently add the 1/2 cup of 100% pure pumpkin puree to your spiced cream cheese mixture. I cannot stress enough the importance of using pure pumpkin puree here. Pumpkin pie filling, while convenient, contains added sugars and spices that would throw off the careful balance of our recipe, resulting in a flavor profile that’s just not quite right. Pure pumpkin gives us the control we need for perfect results.
- Using a rubber spatula, carefully fold the pumpkin puree into the cream cheese mixture until it’s just combined. You want to mix it gently to avoid overworking the mixture. Overmixing can sometimes introduce too much air, which isn’t ideal for the dense, firm texture we’re aiming for in a no-bake treat that needs to hold its shape well. The mixture should now boast a beautiful, inviting pale orange hue and the aroma of pumpkin and spices will be truly captivating.
- Next, let’s prepare our crucial binder: the graham cracker crumbs. In a separate small bowl, combine the finely crushed graham cracker crumbs with the melted unsalted butter. Stir these two ingredients together thoroughly until all the crumbs are evenly moistened and have a texture similar to wet sand. For the finest and most consistent crumbs, which I find work best for integrating smoothly, I usually pulse my graham crackers in a food processor. If you don’t have one, placing them in a sturdy zip-top bag and crushing them with a rolling pin works perfectly well, just aim for a fine consistency.
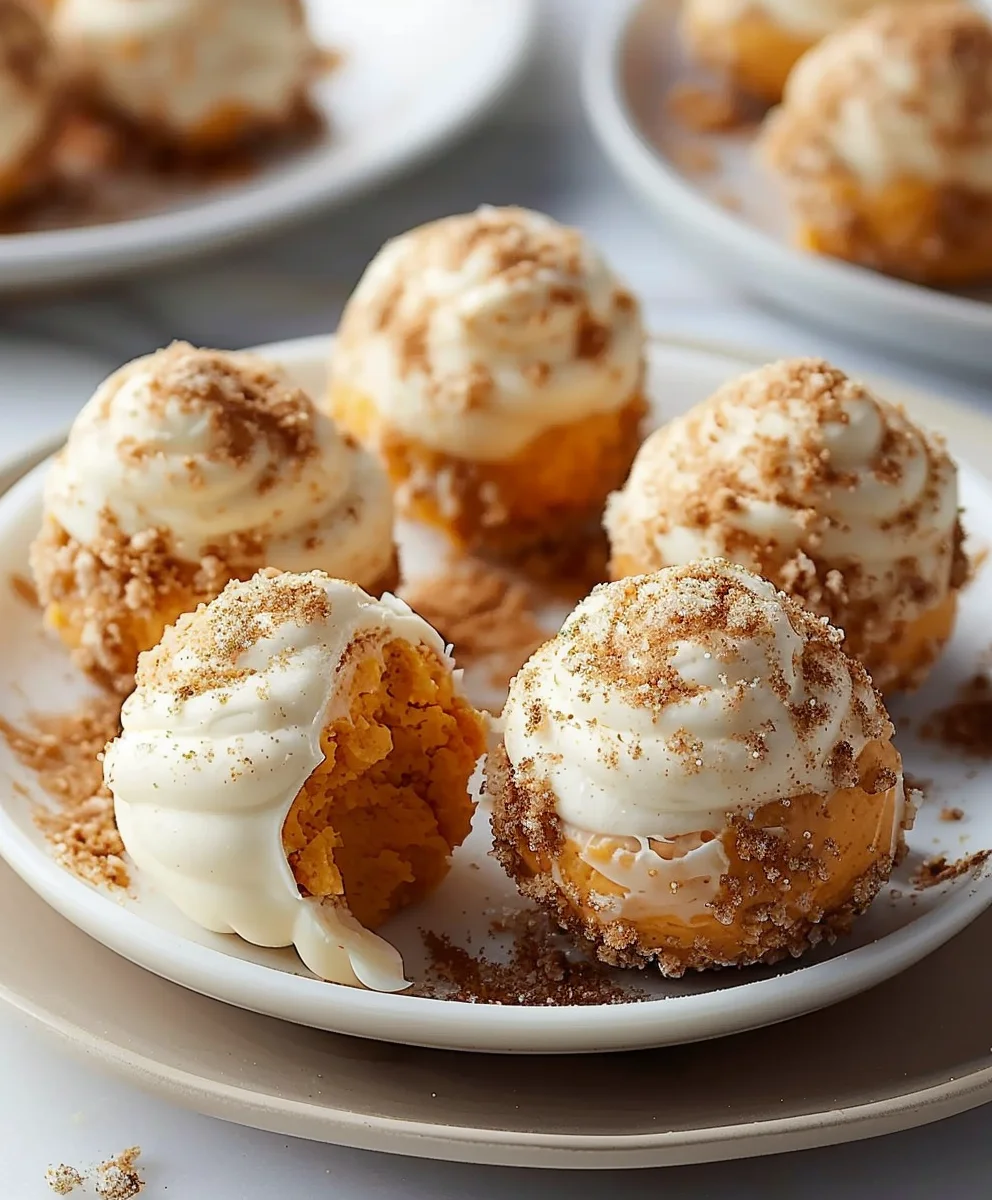
- Now, add the buttered graham cracker crumbs directly into your pumpkin cheesecake mixture. This step is absolutely fundamental for our no-bake balls. The graham crackers not only contribute that classic cheesecake crust flavor that pairs so wonderfully with the creamy filling, but they also act as a structural binder. They absorb moisture and help the mixture firm up significantly, allowing our balls to hold their perfect spherical shape once chilled.
- Using your electric mixer on a very low speed, or a sturdy spatula if mixing by hand, incorporate the graham cracker crumbs into the pumpkin cheesecake mixture. Mix just until the crumbs are evenly distributed throughout the entire batch. Be careful not to overmix at this stage; we just want everything to come together cohesively. The mixture will be quite thick and pleasantly sticky, which is precisely the consistency we need for forming our delightful little pumpkin cheesecake bites.
- This next step is non-negotiable for success: chilling. Once everything is thoroughly mixed, cover the bowl tightly with plastic wrap and transfer the entire bowl to the refrigerator. Allow it to chill for at least 2-3 hours, but honestly, if you have the time, chilling it overnight yields even better results. This chilling period is absolutely vital for several reasons. Firstly, it allows all those wonderful fall flavors to meld and deepen. Secondly, and perhaps most importantly for handling, it firms up the mixture significantly. Trying to roll the balls before adequate chilling will result in a sticky, frustrating mess. Trust me on this one; patience here will be rewarded with perfectly formed, easy-to-handle No Bake Pumpkin Cheesecake Balls Bite Sized Fall Treats.
Forming the Bites and Prepping for Coating
- Once your pumpkin cheesecake mixture has had its long, well-deserved chill, remove it from the refrigerator. It should now be firm enough to easily handle. Before you start rolling, prepare a baking sheet by lining it with either parchment paper or a silicone baking mat. This foresight will prevent the finished balls from sticking and make your cleanup much, much easier.
- Here comes the really fun part: rolling our delicious bites! Grab a small cookie scoop (I find a 1-tablespoon size works perfectly for bite-sized treats) or simply use a regular tablespoon measure to portion out the chilled mixture. Take each portion and gently roll it between the palms of your hands to form smooth, uniform spheres. Aim for consistency in size; not only does it make for a more appealing presentation, but it also ensures they chill and set evenly.
- As you roll each ball, carefully place it onto your prepared baking sheet. A little tip from my kitchen: if the mixture starts to get too sticky or soft from the warmth of your hands, don’t hesitate to pop the bowl back into the fridge for 10-15 minutes to firm up again. Sometimes, I even run my hands under cold water and dry them thoroughly between batches to keep the mixture from adhering too much. Depending on the exact size you roll them, you should yield approximately 24 to 30 delightful pumpkin cheesecake balls.
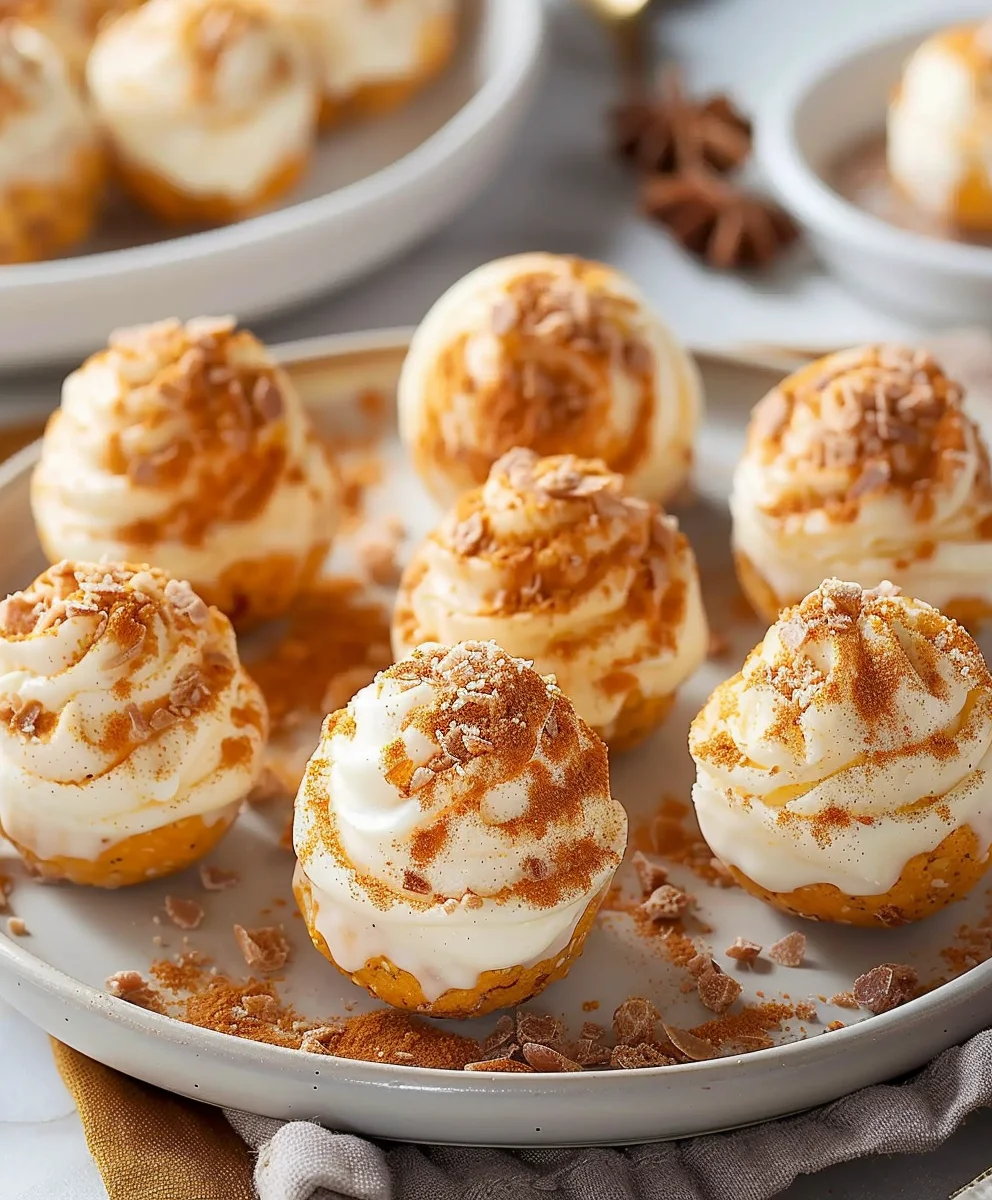
- Once all the balls are beautifully formed and neatly arranged on your baking sheet, it’s time for one more brief chill. Place the entire baking sheet back into the refrigerator for an additional 30 minutes to an hour. This second chill is super important because it helps to firm up the exterior of the balls even further. This makes them much sturdier and easier to coat without losing their perfect shape. It also helps the coating adhere more effectively, ensuring our No Bake Pumpkin Cheesecake Balls Bite Sized Fall Treats are picture-perfect and ready for their delicious finishing touches.
Coating and The Grand Finale
- While your pumpkin cheesecake balls are getting their final, crucial chill, let’s get our coating mixture ready. In a shallow bowl (something wide enough for easy rolling), whisk together the confectioners’ sugar (powdered sugar) and the pumpkin pie spice until they are thoroughly combined and no lumps of sugar remain. If you’re opting for the wonderful addition of chopped pecans or walnuts for that extra crunch and delightful textural dimension, you have a couple of choices: you can either mix them directly into this spiced sugar blend, or you can keep them separate and roll the spiced-sugar-coated balls in them afterward. For a truly elevated experience and a sophisticated twist, I highly recommend mixing in that tiny sprinkle of flaky sea salt here; it works wonders to balance the sweetness and enhance all those warm spices.
- Once the pumpkin cheesecake balls are thoroughly chilled and wonderfully firm, it’s showtime for the coating! Remove them from the refrigerator. One by one, gently drop a cheesecake ball into your spiced confectioners’ sugar mixture. Use a fork or a small spoon to carefully roll the ball around until it’s completely and evenly coated on all sides. Using utensils helps prevent too much direct contact with your warm hands, which could soften the balls too quickly.
- If you decided to use the chopped nuts for an added layer of texture, after you’ve coated the ball generously in the spiced sugar, gently transfer it to the bowl of chopped pecans or walnuts. Roll it around, pressing lightly so that the nuts adhere nicely to the sugary exterior. This creates a gorgeous, rustic, and delightfully crunchy shell that provides an incredible contrast to the creamy interior.
- As each No Bake Pumpkin Cheesecake Balls Bite Sized Fall Treats is coated, place it back onto your parchment-lined baking sheet. Continue this delightful process until every single one of your scrumptious bites is beautifully coated and ready for its final chill.
- For the absolute best texture, flavor, and firmness, transfer the baking sheet with all the finished, coated balls back into the refrigerator for at least another 30 minutes before you plan to serve them. This final chill allows the coating to set perfectly and ensures the balls are firm, cool, and incredibly refreshing when enjoyed.
- Serving and Storage Suggestions: These delightful no-bake pumpkin cheesecake balls are truly at their peak when served chilled. Arrange them artfully on a serving platter for your upcoming fall gatherings, Thanksgiving feasts, or even just as a special, easy treat to enjoy throughout the autumn season. They make a fantastic addition to any dessert spread, offering a rich yet light bite. Any leftovers, if you’re lucky enough to have them (they disappear quickly in my house!), should be stored in an airtight container in the refrigerator. They will remain wonderfully fresh and delicious for up to 5-7 days. I often find that their flavors actually deepen and become even more harmonious after a day or two in the fridge, making them an excellent make-ahead dessert option. For an extra touch of visual appeal and aroma, consider garnishing your serving platter with a few whole cinnamon sticks, some star anise, or a light dusting of extra pumpkin pie spice. These treats are not only incredibly easy and satisfying but also wonderfully pretty, promising to be a hit with everyone. Enjoy every single bite of these truly irresistible no bake pumpkin cheesecake balls bite sized fall treats! They’re a perfect ode to autumn!
Conclusion:
So, there we have it! We’ve journeyed through the simple steps to create a truly irresistible autumn dessert, and I honestly couldn’t be more excited for you to experience these for yourselves. This isn’t just another fall recipe; it’s a game-changer for anyone who loves the cozy, spiced flavors of pumpkin but dreads the oven. Imagine biting into a creamy, dreamy confection that perfectly balances the sweetness of cheesecake with the warm, aromatic embrace of pumpkin pie spice. That’s precisely what these incredible little bites offer. They are ridiculously easy to whip up, requiring absolutely no baking, which means less time hovering over a hot oven and more time enjoying the season. What makes this recipe a true standout, a must-try in every sense, is its effortless elegance. You get all the sophisticated flavor of a gourmet dessert with a fraction of the effort. They are a guaranteed crowd-pleaser, appealing to both kids and adults, making them an ideal candidate for any gathering, big or small. The texture is velvety smooth, melting in your mouth, while the outer coating adds just the right amount of delightful crunch or tender chewiness, depending on your chosen finish. They are a testament to the fact that some of the most satisfying treats are also the simplest to create. It’s truly a celebration of fall in every single, perfect bite.
When it comes to serving these beauties, the possibilities are as delightful as the treats themselves. For a lovely presentation, arrange them artfully on a tiered serving tray or a rustic wooden platter, perhaps garnished with a few fresh cranberries or a sprig of rosemary for a pop of color that really screams autumn. They look absolutely charming served in miniature cupcake liners, making them easy to pick up and enjoy at parties without any fuss or mess. Think about pairing them with your favorite warm beverages: a steaming mug of spiced apple cider, a robust coffee, or a comforting chai latte would complement their flavors wonderfully, enhancing that cozy, autumnal vibe. For a more adult gathering, consider offering them alongside a small glass of dessert wine, like a late-harvest Riesling, or even a shot of spiced rum for a truly indulgent experience. They make the perfect elegant finish to a Thanksgiving feast, a delightful addition to a Halloween party spread, or a welcome contribution to any potluck where you want to bring something impressive yet easy. Don’t overlook their potential as a thoughtful homemade gift! Package a few in a cute treat box tied with a festive ribbon, and you’ve got a personal, delicious present that shows you care. They’re also perfect for a quiet evening at home, curled up on the couch, watching your favorite fall movie. Their individual portion size makes them incredibly convenient for portion control – or, let’s be honest, for sneaking just one more!
But wait, the fun doesn’t stop there! One of the joys of a simple recipe like this is the freedom to get creative with variations, allowing you to tailor these treats precisely to your taste or the preferences of your guests. While the classic graham cracker coating is undeniably divine, don’t hesitate to experiment with other exciting options. Try rolling some in a mix of cinnamon and sugar for an extra autumnal kick, creating a delightful sugary crust, or use finely chopped pecans or walnuts for a satisfyingly nutty crunch and added texture. A delicate drizzle of melted white chocolate over a few, once they’ve fully chilled, adds an extra layer of sweetness and a beautiful visual appeal that elevates them even further. For the adventurous palate, a dusting of cocoa powder or even finely shredded coconut could offer an interesting and unexpected twist, introducing new flavor dimensions. If you want to play with the internal flavors, consider adding a tiny pinch of ground ginger or a whisper of ground cloves to the pumpkin mixture, enhancing the spice profile even further beyond the traditional pumpkin pie spice blend. A half teaspoon of maple extract could infuse a lovely, subtle maple note, perfectly complementing the pumpkin and cream cheese. For those with dietary considerations, you can often adapt this recipe with dairy-free cream cheese and whipped topping alternatives, and use gluten-free graham crackers for the coating, ensuring everyone can enjoy these seasonal delights. The beauty is in its incredible flexibility; you can truly make this recipe your own, tailoring it to your specific preferences and whatever ingredients you have on hand.
So, what are you waiting for? I wholeheartedly encourage you to carve out a little time this season, gather your simple ingredients, and embark on the incredibly rewarding journey of making these delightful treats. I promise you won’t regret it. The joy of creating something so delicious with so little effort is truly satisfying, and the smiles you’ll see when you serve them are priceless. These aren’t just desserts; they are little moments of pure, unadulterated fall happiness, perfectly portioned and bursting with flavor. I’m genuinely excited for you to experience the magic of a dessert that tastes like it took hours, but only took minutes to prepare. Once you’ve had a chance to try them, I would absolutely love to hear about your experience! Did you stick to the classic coating, or did you venture into exciting new variations? Did you serve them at a festive gathering or savor them all by yourself (no judgment here!)? Please share your thoughts, your successes, and any creative twists you came up with in the comments below. Your feedback and personal touches inspire me and fellow food lovers. Dive into the delightful world of these No Bake Pumpkin Cheesecake Balls Bite Sized Fall Treats and let your kitchen fill with the comforting aromas of autumn. Happy creating, and even happier eating!
No Bake Pumpkin Cheesecake Balls Bite Sized Fall Treats
Easy, bite-sized no-bake pumpkin cheesecake balls perfect for fall gatherings or a cozy snack. Captures the rich, creamy flavor of pumpkin cheesecake with warm spices in a convenient, delightful treat.
Ingredients
-
8 oz cream cheese, softened
-
1/2 cup pumpkin puree
-
1 tsp vanilla extract
-
1 tsp pumpkin pie spice
-
1 cup powdered sugar (divided for mixture and coating)
-
1 cup graham cracker crumbs (for coating)
Instructions
-
Step 1
In a large mixing bowl, beat 8 oz softened cream cheese until smooth and light. Add 1/2 cup powdered sugar, 1 tsp vanilla extract, and 1 tsp pumpkin pie spice. Beat until well combined and glossy. Gently fold in 1/2 cup pumpkin puree until just incorporated. -
Step 2
Cover the bowl tightly with plastic wrap and chill in the refrigerator for at least 2-3 hours, or preferably overnight, until the mixture is firm enough to handle easily. -
Step 3
Line a baking sheet with parchment paper. Scoop about 1 tablespoon of the chilled mixture and roll it between your palms to form smooth, uniform spheres. Place each ball onto the prepared baking sheet. -
Step 4
Once all balls are formed, return the baking sheet to the refrigerator for an additional 30-60 minutes. This firms up the exterior, making them easier to coat. -
Step 5
In a shallow bowl, combine the remaining 1/2 cup powdered sugar with 1 cup graham cracker crumbs, mixing thoroughly. -
Step 6
Remove the firm cheesecake balls from the refrigerator. One by one, gently roll each ball in the graham cracker crumb and powdered sugar coating mixture until completely and evenly coated on all sides. Place the coated balls back on the parchment-lined baking sheet. -
Step 7
For optimal texture and firmness, transfer the baking sheet with all coated balls back into the refrigerator for at least another 30 minutes before serving. Store any leftovers in an airtight container in the refrigerator for up to 5-7 days.
Important Information
Nutrition Facts (Per Serving)
It is important to consider this information as approximate and not to use it as definitive health advice.
Allergy Information
Please check ingredients for potential allergens and consult a health professional if in doubt.
Leave a Comment