
No Bake Peanut Butter Lasagna Recipe – just hearing those words evokes a sense of creamy, dreamy delight, doesn’t it? Imagine a dessert that combines the irresistible flavor of peanut butter with the effortless elegance of a layered treat, all without ever turning on your oven. This isn’t just another dessert; it’s a testament to the genius of modern home baking – or rather, no-baking! In our fast-paced lives, finding a dessert that delivers on incredible flavor and texture without demanding hours in the kitchen is truly a treasure.
Why This Dessert Steals the Show
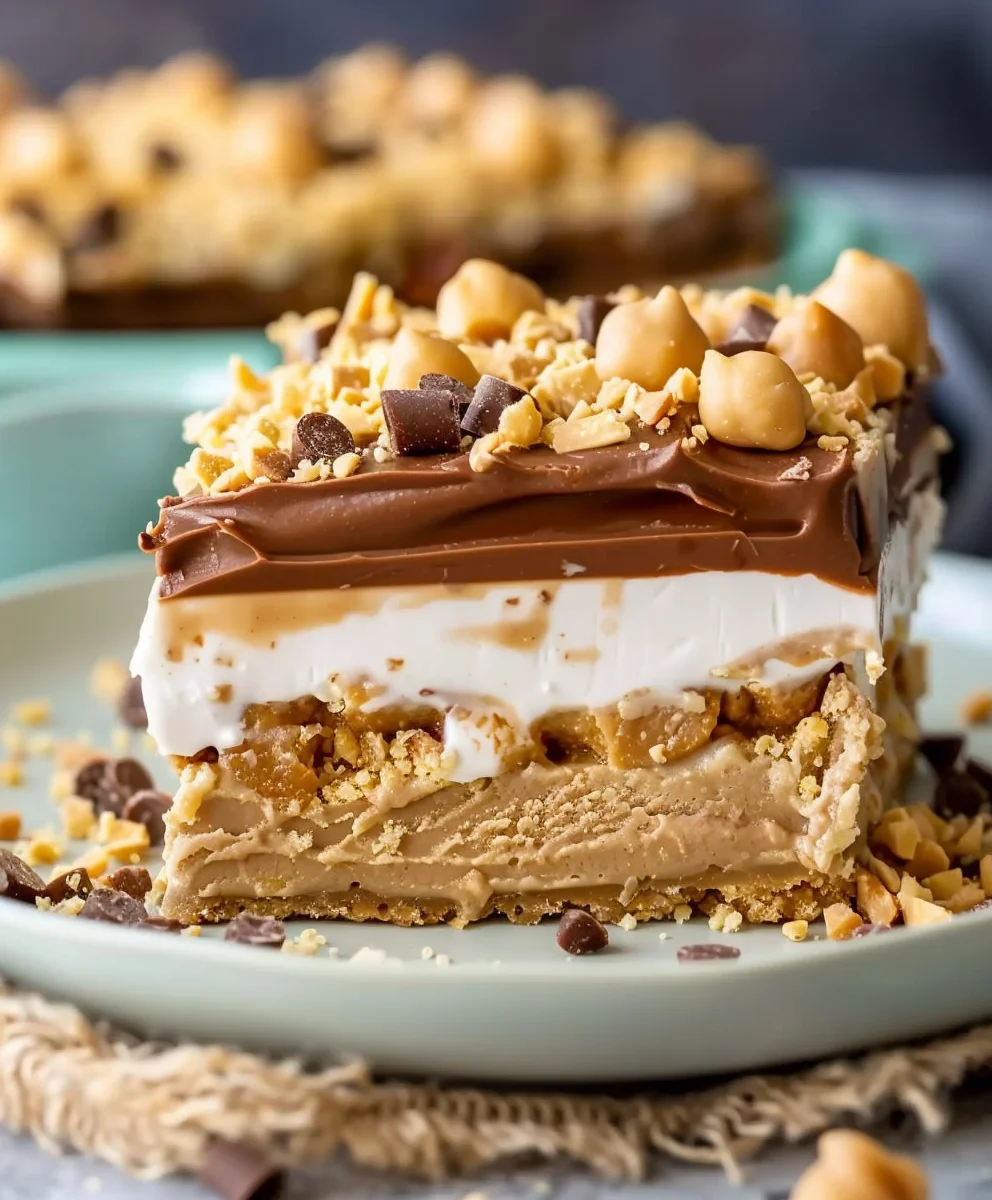
I’ve always been captivated by the magic of no-bake desserts. They stand as a beacon of culinary innovation, proving that exquisite taste doesn’t always require complex techniques or a hot oven. This particular No Bake Peanut Butter Lasagna Recipe takes that concept to a whole new level, offering a symphony of sweet and salty, smooth and slightly crunchy textures. Its layers of rich, creamy peanut butter filling, a delightful crushed cookie crust, and a luscious topping are simply irresistible. It’s the perfect dessert for parties, potlucks, or simply a well-deserved treat for yourself after a long week, promising pure bliss with every forkful. Get ready to impress with minimal effort!

Ingredients:
-
For the Cookie Crust:
- 1 ½ cups (approximately 18-20 whole) chocolate sandwich cookies (like Oreos), finely crushed. Tip: You’ll want to remove the cream filling for a crisper crust, or leave it in for a slightly richer, softer base. I personally prefer removing it for this specific No Bake Peanut Butter Lasagna Recipe.
- 6 tablespoons unsalted butter, melted. Make sure it’s fully melted but not scorching hot.
-
For the Cream Cheese Layer:
- 1 (8-ounce) package cream cheese, full-fat, softened to room temperature. This is crucial for a smooth, lump-free mixture.
- ½ cup granulated sugar.
- 1 (3.4-ounce) package instant vanilla pudding mix (dry mix, do not prepare according to package directions). Ensure it’s instant, not cook-and-serve.
- 1 ½ cups cold milk (dairy or non-dairy equivalent works, but whole milk yields the richest texture).
- 1 teaspoon pure vanilla extract.
-
For the Peanut Butter Layer:
- 1 (8-ounce) package cream cheese, full-fat, softened to room temperature. Again, room temperature is key.
- 1 cup powdered sugar (confectioners’ sugar), sifted. Sifting prevents lumps and ensures a silky smooth texture.
- 1 cup creamy peanut butter. I recommend using a conventional, shelf-stable brand (like Jif or Skippy) for consistent results in this No Bake Peanut Butter Lasagna Recipe, as natural peanut butter can separate.
- 1 (3.4-ounce) package instant chocolate pudding mix (dry mix, do not prepare according to package directions). This chocolate layer truly elevates the peanut butter experience!
- 1 ½ cups cold milk.
- 1 teaspoon pure vanilla extract.
-
For the Whipped Topping & Garnish:
- 1 (8-ounce) container frozen whipped topping (like Cool Whip), thawed. Make sure it’s fully thawed but still very cold.
- Optional garnishes:
- Mini chocolate chips.
- Chopped roasted peanuts.
- A drizzle of melted chocolate or peanut butter.
- Extra crushed chocolate cookies.
Preparation Phase 1: Preparing the Cookie Crust
- First, we need to create the foundation for our delectable No Bake Peanut Butter Lasagna Recipe – the cookie crust. Begin by finely crushing your chocolate sandwich cookies. The best way to achieve a uniform crumb is by using a food processor. Simply toss the cookies in and pulse until they resemble fine sand. If you don’t have a food processor, you can place the cookies in a large Ziploc bag, seal it, and then use a rolling pin or the bottom of a heavy pan to crush them. Aim for a very fine consistency; any large chunks will make the crust uneven and prone to crumbling when serving. Remember, if you’re taking the time to remove the cream filling, this step will be easier and the result even better. I find that about 18-20 cookies usually yield 1 ½ cups of fine crumbs, but it’s always a good idea to measure precisely.
- Once you have your perfectly crushed cookie crumbs, transfer them to a medium-sized mixing bowl. Now, it’s time to add the melted butter. Pour the 6 tablespoons of melted unsalted butter over the cookie crumbs. Use a fork or a rubber spatula to mix thoroughly, ensuring every single crumb is moistened by the butter. The mixture should resemble wet sand and hold together when you pinch it between your fingers. This butter acts as the binding agent, crucial for a stable crust that won’t fall apart. Don’t rush this step; even distribution of butter is key to a successful crust.
- Next, press the buttered cookie crumbs firmly into the bottom of a 9×13-inch baking dish. I find that a dish with slightly higher sides works best for this layered dessert. You can use the back of a spoon, the bottom of a flat-bottomed glass, or even your clean hands to press the mixture down. The goal here is to create an even, compact layer across the entire bottom of the dish. Pay special attention to the corners and edges to ensure they are as dense as the center. A well-pressed crust is less likely to crumble when you cut into your finished dessert. Once pressed, place the dish in the refrigerator to chill for at least 15-20 minutes while you prepare the next layers. This brief chill helps the butter solidify, setting the crust firmly in place.
Preparation Phase 2: Crafting the Cream Cheese Layer
- While your crust is chilling, let’s move on to the creamy first layer of our No Bake Peanut Butter Lasagna Recipe. In a large mixing bowl, combine the 8-ounce package of softened cream cheese with ½ cup of granulated sugar. It is absolutely vital that your cream cheese is at room temperature. If it’s too cold, it will be lumpy and difficult to incorporate smoothly, no matter how much you mix. Use an electric mixer (either a stand mixer with a paddle attachment or a hand mixer) to beat the cream cheese and sugar together until the mixture is light, fluffy, and completely smooth. Scrape down the sides of the bowl frequently to ensure everything is well combined and there are no hidden pockets of unmixed ingredients. This step might take 2-3 minutes, but patience here results in a wonderfully airy and uniform base.
- Once the cream cheese mixture is smooth, add the dry instant vanilla pudding mix, 1 ½ cups of cold milk, and 1 teaspoon of pure vanilla extract to the bowl. Make sure you’re using instant pudding and not the cook-and-serve variety, as we’re not cooking anything here! Pour the cold milk in gradually as you begin to mix. Continue to beat with your electric mixer on medium speed for another 2-3 minutes, or until the mixture becomes thick and well combined. You’ll notice it transforming from a liquidy consistency into a much thicker, almost mousse-like texture. The pudding mix acts as a thickener and flavor enhancer, giving this layer its signature silky texture and delightful vanilla notes. Again, scrape down the bowl to ensure everything is thoroughly incorporated.
- Carefully spread this luscious cream cheese mixture evenly over your chilled cookie crust in the 9×13-inch baking dish. Use an offset spatula or the back of a spoon to gently smooth it out from edge to edge. Try to make this layer as flat and even as possible, as it will serve as the base for the subsequent, equally delicious layers. A smooth layer now contributes to a beautiful presentation later. Once spread, return the dish to the refrigerator. This allows the cream cheese layer to set up further, making it easier to add the next layer without disturbing it. A good 10-15 minutes of chilling here will do wonders.
Preparation Phase 3: Mixing the Dreamy Peanut Butter Layer
- Now for the star of the show in our No Bake Peanut Butter Lasagna Recipe – the peanut butter layer! In a separate large mixing bowl, combine the second 8-ounce package of softened cream cheese with the 1 cup of creamy peanut butter. Just like before, ensure your cream cheese is at room temperature for the best results. Using an electric mixer, beat these two ingredients together until they are completely smooth and well combined. This usually takes about 2-3 minutes. The mixture will be thick and wonderfully fragrant with peanut butter. Scrape down the sides of the bowl frequently to make sure no cream cheese or peanut butter is left unmixed.
- Next, gradually add the 1 cup of sifted powdered sugar to the peanut butter and cream cheese mixture. Sifting the powdered sugar is an extra step that makes a big difference, preventing any small lumps from appearing in your final layer and ensuring a perfectly smooth, velvety texture. Continue beating on low speed until the powdered sugar is fully incorporated. Then, increase the speed to medium and beat for another minute or so until the mixture is light and fluffy.
- To this rich peanut butter base, add the dry instant chocolate pudding mix, 1 ½ cups of cold milk, and 1 teaspoon of pure vanilla extract. Pour the milk in slowly. Beat with your electric mixer on medium speed for 2-3 minutes, or until the mixture thickens considerably and all ingredients are thoroughly combined. Just like the vanilla layer, the pudding mix will work its magic, transforming the liquid into a thick, mousse-like consistency. The chocolate pudding mix is not just a thickener; it adds a subtle yet delightful chocolate undertone that perfectly complements the peanut butter, creating that classic chocolate-peanut butter synergy we all adore. You want this layer to be firm enough to spread without sinking into the layer below.
Assembly Phase: Layering Your No Bake Peanut Butter Lasagna
- Retrieve your chilled baking dish with the cookie crust and vanilla cream cheese layer from the refrigerator. Now, carefully spoon the chocolate peanut butter mixture over the vanilla layer. I recommend spooning dollops of the peanut butter mixture evenly over the entire surface of the vanilla layer before you start spreading. This helps to distribute the weight and makes it easier to spread without disturbing the delicate layer underneath.
- Using an offset spatula or the back of a spoon, gently and evenly spread the peanut butter layer across the entire surface of the vanilla cream cheese layer. Take your time with this step to ensure a smooth, uniform layer. The goal is to create a distinct, beautiful division between the layers, so try not to mix them. Smooth it out all the way to the edges of the dish. The thickness of this layer should be comparable to the vanilla layer beneath it, contributing to the impressive height of your No Bake Peanut Butter Lasagna Recipe.
- Finally, for the top, we’ll add the whipped topping. Gently spread the thawed whipped topping evenly over the peanut butter layer. You can use an offset spatula to create a beautiful, smooth finish, or if you prefer a more rustic look, you can create gentle swirls or peaks with the back of a spoon. This bright white layer provides a lovely visual contrast to the darker layers below and adds a light, airy finish to the dessert. Ensure it covers the entire peanut butter layer right to the edges.
Finishing Touches: Chilling and Serving Your Masterpiece
- Now comes arguably the hardest part – the waiting! For this No Bake Peanut Butter Lasagna Recipe to truly set and become sliceable, it needs a good, long chill. Cover the baking dish loosely with plastic wrap to prevent any odors from the refrigerator from affecting your dessert and place it back in the refrigerator. It needs to chill for a minimum of 4 hours, but honestly, for the best results, I always recommend chilling it overnight (8 hours or more). This extended chill time allows all the layers to firm up completely, making for clean, beautiful slices. It also gives the flavors ample time to meld together, creating a more harmonious and delicious experience.
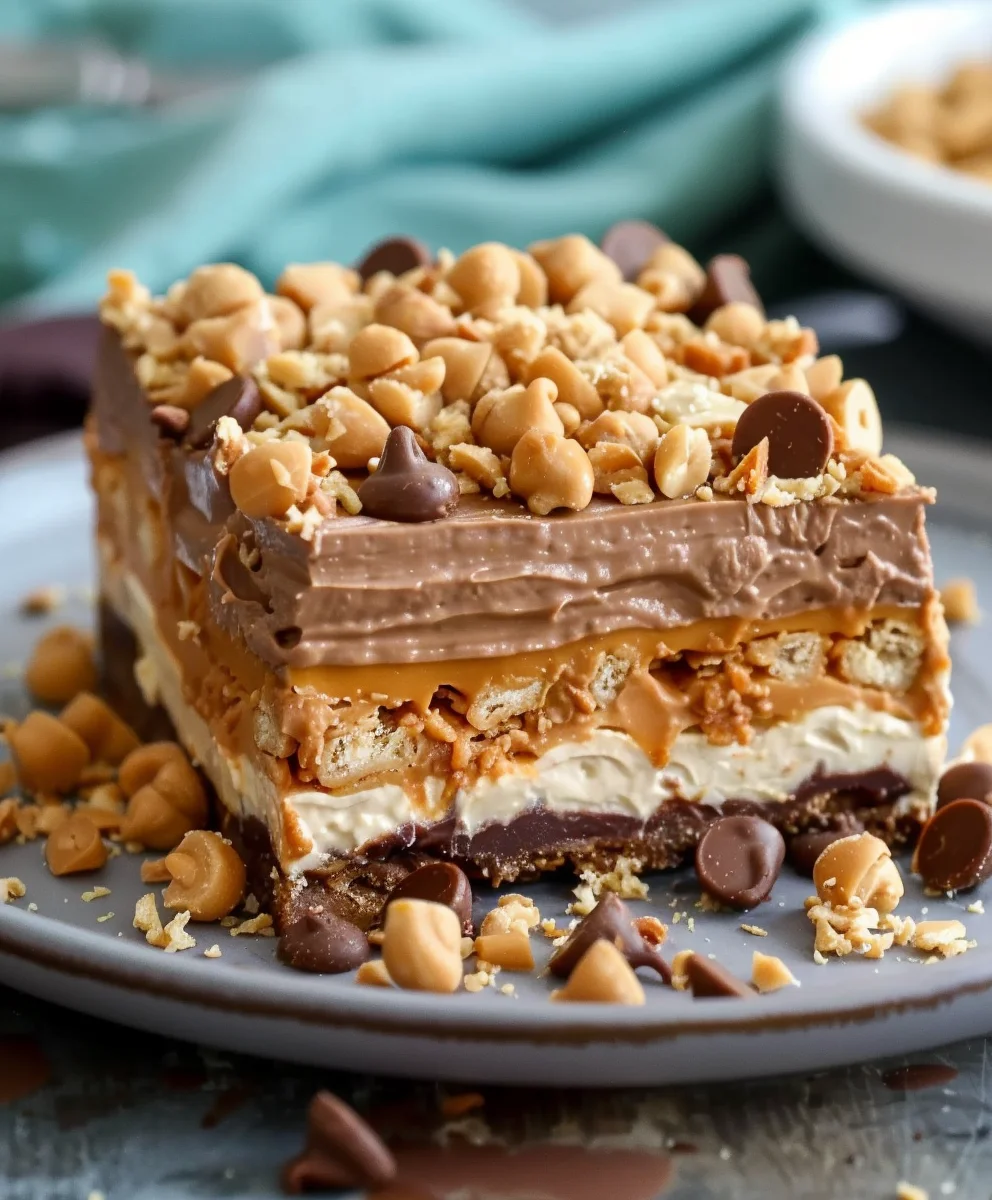
- Once your No Bake Peanut Butter Lasagna is perfectly chilled and set, it’s ready to be served! Before cutting, you might want to consider adding some optional garnishes to elevate its appearance and add extra texture and flavor. My favorite additions include a sprinkle of mini chocolate chips for extra chocolatey goodness, some chopped roasted peanuts for a pleasant crunch and intensified peanut flavor, or even a fancy drizzle of melted chocolate or peanut butter across the top. You could also crumble a few extra chocolate sandwich cookies for a thematic touch.
- To serve, use a sharp knife that has been run under hot water and wiped clean between each slice. This trick helps achieve super clean cuts and prevents the layers from sticking to the knife. Cut the lasagna into squares, typically 12-15 servings depending on how generous you want to be. Use a sturdy spatula to carefully lift each slice from the dish onto individual plates. Each piece will reveal those beautiful, distinct layers – the crunchy cookie crust, the creamy vanilla, the dreamy peanut butter, and the airy whipped topping. This No Bake Peanut Butter Lasagna Recipe is truly a showstopper and a crowd-pleaser, perfect for any gathering or just a delightful treat for yourself! Enjoy every decadent bite.
Conclusion:
And there you have it, my friends! We’ve reached the end of our delightful journey, but hopefully, it’s just the beginning of your own adventure with one of the most effortlessly impressive desserts I know. I sincerely hope you’re feeling inspired, perhaps even a little hungry, to whip up this absolute gem in your own kitchen. I promise you, this isn’t just another dessert recipe; it’s a ticket to pure, unadulterated joy, delivered with minimal fuss and maximum flavor impact. Imagine layers of rich, chocolatey crunch, followed by an impossibly smooth, perfectly sweet and salty peanut butter cream, all crowned with a cloud of light, airy whipped topping and a generous scattering of chocolate shavings. It’s a symphony of textures and tastes that truly needs to be experienced to be believed.
I genuinely believe this recipe is a must-try for so many reasons. For starters, the sheer convenience of a “no-bake” dessert cannot be overstated. No oven, no complex techniques, just simple assembly that yields show-stopping results every single time. It’s the ideal candidate for a last-minute get-together, a celebratory potluck, or simply a well-deserved treat after a long week. The delightful contrast between the crunchy base and the silky-smooth filling, paired with the beloved combination of peanut butter and chocolate, creates an experience that caters to almost every palate. Plus, there’s a wonderful sense of accomplishment that comes from presenting a dessert that looks so elaborate, yet was so incredibly easy to prepare. It’s a crowd-pleaser that consistently elicits gasps of delight and requests for the recipe, trust me on this one!
When it comes to serving, I highly recommend chilling your masterpiece for at least four hours, or even overnight, to allow the layers to set beautifully and the flavors to meld into perfection. My personal favorite way to serve it is simply sliced, showcasing those magnificent layers, perhaps with an extra sprinkle of finely chopped roasted peanuts for an added textural pop, or a delicate drizzle of melted chocolate or even a hint of caramel sauce just before serving. A dusting of cocoa powder or mini chocolate chips also makes for a lovely, inviting garnish. For a truly decadent experience, consider serving individual slices with a small scoop of vanilla bean ice cream on the side, allowing the cool creaminess to contrast with the rich peanut butter goodness. The possibilities are truly endless, and each addition only enhances the already incredible experience.
But don’t stop there! This particular No Bake Peanut Butter Lasagna Recipe is wonderfully versatile, making it perfect for your creative culinary experiments. If you’re feeling adventurous, consider swapping out the chocolate sandwich cookie crust for a graham cracker base, or even a shortbread cookie crust for a different textural profile. For the peanut butter layer, while I adore traditional peanut butter, you could experiment with almond butter or cashew butter if you’re looking for a slightly different nutty flavor, or if you have specific dietary needs (always check for nut allergies, of course!). You could also fold in some finely chopped Reese’s peanut butter cups into the peanut butter layer for an extra burst of candy goodness, or even a handful of mini marshmallows for a s’mores-like twist. For the topping, while classic whipped cream is divine, a chocolate whipped cream or a cream cheese frosting would also be absolutely stellar additions. Imagine adding a layer of thinly sliced bananas for a peanut butter banana twist, or even a hint of coffee extract to the chocolate layer for a mocha vibe. Seriously, the sky’s the limit!
This dessert isn’t just about the eating; it’s about the joy of creating something truly special, something that brings smiles to faces and warmth to hearts. It embodies everything wonderful about homemade treats: love, flavor, and a touch of magic, all without the stress. This specific No Bake Peanut Butter Lasagna Recipe has become a cherished staple in my repertoire, and I genuinely believe it will quickly become one in yours too. It’s reliable, it’s delicious, and it always delivers on its promise of an unforgettable dessert experience. So, go on, take the plunge!
I can’t wait for you to try this amazing recipe. Seriously, don’t hesitate. Give it a go this week, perhaps for your next family dinner, a casual get-together with friends, or simply as a reward for yourself. And when you do, please, please come back and share your experience with me! What did you love most about it? Did you try any exciting variations or serving suggestions? Your feedback and creative twists inspire me and so many other home bakers. Let’s build a community around the sheer delight of this incredible dessert. Happy baking (or rather, happy chilling!), and happy eating!
No-Bake Peanut Butter Lasagna Recipe: Easy & Delicious!
A creamy, dreamy no-bake dessert combining irresistible peanut butter flavor with layered elegance. Effortless to make, perfect for parties or a delightful treat, offering incredible flavor and texture without an oven.
Ingredients
-
2 cups crushed graham crackers (or Nutter Butters)
-
½ cup salted peanuts, chopped
-
½ cup unsalted butter, melted
-
1 ½ cups semi-sweet chocolate chips
-
¾ cup heavy cream
-
1 cup creamy peanut butter
-
8 oz cream cheese, softened
-
1 cup powdered sugar
-
1 tsp vanilla extract
-
1 ½ cups whipped topping (or homemade whipped cream)
-
1 (3.9 oz) box instant chocolate pudding mix
-
1 ½ cups cold milk
Instructions
-
Step 1
Combine crushed graham crackers, chopped salted peanuts, and melted butter. Press firmly into the bottom of a 9×13-inch baking dish. Chill in the refrigerator for 15-20 minutes. -
Step 2
Heat heavy cream until simmering. Pour over chocolate chips and let sit for 5 minutes. Stir until smooth. Spread evenly over the chilled crust and return to the refrigerator for 10-15 minutes to set slightly. -
Step 3
In a large bowl, beat softened cream cheese, creamy peanut butter, powdered sugar, and vanilla extract until smooth and fluffy. Gently fold in 1 ½ cups of whipped topping until just combined. Spread this mixture evenly over the chocolate ganache layer. Chill. -
Step 4
In a separate bowl, whisk the instant chocolate pudding mix with 1 ½ cups cold milk for 2-3 minutes until thickened. Spread this chocolate mousse evenly over the peanut butter cheesecake layer. -
Step 5
Gently spread additional whipped topping evenly over the chocolate mousse layer. Cover the baking dish loosely with plastic wrap and refrigerate for a minimum of 4 hours, or preferably overnight, for best results and clean slicing. -
Step 6
Once thoroughly chilled and set, garnish with mini chocolate chips, chopped peanuts, or a drizzle of melted chocolate/peanut butter if desired. Use a sharp, hot knife to cut into squares and serve cold. Enjoy every decadent bite!
Important Information
Nutrition Facts (Per Serving)
It is important to consider this information as approximate and not to use it as definitive health advice.
Allergy Information
Please check ingredients for potential allergens and consult a health professional if in doubt.
Leave a Comment