
Moist And Juicy Roasted Turkey And Gravy is often the crown jewel of any holiday feast, a dish that single-handedly defines festive gatherings and creates indelible memories. Have you ever dreamt of carving into a perfectly golden bird, only to find meat so tender and flavorful it practically melts in your mouth, all complemented by a rich, savory gravy? That dream is precisely what we aim to help you achieve today!
For centuries, roast turkey has held a place of honor on tables around the world, particularly in North America where it became the undisputed centerpiece of Thanksgiving celebrations following Abraham Lincoln’s proclamation, and equally so during Christmas and other significant family milestones. It’s more than just a meal; it’s a symbol of abundance, warmth, and togetherness. People adore this dish not only for its incredible taste – the crispy skin, the succulent white and dark meat, and the deeply aromatic broth-based gravy – but also for the nostalgia it evokes. The inviting aroma that fills your home as it roasts is a sensory experience in itself, promising comfort and joy.
I know the thought of roasting a whole turkey can feel daunting, with concerns about dry meat or bland flavors. But fear not! My goal is to guide you through every step to ensure your holiday centerpiece, a truly Moist And Juicy Roasted Turkey And Gravy, is nothing short of spectacular this year. Prepare to impress your guests and savor every delicious bite!

Ingredients:
- For the Turkey:
- One (1) whole turkey, fresh or thawed (12-18 lbs is a good standard size for many gatherings; adjust cooking time for larger or smaller birds).
- 1 cup (2 sticks) unsalted butter, softened.
- 2 tablespoons fresh rosemary, finely chopped.
- 2 tablespoons fresh thyme, finely chopped.
- 1 tablespoon fresh sage, finely chopped.
- 2 teaspoons garlic powder.
- 1 teaspoon onion powder.
- 1 teaspoon black pepper, freshly ground.
- 2 teaspoons kosher salt (or more, to taste, depending on brining and personal preference).
- 2 large yellow onions, peeled and quartered.
- 4 celery stalks, roughly chopped.
- 4 carrots, roughly chopped.
- 1 head of garlic, halved horizontally.
- 4 cups (1 quart) low-sodium chicken or turkey broth, plus more if needed for the roasting pan and gravy.
- Optional: Fresh parsley, bay leaves for the cavity.
- For the Brine (Optional, but highly recommended for a “Moist And Juicy Roasted Turkey”):
- 2 gallons cold water.
- 1 cup kosher salt.
- ½ cup granulated sugar.
- 4 bay leaves.
- 1 tablespoon whole black peppercorns.
- 1 tablespoon dried juniper berries (optional, adds a nice piney note to the turkey).
- 2 oranges, quartered.
- 4 sprigs fresh rosemary.
- 4 sprigs fresh thyme.
- Optional: 1 cup apple cider or white wine (adds another layer of flavor to the brine).
- For the Gravy:
- All pan drippings from the roasted turkey.
- ½ cup all-purpose flour (for a roux-based gravy) OR 3 tablespoons cornstarch mixed with ½ cup cold water (for a gluten-free option).
- 2-3 cups additional low-sodium chicken or turkey broth, or reserved brine liquid (diluted), warmed.
- Salt and freshly ground black pepper to taste.
- Optional: A splash of white wine or sherry for extra depth and richness.
- Optional: Fresh herbs like parsley or chives for garnish, adding a touch of freshness.
Phase 1: Preparing Your Turkey for the Ultimate “Moist And Juicy Roasted Turkey”
- Thawing the Turkey: If your turkey is frozen, this is the most critical first step and requires ample time and patience. For every 4 pounds of turkey, allow a full 24 hours of thawing time in the refrigerator. For example, a 16-pound turkey will need a minimum of 4 days to thaw completely. Always place the turkey in a shallow pan or tray during thawing to catch any potential drips and prevent cross-contamination in your refrigerator. Never thaw a turkey at room temperature on the counter; this can lead to dangerous bacterial growth and foodborne illness. Once completely thawed, carefully remove the turkey from its packaging. Locate and remove the neck and giblets from both the main cavity and the smaller neck cavity (often tucked in with the neck). You can discard them, or if you plan to make stock or add flavor to your gravy, set them aside. Thoroughly rinse the turkey inside and out with cold running water. Finally, pat it completely dry with paper towels. This drying step is absolutely crucial for achieving that wonderfully crispy skin everyone loves on a perfectly roasted turkey.
- Brining the Turkey (Highly Recommended for “Moist And Juicy Roasted Turkey”): While optional, brining is my go-to secret weapon for guaranteeing a truly moist and incredibly juicy roasted turkey. It infuses the meat with flavor and moisture, making it much more forgiving during cooking.
- In a very large stockpot, a clean food-grade bucket, or a specialized brining bag, combine all the brine ingredients: 2 gallons of cold water, 1 cup of kosher salt, ½ cup of granulated sugar, the bay leaves, whole peppercorns, juniper berries (if using, as they add a lovely aromatic complexity), quartered oranges, fresh rosemary, fresh thyme, and apple cider or white wine (if you choose to use it). Stir everything vigorously until the salt and sugar are fully dissolved. You want a homogenous solution.
- Carefully submerge the completely thawed and cleaned turkey into the brine solution. Ensure that the turkey is fully covered by the liquid. If the turkey floats, you can place a heavy plate or a clean, weighted object on top to keep it submerged.
- Refrigerate the turkey in the brine for 12-24 hours. For smaller turkeys (12-14 lbs), 12-16 hours is usually sufficient for optimal results. For larger birds (18-20+ lbs), you can extend the brining time up to 24 hours. Be mindful not to over-brine, as this can make the turkey overly salty or give it a somewhat cured texture.
- After the brining period, remove the turkey from the brine solution. Discard the spent brine responsibly. Rinse the turkey thoroughly inside and out under cold running water. This rinsing step is paramount to wash off any excess salt from the surface of the turkey. If you skip this, your turkey may taste too salty.
- Once rinsed, pat the turkey very dry with paper towels, both inside the cavities and all over the exterior skin. This extensive drying step is critical for developing that beautiful, crispy, golden-brown skin we all desire on a “Moist And Juicy Roasted Turkey.” For an even crispier skin, you can place the turkey on a rack set in a roasting pan, uncovered, in the refrigerator for a few hours or even overnight after patting dry. This extra effort allows the skin to further dehydrate, leading to superior crispiness.
Phase 2: Seasoning and Preparing for Roasting
- Prepare the Aromatic Butter: In a small mixing bowl, combine the softened unsalted butter with the finely chopped fresh rosemary, thyme, sage, garlic powder, onion powder, freshly ground black pepper, and kosher salt. Remember to adjust the amount of salt if you brined your turkey; brined turkeys will require significantly less additional salt. Mix all the ingredients together thoroughly until they are well combined and form a fragrant, herbaceous butter compound.
- Seasoning the Turkey: This step ensures flavor penetrates the meat and creates a delicious crust.
- Using your fingers or the handle of a wooden spoon, carefully work your way under the skin over the breast meat of the turkey. Be gentle and try not to tear the skin, as it acts as a protective layer and helps retain moisture.
- Spoon about two-thirds of the aromatic butter mixture under the loosened skin, spreading it evenly over the breast meat. As the turkey roasts, this butter will melt, baste the meat from within, and infuse it with wonderful flavors, contributing greatly to our goal of a truly “Moist And Juicy Roasted Turkey.”
- Rub the remaining butter mixture all over the exterior of the turkey, ensuring the legs, wings, and back are well coated. This creates a flavorful, crispy skin.
- Season the entire exterior of the turkey generously with additional kosher salt and freshly ground black pepper. Even if you brined, a little extra seasoning on the skin adds a lovely finish. Remember, good seasoning is key to a flavorful dish.
- Stuffing the Cavity: Loosely stuff the turkey cavity with the quartered yellow onions, roughly chopped celery, roughly chopped carrots, and the halved head of garlic. You can also add a few sprigs of fresh parsley or bay leaves for extra aroma. It’s very important to avoid densely packing the cavity with traditional bread stuffing, as this can significantly hinder the turkey from cooking evenly and safely. If you desire stuffing, it is always best and safer to cook it in a separate baking dish.
- Trussing the Turkey (Optional but Recommended for Even Cooking): Trussing helps the turkey cook more evenly by compacting its shape, and it also makes for a more attractive presentation on your holiday table.
- Using kitchen twine, tie the turkey legs together. This helps the thigh meat cook more evenly and prevents the legs from splaying out.
- Tuck the wing tips underneath the turkey body. This prevents the delicate wing tips from burning and also helps create a more compact and streamlined shape for consistent cooking.
Phase 3: Roasting Your “Moist And Juicy Roasted Turkey”
- Preheat the Oven: Arrange an oven rack in the lowest position within your oven. Preheat your oven to a robust 425°F (220°C). This initial high heat is strategic; it helps to crisp up the turkey skin quickly and develop a beautiful golden-brown color before the internal temperature rises too much.
- Prepare the Roasting Pan: Scatter the remaining quartered onions, roughly chopped celery, and roughly chopped carrots (from your initial ingredient list) on the bottom of a sturdy roasting pan. This creates a natural rack for the turkey, preventing it from sticking to the bottom, and these aromatic vegetables will caramelize, adding incredible depth of flavor to your pan drippings for the gravy. Pour 2 cups of the low-sodium chicken or turkey broth into the bottom of the pan; this will keep the environment moist and contribute to the pan drippings.
- Position the Turkey: Carefully place the prepared and seasoned turkey breast-side up on top of the bed of vegetables in the roasting pan.
- Initial Roast and Temperature Reduction: This two-stage roasting process is key to both crispy skin and a “Moist And Juicy Roasted Turkey.”
- Roast the turkey at the initial high temperature of 425°F (220°C) for the first 30-45 minutes. During this time, the skin will begin to brown and crisp beautifully.
- After the initial 30-45 minutes, reduce the oven temperature significantly to 325°F (160°C). This lower temperature allows the turkey to cook through gently without drying out.
- Continue roasting, basting the turkey every 45-60 minutes with the flavorful pan juices. Basting helps keep the skin moist and promotes even browning. If you notice the pan juices starting to evaporate too much, add another cup of broth or water to keep the bottom of the pan moist and prevent the drippings from burning.
- If the turkey skin starts to get too dark before the turkey is cooked through to the correct internal temperature, loosely tent it with aluminum foil. This will protect the skin from burning while allowing the internal meat to finish cooking.
- Monitoring Doneness: The total cooking time will vary considerably based on your turkey’s exact size, whether it’s been brined, and the calibration of your specific oven. A general guideline is approximately 13-15 minutes per pound for an unstuffed turkey.
- Begin checking the turkey’s internal temperature with a reliable meat thermometer about 2/3 of the way through the estimated cooking time. Don’t wait until the very end, as you might overcook it.
- Always insert the thermometer into the thickest part of the thigh, making sure not to touch the bone, as bone conducts heat and can give a falsely high reading. The turkey is done when the internal temperature in the thigh reaches 165°F (74°C). You should also check the thickest part of the breast; it should also register 165°F (74°C). Another indicator of doneness is when the juices run clear when you pierce the thigh meat with a knife.
- Do not rely solely on pop-up timers that sometimes come with turkeys; they are often inaccurate and can lead to an overcooked or undercooked bird. A good quality digital meat thermometer is your absolute best friend for achieving a perfectly cooked, safe, and truly “Moist And Juicy Roasted Turkey.”
- The Critical Resting Period: Once the turkey reaches the target internal temperature of 165°F (74°C), remove it promptly from the oven. This step is often overlooked by eager cooks but is absolutely paramount for a truly “Moist And Juicy Roasted Turkey.”
- Carefully transfer the turkey from the hot roasting pan to a large cutting board or a clean serving platter.
- Tent the turkey loosely with aluminum foil. This keeps it warm without steaming the skin.
- Allow the turkey to rest undisturbed for at least 20-30 minutes, or even up to 45 minutes for larger birds. This resting period allows the muscle fibers to relax and the incredibly flavorful juices to redistribute evenly throughout the entire meat. If you carve it too soon, all those precious, hard-earned juices will run out onto your cutting board, leaving you with disappointingly dry meat. Patience here is rewarded with supreme juiciness!
Phase 4: Crafting the Perfect Gravy to Complement Your “Moist And Juicy Roasted Turkey”
- Prepare the Drippings: While the turkey is resting, take this opportune moment to prepare your rich, flavorful gravy.
- Carefully pour all the pan drippings from the roasting pan into a fat separator, or into a large heatproof measuring cup. Be careful, as the pan and drippings will be very hot.
- Allow the drippings to sit for a few minutes. The fat will naturally separate and rise to the top. Skim off as much of the fat as possible using a ladle or spoon, reserving about ¼ cup of the fat if you’re planning to make a traditional roux-based gravy. Discard the rest of the excess fat.
- You should be left with a concentrated, flavorful turkey stock/juice at the bottom of the separator or cup. The roasted vegetables from the pan can be pressed to extract any remaining juices before being discarded, or you can include some softened vegetable bits in your gravy for extra texture and flavor.
- Make the Gravy (Roux Method for Classic Richness):
- In a medium saucepan, melt the reserved ¼ cup of turkey fat (or use unsalted butter if you didn’t reserve enough fat) over medium heat.
- Whisk in ½ cup of all-purpose flour. Cook, whisking constantly, for 2-3 minutes until a light golden-brown roux forms. This cooking time is essential to cook out the raw flour taste and smell.
- Gradually whisk in the reserved pan drippings along with 2-3 cups of additional warmed broth. Whisk continuously and vigorously to prevent any lumps from forming in your gravy.
- Bring the mixture to a gentle simmer, continuing to whisk, and cook for 5-7 minutes, or until the gravy thickens to your desired consistency. If it’s too thick, you can add a little more broth; if it’s too thin, simmer it a bit longer to reduce and thicken.
- Taste the gravy and season with salt and freshly ground black pepper as needed. Remember, the drippings already contain salt, so taste before adding too much.
- For an extra smooth, professional-looking gravy, you can strain it through a fine-mesh sieve into a clean serving boat.
- Make the Gravy (Cornstarch Slurry Method – Gluten-Free Option):
- In a medium saucepan, combine the reserved pan drippings with 2-3 cups of additional warmed broth. Bring the mixture to a simmer over medium heat.
- In a small separate bowl, whisk together 3 tablespoons of cornstarch with ½ cup of cold water until it forms a completely smooth slurry with no lumps.
- Slowly pour the cornstarch slurry into the simmering pan drippings, whisking constantly.
- Continue to whisk and simmer for 1-2 minutes until the gravy thickens to your desired consistency. If it’s not thick enough, you can mix another small slurry (1 tablespoon cornstarch with 2 tablespoons cold water) and add it gradually, whisking, until the desired thickness is reached.
- Taste and season with salt and freshly ground black pepper.
- Strain for a smooth finish if desired, and pour into a serving vessel.
Phase 5: Carving and Serving Your Magnificent “Moist And Juicy Roasted Turkey And Gravy”
- Carving the Turkey: Once the turkey has completed its essential resting period, it’s ready to be carved and admired. Use a sharp carving knife and a sturdy carving fork to make this process easier and safer.
- First, remove the legs and thighs. Cut through the skin between the breast and the leg, then press the leg down until the thigh bone pops out of its socket. Cut through the joint with your knife to remove the entire leg and thigh section. You can then separate the drumstick from the thigh by cutting through the joint.
- Next, remove the wings by cutting through the joint where they meet the breast.
- For the breast meat, start by slicing horizontally along the breastbone to remove the entire breast half in one piece (or as much as possible, depending on the turkey’s structure and your carving skill). Then, place the breast half skin-side up on the cutting board and slice it against the grain into your desired thickness. Slicing against the grain ensures the meat is as tender as possible.
- Arrange the beautifully carved turkey pieces on a large, warm serving platter.
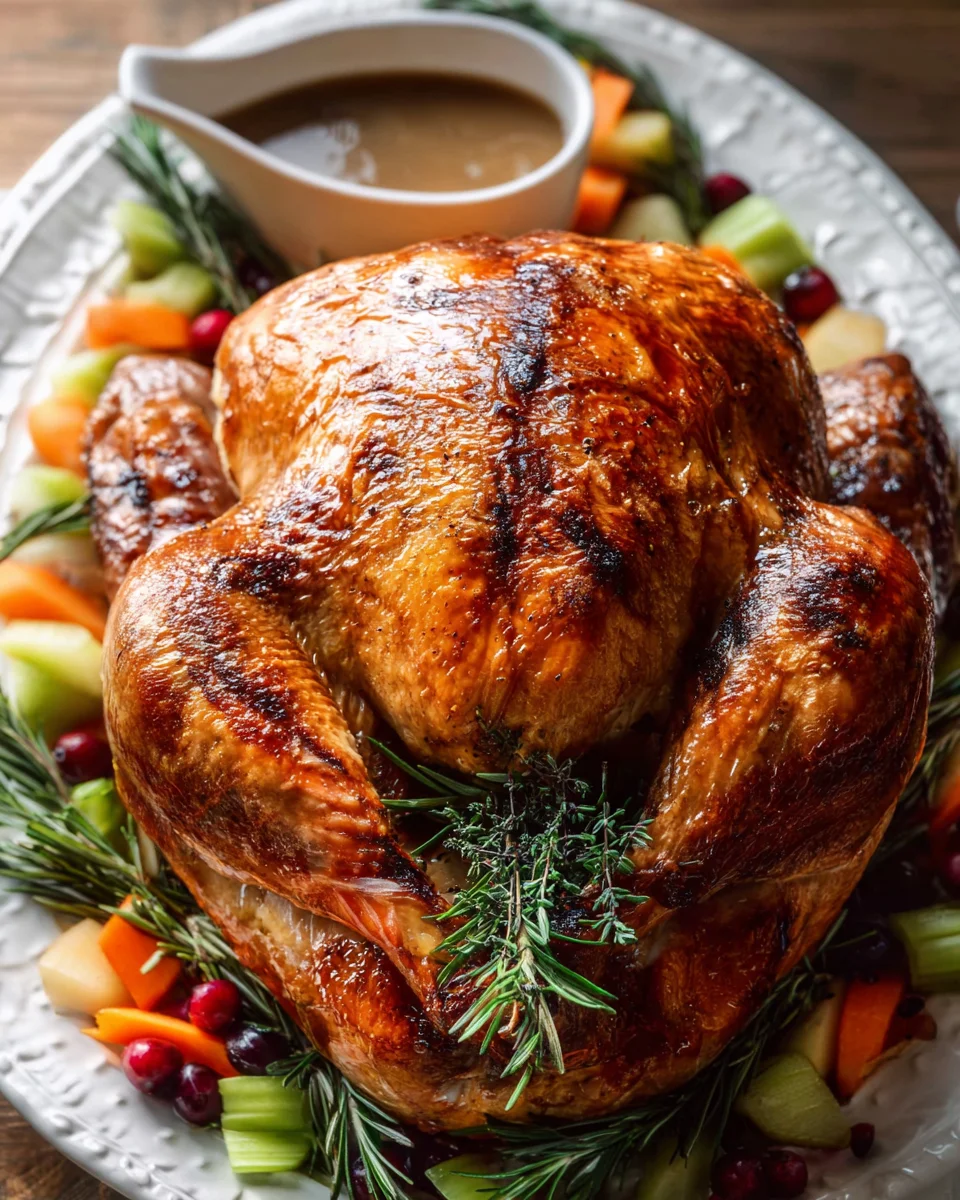
- Serving: Present your beautifully carved, golden-brown “Moist And Juicy Roasted Turkey” on a magnificent platter. You can garnish it with fresh herbs like rosemary or parsley for a festive touch. Serve the rich, flavorful gravy generously alongside, allowing everyone at the table to drench their turkey and accompanying side dishes. This impressive dish is truly the centerpiece of any festive meal, promising tender, succulent meat that is bursting with flavor, perfectly complemented by a luscious gravy that elevates every single bite. Take a moment to enjoy the delicious fruits of your labor!
Conclusion:
So, there you have it, my friends! We’ve reached the end of our culinary journey, and I genuinely hope you’re feeling inspired and ready to tackle what I truly believe is one of the most rewarding recipes you’ll ever undertake. After all the careful steps and loving preparation, the reward is simply unparalleled. This isn’t just another meal; it’s an experience, a centerpiece, and a testament to the joy of home cooking done right. What makes this recipe an absolute must-try, you ask? It’s the consistent, show-stopping result: a bird that is incredibly tender, bursting with flavor, and — crucially — the star of our focus keyword, a truly Moist And Juicy Roasted Turkey And Gravy. Forget dry, bland holiday turkeys of the past; this method is designed to banish those memories forever, replacing them with a triumphant, flavorful feast that will have everyone at your table asking for your secrets.
I’ve walked you through every detail, from seasoning to basting, precisely because I want you to feel utterly confident that you can achieve perfection. The aroma that will fill your home as this magnificent bird roasts is a reward in itself – a comforting, savory symphony that signals something truly special is underway. And that gravy! Oh, that rich, flavorful, golden elixir made from the pan drippings is the crowning glory, tying all the flavors together in a cohesive, unforgettable way. It’s the kind of meal that doesn’t just feed the body but truly nourishes the soul, creating lasting memories around the dining table. This recipe provides an astonishingly flavorful, succulent turkey, ensuring every slice is a testament to culinary excellence.
Serving Suggestions & Delightful Variations:
Now that you’ve mastered the art of roasting, let’s talk about enhancing the entire meal experience. While the star of the show, our delectable turkey, can certainly stand alone, pairing it with classic sides truly completes the picture. Imagine serving generous slices alongside creamy, buttery mashed potatoes, soaking up every drop of that incredible gravy. A vibrant cranberry sauce, whether homemade or store-bought, offers a wonderful tangy contrast. Don’t forget a hearty stuffing – whether it’s a classic sage and onion or something more adventurous with apples and sausage, it’s a perfect companion. Crisp-tender green bean casserole, roasted root vegetables like carrots and parsnips, or even a simple fresh salad with a light vinaigrette all complement the rich flavors beautifully. The beauty of this recipe is its versatility; it pairs well with almost any traditional holiday side.
Thinking beyond the main event? The joy of a perfectly roasted turkey extends far beyond the first meal. Leftovers are a treasure trove of culinary possibilities! Think about crafting epic turkey sandwiches piled high with cranberry sauce and maybe a smear of herbed mayo. Or, shred the remaining meat for a comforting turkey noodle soup on a chilly evening. Turkey pot pies, hearty turkey chili, or even a quick turkey salad are fantastic ways to enjoy the fruits of your labor for days to come. As for variations on the main roast, feel free to experiment with your favorite herb combinations in the butter rub – rosemary, thyme, and sage are classics, but a touch of smoked paprika or even a hint of citrus zest can elevate the flavor profile even further. If you’re feeling adventurous, consider a pre-roast brine for an extra layer of moisture and seasoning, though our current method already ensures an incredibly juicy result. You might also try stuffing the cavity with aromatics like lemon halves, onions, and garlic cloves for an added layer of subtle flavor infusing the meat from the inside out.
Your Culinary Adventure Awaits!
So, what are you waiting for? This isn’t just a recipe; it’s an invitation to create something truly spectacular in your own kitchen. I urge you, wholeheartedly, to give this recipe a try. Don’t be intimidated by the size of the bird or the grandeur of the occasion it often signifies. Break it down, follow the steps, and trust the process. I promise you, the reward — the oohs, the aahs, and the contented silence around the table — will be more than worth every moment of effort. The confidence you’ll gain from successfully roasting such an impressive dish is immense, and you’ll find yourself eager to host and entertain more often. It’s a game-changer for anyone who loves to cook and entertain, making you the undisputed holiday hero.
Once you’ve experienced the sheer delight of this Moist And Juicy Roasted Turkey And Gravy, I would absolutely love to hear about it! Please, share your culinary journey with me and with our community. Did you add a unique twist to the seasoning? What were your favorite side dishes? Did you discover a clever use for the leftovers? Snap some photos and share them! Your experiences, tips, and triumphs are incredibly valuable and inspiring. Let’s celebrate the joy of cooking together and make every meal a memorable one. Happy roasting, and I can’t wait to see your amazing creations!
Moist Roasted Turkey & Gravy Recipe – Juicy & Flavorful!
Achieve the crown jewel of any holiday feast: a perfectly golden, moist and juicy roasted turkey with rich, savory gravy that melts in your mouth, defining festive gatherings and creating indelible memories.
Ingredients
Instructions
Important Information
Nutrition Facts (Per Serving)
It is important to consider this information as approximate and not to use it as definitive health advice.
Allergy Information
Please check ingredients for potential allergens and consult a health professional if in doubt.
Leave a Comment