
Lemon Meltaways are more than just a cookie; they are a delightful culinary experience that promises to brighten your day with every tender bite. Imagine a treat so exquisitely delicate that it practically dissolves on your tongue, leaving behind a beautiful burst of sunny citrus flavor. That, my friends, is the magic encapsulated within each perfect cookie. I’ve always found immense joy in baking these, and I’m thrilled to share why they’ve earned a special place in so many hearts and recipe boxes.
While the precise historical origins of the “meltaway” style cookie are debated, these particular lemon versions have undoubtedly become a cherished staple in home kitchens across generations. They evoke a sense of nostalgic comfort, often appearing at holiday gatherings, afternoon tea parties, or simply as a well-deserved treat after a long day. People universally adore Lemon Meltaways for their unique combination of bright, zesty lemon taste and their unbelievably soft, buttery texture. Unlike many cookies that offer a chew or a snap, these are designed to literally melt away, creating a truly luxurious sensation that is both refreshing and incredibly satisfying. The simple, honest ingredients come together to form a truly iconic biscuit that proves elegance doesn’t always need complexity. Get ready to fall in love with the pure, unadulterated pleasure of these exquisite cookies!

Ingredients:
- For the Lemon Meltaways Cookies:
- 1 cup (2 sticks or 226g) unsalted butter, softened to room temperature. This is crucial for a smooth creamed mixture!
- ½ cup (100g) granulated sugar
- 2 tablespoons fresh lemon zest, from about 2 medium lemons. Make sure to only get the yellow part!
- 1 large egg yolk, separated from the white. We only need the richness of the yolk here.
- 1 tablespoon fresh lemon juice
- ½ teaspoon pure vanilla extract
- 2 cups (240g) all-purpose flour, spooned and leveled. I like to sift mine for extra lightness.
- ¼ teaspoon salt
- For the Powdered Sugar Coating:
- ½ cup (60g) powdered sugar (also known as confectioners’ sugar)
- For the Lemon Glaze (Optional, for an extra burst of lemon!):
- 1 ½ cups (180g) powdered sugar, sifted
- 3-4 tablespoons fresh lemon juice (start with 3 and add more if needed)
- ½ teaspoon lemon zest (optional, for extra flavor and speckles)
Preparing Your Lemon Meltaways Dough
Oh, these Lemon Meltaways are truly a delight, and the journey begins with creating a perfectly tender, melt-in-your-mouth dough. My kitchen always smells amazing when I start this process!
-
Prepping Your Ingredients for Success:
Before you even think about mixing, take a moment to ensure all your ingredients are ready. I always measure out my flour, zest my lemons, and make sure my butter is wonderfully soft. This really sets you up for success and ensures a smooth dough texture. If your butter isn’t soft enough, you can gently warm it in the microwave for a few seconds, but be careful not to melt it completely!
In a medium bowl, whisk together your 2 cups of all-purpose flour and ¼ teaspoon of salt. I always sift my flour at this stage; it truly helps to aerate it and prevent any lumps, resulting in a lighter cookie. Set this dry mixture aside for now.
-
The Creaming Method: Building the Foundation of Flavor:
Now, let’s get to the heart of these Lemon Meltaways. In the bowl of a stand mixer fitted with the paddle attachment, or with a large bowl and a handheld electric mixer, combine your 1 cup of softened unsalted butter with ½ cup of granulated sugar. Beat them together on medium speed for about 3-5 minutes, or until the mixture is beautifully light, fluffy, and pale in color. You’ll notice a significant change in volume and texture, and this is where air is incorporated, which contributes to that signature “meltaway” texture.
Once it’s light and fluffy, scrape down the sides of the bowl with a spatula to ensure everything is evenly combined. This step is essential for uniform texture in your final cookies.
-
Infusing the Lemon Goodness and Enriching the Dough:
Next, add the star of the show: 2 tablespoons of fresh lemon zest. I like to beat this in for about 30 seconds, allowing the fragrant oils from the zest to really meld with the butter and sugar. The aroma at this stage is absolutely intoxicating!
Then, add your single large egg yolk, 1 tablespoon of fresh lemon juice, and ½ teaspoon of pure vanilla extract. Beat on medium speed for another 1-2 minutes until everything is well incorporated. The mixture might look a little curdled at first, but keep mixing, and it will come together beautifully. Scrape down the sides of the bowl once more to catch any stubborn bits.
-
Gently Incorporating the Dry Ingredients:
Reduce your mixer speed to low. Gradually add your previously prepared flour and salt mixture to the wet ingredients, a third at a time. Mix only until just combined. It’s very important not to overmix the dough at this stage. Overmixing can develop the gluten in the flour too much, leading to tough cookies instead of the delicate, tender Lemon Meltaways we’re aiming for. As soon as you see no streaks of dry flour, stop mixing. I usually give it a final gentle fold with a rubber spatula to ensure everything is perfectly incorporated without overworking it.
The dough will be soft and pliable, almost like playdough, but not sticky.
-
The Chilling Game: Patience is a Virtue for Perfect Meltaways:
Transfer the dough to a piece of plastic wrap, flatten it into a disc, and wrap it tightly. Now comes the hard part: chilling! Place the dough in the refrigerator for at least 1 hour, or up to 2-3 days. This chilling period is absolutely non-negotiable for Lemon Meltaways. It allows the butter to firm up, making the dough much easier to handle and preventing the cookies from spreading too much in the oven. More importantly, it allows the flavors to meld and deepen, resulting in a more flavorful cookie. Trust me, the wait is worth it!
Baking the Perfect Lemon Meltaways
Once your dough is nicely chilled and full of flavor, it’s time to bring these Lemon Meltaways to life in the oven! Get ready for your kitchen to smell incredible.
-
Preheating and Preparing Your Baking Sheets:
When you’re ready to bake, preheat your oven to 350°F (175°C). Line two large baking sheets with parchment paper or silicone baking mats. I always use parchment paper; it ensures no sticking and makes cleanup a breeze. Having two sheets ready means you can work efficiently!
-
Shaping Those Irresistible Lemon Meltaways:
Remove the chilled dough from the refrigerator. If it’s very firm, let it sit at room temperature for 5-10 minutes to make it a little easier to work with, but don’t let it get too warm. Use a small cookie scoop (about 1 tablespoon in size) or simply roll portions of the dough into 1-inch balls. I find that a 1-tablespoon scoop makes perfectly uniform cookies, which is great for even baking.
Place the dough balls about 1-2 inches apart on your prepared baking sheets. They won’t spread a huge amount, but you want to give them a little room to breathe. I usually get about 20-24 cookies per standard baking sheet, ensuring optimal air circulation around each cookie for even baking.
-
The Magic of Baking: Watching Them Transform:
Bake one sheet at a time in the preheated oven for 10-12 minutes. The exact baking time can vary depending on your oven, so keep an eye on them. You’re looking for the edges to be set and very lightly golden. The centers should still look pale and perhaps a little soft. These cookies should NOT brown significantly; their charm is in their pale, tender appearance. Overbaking will result in a less “meltaway” texture, making them too crisp, which isn’t what we want for these delicate treats.
When they’re done, carefully remove the baking sheets from the oven. The cookies will be very delicate at this stage, so resist the urge to move them immediately.
-
The Cooling Process: From Tray to Rack:
Allow the Lemon Meltaways to cool on the baking sheets for about 5 minutes. This cooling period on the hot tray helps them set up and firm up slightly, making them much easier to transfer without breaking. After 5 minutes, use a thin spatula to carefully transfer the cookies to a wire rack to cool completely. Complete cooling is essential before applying any coating or glaze, otherwise, your coating will melt right off!
Crafting the Signature Lemon Meltaways Glaze (or Coating)
Now for the finishing touch that truly makes these Lemon Meltaways unforgettable! You have a couple of options here, both equally delicious, depending on your preference for a powdered sugar roll or a drizzly glaze.
-
The Classic Powdered Sugar Roll:
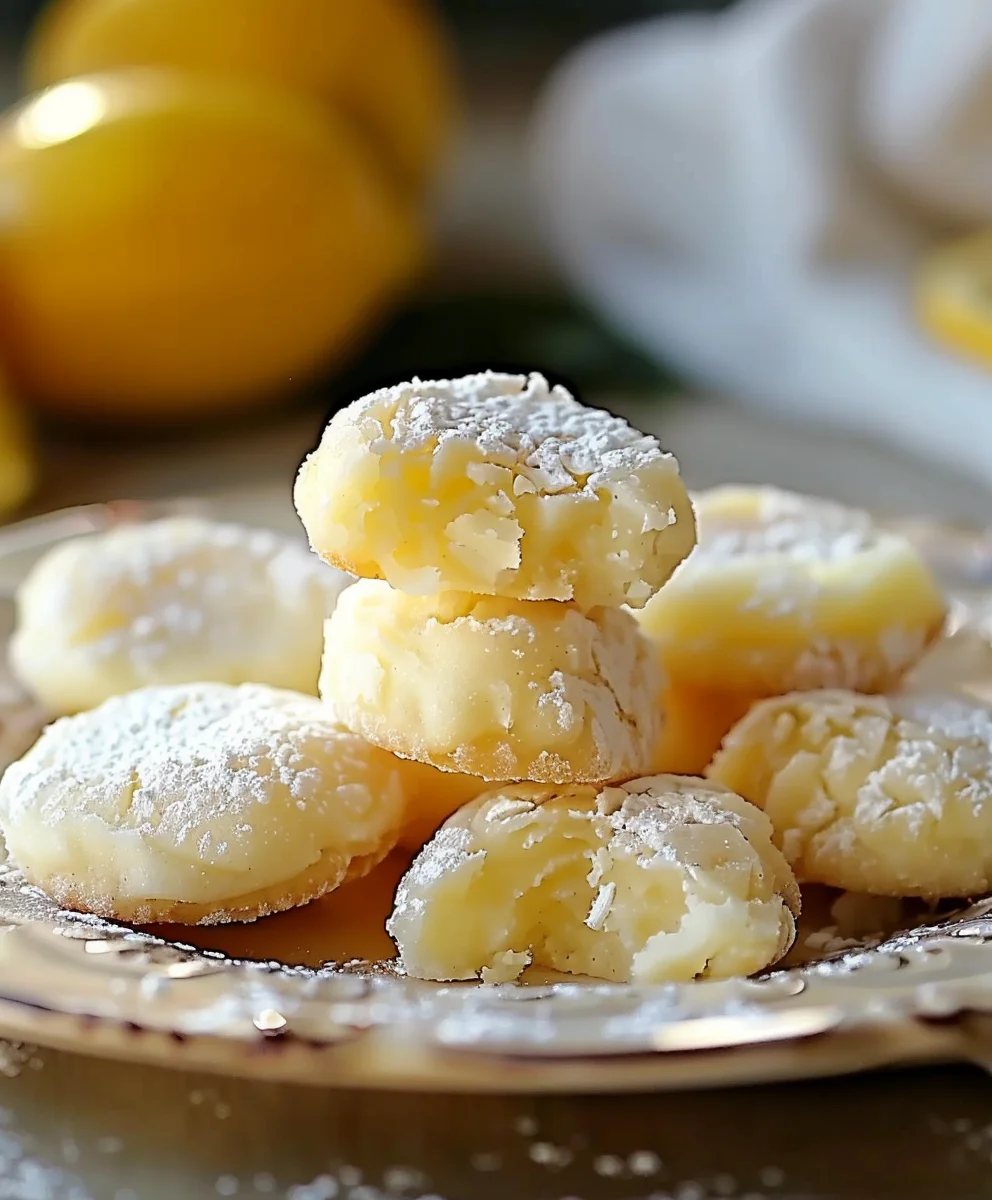
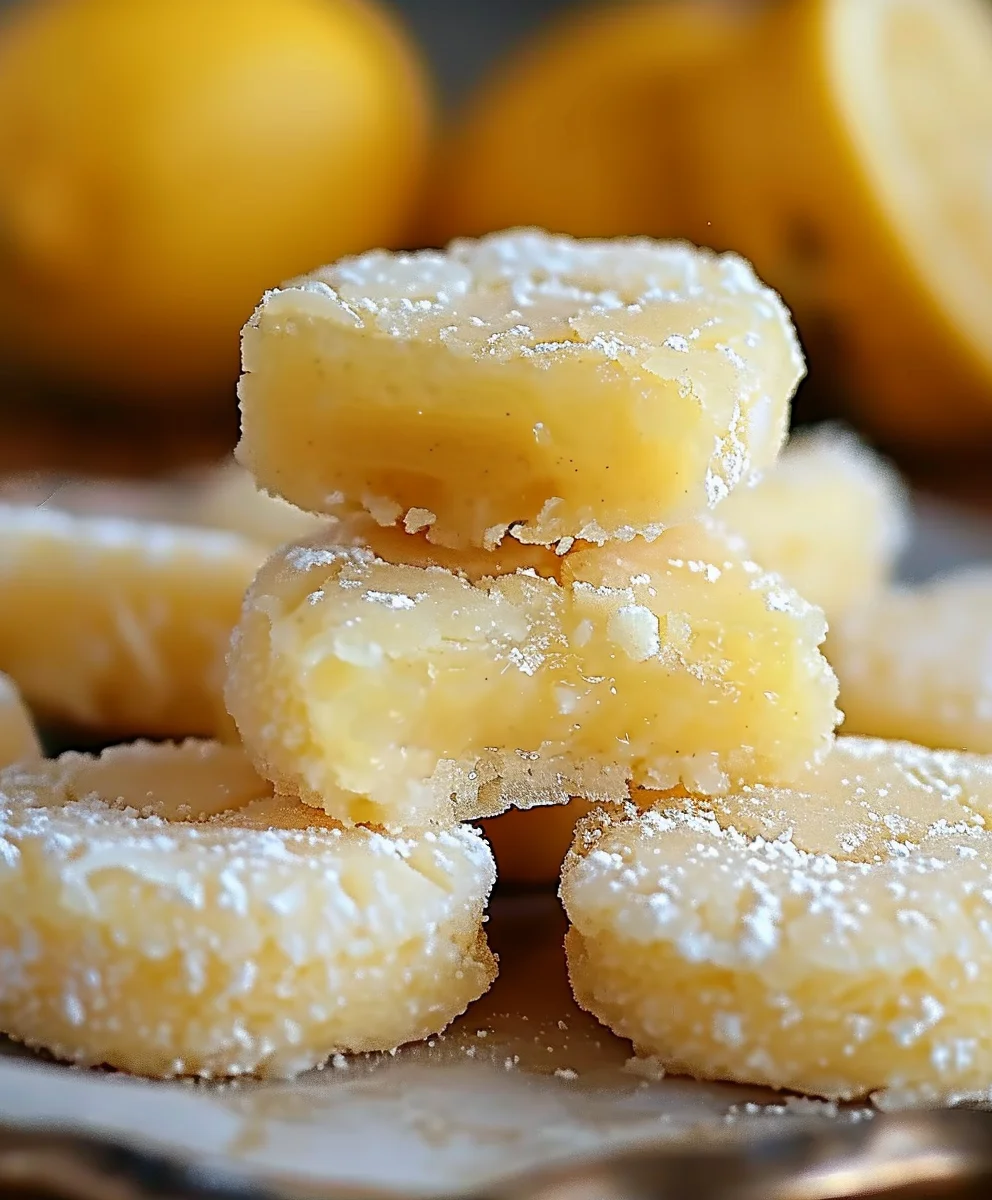
While your cookies are cooling, prepare the powdered sugar coating. Pour ½ cup of powdered sugar into a small, shallow bowl. Once the cookies are completely cool, gently roll each cookie in the powdered sugar until it’s fully coated. You can even give them a second roll if you like a thicker dusting. This creates that iconic snowy look and adds another layer of sweetness that melts beautifully on the tongue.
I find this method incredibly charming and gives these Lemon Meltaways their classic delicate appeal. Make sure the cookies are cool, or the sugar will disappear!
-
The Zesty Lemon Glaze (for an extra tang!):
If you prefer a more pronounced lemon flavor and a slightly firmer coating, let’s make a glaze. In a medium bowl, whisk together 1 ½ cups of sifted powdered sugar with 3 tablespoons of fresh lemon juice. Start with 3 tablespoons and add more, a teaspoon at a time, until you reach a consistency that is thick but pourable. You want it to be like a thick syrup, not too watery, as it needs to coat the cookies nicely. This is also where I sometimes add an extra ½ teaspoon of lemon zest directly into the glaze for those beautiful speckles and an even more intense citrus kick.
Taste the glaze! Does it need more lemon? More sweetness? Adjust to your liking. This is your chance to really personalize the flavor!
-
Applying Your Chosen Finish:
If you chose the powdered sugar roll: Simply roll each cooled cookie as described in step 10. You can stop there, or for an extra layer of deliciousness and a slight “crackle” when bitten, some people like to roll them while they are slightly warm, then again when fully cool. This creates a double layer of melt-in-your-mouth sugar.
If you chose the lemon glaze: You have a few options. You can dip the top of each cooled cookie into the glaze, letting any excess drip off before placing it back on the wire rack. Alternatively, you can use a spoon to drizzle the glaze decoratively over the tops of the cookies. For a full coverage, a small offset spatula can also be used to spread the glaze evenly. I often use a fork to drizzle, creating a beautiful pattern.
Final Touches and Enjoyment of Your Lemon Meltaways
You’re almost there! The tantalizing aroma of fresh lemon will be filling your kitchen, and your beautiful Lemon Meltaways are nearly ready to be devoured.
-
Allowing the Glaze to Set (If Applicable):
If you opted for the lemon glaze, it’s important to let it set properly. Leave the glazed cookies on the wire rack, ideally over a sheet of parchment paper to catch any drips, for at least 30 minutes to 1 hour, or until the glaze is completely dry and firm to the touch. In a humid environment, this might take a little longer. Patience here ensures a beautiful, non-sticky finish. You want that lovely, slightly crisp glaze when you bite into them.
-
Storage Tips for Peak Freshness:
These Lemon Meltaways are best enjoyed within a few days of baking. Store them in an airtight container at room temperature. If they are glazed, you might want to place a piece of parchment paper between layers to prevent sticking, though if the glaze is fully set, this usually isn’t necessary. They stay wonderfully fresh and tender for up to 5 days, though honestly, mine rarely last that long!
For longer storage, you can freeze the unglazed baked cookies for up to 2 months. Thaw them at room temperature and then apply your desired coating or glaze. You can also freeze the dough wrapped tightly for up to a month, then thaw, roll, and bake as directed.
-
Serving Suggestions: The Ultimate Lemon Meltaways Experience:
Serve your gorgeous Lemon Meltaways with a cup of tea or coffee for a delightful afternoon treat. They are also absolutely perfect for potlucks, bake sales, or as a thoughtful homemade gift. The bright, zesty lemon flavor and tender, buttery texture make them a universal crowd-pleaser. I often find myself reaching for just one more, and then one more after that!
They truly live up to their name – they melt away in your mouth, leaving behind a wonderful burst of lemon. Enjoy every single crumb of these incredible cookies!
Conclusion:
There’s just something truly enchanting about a dessert that delivers so much joy with so little fuss, and I genuinely believe this recipe perfectly encapsulates that magic. These aren’t merely cookies; they are a sublime experience, a tiny parcel of sunshine that brightens any day and effortlessly elevates any occasion. I truly believe this recipe stands out because it marries impressive simplicity with spectacularly delicious results. You absolutely do not need to be a seasoned pastry chef to create something utterly unforgettable in your own kitchen. The moment those Lemon Meltaways hit your tongue, you’ll understand precisely what I mean by “melt-in-your-mouth” perfection. Their tender, almost powdery crumb, infused with bright, zesty lemon, followed by that ethereal, disappearing act on your palate, sets them apart from typical sugar cookies or shortbread. They possess a delicate balance of sweetness and tang that is utterly addictive, making them an absolute must-try for anyone who appreciates a truly refreshing and elegant treat. This recipe is a testament to how simple ingredients can come together to create something truly extraordinary and memorable.
Imagine serving these delicate, sunshine-hued treats at your next brunch gathering, a charming garden party, or simply alongside a warm cup of Earl Grey tea or a robust espresso on a quiet afternoon. Their vibrant flavor and beautiful presentation make them an instant crowd-pleaser. They also make the most thoughtful and heartfelt homemade gift; pack them carefully in a lovely box, tie it with a pretty ribbon, and you’ve got a present that speaks volumes of care and affection. While the classic lemon zest and juice combination is undeniably perfect and always a winner, don’t hesitate to get creative and make them your own! For a slight twist, you could consider swapping out half of the lemon zest for lime zest, creating a lovely, subtly different lemon-lime meltaway. Or, if you’re a fan of delicate floral notes, a tiny hint of pure lavender extract in the dough could elevate these to an entirely new level of sophisticated deliciousness. During the holiday season, a touch of cranberry zest (easily grated from frozen cranberries) could lend a festive pink hue and a wonderfully tart counterpoint. For an added textural contrast and a pop of green, how about sprinkling some finely chopped pistachios over the top of the wet glaze? If you prefer an even richer glaze, a delicate drizzle of melted white chocolate over the set lemon glaze can add another layer of luxurious indulgence. The possibilities are truly endless, and I wholeheartedly encourage you to experiment with what excites your palate and makes your heart sing. That’s truly the beauty of baking, isn’t it? Making a beloved recipe uniquely yours.
So, what are you waiting for? I genuinely hope you’ll take the plunge and whip up a batch of these extraordinary Lemon Meltaways very soon. I promise you, the minimal effort involved yields maximum delight. There’s something so incredibly satisfying about pulling a tray of beautifully glazed, fragrant cookies from the oven, knowing you’ve created something truly special and delicious with your own hands. Once you’ve experienced the magic of these disappearing delights yourself, I would absolutely love to hear all about it! Please don’t keep your culinary triumphs to yourself. Did you stick faithfully to the classic recipe, or did you venture into trying one of the delightful variations? What occasion did you decide to make them for? And most importantly, did they disappear as quickly from your plate as they always do from mine? Your feedback, your photos, and your unique twists and stories not only inspire me but also countless other home bakers in our wonderful community. Let’s build a little community of meltaway enthusiasts who share a passion for bright, zesty, melt-in-your-mouth goodness! Happy baking, my friends. May your kitchen be filled with the brightest lemon scent and your days with delicious, joyful moments.
Lemon Meltaways Cookies
Lemon Meltaways are delightful cookies that practically dissolve on your tongue, leaving a beautiful burst of sunny citrus flavor. Adored for their unique combination of bright lemon taste and unbelievably soft, buttery texture, these cookies are designed to literally melt away, offering a luxurious and satisfying treat.
Ingredients
-
1 cup (226g) unsalted butter, softened
-
½ cup (100g) granulated sugar
-
2 tbsp fresh lemon zest
-
1 large egg yolk
-
1 tbsp fresh lemon juice
-
½ tsp pure vanilla extract
-
2 cups (240g) all-purpose flour
-
¼ tsp salt
-
½ cup (60g) powdered sugar (for coating)
-
1 ½ cups (180g) powdered sugar, sifted (for optional glaze)
-
3-4 tbsp fresh lemon juice (for optional glaze)
-
½ tsp lemon zest (optional, for glaze)
Instructions
-
Step 1
Whisk together 2 cups all-purpose flour and ¼ tsp salt in a medium bowl; set aside. -
Step 2
In a stand mixer with the paddle attachment, cream 1 cup softened unsalted butter and ½ cup granulated sugar on medium speed for 3-5 minutes until light and fluffy. Scrape down the bowl. -
Step 3
Beat in 2 tbsp lemon zest for 30 seconds. Add 1 large egg yolk, 1 tbsp lemon juice, and ½ tsp vanilla extract; beat for 1-2 minutes until well combined. Scrape down the bowl. -
Step 4
Reduce mixer speed to low. Gradually add the flour and salt mixture, mixing only until just combined. Do not overmix. -
Step 5
Transfer dough to plastic wrap, flatten into a disc, wrap tightly, and chill in the refrigerator for at least 1 hour (or up to 2-3 days). -
Step 6
Preheat oven to 350°F (175°C). Line two large baking sheets with parchment paper. -
Step 7
Remove chilled dough. Roll portions into 1-inch balls (about 1 tablespoon in size). Place balls 1-2 inches apart on prepared baking sheets. -
Step 8
Bake one sheet at a time for 10-12 minutes, until the edges are set and very lightly golden, and centers look pale. Do not brown significantly. -
Step 9
Cool cookies on the baking sheets for 5 minutes, then carefully transfer them to a wire rack to cool completely. -
Step 10
For the classic coating: Once cookies are completely cool, roll each in ½ cup powdered sugar until fully coated. -
Step 11
Optional lemon glaze: Whisk together 1 ½ cups sifted powdered sugar with 3-4 tbsp fresh lemon juice (add more as needed for desired consistency) and optional ½ tsp lemon zest. Dip the tops of cooled cookies or drizzle glaze decoratively over them. Let glaze set on a wire rack for 30 minutes to 1 hour, or until dry and firm. -
Step 12
Store Lemon Meltaways in an airtight container at room temperature for up to 5 days. Enjoy!
Important Information
Nutrition Facts (Per Serving)
It is important to consider this information as approximate and not to use it as definitive health advice.
Allergy Information
Please check ingredients for potential allergens and consult a health professional if in doubt.
Leave a Comment