
Pumpkin Pasties are an absolute autumnal delight, a true testament to the comforting power of seasonal baking. I invite you to discover the charm of these handheld wonders, which perfectly capture the essence of fall in every golden, flaky bite. Historically, pasties were a staple for Cornish miners, offering a hearty, self-contained meal that was easy to carry and eat on the go. While their origins speak to practicality and sustenance, the addition of sweet, spiced pumpkin transforms them into something truly magical—a beloved tradition embraced during harvest festivals and cozy gatherings, evoking feelings of warmth and nostalgia.
People adore this dish for its incredible balance of textures and flavors. Imagine a rich, creamy pumpkin filling, infused with aromatic spices like cinnamon, nutmeg, and ginger, all encased within a perfectly golden and buttery pastry crust. These delightful Pumpkin Pasties offer the ultimate portable comfort food, ideal for a crisp morning coffee, a satisfying midday snack, or as a charming, unique dessert. Their convenience makes them perfect for sharing with loved ones, and their irresistible taste ensures they become an instant classic in any home. Get ready to bake a batch that will warm hearts and homes alike!

Ingredients:
-
For the Flaky Pastry Dough:
- 3 cups (360g) all-purpose flour, plus extra for dusting
- 1 teaspoon fine sea salt
- 1 cup (226g) unsalted butter, very cold and cut into 1/2-inch cubes
- 1/2 cup (120ml) ice water, plus 1-2 tablespoons more if needed
- 1 large egg, whisked, for egg wash
-
For the Rich Pumpkin Filling:
- 2 cups (about 450g) roasted pumpkin puree (from 1 small sugar pumpkin or butternut squash), cooled
- 1/2 cup (100g) granulated sugar
- 1/4 cup (50g) packed light brown sugar
- 1/2 teaspoon ground cinnamon
- 1/4 teaspoon ground nutmeg
- 1/8 teaspoon ground cloves
- 1/8 teaspoon ground ginger
- 1/4 teaspoon fine sea salt
- 1 large egg
- 1/4 cup (60ml) heavy cream or evaporated milk
- 1 teaspoon pure vanilla extract
Crafting the Perfect Pastry for Your Pumpkin Pasties:
Creating the dough for our delightful Pumpkin Pasties is the first crucial step, and I promise you, it’s simpler than it sounds! The key to a flaky crust lies in keeping your butter and water very cold, and not overworking the dough. Trust me on this; these small details make all the difference in achieving that wonderfully crisp and tender pastry.
-
Combine Dry Ingredients: In a large mixing bowl, I like to whisk together the all-purpose flour and fine sea salt. This ensures an even distribution of the salt throughout our pastry, enhancing its flavor.
-
Incorporate the Cold Butter: Now comes the fun part! Add your very cold, cubed unsalted butter to the flour mixture. Using a pastry blender, two knives, or even just your fingertips, work the butter into the flour until the mixture resembles coarse breadcrumbs. It’s important to leave some pea-sized pieces of butter intact; these will create steam during baking, giving our Pumpkin Pasties their characteristic flakiness. Try to work quickly to prevent the butter from melting from the warmth of your hands.
-
Add Ice Water Gradually: Make a well in the center of the flour and butter mixture, then slowly pour in the ice water, starting with 1/2 cup. I like to mix gently with a fork until the dough just begins to come together. If it still looks too dry and crumbly, add the remaining 1-2 tablespoons of ice water, one teaspoon at a time, until a cohesive dough forms. Be careful not to add too much water, as this can make the pastry tough. The goal is to bring it together without over-mixing.
-
Form and Chill the Dough: Once the dough has formed, gently gather it into a ball and flatten it into two equal discs. Wrap each disc tightly in plastic wrap. Now, the most important part: place these dough discs in the refrigerator to chill for at least 1 hour, or preferably 2 hours. This chilling period allows the gluten to relax, making the dough easier to roll out, and ensures the butter stays cold, which is vital for a flaky texture in our finished Pumpkin Pasties. You can even prepare this dough a day in advance!
Preparing the Aromatic Pumpkin Filling:
While our pastry chills, we can turn our attention to the heart of our Pumpkin Pasties – the incredibly flavorful filling. This blend of sweet pumpkin and warm spices is what truly makes these treats so comforting and delicious. I always recommend using homemade roasted pumpkin puree if you can; the depth of flavor is incomparable, but good quality canned pumpkin puree works wonderfully too!
-
Roast the Pumpkin (if using fresh): If you’re starting with a fresh sugar pumpkin or butternut squash, I suggest cutting it in half, scooping out the seeds, and roasting it cut-side down on a baking sheet at 400°F (200°C) for 30-45 minutes, or until fork-tender. Once cooled, scoop out the flesh and either mash it thoroughly or process it in a food processor until perfectly smooth. You’ll need 2 cups of this delightful puree.
-
Combine Wet and Dry Ingredients: In a medium-sized mixing bowl, I combine the cooled pumpkin puree with the granulated sugar, light brown sugar, cinnamon, nutmeg, cloves, ginger, and salt. These spices are the soul of our Pumpkin Pasties, so make sure they’re fresh for the best aroma and taste.
-
Add Egg and Liquids: Next, I crack in the large egg, pour in the heavy cream (or evaporated milk, if you prefer a slightly lighter but still rich texture), and add the vanilla extract. The egg acts as a binder, helping the filling to set beautifully, while the cream and vanilla add an irresistible richness and fragrance.
-
Mix Until Smooth: Whisk all the filling ingredients together until they are thoroughly combined and completely smooth. I like to use a silicone spatula to scrape down the sides of the bowl to ensure everything is incorporated evenly. Give it a taste here – if you feel it needs a tiny bit more spice or sweetness, now’s your chance to adjust! The filling should be thick enough to hold its shape but still pourable. Once mixed, set this flavorful filling aside. There’s no need to chill it, but make sure it’s not piping hot if you’ve just made the puree.
Assembling Your Irresistible Pumpkin Pasties:
Now for the exciting part – bringing all our hard work together to form the beautiful Pumpkin Pasties! This stage is where our flaky pastry meets our luscious pumpkin filling. Patience and a light hand are your best friends here. I find it so satisfying to see these little bundles of joy come to life.
-
Preheat Oven and Prepare Baking Sheets: Before you begin assembling, I recommend preheating your oven to 375°F (190°C). Line two large baking sheets with parchment paper; this prevents sticking and makes for easy cleanup.
-
Roll Out the Pastry: Take one disc of chilled pastry dough from the refrigerator. On a lightly floured surface, roll it out into a large circle, about 1/8-inch thick. I aim for a diameter of about 12-14 inches. Don’t worry if it’s not a perfect circle; we’ll be cutting out rounds. If the dough starts to stick, add a tiny bit more flour to your surface or rolling pin. If it becomes too warm and difficult to handle, pop it back into the fridge for 10-15 minutes.
-
Cut Out Pastry Rounds: Using a 4-inch round cookie cutter or a clean, wide-mouthed glass, cut out as many circles as you can from the rolled dough. Gently gather the scraps, re-roll them, and cut out more circles until you’ve used most of the dough. You should get about 6-8 circles from each disc, totaling around 12-16 Pumpkin Pasties.
-
Fill the Pasties: Place a generous tablespoon of the pumpkin filling onto the center of each pastry circle. Don’t overfill! This is a common mistake that can lead to leaky pasties. Leave a clear border of about 1/2 inch around the edge of the dough. I always tell myself less is more when it comes to filling, to ensure a perfect seal.
-
Fold and Crimp: Lightly moisten the edges of one half of the pastry circle with a little water (I just use my fingertip dipped in a tiny bowl of water). Then, carefully fold the other half of the pastry over the filling to create a half-moon shape. Press down firmly on the edges to seal the pastry. Now, for that classic pasty look, you can crimp the edges using the tines of a fork. This not only looks lovely but also helps to ensure a tight seal, preventing the delicious filling from escaping during baking. Repeat this process with all the remaining pastry circles and filling.
-
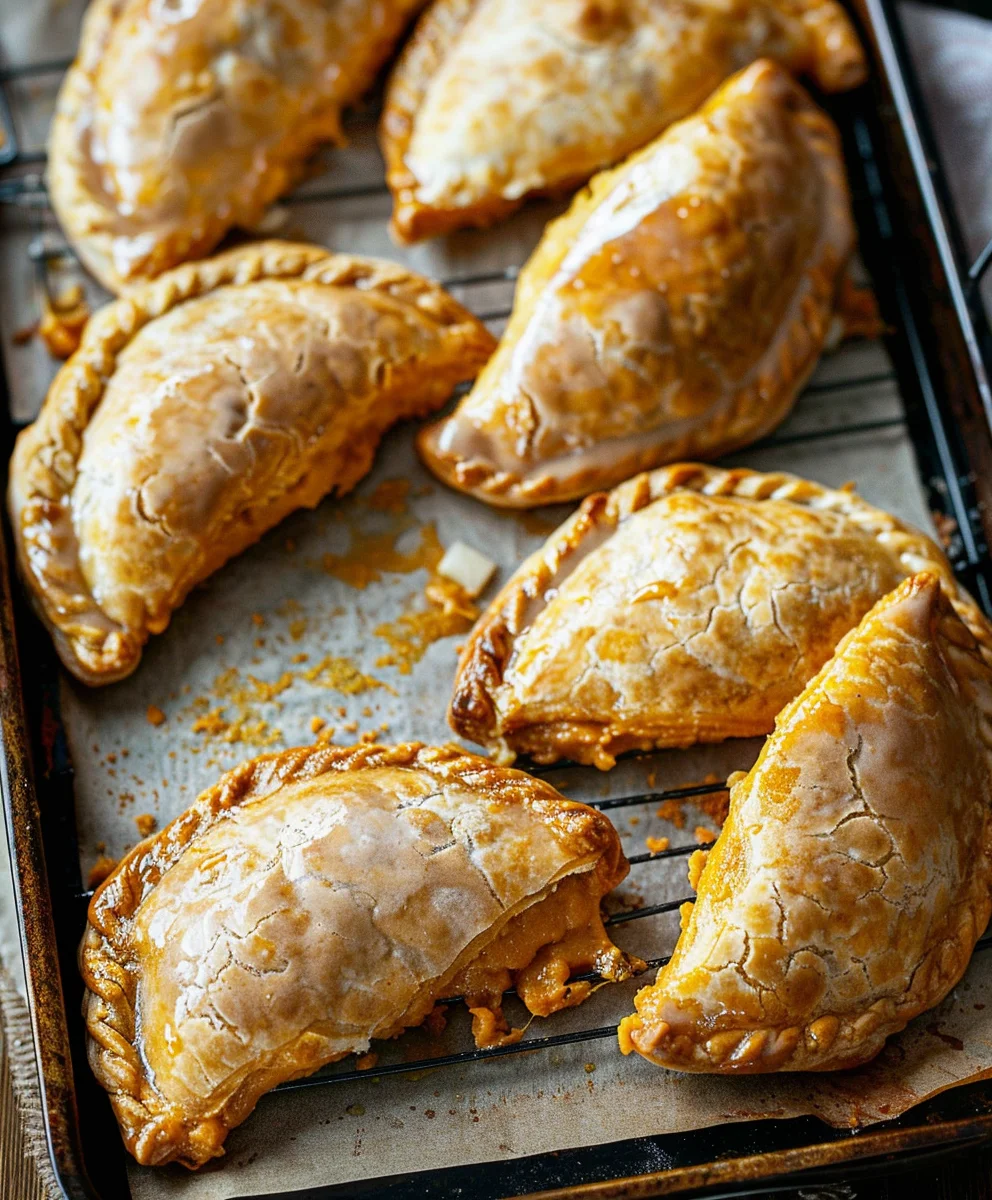
Egg Wash and Venting: Carefully transfer your assembled Pumpkin Pasties to the prepared baking sheets. In a small bowl, lightly whisk the remaining large egg with a teaspoon of water to create an egg wash. Brush the tops of each pasty with this egg wash; this will give them a beautiful golden-brown sheen as they bake. Finally, make a couple of small slits on the top of each pasty with a sharp knife. These vents allow steam to escape, preventing the pasties from bursting and ensuring an evenly cooked filling.
Baking Your Delicious Pumpkin Pasties to Golden Perfection:
The moment of truth! Baking these Pumpkin Pasties fills my kitchen with the most incredible aroma – a tantalizing blend of sweet pumpkin, warm spices, and buttery pastry. It’s truly a sensory delight that signals autumn is here. Achieving that perfect golden crust and tender, set filling is key to making these pasties unforgettable.
-
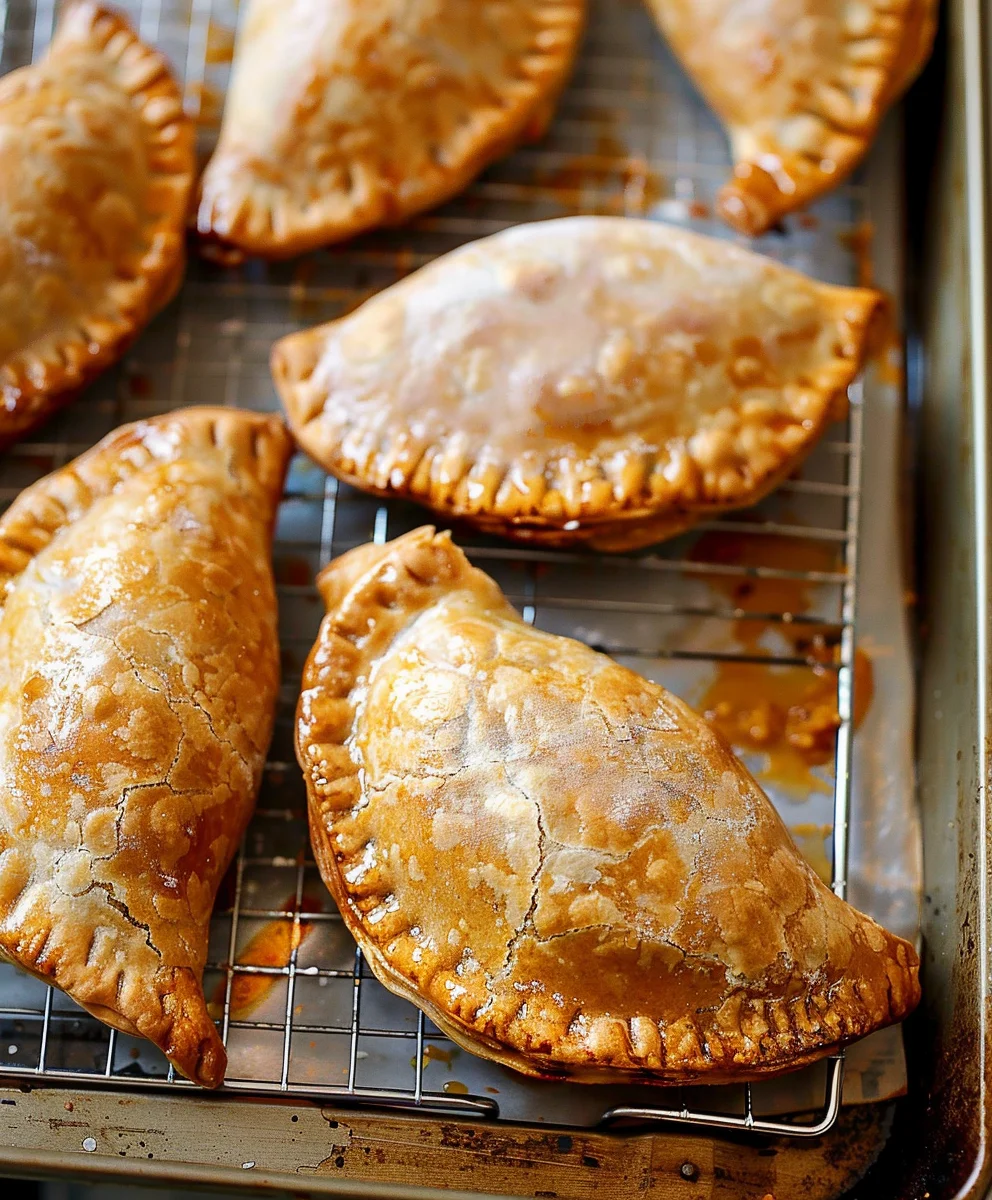
Bake Until Golden: Place the baking sheets with your Pumpkin Pasties into the preheated 375°F (190°C) oven. Bake for 20-25 minutes, or until the pastry is beautifully golden brown and the filling is set. Baking times can vary slightly depending on your oven, so keep an eye on them after the 20-minute mark. You’ll know they’re ready when the edges are deep golden and the centers look slightly puffed.
-
Rotate Halfway Through: For even baking and browning, I always recommend rotating your baking sheets halfway through the baking time. If you’re baking two sheets at once, swap their positions from top to bottom and front to back. This ensures every single one of your Pumpkin Pasties gets an equal share of that wonderful oven heat.
-
Cool Before Serving: Once baked to perfection, carefully remove the Pumpkin Pasties from the oven. Transfer them to a wire rack to cool. This step is crucial! While it’s tempting to dive right into these warm, fragrant treats, allowing them to cool for at least 15-20 minutes lets the filling set completely. Cutting into them too soon can cause the filling to spill out. Plus, the pastry will firm up and become even flakier as it cools slightly.
-
Enjoy Your Handiwork: These Pumpkin Pasties are absolutely wonderful served warm or at room temperature. They make a fantastic breakfast treat, a delightful afternoon snack with a cup of tea, or a charming dessert. I sometimes like to dust them with a little powdered sugar for an extra touch of sweetness and presentation, though they are perfectly delicious on their own. The flaky pastry, combined with the creamy, spiced pumpkin filling, creates a truly comforting and satisfying experience. I just know you’re going to love them!
Tips for Perfect Pumpkin Pasties Every Time:
Making Pumpkin Pasties is a rewarding experience, and with a few extra tips, you can ensure your batch is absolutely flawless. I’ve learned these little tricks over time, and they truly make a difference in the final product, guaranteeing that flaky crust and perfectly spiced filling we all crave.
-
Keep Everything Cold: I cannot stress this enough – cold butter and ice water are the secrets to a truly flaky pastry. Warm butter melts into the flour too quickly, leading to a tough crust. If your kitchen is warm, consider chilling your flour for 10-15 minutes before starting, and even chilling your mixing bowl!
-
Don’t Overwork the Dough: When mixing the dough, stop as soon as it just comes together. Overworking develops the gluten too much, which results in a tough rather than tender pastry. Handle the dough as little as possible during all stages of preparation.
-
Properly Measure Pumpkin Puree: If using canned pumpkin, be sure to use 100% pure pumpkin puree, not pumpkin pie filling, which already contains sweeteners and spices. If making your own, ensure it’s well-drained to avoid a watery filling that could make the pastry soggy. I often spread my homemade puree on paper towels for a few minutes to absorb excess moisture.
-
Seasoning the Filling to Taste: While my spice blend is a great starting point, feel free to adjust the spices in the filling to your personal preference. Love ginger? Add a little more! Prefer less clove? Reduce it. A quick taste test of the raw filling (before adding the egg) can help you decide if it needs any adjustments.
-
Preventing Leaky Pasties: The key here is a good seal. Make sure the edges of your pastry circles are clean and free of filling before you fold and crimp. A slight dab of water on the pastry edge helps create a stronger bond. Press firmly, and don’t skimp on the fork crimping!
-
Storage and Reheating: Leftover Pumpkin Pasties are a treat! Store them in an airtight container at room temperature for up to 2 days, or in the refrigerator for up to 4 days. To reheat, I like to warm them gently in a toaster oven or conventional oven at 300°F (150°C) for 5-10 minutes. This brings back some of their original crispness. They also freeze beautifully before or after baking. If freezing unbaked pasties, arrange them on a baking sheet until firm, then transfer to a freezer bag for up to 3 months. Bake from frozen, adding about 5-10 minutes to the baking time.
-
Experiment with Shapes: While the half-moon shape is traditional, don’t hesitate to get creative! You could use larger cutters for bigger pasties, or even crimp them into square or rectangular pockets. The beauty of homemade Pumpkin Pasties is that they don’t have to be perfect; their rustic charm is part of their appeal!
-
Serving Suggestions: While they’re divine on their own, consider serving your Pumpkin Pasties with a dollop of whipped cream, a drizzle of caramel sauce, or a sprinkle of powdered sugar for an extra touch of elegance. I find they pair wonderfully with a hot cup of coffee or a spiced chai latte, especially on a crisp autumn morning. Enjoy every single bite of these homemade delights!
Conclusion:
So, there you have it – my cherished recipe for what I truly believe are the most delightful and comforting treats you could ever bake. These aren’t just any pastries; they are a warm hug on a chilly day, a burst of autumnal flavor that transcends the ordinary. What makes this recipe an absolute must-try, in my humble opinion, is its perfect balance of simplicity and sophistication. You don’t need to be a seasoned baker to achieve flaky, golden perfection with a filling that sings with the subtle spice of the season. I’ve poured my heart into perfecting the ratios, ensuring that each bite delivers that ideal blend of tender, slightly sweet pumpkin, aromatic spices, and a pastry crust that shatters beautifully. It’s the kind of recipe that brings joy to both the baker and the lucky recipient, making ordinary moments feel truly special. The aroma alone, as they bake, is enough to transform your kitchen into a sanctuary of warmth and anticipation. Trust me when I say, once you try these, you’ll understand why they’ve become a staple in my home, cherished by everyone who tastes them. They possess an undeniable charm, a nostalgic quality that speaks to the soul, making them far more than just a dessert – they are an experience.
Now, while these are absolutely divine straight out of the oven, cooled slightly so the filling sets, the possibilities for enjoyment don’t end there. For a truly indulgent experience, I highly recommend serving them with a generous dollop of freshly whipped cream, perhaps infused with a hint of vanilla bean or a tiny splash of bourbon for an adult twist. A scoop of good quality vanilla bean ice cream melting over a warm pasty is another heavenly combination – the contrast of hot and cold, creamy and flaky, is simply irresistible. If you’re feeling a bit adventurous, consider a drizzle of caramel sauce or a sprinkle of toasted pecans for added texture and richness. A dusting of powdered sugar is, of course, a classic and elegant touch that always impresses.
But why stop at dessert? While the recipe as written leans towards the sweeter side, these pastries are surprisingly versatile. For a fascinating savory twist, you could reduce the sugar in the pumpkin filling significantly or even omit it, then add a pinch of smoked paprika, a whisper of cayenne, and perhaps some crumbled feta or goat cheese. Imagine serving these savory bites alongside a hearty bowl of chili or a robust autumn soup – they would be an unexpected and delightful accompaniment, adding a gourmet touch to your meal. Another variation I’ve explored involves incorporating a thin layer of cream cheese frosting inside the pasty before baking, creating a luscious, tangy counterpoint to the sweet pumpkin that’s simply divine. Or, for a different fruit profile, consider a mix of pumpkin and finely diced apple, enhancing that classic autumn pairing with a lovely tartness. You could also experiment with different pastry shapes; mini hand pies for a party, or even one large galette, offer a lovely presentation for a brunch or gathering. Don’t be afraid to make them your own – the core recipe is robust enough to handle creative interpretation. Just remember, the golden rule of baking applies: taste as you go! The beauty of these lies in their adaptability, making them suitable for breakfast with coffee, a midday snack, or the star of your dessert table. I’ve even made a batch using different spice blends – a chai-spiced pumpkin pasty is an absolute revelation, for instance, offering a uniquely fragrant twist that will surprise and delight your palate.
Your Culinary Adventure Awaits!
So, my dear readers, I genuinely hope I’ve inspired you to roll up your sleeves and give these magnificent Pumpkin Pasties a try. This recipe isn’t just about baking; it’s about creating memories, filling your home with incredible aromas, and savoring the simple joys of a homemade treat. Don’t be shy – dive into your kitchen, gather your ingredients, and embark on this delicious journey. I promise you, the effort is well worth the reward. And when you do, please, please share your experiences! I absolutely love hearing from you. Did you try a unique variation? What did your family think? Post your photos, tell me about your triumphs (and any little learning curves – we all have them!). Your feedback and stories truly make my day and inspire me to keep sharing these beloved recipes. Happy baking, and I can’t wait to hear all about your delicious creations!
Pumpkin Pasties
An irresistible autumnal delight, these handheld pumpkin pasties feature a rich, creamy, spiced pumpkin filling encased in a golden, buttery, flaky pastry crust. Perfect for fall gatherings, they offer ultimate portable comfort food.
Ingredients
-
3 cups (360g) all-purpose flour
-
½ teaspoon salt
-
20 tablespoons (300g) unsalted butter, very cold, cubed
-
½ cup (70g) ice milk
-
1 (15 oz) can pumpkin puree
-
⅓ cup (70g) packed light brown sugar
-
2.5 teaspoons ground cinnamon
-
¼ teaspoon nutmeg, freshly grated
-
Pinch ground cloves
-
2 egg yolks
-
1 teaspoon vanilla extract
-
1-½ cups plus 2 tablespoons (200g) powdered sugar
-
2-3 tablespoons (30-45g) milk
Instructions
-
Step 1
In a large bowl, whisk flour and salt. Cut in very cold, cubed butter using a pastry blender or fingertips until mixture resembles coarse crumbs with pea-sized butter pieces. Gradually add ice milk, mixing gently with a fork until dough just comes together. Do not overmix. Gather dough into two equal discs, wrap tightly, and chill in the refrigerator for at least 1-2 hours (or up to 2 days). -
Step 2
While dough chills, combine pumpkin puree, light brown sugar, ground cinnamon, nutmeg, cloves, egg yolks, and vanilla extract in a medium bowl. Whisk until all ingredients are thoroughly combined and smooth. Set aside. -
Step 3
Preheat oven to 375°F (190°C). Line two large baking sheets with parchment paper. On a lightly floured surface, roll one dough disc to approximately 1/8-inch thickness (about 12-14 inches diameter). Using a 4-inch round cutter, cut out as many circles as possible. Gather scraps, re-roll, and cut more circles (aim for 12-16 pasties total). -
Step 4
Place a generous tablespoon of pumpkin filling onto the center of each pastry circle, leaving a ½-inch border. Lightly moisten one half of the pastry edge with water. Fold the other half over to create a half-moon shape. Press firmly to seal the edges, then crimp with a fork for a decorative and secure seal. Transfer assembled pasties to prepared baking sheets. -
Step 5
Bake in the preheated oven for 20-25 minutes, or until pastry is golden brown. For even baking, rotate baking sheets halfway through. Remove from oven and transfer to a wire rack to cool for at least 15-20 minutes, allowing the filling to set. -
Step 6
While pasties cool, whisk 1-½ cups plus 2 tablespoons powdered sugar with 2-3 tablespoons milk until smooth, forming a glaze. Drizzle glaze over cooled pasties. Serve warm or at room temperature.
Important Information
Nutrition Facts (Per Serving)
It is important to consider this information as approximate and not to use it as definitive health advice.
Allergy Information
Please check ingredients for potential allergens and consult a health professional if in doubt.
Leave a Comment