
Old Fashioned Cinnamon Apple Crisp holds a special place in the hearts of many, instantly conjuring images of cozy evenings and the warmth of home. There’s an undeniable magic in its simplicity, a dessert that transports us back to cherished memories with every fragrant bite. Imagine stepping into a kitchen filled with the comforting aroma of baked apples and warm spices, promising a treat that is both profoundly satisfying and wonderfully unpretentious.
This beloved dessert, often seen as a simpler, less demanding cousin to the classic apple pie, boasts a rich, informal history as a quintessential American comfort food. It emerged as a practical yet delicious way to celebrate the bounty of autumn apple harvests, requiring no intricate pastry work but delivering maximum flavor and texture. I find myself continually drawn to the charm of an Old Fashioned Cinnamon Apple Crisp because it perfectly balances the soft, tender sweetness of baked apples with a glorious, buttery streusel topping that delivers an irresistible crunch.
Why People Adore This Timeless Dessert
People adore this dish not only for its incredible taste—the harmonious blend of tart and sweet apples infused with generous amounts of cinnamon, nutmeg, and a hint of cloves—but also for its delightful textural contrast. The bubbling, juicy fruit beneath a golden-brown, crumbly topping is pure culinary bliss. It’s the ultimate dessert for any occasion, from a casual family dinner to a festive gathering, offering a slice of wholesome indulgence without any fuss. It’s a testament to the fact that often, the simplest recipes yield the most profound joy.

Ingredients:
For the Old Fashioned Cinnamon Apple Filling:
- 6-8 medium-sized apples (about 6-7 cups sliced, depending on variety; I often use a mix of Granny Smith for tartness, Honeycrisp for crisp texture, and Fuji or Gala for sweetness and firmness – a delightful blend ensures a complex flavor profile for your Old Fashioned Cinnamon Apple Crisp).
- 1/2 cup granulated sugar (adjust to 1/3 cup if your apples are very sweet, or up to 2/3 cup if they are quite tart, like Granny Smith alone).
- 1/4 cup packed light brown sugar (this adds a beautiful caramel note and depth to the apple filling).
- 2 tablespoons all-purpose flour (this helps to thicken the juices released by the apples, preventing a watery filling).
- 1 teaspoon ground cinnamon (the star spice in our Old Fashioned Cinnamon Apple Crisp, providing that signature warmth).
- 1/4 teaspoon ground nutmeg (freshly grated is always superior, but pre-ground works wonderfully too, adding another layer of aromatic spice).
- 1 tablespoon fresh lemon juice (crucial for balancing the sweetness, brightening the apple flavor, and preventing the apples from browning too quickly).
- 1/4 teaspoon salt (just a pinch to enhance all the other flavors).
For the Golden Crisp Topping:
- 1 cup all-purpose flour (the foundation of our perfectly crumbly topping).
- 1 cup old-fashioned rolled oats (do not use instant oats here; the old-fashioned variety provides the best chewiness and texture for a classic Old Fashioned Cinnamon Apple Crisp).
- 1/2 cup packed light brown sugar (contributes to the rich, caramelized sweetness and helps achieve that golden-brown color).
- 1/2 cup granulated sugar (for additional sweetness and a slight crispness).
- 1 teaspoon ground cinnamon (to echo the spice in the filling and infuse the topping with warm flavor).
- 1/2 teaspoon salt (balances the sweetness and sharpens the overall taste).
- 1/2 cup (1 stick) unsalted butter, very cold and cut into 1/2-inch cubes (using cold butter is paramount for achieving a truly crisp and crumbly topping that won’t melt too quickly).
Preparing the Irresistible Apple Filling for Your Old Fashioned Cinnamon Apple Crisp
My favorite part about making an Old Fashioned Cinnamon Apple Crisp is the incredible aroma that fills the kitchen as those apples mingle with the spices. Let’s get these apples ready to be the star of our show.
- Prepare Your Apples with Care: First, you’ll want to gather all your beautiful apples. Using a sharp vegetable peeler, carefully remove the skin from each apple. Once peeled, use an apple corer to remove the core, or if you don’t have one, simply cut the apples into quarters and then carefully slice out the core and any seeds with a small knife. After coring, slice the apples into uniform pieces, about 1/4 to 1/2 inch thick. Uniformity is key here because it ensures all the apple slices cook at roughly the same rate, giving you that perfectly tender, not mushy, filling. I usually aim for crescent-shaped slices, but rustic chunks work beautifully too if that’s your preference. Place all the sliced apples into a very large mixing bowl.
- Combine Dry Ingredients for the Filling: In a separate, smaller bowl, whisk together the granulated sugar, light brown sugar, all-purpose flour, ground cinnamon, ground nutmeg, and salt. Make sure these dry ingredients are thoroughly combined. This initial whisking helps distribute the spices evenly, so you won’t end up with pockets of intense cinnamon or sugar in your final Old Fashioned Cinnamon Apple Crisp.
- Flavor the Apples: Now, sprinkle the dry sugar and spice mixture evenly over the sliced apples in the large mixing bowl. Add the tablespoon of fresh lemon juice. The lemon juice is truly magical here; it prevents the apples from browning too quickly, brightens their natural flavor, and provides a lovely counterpoint to the sweetness.
- Toss and Coat: Using a large spoon or, even better, your clean hands (which I find gives the best feel and coverage!), gently toss the apple slices until they are all thoroughly coated with the sugar, spice, and flour mixture. Be patient and thorough in this step; every apple slice should have a light dusting of the mixture. This coating is what will transform into that luscious, thick, and flavorful apple filling as it bakes. You’ll already start to smell the wonderful cinnamon, promising a truly amazing Old Fashioned Cinnamon Apple Crisp.
- Set Aside: Once coated, set the bowl of apple filling aside while you prepare the crisp topping. This short resting period allows the apples to start releasing some of their natural juices, which will marry beautifully with the thickening flour during baking.
Crafting the Perfect Golden Crisp Topping for Your Old Fashioned Cinnamon Apple Crisp
The topping is what gives this Old Fashioned Cinnamon Apple Crisp its name and its incredible texture. A good crisp topping should be buttery, crumbly, and wonderfully golden. The secret, as you’ll see, lies in keeping that butter very cold!
- Whisk Dry Topping Ingredients: In a medium-sized mixing bowl, combine the all-purpose flour, old-fashioned rolled oats, light brown sugar, granulated sugar, ground cinnamon, and salt. Use a whisk to vigorously combine these ingredients until they are uniformly mixed. This ensures that every bite of your topping will have consistent flavor and sweetness, and it prepares the flour to be evenly incorporated with the butter. Using old-fashioned rolled oats is non-negotiable for me in an Old Fashioned Cinnamon Apple Crisp; they provide a delightful chewiness and hearty texture that instant oats simply can’t replicate.
- Incorporate the Cold Butter: Now for the crucial part: adding the cold butter. Take your very cold, cubed unsalted butter and add it to the dry topping mixture. You have a couple of options here for incorporating the butter:
- Using a Pastry Blender: This is my preferred method. A pastry blender has sturdy wires that efficiently cut the butter into the flour mixture, creating small, consistent pieces without overworking the dough or melting the butter too much with the warmth of your hands. Continue cutting until the mixture resembles coarse crumbs, with some pieces of butter still visible, about the size of small peas.
- Using Your Fingertips: If you don’t have a pastry blender, your fingertips work wonderfully! Quickly rub the cold butter into the dry ingredients. The key here is to work quickly to minimize the heat transfer from your hands to the butter. You want to pinch and rub the butter into the flour until the mixture again resembles coarse crumbs, with small, pea-sized pieces of butter remaining. This method gives you excellent control and feel for the texture.
- Using a Food Processor: For an even quicker method, you can pulse the ingredients in a food processor a few times until the butter is incorporated and the mixture forms coarse crumbs. Be very careful not to over-process, as this can lead to a less tender topping.
- Achieve the Right Texture: Regardless of the method you choose, the goal is to achieve a crumbly mixture where the butter is evenly distributed but still in small, distinct pieces. These little pockets of cold butter are what will melt and create steam during baking, contributing to that incredible, flaky, and crispy texture that makes an Old Fashioned Cinnamon Apple Crisp so satisfying. Avoid overmixing, as this can develop the gluten in the flour too much and result in a tough topping.
- Keep it Cold: If your kitchen is particularly warm or if you find the butter is starting to soften, you can pop the bowl of topping into the refrigerator for 10-15 minutes. Keeping the butter cold right up until it goes into the oven is the secret weapon for an unbelievably crisp and golden topping.
Assembling and Baking Your Old Fashioned Cinnamon Apple Crisp to Golden Perfection
The moment of truth is here! Let’s bring everything together and get this Old Fashioned Cinnamon Apple Crisp into the oven so we can enjoy the magical transformation that’s about to happen.
- Preheat Your Oven: First things first, preheat your oven to 375°F (190°C). Make sure your oven rack is in the middle position to ensure even baking and browning of both the apples and the topping.
- Prepare Your Baking Dish: Lightly grease a 9×13-inch baking dish (or a similar sized oven-safe dish, about 3-quart capacity) with butter or cooking spray. This small step helps prevent the delicious apple filling from sticking to the bottom, making serving much easier. I always find a ceramic dish works wonderfully for holding heat and providing a rustic presentation for an Old Fashioned Cinnamon Apple Crisp.
- Layer the Apple Filling: Pour the prepared apple filling evenly into the greased baking dish. Use a spatula or the back of a spoon to spread the apples into a single, relatively even layer. Don’t worry if it looks like a lot of apples; they will cook down and soften beautifully. The goal is to ensure consistent thickness across the dish for even cooking.
- Distribute the Crisp Topping: Now, take your wonderfully crumbly crisp topping and sprinkle it evenly over the apple layer. Try to get a good, consistent layer across the entire surface. You want every bite of your Old Fashioned Cinnamon Apple Crisp to have that delightful combination of tender apples and crunchy topping. Don’t press the topping down; leave it loose and airy so it can bake up light and crisp.
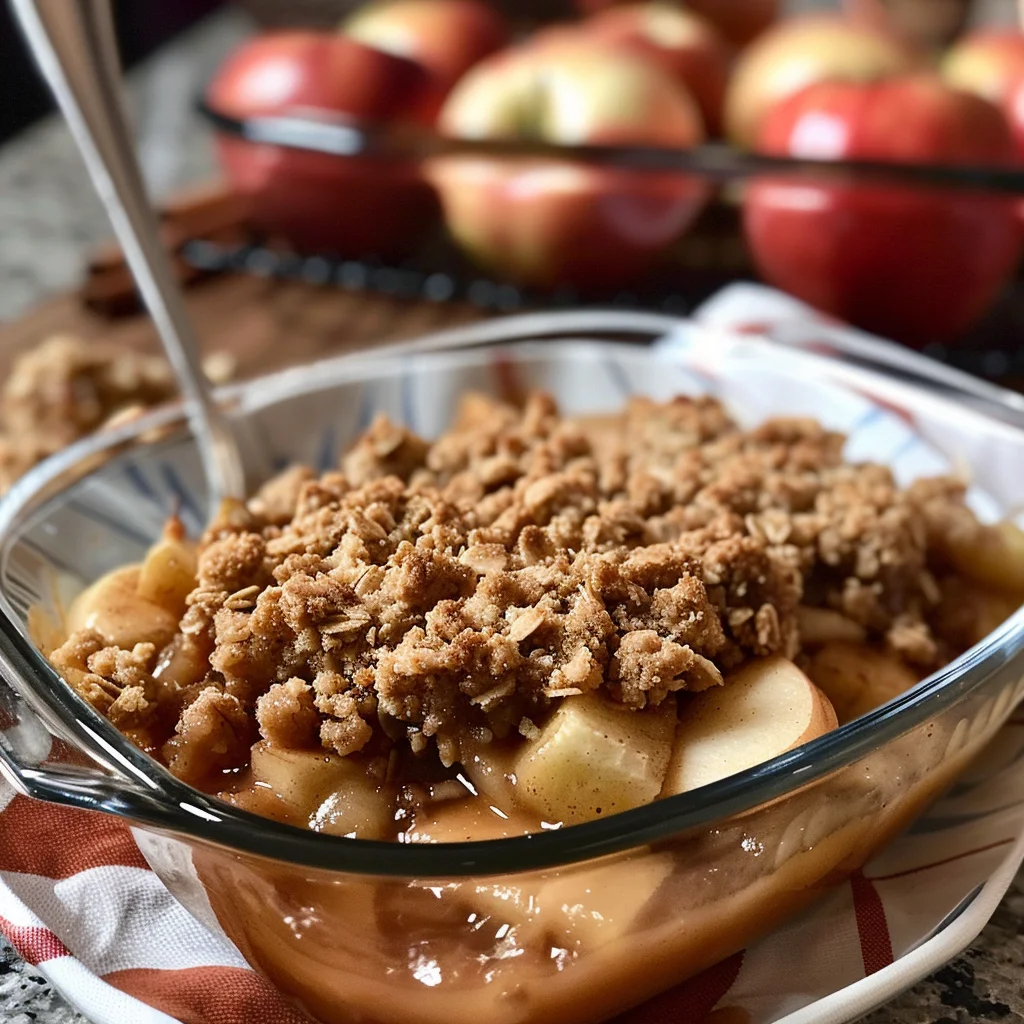
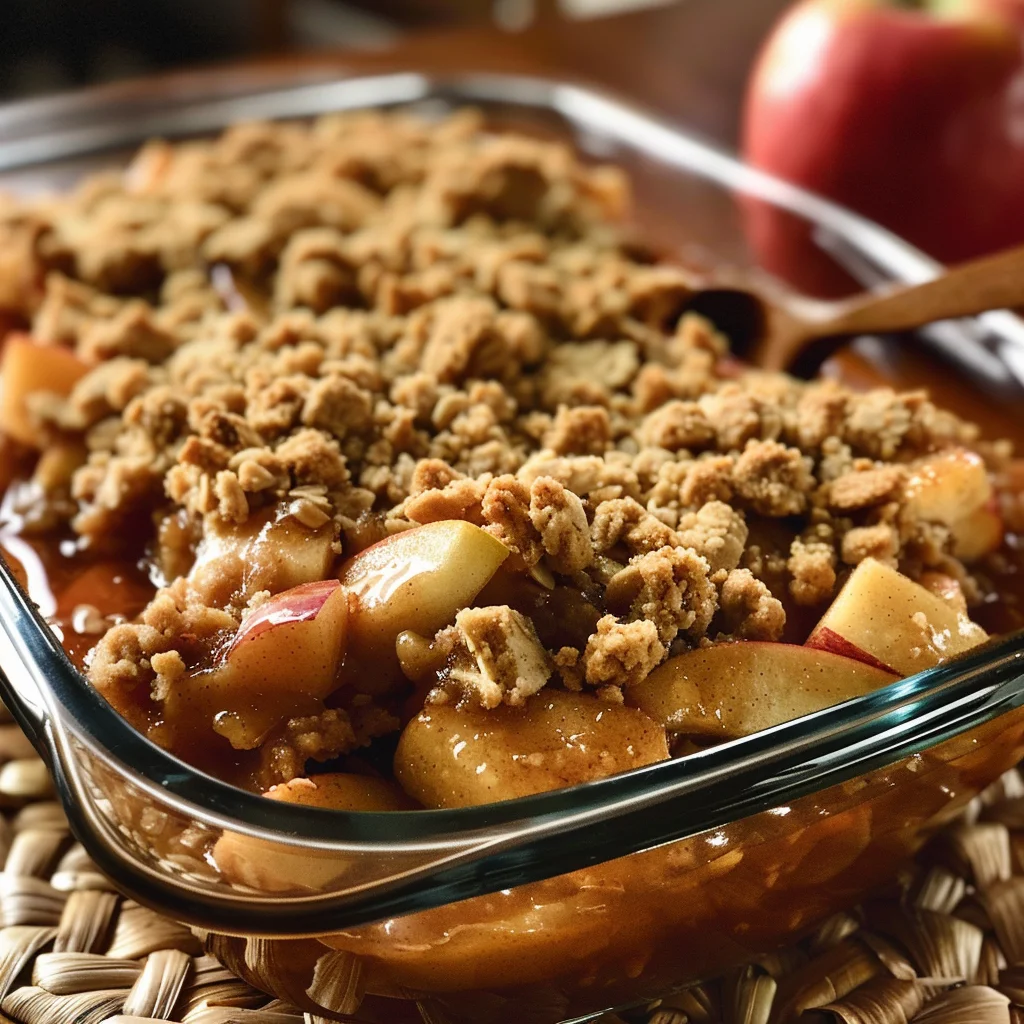
- Bake to Golden Perfection: Place the baking dish carefully into your preheated oven. Bake for approximately 45-55 minutes. The exact baking time can vary depending on your oven and the type of apples you used.
- Visual Cues for Doneness: Look for the topping to be beautifully golden brown and crunchy. More importantly, observe the apple filling – you should see the juices bubbling up around the edges of the dish, thick and syrupy, indicating the apples are cooked through and tender. If the topping starts to get too dark before the apples are tender, you can loosely tent the dish with aluminum foil for the last 10-15 minutes of baking.
- Testing for Tenderness: To be absolutely sure, you can carefully insert a thin, sharp knife into the center of the crisp (through the topping and into the apples). If it goes in easily with little resistance, your apples are perfectly tender.
- Cooling Period: Once your Old Fashioned Cinnamon Apple Crisp is baked to perfection, remove it from the oven and place it on a wire rack to cool. This cooling period is important, not just to prevent burning your mouth, but also to allow the apple filling to set up and thicken properly. The flavors also meld and deepen as it cools slightly. I know it’s hard to resist that incredible aroma, but trust me, 15-20 minutes of cooling will make a significant difference in texture and flavor.
Tips for the Ultimate Old Fashioned Cinnamon Apple Crisp Experience
Making a great Old Fashioned Cinnamon Apple Crisp is more than just following steps; it’s about understanding the nuances that elevate it from good to absolutely unforgettable. Here are some of my favorite tips to ensure your crisp is the best it can be every single time.
- Choosing the Right Apples is Key: While I listed a few varieties, the best Old Fashioned Cinnamon Apple Crisp often comes from a mix of apples. Tart apples like Granny Smith provide a necessary counterpoint to the sweetness, ensuring the dish isn’t cloyingly sweet. Firmer apples like Honeycrisp, Fuji, or Braeburn hold their shape well during baking, giving you lovely distinct apple pieces rather than a mushy apple sauce. Softer apples like McIntosh might break down more, which isn’t bad if you prefer a softer texture, but for that classic crisp feel, a mix is ideal. Don’t be afraid to experiment with your local orchard’s offerings!
- Don’t Skimp on the Lemon Juice: That tablespoon of fresh lemon juice in the filling isn’t just to prevent browning. It truly brightens the apple flavor, making it pop. It acts as a necessary acidic balance to the sweetness of the sugars and the richness of the butter in the topping. If you skip it, your crisp might taste a little flat.
- Embrace the Cold Butter Rule: I cannot stress this enough: cold butter for the topping is non-negotiable! When cold butter hits the hot oven, the water in the butter rapidly turns to steam, creating tiny pockets and layers that result in an incredibly crisp and crumbly topping. If your butter is too soft, it will melt into the flour too quickly, leading to a denser, chewier, and less “crispy” topping. Pop your butter in the freezer for 10-15 minutes before cutting it if your kitchen is warm.
- Customize Your Spices: While cinnamon and nutmeg are the classic duo for an Old Fashioned Cinnamon Apple Crisp, don’t hesitate to personalize your spice blend. A pinch of ground ginger, a touch of allspice, or even a tiny amount of cardamom can add wonderful depth and complexity. Just be mindful not to overpower the natural apple flavor.
- For an Extra Nutty Topping: If you love nuts, you can add about 1/2 cup of chopped pecans or walnuts to your crisp topping mixture. They toast beautifully in the oven, adding another layer of crunch and flavor that complements the apples and oats perfectly.
- Serving Suggestions: While undeniably delicious on its own, an Old Fashioned Cinnamon Apple Crisp truly shines when served warm with a scoop of premium vanilla bean ice cream. The cold, creamy ice cream melting into the warm, spiced apples and crunchy topping is a sublime experience. A dollop of freshly whipped cream or a drizzle of warm caramel sauce are also fantastic additions that elevate this simple dessert to something truly special.
- Storage and Reheating: If you happen to have leftovers (a rare occurrence in my house!), store the cooled crisp covered loosely with foil or plastic wrap in the refrigerator for up to 3-4 days. To reheat, you can warm individual portions in the microwave, but for the best crispness, I recommend reheating in a preheated oven at 350°F (175°C) for about 15-20 minutes, or until warmed through and the topping is crisp again. This method revives the topping’s texture beautifully.
- The Art of Patience (Cooling Time): I know the smell is intoxicating and you want to dig in immediately, but allowing your Old Fashioned Cinnamon Apple Crisp to cool for at least 15-20 minutes after baking is crucial. This time allows the apple filling to set up properly, thickening to that perfect syrupy consistency. Cutting into it too soon often results in a runnier filling. Trust the process, and your patience will be rewarded with a perfectly textured crisp.
Conclusion:
So, there you have it. My heartfelt plea, my gentle nudge, for you to truly embrace the comforting magic that this recipe brings to any home. I’ve shared with you the steps to create something truly special, a dessert that transcends mere sweetness and becomes an experience, a memory in the making. What makes this particular dish a standout in a sea of delicious options, you ask? Well, it’s the perfect harmony of textures and flavors that dance on your palate with every single spoonful. We’re talking about crisp, tart apples that soften just enough to yield, bathed in the warmth of cinnamon and other aromatic spices. This apple base is then crowned with that irresistible, buttery, crumbly topping that provides the most satisfying crunch. It’s not just a dessert; it’s a warm hug on a plate, a slice of pure, unadulterated comfort that reminds us of simpler times and cherished family gatherings.
I promise you, from the bottom of my heart, that once you pull this golden-brown masterpiece from your oven, the aroma alone will be enough to win over anyone within sniffing distance. It’s an instant mood-lifter, a culinary beacon that draws everyone to the kitchen, eager for a taste. This recipe isn’t overly complicated, yet it delivers a profound depth of flavor and a level of satisfaction that belies its straightforward preparation. It’s the kind of dish that makes you feel like a star baker without demanding hours of intricate work. That beautiful balance of sweet and tangy, the tender fruit contrasting with the crunchy topping – it’s simply divine, making it an absolute must-try for both seasoned bakers and kitchen novices alike.
What truly sets this particular recipe apart is its dedication to authenticity and those timeless flavors that resonate so deeply with us. It’s not just any apple crisp; it’s an Old Fashioned Cinnamon Apple Crisp, meticulously crafted to evoke nostalgia and deliver that classic, beloved taste we all crave. This isn’t just about dessert; it’s about tradition, about sharing a piece of culinary history that continues to delight generation after generation. The careful selection of apples, the generous infusion of real cinnamon, and that perfectly balanced crumb topping are all elements that elevate this dish from good to truly exceptional. Each bite transports you, whether to a cozy autumn evening, a festive holiday gathering, or simply a quiet moment of personal indulgence. It’s incredibly versatile, perfect for serving after a hearty family dinner, bringing to a potluck, or simply enjoying as a comforting treat on a lazy weekend afternoon. Trust me when I say, this recipe is designed to impress and satisfy on every level, leaving a lasting impression of warmth and deliciousness.
Now, while this glorious crisp is undeniably perfect on its own, allowing its pure flavors to shine, I absolutely adore exploring the many ways we can elevate and personalize the experience. For the ultimate classic indulgence, and frankly, my personal favorite, I highly recommend serving a generous scoop of good quality vanilla bean ice cream right on top, letting it melt ever so slightly into the warm, spiced apples and crumbly topping. The contrast between the hot crisp and the cold, creamy ice cream is simply out of this world! Alternatively, a dollop of freshly whipped cream, perhaps infused with a hint of vanilla or a touch of maple syrup, adds a beautiful lightness and elegance. For those who enjoy a bit more decadence, a drizzle of warm caramel sauce across the top can take this dessert to an entirely new level of deliciousness. Don’t be shy about adding a sprinkle of toasted pecans or walnuts to the topping mixture before baking for an extra layer of nutty crunch, or even a handful of dried cranberries for a festive tartness, especially around the holidays. If you’re feeling adventurous, consider a small dollop of crème fraîche for a sophisticated tangy counterpoint to the sweetness. The beauty of this Old Fashioned Cinnamon Apple Crisp is its adaptability; feel free to experiment with different apple varieties, or even mix in a few pears for a slightly different fruity profile. For those with dietary considerations, gluten-free flour blends work wonderfully in the topping, and natural sweeteners can be adjusted to taste. Make it your own!
So, what are you waiting for? I genuinely hope you’re feeling inspired to roll up your sleeves, gather your ingredients, and bring the irresistible magic of this dessert into your own kitchen. There’s a profound joy in baking, a wonderful sense of accomplishment when you create something so utterly delicious from scratch. I truly believe that the best recipes are those that are shared, made, and then shared again. Please, make this Old Fashioned Cinnamon Apple Crisp, savor every warm, comforting bite, and then tell me all about it! I would be absolutely thrilled to hear about your experience. Did you add a special touch? What did your family and friends think? Did you find a new favorite way to serve it? Share your thoughts, your successes, and even your questions in the comments below. Better yet, snap a photo of your magnificent creation and share it on your social media, tagging me so I can see your culinary triumph! Let’s build a community of home bakers who appreciate the simple, soul-satisfying pleasure of a truly classic dessert. I can’t wait to see your versions and hear your stories!
Old Fashioned Cinnamon Apple Crisp
If there’s a dessert that embodies the warmth and comfort of fall, it’s the Old Fashioned Cinnamon Apple Crisp. This classic recipe brings together tender, juicy apples with a delightful cinnamon-spiced crumbly topping. The aroma alone is enough to make your home feel cozy and welcoming.
Ingredients
-
6 cups sliced apples (5-6 medium, e.g., Granny Smith, Honeycrisp, Fuji)
-
1 cup granulated sugar
-
3/4 cup all-purpose flour
-
1 cup old-fashioned rolled oats
-
3/4 cup packed light brown sugar (1/4 cup for filling, 1/2 cup for topping)
-
2 teaspoons ground cinnamon (1 tsp for filling, 1 tsp for topping)
-
1/4 teaspoon ground nutmeg
-
1 tablespoon fresh lemon juice
-
3/4 teaspoon salt (1/4 tsp for filling, 1/2 tsp for topping)
-
1/2 cup (1 stick) unsalted butter, very cold, cubed
Instructions
-
Step 1
Peel, core, and slice apples 1/4 to 1/2 inch thick; place in a large bowl. In a separate small bowl, whisk together 1/2 cup granulated sugar, 1/4 cup light brown sugar, 2 tablespoons all-purpose flour, 1 teaspoon ground cinnamon, 1/4 teaspoon ground nutmeg, and 1/4 teaspoon salt. Sprinkle this mixture over apples, add 1 tablespoon fresh lemon juice, and toss until apples are well coated. Set aside. -
Step 2
In a medium bowl, whisk together the remaining 10 tablespoons (approx. 5/8 cup) all-purpose flour, 1 cup old-fashioned rolled oats, 1/2 cup light brown sugar, the remaining 1/2 cup granulated sugar, 1 teaspoon ground cinnamon, and 1/2 teaspoon salt. Add 1/2 cup (1 stick) very cold, cubed unsalted butter. Use a pastry blender, your fingertips, or a food processor to cut the butter into the dry ingredients until the mixture resembles coarse crumbs with pea-sized butter pieces. Keep cold. -
Step 3
Preheat oven to 375°F (190°C). Lightly grease a 9×13-inch baking dish. Pour the prepared apple filling evenly into the dish. Sprinkle the crumbly topping evenly over the apples, avoiding pressing it down. Bake for 45-55 minutes, or until the topping is golden brown, crunchy, and the apple juices are bubbling and thick. If topping browns too quickly, tent loosely with foil. -
Step 4
Remove from oven and let cool on a wire rack for at least 15-20 minutes. This allows the filling to set properly. Serve warm, ideally with vanilla bean ice cream or whipped cream.
Important Information
Nutrition Facts (Per Serving)
It is important to consider this information as approximate and not to use it as definitive health advice.
Allergy Information
Please check ingredients for potential allergens and consult a health professional if in doubt.
Leave a Comment