
Irresistible No Bake Cream Cheese Peanut Butter Pie Recipe – is there anything more enticing to beckon you into the kitchen, or rather, away from the oven? I know what you’re thinking: a dessert that’s utterly decadent, requires no baking whatsoever, and comes together with minimal fuss? Yes, it’s absolutely true! This isn’t just any pie; it’s a culinary dream come true for anyone craving a rich, satisfying treat without the heat and hassle of traditional baking.
Why This Pie Will Steal Your Heart (And Palate!)
Imagine a velvety smooth, tangy cream cheese filling, perfectly balanced with the deep, nutty flavor of peanut butter, all nestled in a crisp, sweet graham cracker crust. Every single bite offers a delightful contrast of textures and a harmonious blend of sweet, salty, and slightly tart notes that truly sing on your palate. While its exact origins might be debated, the glorious combination of peanut butter and cream cheese has long been a beloved pairing in American dessert culture, evolving into countless delicious forms. This particular no-bake version takes convenience to a new level, making it an absolute staple for potlucks, spontaneous family gatherings, or simply a special weeknight indulgence.
People adore this pie not only for its incredible flavor profile but also for its sheer simplicity. It’s a guaranteed crowd-pleaser that delivers maximum impact for minimal effort. If you’re searching for that perfect dessert to impress without the stress, our Irresistible No Bake Cream Cheese Peanut Butter Pie Recipe is exactly what you need. I promise, it will quickly become a cherished favorite in your personal recipe collection!

Ingredients:
-
For the Irresistible Graham Cracker Crust:
- 1 ½ cups (about 15-18 full sheets) graham cracker crumbs (I like to crush my own for freshness, but pre-crushed works beautifully too!)
- ¼ cup granulated sugar
- ½ cup (1 stick or 113g) unsalted butter, melted
-
For the Dreamy Cream Cheese Peanut Butter Filling:
- 8 ounces (226g) full-fat cream cheese, softened at room temperature (this is crucial for a smooth filling!)
- 1 cup (250g) creamy peanut butter (I always reach for a classic brand for consistency, but a good natural creamy peanut butter can also work, just stir it well first)
- 1 ½ cups powdered sugar (also known as confectioners’ sugar), sifted to avoid lumps
- 1 teaspoon pure vanilla extract
- 1 ½ cups cold heavy cream (for that luscious, airy texture)
- Optional: 2 tablespoons milk or half-and-half, if needed for a smoother consistency during mixing
-
For the Glorious Garnish (Optional, but highly recommended!):
- Extra whipped cream or store-bought whipped topping
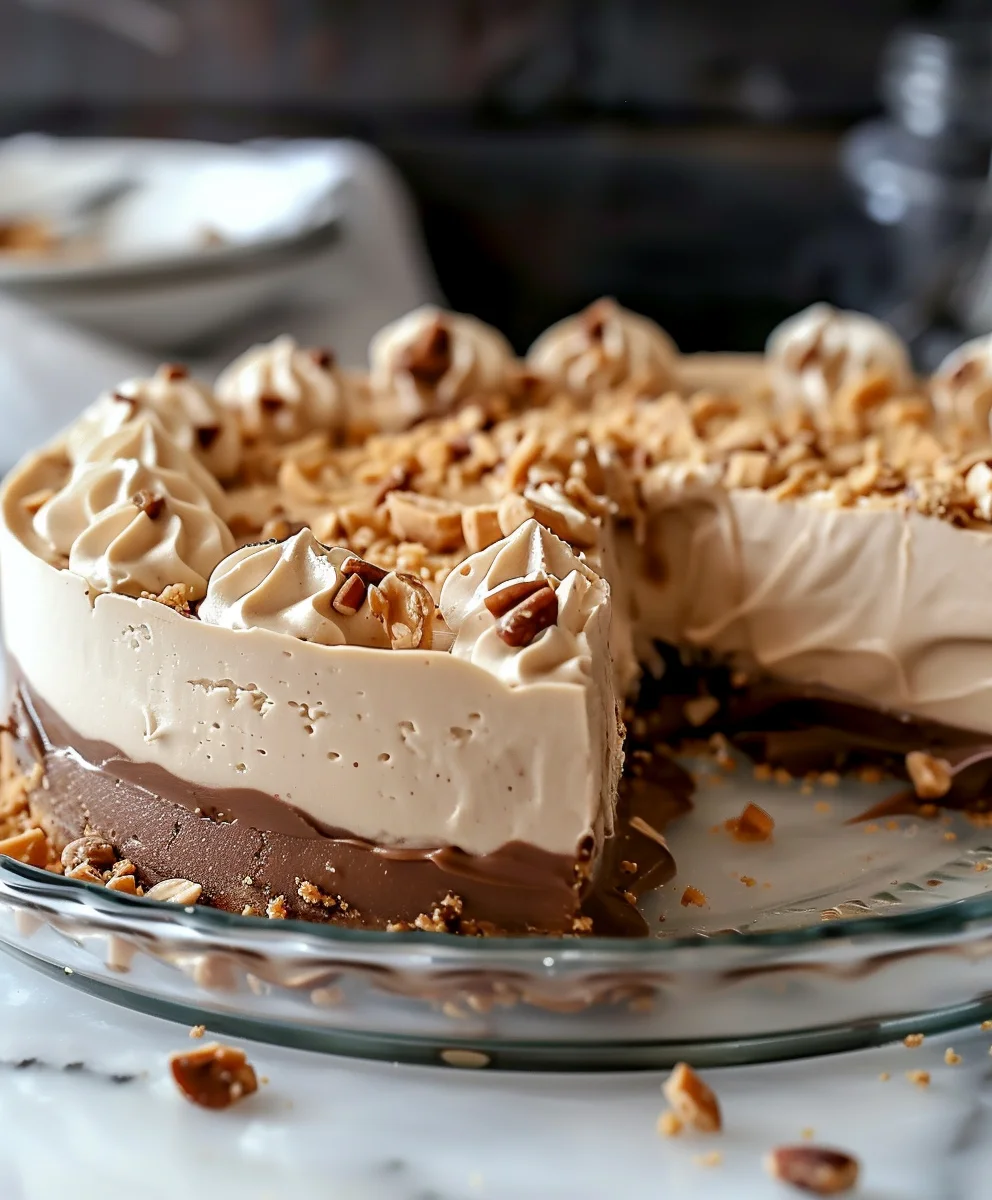
- ½ cup chopped roasted peanuts
- Chocolate shavings or mini chocolate chips
- A drizzle of chocolate syrup or peanut butter sauce
Preparing the Irresistible Graham Cracker Crust
- Get Ready to Mingle: First things first, grab a medium-sized mixing bowl. If you’re crushing your own graham crackers, you can use a food processor for ultra-fine crumbs, or simply place them in a zip-top bag and crush them with a rolling pin until they resemble fine sand. I find crushing them myself incredibly satisfying, and it truly makes a difference in freshness! Once you have your beautiful crumbs, transfer them to the bowl.
- Sweeten the Deal: Add the granulated sugar to your graham cracker crumbs. Give them a good stir with a fork or a whisk to ensure the sugar is evenly distributed. This tiny bit of sugar doesn’t just add sweetness; it also helps bind the crust together and gives it a lovely, subtle crispness.
- Butter Up: Now, for the magic binder! Gently melt your unsalted butter. You can do this in a microwave in short bursts, or on the stovetop over low heat. Once melted, pour it over the crumb mixture. Stir thoroughly with a spoon or your hands until all the crumbs are moistened and resemble wet sand. It’s important that every crumb gets a good coating of butter; this is what will hold your crust together and prevent it from falling apart when you slice into your magnificent pie.
- Press for Success: Transfer the buttered crumb mixture into a 9-inch pie plate. Now, for the crucial part: pressing! I like to start by spreading the crumbs evenly across the bottom, then I use the bottom of a flat-bottomed glass or a measuring cup to firmly press the crumbs into the bottom and up the sides of the pie plate. Be really firm here! The harder you press, the more solid and less crumbly your crust will be. A sturdy crust is the foundation of any great no-bake pie. Make sure the edges are neat and even.
- Chill Out: Once your crust is perfectly pressed, pop the pie plate into the refrigerator for at least 30 minutes. This chilling time is essential. It allows the butter to solidify, setting the crust firmly in place. While the crust is chilling, you can move on to preparing the sensational peanut butter filling!
Crafting the Creamy Peanut Butter Filling for Your No Bake Pie
- Softening is Key: In a large mixing bowl, place your 8 ounces of full-fat cream cheese. It’s absolutely vital that your cream cheese is at room temperature. If it’s too cold, you’ll end up with stubborn lumps in your filling, no matter how much you beat it, and we want a silky-smooth, irresistible filling. I usually take mine out of the fridge at least an hour before I plan to start baking.
- Whip the Cream Cheese: Using an electric mixer (either a hand-held one or a stand mixer with the paddle attachment), beat the softened cream cheese on medium speed until it’s incredibly smooth and fluffy. This should take about 2-3 minutes. Scrape down the sides of the bowl occasionally to ensure everything gets incorporated. You’re looking for a light, airy texture with no visible lumps. This step lays the groundwork for the pie’s luxurious consistency.
- Introduce the Peanut Butter: Add the 1 cup of creamy peanut butter to the beaten cream cheese. Beat again on medium speed until the peanut butter is fully combined with the cream cheese, and the mixture is smooth and uniform. This might take another 1-2 minutes. I always opt for creamy peanut butter here because it contributes to that wonderfully smooth texture we’re aiming for. If you use natural peanut butter, make sure it’s well-stirred and doesn’t separate; otherwise, the oil might separate in your filling.
- Sweeten and Flavor: Next, add the 1 ½ cups of sifted powdered sugar and the 1 teaspoon of pure vanilla extract to the peanut butter and cream cheese mixture. Sifting the powdered sugar beforehand is a small step that makes a big difference, preventing any unpleasant gritty bits in your filling. Beat on low speed until the sugar is just incorporated, then increase to medium and beat until the mixture is light, fluffy, and perfectly combined, about 2-3 minutes. If, at this point, your mixture seems a little too thick or stiff to work with, you can add 1-2 tablespoons of milk or half-and-half to achieve a more spreadable consistency. Beat just until combined after adding.
- Whip the Heavy Cream to Perfection: In a separate, very clean, and preferably chilled large mixing bowl (I often put my bowl and whisk attachment in the freezer for 10-15 minutes beforehand for optimal results), pour in your 1 ½ cups of cold heavy cream. Using an electric mixer with the whisk attachment, beat the heavy cream on high speed until stiff peaks form. This means when you lift the whisk, the peaks of cream stand up straight without flopping over. Be careful not to overbeat, or you’ll end up with butter! This step is crucial for adding an incredible lightness and airiness to your pie filling.
- Gently Fold for Lightness: Now, for the final marriage of ingredients! Take about a third of your whipped cream and gently fold it into the peanut butter mixture using a rubber spatula. This initial addition helps lighten the peanut butter mixture, making it easier to incorporate the rest of the whipped cream without deflating it. Once that’s loosely combined, add the remaining whipped cream. Continue to fold gently, using an upward motion from the bottom of the bowl, until no streaks of white cream remain and the mixture is homogenous, light, and airy. The goal here is to keep as much of that wonderful air in the whipped cream as possible, creating a cloud-like texture for your pie. Avoid overmixing!
Assembling and Chilling Your No Bake Masterpiece
- Fill the Crust: Retrieve your chilled graham cracker crust from the refrigerator. Carefully spoon the glorious peanut butter cream cheese filling into the prepared crust. Use your rubber spatula or the back of a spoon to gently spread the filling evenly across the bottom and smooth out the top. You want it to look beautiful and inviting!
- The Long Chill (It’s Worth It!): Once your pie is assembled, it’s time for the final, and perhaps most important, step: chilling. Cover the pie loosely with plastic wrap (you don’t want the plastic wrap to touch the filling if possible, or it might stick) and place it back in the refrigerator. Your “Irresistible No Bake Cream Cheese Peanut Butter Pie” needs to chill for a minimum of 4-6 hours, but ideally overnight, to allow the filling to set completely. This firm setting is absolutely essential for clean slices and that perfectly stable, creamy texture we’re craving. Patience is a virtue here, my friend!
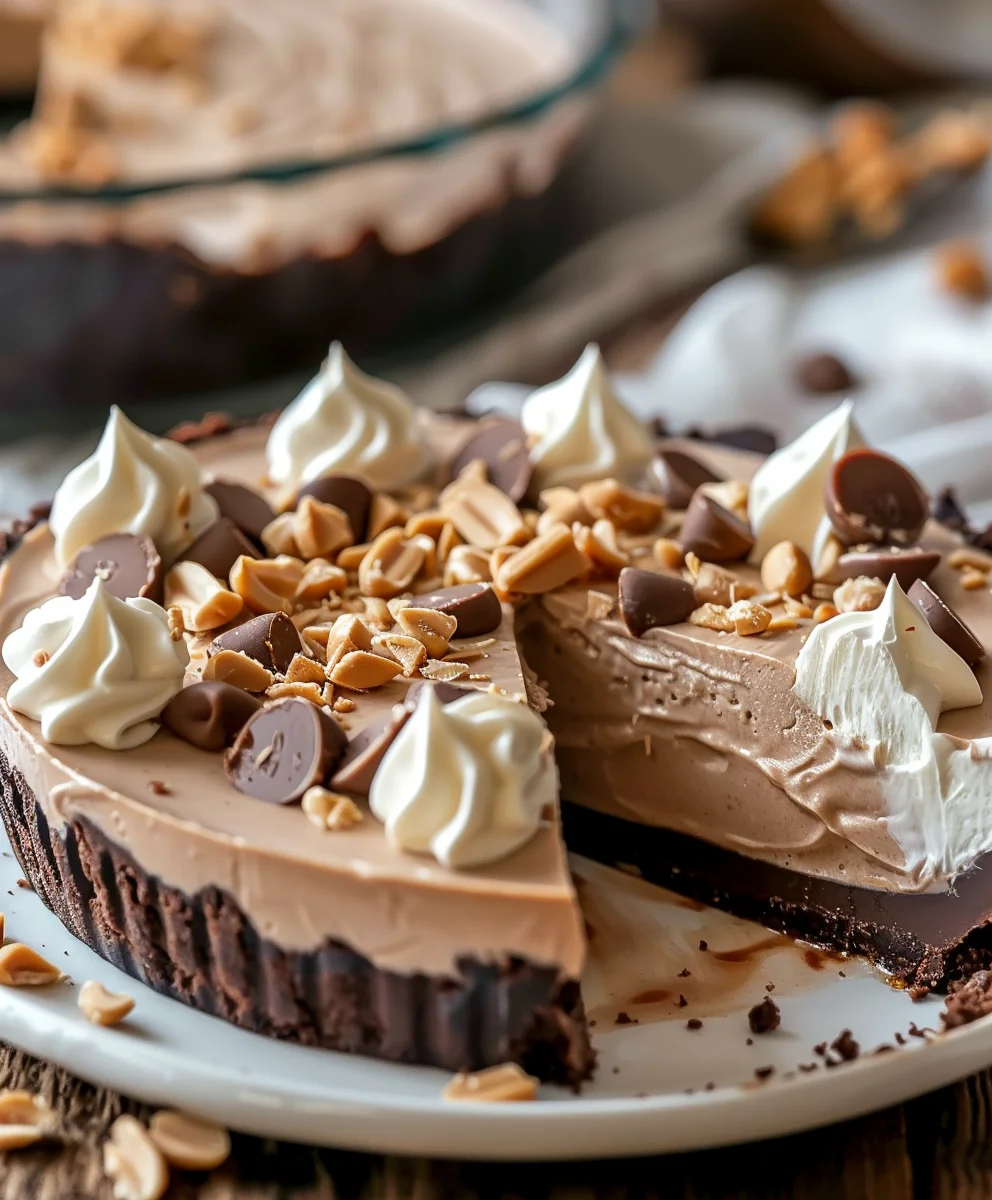
- Garnish and Serve with Panache: When your pie is thoroughly chilled and set, it’s time for the grand finale! Before serving, you can unleash your creativity with garnishes. I love to pipe a generous swirl of extra whipped cream around the edge or dollop it directly onto individual slices. A sprinkle of chopped roasted peanuts adds a fantastic crunch and enhances that peanut butter flavor even more. For chocolate lovers, a scattering of mini chocolate chips or elegant chocolate shavings is divine. A drizzle of chocolate syrup or even a little warm peanut butter sauce can elevate this pie to true dessert royalty. This pie is best served cold, straight from the fridge.
Tips for the Perfect Irresistible No Bake Cream Cheese Peanut Butter Pie
- Temperature Matters: As I mentioned, ensuring your cream cheese is at room temperature is non-negotiable for a smooth filling. On the flip side, your heavy cream needs to be as cold as possible for it to whip up properly into stiff peaks. These temperature differences, when respected, contribute immensely to the final texture.
- Don’t Overmix: While beating the cream cheese and peanut butter, ensure it’s smooth, but once you add the whipped cream, fold gently. Overmixing the filling after the whipped cream has been added can deflate it, leading to a denser, less airy pie. We want light and fluffy!
- Quality Ingredients: Since this is a “no-bake” recipe, the flavors of your raw ingredients truly shine. Invest in good quality cream cheese, a peanut butter you genuinely love, and fresh heavy cream. It makes a noticeable difference in the overall taste of your “Irresistible No Bake Cream Cheese Peanut Butter Pie.”
- Storage: Leftover pie (if there is any, which is a rare occurrence in my house!) should be stored covered in the refrigerator. It will stay fresh and delicious for 3-4 days. For longer storage, slices can be individually wrapped and frozen for up to 1 month. Just thaw them in the refrigerator for a few hours before serving.
-
Personalize Your Pie: This recipe is a fantastic base for customization.
- Chocolate Swirl: Before chilling, gently drizzle about ¼ cup of melted dark chocolate or chocolate syrup over the top of the filling, then use a knife or skewer to create elegant swirls.
- Different Crusts: While graham cracker is classic, try an Oreo crust for a chocolate-peanut butter dream, or even a Nutter Butter crust to double down on the peanut butter flavor!
- Mini Pies: Instead of a full pie, press the crust into muffin tins lined with paper liners for individual “Irresistible No Bake Cream Cheese Peanut Butter Mini Pies.” Adjust chilling time slightly.
- Extra Peanut Butter Punch: Mix in a few tablespoons of finely chopped peanut butter cups or mini Reese’s Pieces into the filling before spreading for an extra burst of flavor and texture.
No matter how you choose to make it, I am confident that this “Irresistible No Bake Cream Cheese Peanut Butter Pie Recipe” will become a cherished favorite in your recipe collection, bringing smiles and satisfaction with every single bite. Enjoy!
Conclusion:
And there you have it, my friends! We’ve reached the sweet finale of our journey, and I genuinely hope you’re as excited as I am about what we’ve just explored. This isn’t just any dessert recipe; it’s an absolute game-changer, a dessert that promises pure, unadulterated joy with minimal effort. What truly makes this pie a standout, a bona fide must-try in every sense of the word, is its incredible ability to deliver on both flavor and convenience. Imagine a dessert so utterly decadent, so richly satisfying, yet requiring absolutely no oven time. That, right there, is the magic!
I can confidently say that this Irresistible No Bake Cream Cheese Peanut Butter Pie Recipe is destined to become a beloved staple in your kitchen, a go-to treat for any occasion. Its velvety-smooth texture, a perfect dance between creamy cheese and robust peanut butter, creates a symphony of flavors that will have everyone at your table asking for seconds. The delightful crunch of the crust provides the ideal counterpoint to the luscious filling, making every single bite a truly memorable experience. It’s the kind of dessert that feels gourmet and complicated, but secretly, it’s a breeze to put together. This makes it perfect for busy weeknights when you crave something special, or for impressing guests at a dinner party without breaking a sweat in the kitchen.
Elevate Your Pie: Serving Suggestions and Delicious Variations
Now, while this pie is absolutely phenomenal on its own, I always encourage a little creative flair! For an elevated presentation and an extra layer of indulgence, consider serving each slice with a generous dollop of freshly whipped cream. The light, airy cream provides a beautiful contrast to the pie’s richness. A drizzle of warm chocolate fudge or caramel sauce can also add a delightful visual appeal and an additional dimension of sweetness. For peanut butter aficionados, a sprinkle of chopped roasted peanuts or mini chocolate chips on top just before serving adds a fantastic textural element and reinforces those classic flavors. And if you’re feeling a bit adventurous, a tiny pinch of flaky sea salt scattered over the top can miraculously enhance all the sweet notes, creating that sophisticated sweet-and-salty balance that everyone adores.
But why stop there? The beauty of a no-bake recipe lies in its adaptability! You can easily tweak this recipe to suit your preferences or to create exciting new versions. How about experimenting with the crust? While the classic graham cracker crust is always a winner, imagine the possibilities with crushed Oreo cookies for a chocolatey twist, or even a pretzel crust for an incredible sweet and salty foundation that truly pops. For a flavor variation in the filling, you could swirl in some hazelnut spread alongside the peanut butter for a Nutella-inspired delight, or even incorporate a layer of sliced bananas at the bottom before adding the filling for a tropical touch. A hint of espresso powder mixed into the cream cheese filling can also add a subtle depth that coffee lovers will appreciate. For individual servings, try making mini pies in muffin tins using cupcake liners—they’re adorable, portion-controlled, and perfect for parties!
Your Turn: Make It, Love It, Share It!
So, what are you waiting for? I’ve shared all my secrets, tips, and inspiration for creating this extraordinary dessert. Now, it’s your turn to roll up your sleeves (metaphorically, of course, since there’s no baking involved!) and bring this incredible pie to life in your own kitchen. I promise you, the process is as enjoyable as the outcome. There’s a profound satisfaction in crafting something so delicious with your own hands, and even more so when it’s met with gasps of delight from those you share it with.
I am genuinely eager to hear about your experiences. Did you try a unique variation? Was it a hit at your last gathering? Please, don’t keep your triumphs to yourself! I encourage you, no, I urge you, to dive into this recipe, make it your own, and then come back and share your thoughts, your photos, and your success stories in the comments section. Your feedback, your creative twists, and your enthusiasm fuel this community and inspire us all. So, go forth, embrace the simplicity and deliciousness of this pie, and prepare to be utterly charmed. Happy baking (or rather, happy chilling)!
Irresistible No Bake Cream Cheese Peanut Butter Pie
A decadent, no-bake cream cheese peanut butter pie recipe featuring a velvety smooth filling in a crisp graham cracker crust. Quick to prepare and perfect for any occasion without the oven.
Ingredients
-
1 ½ cups graham cracker crumbs
-
½ cup unsalted butter, melted
-
8 oz cream cheese, softened
-
1 cup creamy peanut butter
-
1 cup confectioners’ sugar
-
1 cup heavy whipping cream
-
3 tbsp cocoa powder
Instructions
-
Step 1
Combine graham cracker crumbs and melted butter. Press mixture firmly into a 9-inch pie plate. Chill crust for at least 30 minutes in the refrigerator. -
Step 2
In a large bowl, beat softened cream cheese until smooth and fluffy. Add creamy peanut butter and beat until fully combined. Gradually add confectioners’ sugar and beat until the mixture is light and fluffy. -
Step 3
In a separate, chilled bowl, whip cold heavy cream on high speed until stiff peaks form. Avoid overbeating. -
Step 4
Gently fold about a third of the whipped cream into the peanut butter mixture to lighten it, then fold in the remaining whipped cream until just combined and airy. For an optional chocolate swirl, mix 3 tbsp cocoa powder with 2 tbsp hot water to form a paste, then gently swirl into a portion of the filling or dust on top as a garnish. -
Step 5
Spoon the filling into the chilled graham cracker crust and smooth the top evenly. Cover loosely and refrigerate for a minimum of 4-6 hours, or ideally overnight, to allow the pie to set completely. -
Step 6
Once thoroughly chilled and set, garnish as desired (e.g., with extra whipped cream or chopped roasted peanuts). Serve cold.
Important Information
Nutrition Facts (Per Serving)
It is important to consider this information as approximate and not to use it as definitive health advice.
Allergy Information
Please check ingredients for potential allergens and consult a health professional if in doubt.
Leave a Comment