
Classic Japanese Fried Chicken Karaage
Welcome to my kitchen, where today we’re diving into the legendary Classic Japanese Fried Chicken Karaage! This isn’t just any fried chicken; it’s a culinary masterpiece that will transport your taste buds straight to the bustling streets of Tokyo. What makes Karaage so incredibly special, you ask? It’s that magical contrast: an impossibly crispy, golden-brown exterior giving way to the most tender, succulent, and flavor-packed chicken you’ve ever bitten into. I promise, once you taste this perfectly seasoned bite-sized delight, marinated in a savory blend of soy sauce, ginger, garlic, and a touch of non-alcoholic richness, you’ll understand why it’s a staple in Japanese cuisine and a beloved dish worldwide. Prepare yourself for a dish that’s not only a joy to eat but also surprisingly simple to create at home, transforming ordinary chicken pieces into extraordinary crispy nuggets of joy that everyone, from kids to adults, will absolutely adore.

Ingredient Notes
Making delicious Classic Japanese Fried Chicken Karaage starts with selecting the right ingredients. I’ve found that paying attention to these key components makes all the difference in achieving that irresistible flavor and crunch.
Chicken
- Chicken Thighs: I always recommend using boneless, skin-on chicken thighs. They are inherently more flavorful and stay wonderfully juicy during frying, which is crucial for Karaage. The skin, when fried, adds an extra layer of crispiness. I cut mine into bite-sized pieces, roughly 1.5 to 2 inches, ensuring they cook evenly and are easy to eat.
- Substitution: While thighs are my top pick, you can use chicken breast if you prefer leaner meat. Just be mindful that it can dry out more easily, so don’t overcook it!
The Marinade
This is where the magic happens, infusing the chicken with that distinct Japanese flavor profile.
- Soy Sauce: A good quality Japanese soy sauce is non-negotiable for umami and saltiness. I use regular, not low-sodium, for the best flavor.
- Fresh Ginger: Grated fresh ginger adds a pungent, aromatic warmth that is characteristic of Karaage. Don’t skip it!
- Fresh Garlic: Similarly, freshly grated garlic provides a depth of flavor that dried garlic powder just can’t match.
- Non-Alcoholic Alternative for Sake: Traditionally, sake is used for tenderness and flavor. For a non-alcoholic version, I find that a splash of chicken broth or even white grape juice works well to add moisture and a subtle complexity.
- Non-Alcoholic Alternative for Mirin: Mirin adds a touch of sweetness and glaze. You can substitute it by adding a tiny pinch of sugar (about 1/4 teaspoon per tablespoon of mirin) to your marinade, or use a little extra chicken broth if you used that as your sake alternative.
- Sesame Oil (Optional): A tiny drizzle of toasted sesame oil adds a lovely nutty aroma, but it’s not strictly traditional for all Karaage recipes, so it’s up to your preference.
The Coating
- Potato Starch (Katakuriko): This is the secret to truly crispy, light, and less greasy Karaage! Potato starch fries up incredibly light and airy, creating those signature craggy bits that hold the crunch. I find it superior to cornstarch for this specific dish.
- Substitution: Cornstarch can be used as a substitute, and while it will still yield a crispy result, the texture will be slightly denser and less delicate than with potato starch. All-purpose flour is not recommended on its own, as it tends to create a heavier, doughier crust.
Frying Oil
- Neutral Oil with a High Smoke Point: I always opt for vegetable oil, canola oil, or peanut oil. You need enough oil to deep-fry the chicken, ensuring it’s submerged and cooks evenly.
Step-by-Step Instructions
Get ready to fry up some of the most delicious chicken you’ll ever taste! Here’s how I make my Classic Japanese Fried Chicken Karaage:
- Prepare the Chicken: First, I take my boneless, skin-on chicken thighs and pat them really dry with paper towels. This is an important step to ensure the marinade adheres well and the chicken doesn’t steam during frying. Then, I cut them into bite-sized pieces, aiming for roughly 1.5 to 2 inches each. This size ensures even cooking and easy serving.
- Marinate the Chicken: In a medium bowl, I combine all the marinade ingredients: soy sauce, grated fresh ginger, grated fresh garlic, my non-alcoholic sake alternative (like chicken broth), and my non-alcoholic mirin alternative (like a pinch of sugar). I mix it well, then add the chicken pieces, making sure every piece is coated. I cover the bowl and let it marinate in the refrigerator for at least 30 minutes, but ideally 2-4 hours, or even overnight for the best flavor penetration.
- Coat the Chicken: When I’m ready to fry, I take the chicken out of the fridge. I usually drain off any excess liquid from the marinade, but don’t rinse the chicken. In a shallow dish or a Ziploc bag, I place the potato starch. Then, I add the marinated chicken pieces, a few at a time, tossing them to ensure they are evenly coated with a thin layer of starch. It’s important to shake off any excessive starch so you get a light, crispy crust, not a thick, doughy one.
- First Fry (Cooking Through): I heat about 2-3 inches of a neutral frying oil in a heavy-bottomed pot or deep fryer to around 325-340°F (160-170°C). It’s crucial to use a thermometer for accurate temperature control. Once the oil is hot, I carefully add the chicken pieces in batches, making sure not to overcrowd the pot. Overcrowding will drop the oil temperature and lead to soggy chicken. I fry each batch for about 3-4 minutes, or until the chicken is lightly golden brown and cooked through. I remove the chicken with a spider or slotted spoon and place it on a wire rack set over a baking sheet to drain.
- Second Fry (Achieving Ultimate Crispiness): This is my secret to truly amazing, extra-crispy Karaage! After all the chicken has had its first fry, I increase the oil temperature to about 350-375°F (175-190°C). I then return the chicken to the hot oil for a second fry, again in batches, for just 1-2 minutes. This quick second fry will make the chicken gorgeously deep golden brown and incredibly crisp on the outside, while keeping the inside juicy.
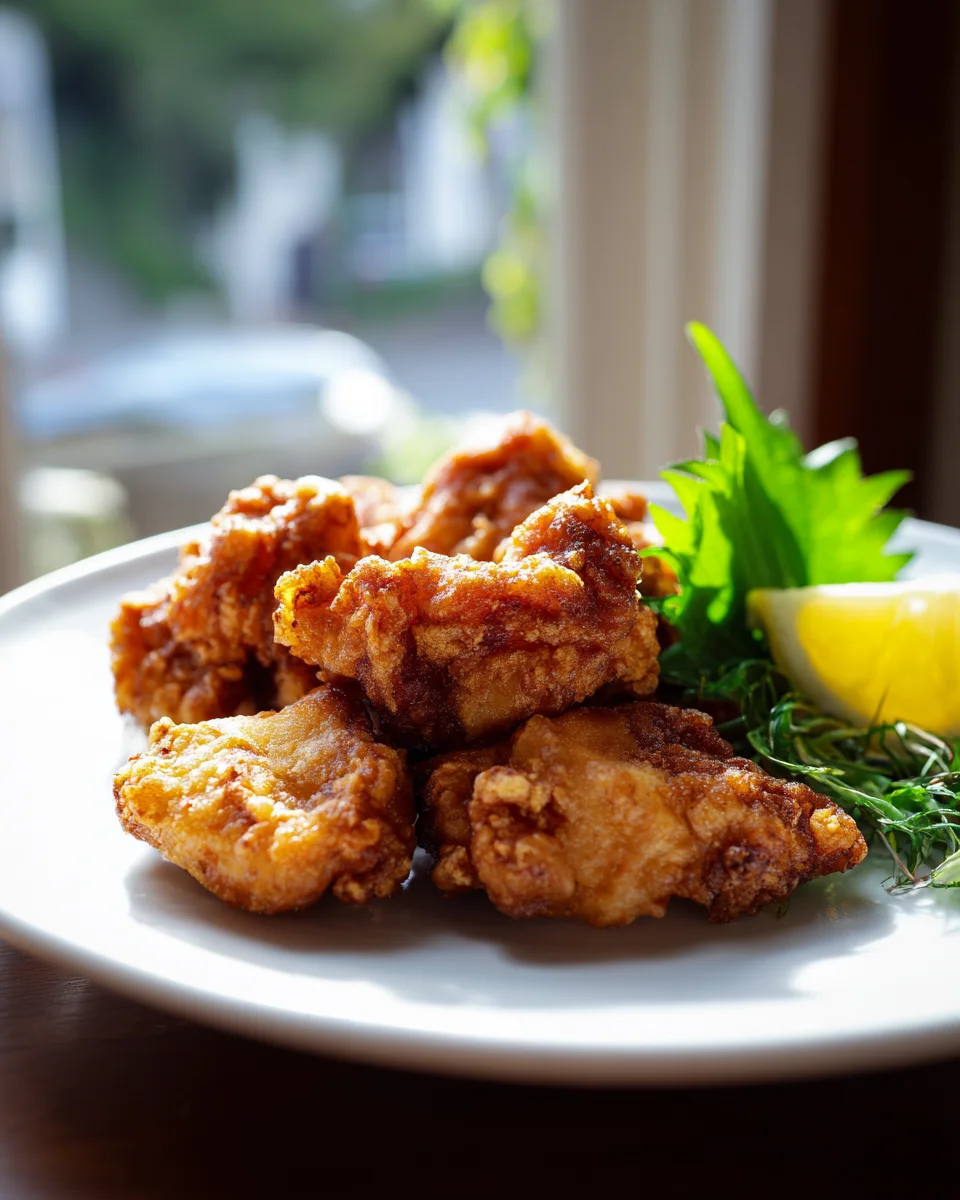
- Drain and Serve: Once the chicken is beautifully golden and crispy, I remove it from the oil and place it back on the wire rack to drain any excess oil. I like to serve it immediately with a squeeze of fresh lemon, a dollop of Japanese mayonnaise, or a sprinkle of shichimi togarashi (Japanese seven-spice blend). Enjoy!
Tips & Suggestions
Over the years, I’ve picked up a few tricks that really elevate homemade Classic Japanese Fried Chicken Karaage. Here are my favorite tips:
- Double Frying is Key: I cannot stress this enough! The two-stage frying process is what takes Karaage from good to absolutely phenomenal. The first fry cooks the chicken through, and the second fry, at a higher temperature, is what creates that signature, shattering crispiness and beautiful golden color.
- Don’t Overcrowd the Pot: Frying in batches is essential. I know it can be tempting to put more chicken in, but overcrowding drastically lowers the oil temperature, leading to greasy, less crispy results. Patience is a virtue here!
- Use a Thermometer: Accurate oil temperature is vital for perfect frying. I always use a deep-fry thermometer to ensure my oil is at the correct temperature for both the first and second fries. This prevents undercooked chicken or burnt exteriors.
- Pat the Chicken Dry: Before marinating and especially before coating, I make sure the chicken is very dry. Excess moisture can make the coating gummy and prevent it from crisping up properly.
- Shake Off Excess Starch: A thin, even coating of potato starch is what you’re aiming for. Too much starch will create a thick, heavy crust instead of that light, airy crunch. Give the chicken a good shake after coating.
- Serve with Fresh Lemon and Japanese Mayonnaise: A squeeze of fresh lemon juice brightens the rich flavor of the fried chicken, and Japanese mayonnaise (like Kewpie) is the traditional, creamy, slightly sweet accompaniment that truly completes the experience.
- Consider Marinade Time: If you have the time, letting the chicken marinate for 4 hours or even overnight in the refrigerator makes a significant difference in flavor depth.
- Experiment with Spice: For a little kick, I sometimes add a pinch of white pepper or a tiny bit of red pepper flakes to the marinade. A sprinkle of shichimi togarashi after frying is also fantastic.
Storage
While Karaage is absolutely best enjoyed fresh, I know sometimes there are leftovers, or you might want to prepare it ahead. Here’s how I handle storage:
- Refrigeration: Any leftover Classic Japanese Fried Chicken Karaage should be stored in an airtight container in the refrigerator. It will keep well for 2-3 days.
- Reheating for Best Results: Microwaving leftover Karaage is a big no-no if you want to retain any crispiness; it will just become soggy. My preferred method is to reheat it in a preheated oven or an air fryer.
- Oven: Preheat your oven to 375°F (190°C). Place the Karaage on a wire rack set over a baking sheet (this allows air circulation) and heat for 10-15 minutes, or until heated through and crispy again.
- Air Fryer: Preheat your air fryer to 350°F (175°C). Place the Karaage in a single layer in the basket and air fry for 5-8 minutes, shaking the basket halfway through, until hot and crisp.
- Freezing Cooked Karaage: Yes, you can freeze cooked Karaage! I like to let it cool completely, then arrange the pieces in a single layer on a baking sheet and freeze until solid. Once frozen, transfer them to a freezer-safe bag or container. This prevents them from sticking together. It will keep well for up to 1 month.
- Reheating from Frozen: To reheat from frozen, I use the oven or air fryer method mentioned above, but I usually add an extra 5-10 minutes to the cooking time, ensuring it’s fully heated through and crispy. There’s no need to thaw it first!
Final Thoughts
And there you have it, my friends! We’ve reached the end of our delicious journey into making truly authentic Classic Japanese Fried Chicken Karaage. I honestly believe that once you experience the magic of its perfectly crispy, golden-brown coating giving way to incredibly tender, juicy chicken, bursting with that signature savory-sweet flavor from its special marinade, you’ll understand why it’s a dish cherished by so many.
This isn’t just any fried chicken; it’s a culinary masterpiece that delivers on every front. I hope you’re feeling inspired and excited to bring the unforgettable taste of Classic Japanese Fried Chicken Karaage into your own home. It’s a recipe that promises satisfaction with every bite, whether you’re enjoying it as a hearty snack, part of a bento, or as the star of your dinner table.
Go ahead, gather your ingredients, and prepare to impress yourself and your loved ones. I’m confident that your homemade Classic Japanese Fried Chicken Karaage will be an absolute hit. Happy cooking, and get ready to savor every moment!
Irresistible Japanese Karaage: Perfect Crispy Fried Chicken
- Total Time: 45 minutes
- Yield: 4 servings
Description
Experience the magic of Classic Japanese Fried Chicken Karaage, featuring a perfectly crispy exterior and tender, juicy chicken. This simple yet flavorful dish will transport your taste buds to the streets of Tokyo.
Ingredients
- Boneless, skin-on chicken thighs
- Soy sauce
- Fresh ginger, grated
- Fresh garlic, grated
- Non-alcoholic alternative for sake (like chicken broth or white grape juice)
- Non-alcoholic alternative for mirin (like a pinch of sugar or extra chicken broth)
- Sesame oil (optional)
- Potato starch (Katakuriko)
- Neutral oil with a high smoke point (like vegetable oil, canola oil, or peanut oil)
Instructions
- Prepare the Chicken: Pat the boneless, skin-on chicken thighs dry with paper towels and cut them into bite-sized pieces, roughly 1.5 to 2 inches.
- Marinate the Chicken: In a medium bowl, combine soy sauce, grated fresh ginger, grated fresh garlic, non-alcoholic sake alternative, and non-alcoholic mirin alternative. Mix well, add the chicken pieces, coat them, cover the bowl, and let it marinate in the refrigerator for at least 30 minutes, ideally 2-4 hours or overnight.
- Coat the Chicken: Drain excess liquid from the marinade, then place potato starch in a shallow dish or Ziploc bag. Add marinated chicken pieces a few at a time, tossing to coat evenly with a thin layer of starch, shaking off any excess.
- First Fry (Cooking Through): Heat 2-3 inches of neutral frying oil in a heavy-bottomed pot or deep fryer to around 325-340°F (160-170°C). Fry chicken pieces in batches for about 3-4 minutes until lightly golden brown and cooked through. Remove with a spider or slotted spoon and place on a wire rack to drain.
- Second Fry (Achieving Ultimate Crispiness): Increase oil temperature to about 350-375°F (175-190°C). Return chicken to the hot oil for a second fry in batches for 1-2 minutes until deep golden brown and crispy.
- Drain and Serve: Remove chicken from oil and place back on the wire rack to drain excess oil. Serve immediately with a squeeze of fresh lemon, Japanese mayonnaise, or shichimi togarashi.
- Prep Time: 15 mins
- Cook Time: 30 mins
- Category: Dinner
- Method: Frying
- Cuisine: Japanese
Nutrition
- Serving Size: 1 piece
- Calories: 300
- Sugar: 1 g
- Sodium: 600 mg
- Fat: 20 g
- Saturated Fat: 5 g
- Unsaturated Fat: 15 g
- Trans Fat: 0 g
- Carbohydrates: 10 g
- Fiber: 1 g
- Protein: 25 g
- Cholesterol: 80 mg
Keywords: Double frying is key for achieving the signature crispiness. Don't overcrowd the pot during frying, and ensure the chicken is dry before marinating and coating.
Leave a Comment