
Homemade Vegan Fruit Snacks: Prepare to revolutionize your snacking game! Forget those store-bought, overly processed gummies. We’re diving headfirst into a world of vibrant flavors and wholesome goodness with these delightful, easy-to-make treats. Imagine sinking your teeth into a chewy, fruity burst of sunshine, knowing exactly what ingredients went into each bite.
Fruit snacks have been a beloved treat for generations, offering a convenient and portable way to enjoy the taste of fruit. But often, commercially produced versions are loaded with artificial colors, flavors, and excessive sugar. That’s where our homemade vegan fruit snacks come in! We’re taking back control of our snacks and creating a healthier, more delicious alternative.
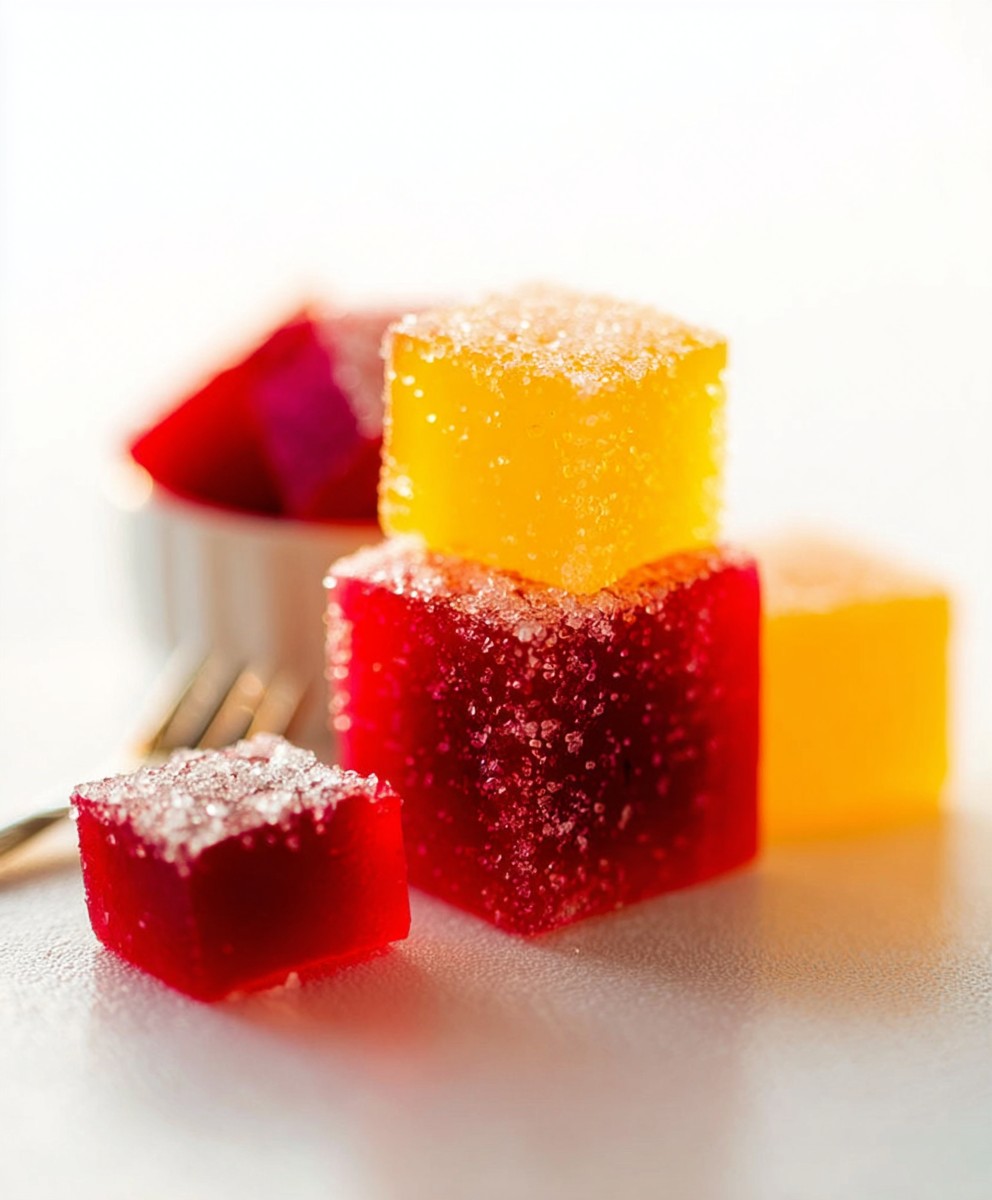
What makes these fruit snacks so irresistible? It’s the perfect combination of a satisfyingly chewy texture and the concentrated sweetness of real fruit. Plus, the vibrant colors are naturally derived, making them a feast for the eyes as well as the taste buds. Whether you’re packing lunchboxes, fueling up for a hike, or simply craving a guilt-free treat, these homemade wonders are sure to become a new family favorite. Get ready to unleash your inner chef and create a batch of these delightful snacks – you won’t regret it!

Ingredients:
- 1 cup fresh fruit puree (e.g., strawberries, raspberries, mango, blueberries – use one or a combination)
- 2 tablespoons maple syrup (or agave nectar, or honey if not vegan)
- 2 tablespoons lemon juice (freshly squeezed is best!)
- 4 tablespoons agar-agar powder
- 1/2 cup water
- Optional: 1/4 teaspoon natural food coloring (for a more vibrant color)
- Optional: 1 teaspoon vanilla extract (for added flavor)
- Optional: Sugar or shredded coconut for coating
Preparing the Fruit Puree
Okay, let’s start by getting our fruit puree ready. This is the foundation of our delicious fruit snacks, so we want to make sure it’s nice and smooth. I usually use a blender or food processor for this, but you can also mash the fruit really well with a fork if you’re feeling old-school!
- Wash and prepare your fruit: Thoroughly wash your chosen fruit. If you’re using strawberries, remove the stems. For mango, peel and chop it into chunks. Blueberries and raspberries are pretty much good to go after a wash!
- Blend or process the fruit: Place the prepared fruit into a blender or food processor. Blend until completely smooth. You want a consistent puree with no chunks. If you’re using a fork, mash the fruit until you achieve a similar consistency. This might take a little elbow grease!
- Strain the puree (optional): For an extra smooth texture, you can strain the puree through a fine-mesh sieve. This will remove any seeds or remaining bits of pulp. I usually skip this step, but it’s a good option if you’re aiming for a super refined texture.
- Measure out 1 cup of puree: Once you have your smooth puree, measure out exactly 1 cup. This is important for getting the right consistency in the final fruit snacks. If you have a little more or less, it’s not the end of the world, but try to be as accurate as possible.
Cooking the Fruit Snack Mixture
Now comes the fun part – cooking the mixture! This is where the magic happens and the agar-agar powder works its gelling magic. Don’t be intimidated; it’s a pretty straightforward process. Just make sure to keep a close eye on the mixture and stir frequently to prevent burning.
- Combine ingredients in a saucepan: In a medium-sized saucepan, combine the fruit puree, maple syrup (or your chosen sweetener), lemon juice, agar-agar powder, and water. Whisk everything together really well to ensure the agar-agar powder is fully dissolved. This is crucial to avoid clumps in your final product.
- Bring to a boil: Place the saucepan over medium heat and bring the mixture to a gentle boil, stirring constantly. It’s important to stir continuously to prevent the agar-agar from sticking to the bottom of the pan and burning.
- Simmer for 5-7 minutes: Once the mixture is boiling, reduce the heat to low and let it simmer for 5-7 minutes, continuing to stir constantly. This simmering time is essential for the agar-agar to fully activate and create a strong gel. You’ll notice the mixture thickening slightly as it simmers.
- Add optional ingredients: If you’re using any optional ingredients like natural food coloring or vanilla extract, now is the time to add them. Stir them in thoroughly until they are evenly distributed throughout the mixture.
- Check for proper gelling: To test if the mixture is ready, you can perform a simple test. Place a small spoonful of the mixture onto a cold plate and let it sit for a minute or two. If it sets into a firm gel, then it’s ready. If it’s still runny, continue simmering for another minute or two and test again.
Setting the Fruit Snacks
Alright, the mixture is cooked, and now we need to set it! This part is pretty easy. You just need a suitable container and a little patience while the fruit snacks firm up in the refrigerator.
- Prepare your container: Line a baking dish or container with parchment paper or a silicone mat. This will prevent the fruit snacks from sticking and make them easier to remove later. I usually use an 8×8 inch baking dish, but you can use any size you like, depending on how thick you want your fruit snacks to be.
- Pour the mixture into the container: Carefully pour the hot fruit snack mixture into the prepared container, spreading it evenly. Use a spatula to smooth out the surface.
- Refrigerate for at least 2 hours: Place the container in the refrigerator and let it chill for at least 2 hours, or preferably overnight. This will allow the agar-agar to fully set and create firm, chewy fruit snacks.
Cutting and Coating (Optional)
The fruit snacks are set! Now it’s time to cut them into fun shapes and, if you like, add a little extra sweetness with a coating of sugar or shredded coconut.
- Remove from the container: Once the fruit snacks are firm, carefully lift them out of the container using the parchment paper or silicone mat.
- Cut into desired shapes: Place the fruit snack slab onto a cutting board and use a sharp knife, cookie cutters, or even pizza cutter to cut them into your desired shapes. Get creative! You can make squares, rectangles, stars, hearts, or any other shape you can imagine.
- Optional: Coat the fruit snacks: If you want to add a little extra sweetness or texture, you can coat the fruit snacks in sugar or shredded coconut. Place the sugar or coconut in a shallow dish and gently roll each fruit snack in it until it’s evenly coated.
- Store properly: Store the finished fruit snacks in an airtight container in the refrigerator. They will keep for up to a week.
Tips and Tricks for Perfect Fruit Snacks
Here are a few extra tips and tricks to help you make the best homemade vegan fruit snacks ever!
- Adjust sweetness to your liking: The amount of maple syrup (or other sweetener) can be adjusted to your preference. If you prefer a sweeter fruit snack, add a little more. If you prefer a less sweet snack, reduce the amount.
- Experiment with different fruits: Don’t be afraid to experiment with different fruits and fruit combinations! Mango and pineapple, strawberry and banana, or blueberry and raspberry are all delicious options.
- Use high-quality agar-agar powder: The quality of the agar-agar powder can affect the texture of the fruit snacks. I recommend using a high-quality brand for the best results.
- Don’t overcook the mixture: Overcooking the mixture can result in tough or rubbery fruit snacks. Be sure to simmer it for only the recommended time.
- Store in the refrigerator: These fruit snacks need to be stored in the refrigerator to maintain their firmness.
- For a clearer fruit snack: Use clear fruit juices like apple or white grape juice as part of your puree. This will result in a more translucent final product.
- Add a touch of spice: A pinch of cinnamon or nutmeg can add a warm and comforting flavor to your fruit snacks.
- Make layered fruit snacks: Create different colored layers by preparing separate fruit purees and pouring them into the container one at a time, allowing each layer to set slightly before adding the next.
- Use silicone molds: For perfectly shaped fruit snacks, use silicone molds in various shapes and sizes. This eliminates the need for cutting.
Troubleshooting
Sometimes things don’t go exactly as planned. Here are some common issues and how to fix them:
- Fruit snacks are too soft: This could be due to not using enough agar-agar powder or not simmering the mixture long enough. Try adding more agar-agar powder next time or simmering for a longer period.
- Fruit snacks are too tough: This could be due to overcooking the mixture. Be sure to simmer it for only the recommended time.
- Fruit snacks are clumpy: This could be due to not dissolving the agar-agar powder properly. Make sure to whisk it thoroughly into the mixture before heating.
- Fruit snacks are sticking to the container: Make sure to line the container with parchment paper or a silicone mat.
Enjoy!
I hope you enjoy making and eating these homemade vegan fruit snacks! They’re a healthy and delicious treat that’s perfect for kids and adults alike. Have fun experimenting with different flavors and shapes, and let me know what you create!
Conclusion:
And there you have it! These Homemade Vegan Fruit Snacks are so much more than just a sweet treat; they’re a guilt-free indulgence, a fun project, and a delicious way to sneak extra fruit into your day. I truly believe this recipe is a must-try for anyone looking for a healthier alternative to store-bought gummies, especially if you have little ones (or are just a kid at heart!). The vibrant colors and naturally sweet flavors are incredibly appealing, and the satisfaction of knowing exactly what’s going into your snacks is priceless.
But why is this recipe a must-try? Beyond the health benefits and the fun factor, it’s the sheer versatility that makes these fruit snacks a winner. You’re not limited to just one flavor or shape! Experiment with different fruits like mango, pineapple, or even berries for a burst of tropical sunshine. Add a touch of spice like ginger or cinnamon for a warming twist. And don’t be afraid to get creative with your molds – think dinosaurs, stars, or even personalized initials. The possibilities are endless!
Speaking of variations, let me share a few of my favorite serving suggestions. For a refreshing summer treat, try freezing the fruit snacks for a few hours. They become delightfully chewy and icy, perfect for cooling down on a hot day. You can also pack them in lunchboxes as a healthy and convenient snack for school or work. Or, for a more sophisticated presentation, arrange them on a platter with fresh fruit and yogurt for a light and elegant dessert.
Another fun variation is to add a boost of nutrients by incorporating ingredients like chia seeds or flaxseed meal into the mixture. These tiny powerhouses are packed with fiber and omega-3 fatty acids, making your fruit snacks even healthier. You can also experiment with different sweeteners, such as maple syrup or agave nectar, to find your perfect level of sweetness.
Homemade Vegan Fruit Snacks are also a fantastic option for those with dietary restrictions. They’re naturally gluten-free, dairy-free, and vegan, making them suitable for a wide range of people. Plus, you can easily adjust the recipe to accommodate other allergies or sensitivities. For example, if you’re allergic to citrus fruits, simply substitute them with other fruits that you can tolerate.
I’m so excited for you to try this recipe and discover the joy of making your own healthy and delicious fruit snacks. It’s a simple and rewarding process that will leave you feeling good about what you’re eating and sharing with your loved ones.
So, what are you waiting for? Gather your ingredients, dust off your molds, and get ready to create some magic in the kitchen! I’m confident that you’ll love these Homemade Vegan Fruit Snacks as much as I do.
And finally, I’d absolutely love to hear about your experience! Once you’ve tried the recipe, please come back and share your thoughts in the comments below. Did you make any variations? What fruits did you use? What shapes did you create? I’m eager to see your creations and learn from your experiences. Don’t forget to tag me in your photos on social media – I can’t wait to see your delicious and healthy fruit snacks! Happy snacking!
Homemade Vegan Fruit Snacks: Easy & Healthy Recipe
Homemade vegan fruit snacks made with fresh fruit puree, agar-agar, and a touch of sweetness. A healthy and delicious treat for kids and adults!
Ingredients
Instructions
Recipe Notes
- Adjust sweetness to your liking.
- Experiment with different fruits and fruit combinations.
- Use high-quality agar-agar powder.
- Don’t overcook the mixture.
- Store in the refrigerator.
- For a clearer fruit snack, use clear fruit juices.
- Add a touch of spice (cinnamon, nutmeg).
- Make layered fruit snacks with different colored purees.
- Use silicone molds for perfectly shaped fruit snacks.
Leave a Comment