
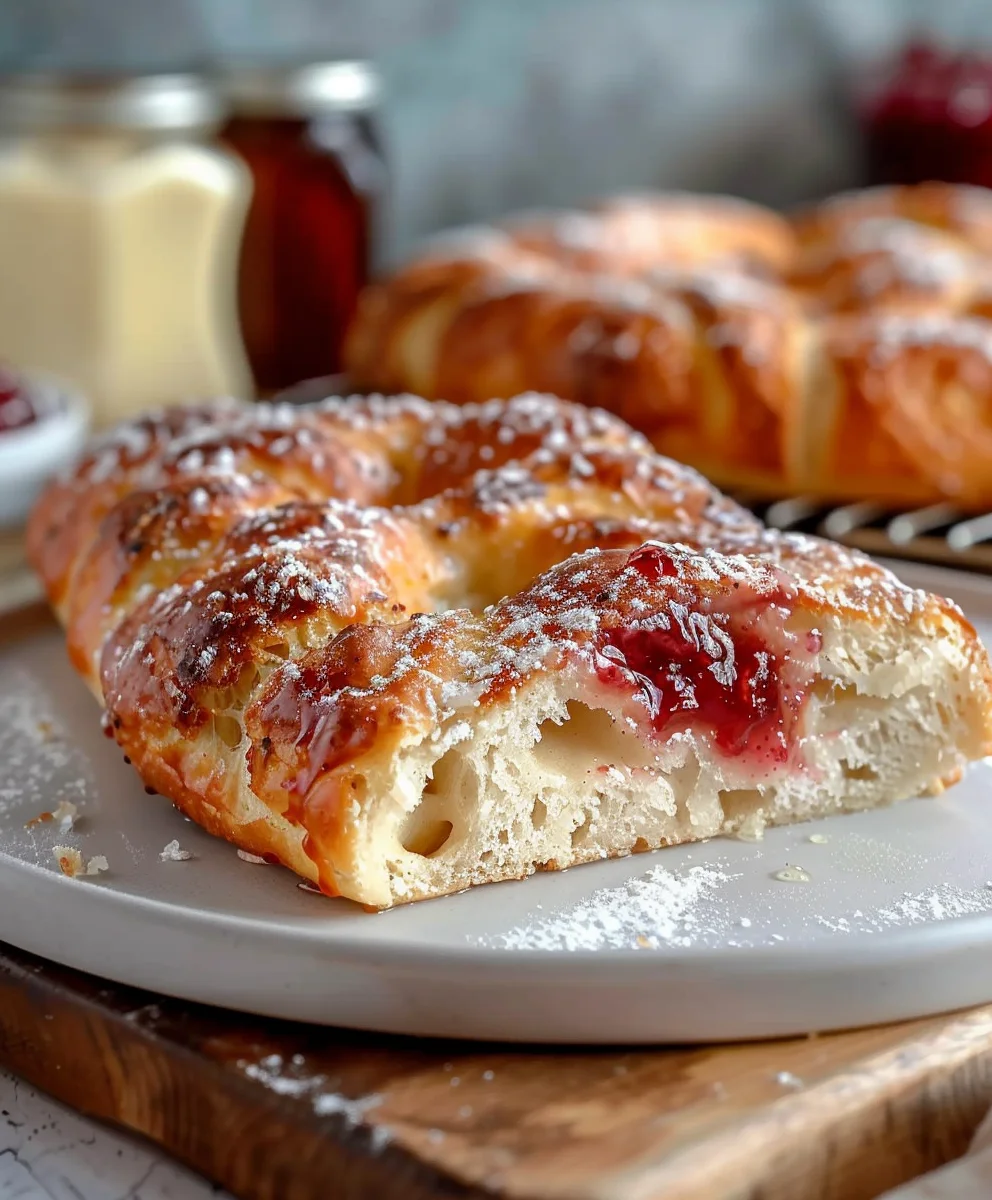
Homemade Jam Donut Focaccia – does that phrase alone pique your curiosity and tantalize your taste buds? It certainly should! Imagine the rustic charm and airy texture of a traditional Italian focaccia, lovingly infused with olive oil and a hint of salt, then taken to an entirely new dimension with pockets of sweet, fruity jam, reminiscent of your favorite filled donut. This isn’t just a recipe; it’s an innovation, a delightful bridge between two beloved culinary worlds that promises an unforgettable experience.
A Fusion of Flavors and Traditions
For centuries, focaccia has graced Italian tables, celebrated for its dimpled surface and incredible versatility – often enjoyed with savory toppings. Donuts, on the other hand, have captivated sweet tooths worldwide with their irresistible fillings and soft dough. This unique creation takes the best of both, offering a playful yet sophisticated treat. People adore this dish because it delivers an unexpected harmony of flavors: the subtle savory notes of the focaccia perfectly complement the sweet, gooey burst of jam, while its light, chewy texture provides a comforting contrast to the vibrant filling. It’s a comforting, surprising, and utterly delicious way to elevate your baking, proving that some of the best culinary adventures happen when you dare to combine the familiar in extraordinary ways. Get ready to fall in love with this incredible Homemade Jam Donut Focaccia!

Ingredients:
-
For the Enriched Focaccia Dough:
- All-Purpose Flour: 4 cups (about 500 grams). I always recommend using a good quality unbleached all-purpose flour for this recipe. It has the right protein content to develop a lovely, soft crumb, which is absolutely essential for our “Homemade Jam Donut Focaccia.”
- Granulated Sugar: 1/2 cup (about 100 grams), plus 1 teaspoon for the yeast. This provides sweetness to the dough, reminiscent of a classic donut, and also feeds our hardworking yeast.
- Instant Dry Yeast: 2 1/4 teaspoons or 1 standard packet (about 7 grams). Instant yeast is my go-to for its convenience; you don’t need to proof it separately, but I always like to give it a little nudge with warm milk and sugar just to be sure it’s active and thriving.
- Warm Milk: 1 cup (240ml). The ideal temperature is between 105°F and 115°F (40°C-46°C). Too hot and you’ll kill the yeast, too cold and it won’t activate properly. I usually warm it slightly in the microwave until it’s comfortably warm to the touch, like a baby’s bath.
- Large Eggs: 2, at room temperature. Eggs add richness, color, and structure to our dough, making it more brioche-like and tender, which is perfect for a sweet focaccia masquerading as a donut.
- Unsalted Butter: 1/2 cup (113 grams or 1 stick), melted and slightly cooled. Butter is key to an enriched dough, contributing incredible flavor, softness, and that luxurious texture we’re aiming for. Make sure it’s not hot when you add it, or it might cook the eggs or inhibit the yeast.
- Fine Sea Salt: 1 teaspoon. Salt is a flavor enhancer and also helps control yeast activity and strengthens the gluten network, giving our focaccia a better rise and texture. Don’t skip it!
- Vanilla Extract: 1 teaspoon. Just a touch of vanilla elevates the sweetness and complements the jam beautifully. It’s a little secret for that extra donut vibe.
-
For the Jam Filling:
- Your Favorite Fruit Jam or Preserve: 1 to 1 1/2 cups. I love raspberry or strawberry jam for this, but apricot, blueberry, or even a mixed berry preserve would be absolutely delightful. Choose one that isn’t too runny, so it stays nicely in its pockets during baking. If yours is very thick, you might want to warm it gently to make it easier to spoon.
-
For the Donut-Style Topping:
- Unsalted Butter: 1/4 cup (57 grams or 1/2 stick), melted. This will be brushed generously over our warm focaccia to help the sugar stick.
- Granulated Sugar: 1/2 cup. For coating the baked focaccia, giving it that unmistakable donut finish.
Preparing the Enriched Focaccia Dough
- Activate the Yeast: In a large mixing bowl (or the bowl of your stand mixer), combine the warm milk, 1 teaspoon of granulated sugar, and the instant dry yeast. Give it a gentle stir and let it sit for about 5-10 minutes. You should see a foamy layer developing on the surface, which tells you your yeast is alive and ready to work its magic. This step is crucial for ensuring a light and airy Homemade Jam Donut Focaccia. If it doesn’t foam, your milk might have been too hot or too cold, or your yeast might be expired; in that case, it’s best to start over.
- Combine Wet Ingredients: To the activated yeast mixture, add the remaining granulated sugar (the 1/2 cup), the two room-temperature eggs, the cooled melted butter, and the vanilla extract. Whisk everything together until it’s well combined and smooth. The mixture should smell subtly sweet and rich even at this stage.
- Mix in Dry Ingredients: Gradually add the all-purpose flour and the fine sea salt to the wet mixture. If you’re using a stand mixer, attach the dough hook. Start mixing on low speed until the flour is mostly incorporated and a shaggy dough forms. If mixing by hand, use a sturdy wooden spoon or your hands to bring the dough together.
- Knead the Dough: Increase the stand mixer speed to medium-low and knead for 8-10 minutes. If kneading by hand, turn the dough out onto a lightly floured surface and knead vigorously for 12-15 minutes. You are looking for a dough that is smooth, elastic, and slightly tacky but no longer sticky. It should pass the “windowpane test” – where you can gently stretch a small piece of dough thin enough to see light through it without tearing. This gluten development is what gives our “Homemade Jam Donut Focaccia” its characteristic chew and structure, preventing it from being dense. Don’t be afraid to knead for the full duration; this dough needs it to become truly delightful.
- First Rise (Bulk Fermentation): Lightly grease a clean large bowl with a neutral oil (like vegetable or canola). Transfer the kneaded dough to the bowl, turning it once to coat the entire surface with oil. Cover the bowl tightly with plastic wrap or a clean damp kitchen towel. Place it in a warm, draft-free spot in your kitchen. I often use my oven with just the light on, which provides a gentle warmth. Allow the dough to rise until it has visibly doubled in size, which typically takes about 1 to 1 1/2 hours, depending on the warmth of your kitchen. Patience is a virtue here; a good first rise is foundational for a light and airy final product.
Shaping and Filling Our Sweet Focaccia
- Prepare the Baking Pan: While the dough is on its first rise, prepare your baking pan. Lightly grease a 9×13-inch baking pan or a large rimmed baking sheet with butter or a non-stick cooking spray. You can also line it with parchment paper for easier cleanup, leaving a slight overhang on the sides.
- Punch Down and Transfer: Once the dough has doubled, gently punch it down to release the air. This step helps redistribute the yeast and creates a finer crumb. Turn the dough out onto the prepared baking pan.
- Shape the Focaccia Base: Using your fingertips, gently press and spread the dough evenly across the bottom of the pan. The dough might resist a bit at first; if it does, let it rest for 5-10 minutes (covered with plastic wrap) to allow the gluten to relax, then continue pressing. You want to achieve an even thickness throughout the pan. Don’t worry about perfection; rustic charm is part of focaccia’s appeal!
- Create the Jam Pockets: Now for the fun part that makes this a “Homemade Jam Donut Focaccia”! Using your oiled fingertips (this prevents sticking), firmly press indentations all over the surface of the dough. Make them deep enough to hold a good dollop of jam, but not so deep that you go right through the dough. I usually aim for indentations about an inch apart. These little pockets will cradle our sweet jam, creating bursts of fruitiness in every bite.
- Fill with Jam: Spoon your chosen fruit jam generously into each indentation. Don’t be shy! A good amount of jam is what gives this focaccia its delightful “donut” character. If your jam is very thick, you might want to gently warm it slightly to make it easier to spoon.
- Second Rise (Proofing): Loosely cover the pan with plastic wrap or a clean kitchen towel. Place it back in that warm, draft-free spot for its second rise, or “proofing.” Let it rise for another 30-45 minutes, or until the dough looks visibly puffy and slightly expanded, and the indentations around the jam pockets look more pillowy. This final rise is crucial for the focaccia to achieve a light, airy texture similar to a freshly baked donut.
Baking the Homemade Jam Donut Focaccia
- Preheat the Oven: About 15-20 minutes before the end of the second rise, preheat your oven to 375°F (190°C). Make sure an oven rack is in the middle position.
- Bake the Focaccia: Carefully remove the plastic wrap from the pan and place the focaccia in the preheated oven. Bake for 25-30 minutes, or until the focaccia is beautifully golden brown on top, puffed up, and the jam is bubbling invitingly. The edges should also be golden. If you notice it browning too quickly, you can loosely tent it with aluminum foil during the last 10 minutes.
- Check for Doneness: To be absolutely sure, you can insert a thin skewer or toothpick into a part of the focaccia that isn’t covered in jam; it should come out clean. The internal temperature, if you have a thermometer, should read around 200-210°F (93-99°C).
- Cool Slightly: Once baked, remove the focaccia from the oven. Let it cool in the pan on a wire rack for about 5-10 minutes. This helps it firm up slightly before you handle it.
The Donut-Style Finishing Touch
- Prepare the Sugar Coating: While the focaccia is cooling slightly, melt the 1/4 cup of unsalted butter in a small bowl. Spread the 1/2 cup of granulated sugar evenly on a shallow plate or a piece of parchment paper.
- Brush with Butter: After its brief rest in the pan, carefully transfer the warm focaccia (using the parchment paper overhang if you used it, or a spatula if not) to the wire rack. While it’s still warm, generously brush the entire top surface of the focaccia, avoiding the jam pockets as much as possible, with the melted butter. This butter layer is essential; it adds a rich flavor and helps the sugar adhere perfectly, giving our “Homemade Jam Donut Focaccia” its irresistible donut finish.
- Coat with Sugar: Immediately after brushing with butter, gently press the buttered surface of the focaccia onto the granulated sugar spread on the plate. Alternatively, you can sprinkle the sugar generously over the top. Make sure to get good coverage, especially on the puffy, bread-like parts. You want every bite to have that classic sweet crunch.
- Final Cooling and Serving: Allow the “Homemade Jam Donut Focaccia” to cool completely on the wire rack. This allows the jam to set up properly and the sugar coating to fully adhere and dry slightly. Trying to slice it too early might result in a messy, sticky situation.
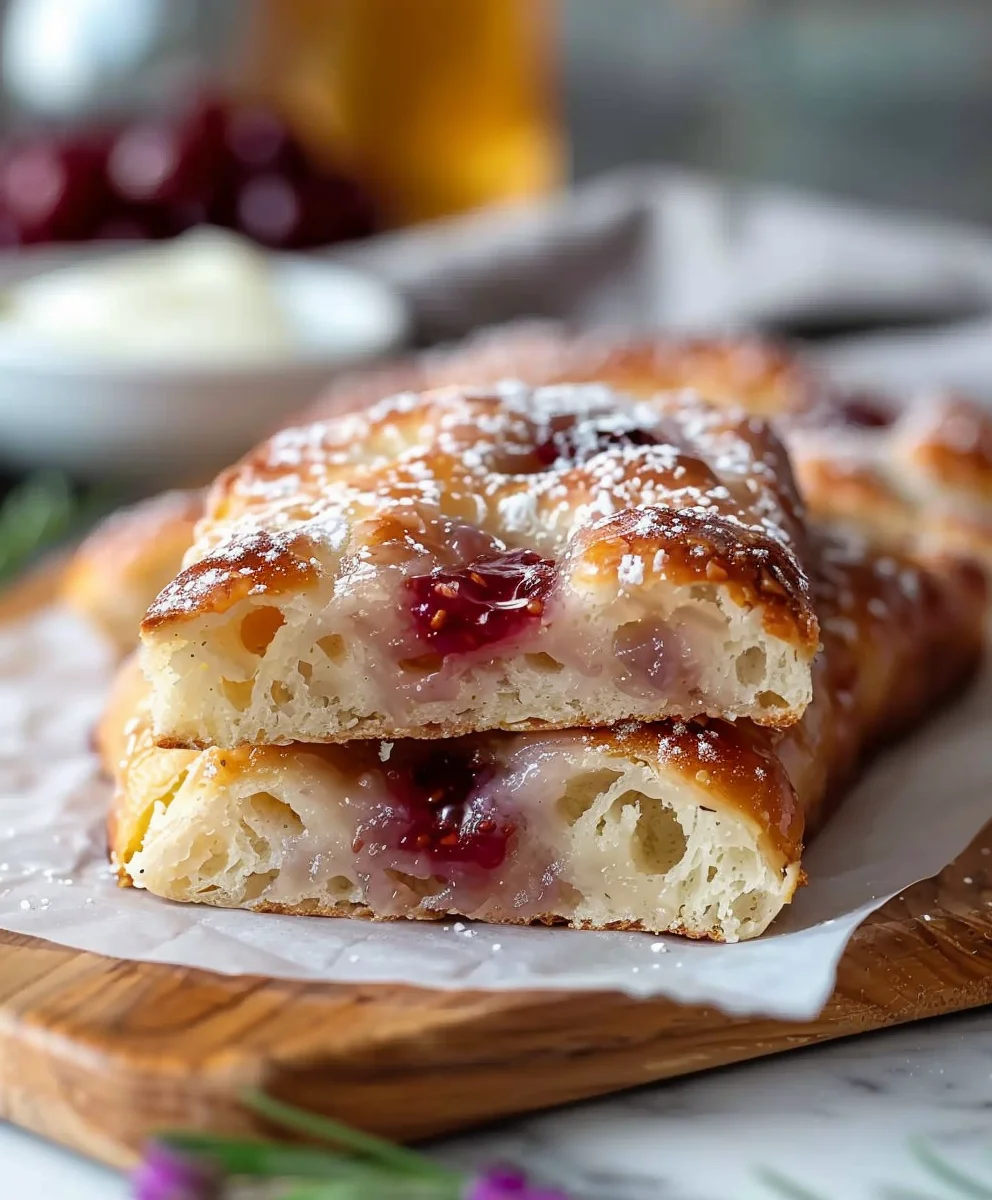
- Enjoy! Once cooled, slice the focaccia into squares or rectangles. Serve it warm or at room temperature. This is absolutely divine with a cup of coffee for breakfast, as a sweet afternoon treat, or even as a unique dessert. The combination of soft, rich bread, sweet fruit jam, and a sugary, buttery crust truly captures the essence of a donut in an exciting new form. I promise, you’ll be making this again and again!
Conclusion:
And so, we arrive at the sweet crescendo of our culinary journey. I genuinely hope you’re feeling as excited as I am about what we’ve just explored. This isn’t just another recipe; it’s an invitation to experience something truly extraordinary, a delightful dance between the comforting chew of a classic focaccia and the sugary, fruit-filled joy of your favorite donut. The transformation from simple ingredients into this spectacular treat is nothing short of magical, and I promise you, the aroma alone as it bakes will have your household captivated. It’s that perfect balance of rustic charm and playful indulgence that makes it an absolute showstopper, yet so wonderfully approachable to create in your own kitchen. I often find myself marveling at how such an innovative concept can deliver such profound comfort and joy with every single bite.
What truly sets this recipe apart, and why I consider it an absolute must-try, is its unique ability to surprise and delight. Imagine presenting a platter of this golden, dimpled bread, glistening with sugar and peeking with vibrant jam, to friends or family. Their initial intrigue will quickly turn to awe once they take that first taste – the light, airy texture of the focaccia giving way to a burst of sweet, tangy jam, all enveloped in a delicate sugary crust. It’s an experience that transcends a simple snack; it’s a memorable moment shared. I firmly believe that the best food tells a story, and this particular creation tells a tale of creativity, comfort, and pure, unadulterated pleasure. It’s an escape from the ordinary, a bold step into a world where two beloved baked goods merge to form something even greater than the sum of their parts. The satisfaction of pulling this beautiful bread from your oven, knowing you’ve crafted such an imaginative and delicious treat, is immense.
Serving Suggestions to Elevate Your Experience:
While this delightful creation is perfect straight from the oven, still warm and wonderfully soft, I have a few suggestions to enhance your enjoyment even further. Consider serving slices alongside a steaming mug of coffee or a delicate cup of tea for an unbeatable breakfast or an indulgent afternoon treat. For a more decadent dessert option, try pairing it with a scoop of creamy vanilla bean ice cream or a dollop of freshly whipped cream. The contrast of the warm, sweet bread with the cool, rich dairy is simply divine. Don’t be afraid to experiment with different jam fillings either! While strawberry or raspberry are classic choices, imagine the zing of a lemon curd, the subtle sweetness of apricot, or even a mixed berry medley. For an extra touch of elegance, a light dusting of powdered sugar over the top, perhaps mixed with a hint of cinnamon, adds both visual appeal and another layer of flavor. You could also drizzle a simple vanilla bean glaze over individual pieces for an even more pronounced “donut” effect. For brunches or gatherings, cutting the focaccia into smaller, bite-sized squares makes for excellent individual servings that are easy to pick up and enjoy. I sometimes like to add a tiny sprinkle of orange zest to the sugar topping for a bright, aromatic lift.
Your Culinary Adventure Awaits!
Now, it’s your turn! I truly cannot emphasize enough how rewarding it is to bring this recipe to life in your own kitchen. Don’t let any hesitation hold you back; the process is incredibly enjoyable, and the results are truly spectacular. This is your chance to impress yourself, your loved ones, and anyone lucky enough to share a bite. The pure delight of creating something so unique and delicious is a feeling I wish for everyone to experience. So, roll up your sleeves, gather your ingredients, and prepare to embark on a truly satisfying baking adventure. I am absolutely confident that you will fall head over heels for this incredible Homemade Jam Donut Focaccia. Once you’ve made it and savored every last crumb, please, please share your experience! I love hearing about your triumphs, your clever variations, and the joy these recipes bring into your homes. Snap a photo, tell me about your favorite jam filling, or simply share how much you loved it in the comments below. Happy baking, my friends!
Homemade Jam Donut Focaccia
A unique fusion of traditional Italian focaccia and a sweet, fruit-filled donut, offering an unforgettable sweet and fluffy treat with a rustic charm, finished with a sweet glaze.
Ingredients
-
1 3/4 cups warm water (105-115°F)
-
2 tsp sugar
-
1 packet active dry yeast
-
2 cups bread flour
-
2 cups all-purpose flour
-
2 tsp salt
-
6 tbsp olive oil, divided
-
1 jar raspberry preserves (Bonne Maman or similar)
-
2 cups confectioners’ sugar
-
2-4 tbsp whole milk (or as needed for consistency)
Instructions
-
Step 1
In a large mixing bowl, combine warm water, 2 tsp sugar, and instant dry yeast. Stir gently and let sit for 5-10 minutes until foamy. -
Step 2
In a separate large bowl, combine bread flour, all-purpose flour, and 2 tsp salt. Add the activated yeast mixture and 2 tbsp of the olive oil. Mix until a shaggy dough forms. -
Step 3
Knead the dough for 8-10 minutes using a stand mixer with a dough hook, or 12-15 minutes by hand on a lightly floured surface, until the dough is smooth, elastic, and slightly tacky. -
Step 4
Lightly oil a clean large bowl with some olive oil. Transfer the kneaded dough to the bowl, turning once to coat. Cover tightly with plastic wrap and let rise in a warm, draft-free spot for 1 to 1 1/2 hours, or until doubled in size. -
Step 5
Grease a 9×13-inch baking pan with olive oil or line with parchment paper. Gently punch down the risen dough and transfer it to the prepared pan. Using oiled fingertips, gently press and spread the dough evenly across the bottom of the pan. -
Step 6
Using oiled fingertips, firmly press deep indentations (about 1 inch apart) all over the surface of the dough. Ensure they are deep enough to hold jam without going through the dough. -
Step 7
Spoon raspberry preserves generously into each indentation. If jam is very thick, warm it slightly for easier spooning. -
Step 8
Loosely cover the pan with plastic wrap or a clean kitchen towel. Place it back in a warm spot and let rise for another 30-45 minutes, or until the dough looks visibly puffy and slightly expanded. -
Step 9
Preheat your oven to 375°F (190°C) about 15-20 minutes before the end of the second rise. Remove the cover from the focaccia and bake for 25-30 minutes, or until golden brown on top and the jam is bubbling. -
Step 10
While the focaccia cools slightly (about 5-10 minutes) in the pan, whisk together the confectioners’ sugar and 2-4 tbsp whole milk in a small bowl until a smooth, pourable glaze forms. Adjust milk for desired consistency. -
Step 11
Carefully transfer the warm focaccia to a wire rack. Drizzle the sweet glaze generously over the entire top surface. Allow the focaccia to cool completely on the wire rack before slicing into squares or rectangles and serving.
Important Information
Nutrition Facts (Per Serving)
It is important to consider this information as approximate and not to use it as definitive health advice.
Allergy Information
Please check ingredients for potential allergens and consult a health professional if in doubt.
Leave a Comment