
French Bread Recipe With A Crispy, Crackly Crust
Are you ready to bring the authentic taste and aroma of a Parisian boulangerie right into your own kitchen? I certainly hope so, because today, we’re diving into the wonderful world of French Bread Recipe With A Crispy, Crackly Crust. This isn’t just any bread recipe; it’s the recipe that will transform your baking game and make you feel like a true artisan.
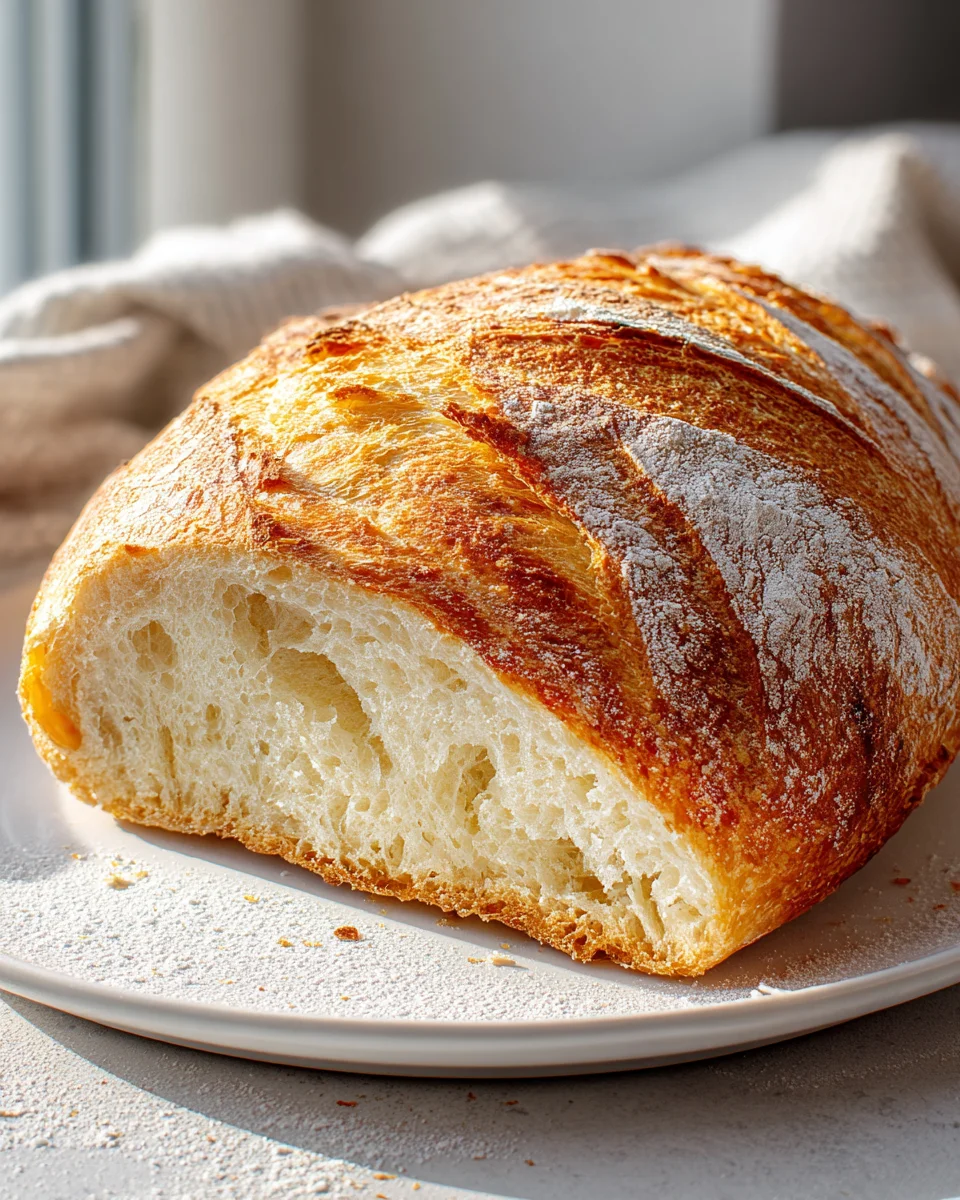
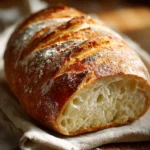
What makes this French Bread Recipe With A Crispy, Crackly Crust so incredibly special? Well, it’s all in the name! We’re talking about that glorious, shatteringly crisp crust that crackles beautifully when you press it, giving way to an interior that’s impossibly soft, airy, and full of those beautiful irregular holes that bread dreams are made of. You know the kind – the one that fills your home with an intoxicating aroma as it bakes, making everyone gather around the oven in anticipation. Trust me, the aroma alone is worth the effort!
I promise you, dear baker, you’ll absolutely adore this recipe. There’s an unparalleled satisfaction in pulling a golden-brown loaf from your oven, knowing you created such a masterpiece with your own hands. Forget store-bought; once you’ve tasted the fresh, warm perfection of this homemade French bread, there’s no going back. It’s perfect for dipping into olive oil, accompanying a hearty stew, or simply tearing into it warm with a pat of butter.
At its heart, classic French bread is deceptively simple: just a few basic ingredients like flour, water, yeast, and salt. But the magic happens in the technique – the careful kneading, the patient proofing, and the crucial steam during baking that helps develop that signature crackly exterior. This recipe guides you through each step, making what might seem intimidating incredibly achievable. Get ready to impress yourself and everyone lucky enough to share a slice!

Ingredient Notes
Creating that quintessential French bread with an irresistible crispy, crackly crust starts with understanding a few key ingredients. While the list might seem simple, their quality and proper handling make all the difference.
- Flour: For an authentic French loaf, I highly recommend using bread flour. It has a higher protein content (typically 12-14%) compared to all-purpose flour, which means it develops stronger gluten. This gluten network is crucial for trapping the gases produced by the yeast, resulting in a beautiful open crumb structure and, importantly, providing the backbone for that crispy exterior. While all-purpose flour can work in a pinch, your crust might be slightly less robust, and the crumb a bit denser. If using all-purpose, aim for an unbleached variety.
- Water: This might be the most underestimated ingredient! The temperature of your water is critical for activating the yeast – aim for lukewarm, around 95-105°F (35-40°C). Beyond activation, water is key to hydration. French bread often has a relatively high hydration level, which contributes to its airy crumb and a more dramatic crust development during baking. I always use filtered water if my tap water has a strong chlorine taste.
- Yeast: You’ll typically use either active dry yeast or instant yeast. I personally prefer instant yeast because it can be mixed directly with the dry ingredients and doesn’t require proofing in water beforehand, saving a step. If you’re using active dry yeast, remember to “proof” it first by dissolving it in a small portion of your lukewarm water with a pinch of sugar for about 5-10 minutes, until it becomes foamy. This confirms your yeast is alive and active!
- Salt: Essential for flavor, salt also plays a vital role in controlling yeast activity and strengthening the gluten structure. I use fine sea salt or kosher salt. Avoid iodized table salt, which can impart an off-flavor and often contains anti-caking agents. Be precise with your measurement; too little salt makes bland bread, too much can inhibit yeast activity.
- Optional – Malt Powder: For an even more authentic color and a slightly deeper flavor in your crust, you can add a tiny amount of diastatic malt powder (not to be confused with non-diastatic malt or malted milk powder). It helps enzymes break down starches into sugars, aiding browning and crust development. A little goes a long way, usually 1/2 to 1 teaspoon per loaf.
No substitutions are typically needed for French bread regarding beef or non-alcohol alternatives, as these ingredients aren’t usually found in this classic recipe.
Step-by-Step Instructions
Achieving that glorious crispy, crackly crust is all about technique, especially around steam and oven conditions. Here’s how I do it:
- Combine Dry Ingredients: In a large mixing bowl, whisk together your flour, salt, and instant yeast (if using active dry, proof it first as described in ingredient notes). If you’re adding malt powder, mix it in here too.
- Add Water & Mix: Gradually add the lukewarm water to your dry ingredients, mixing with a wooden spoon or a stand mixer with a dough hook on low speed until a shaggy, cohesive dough forms. Make sure there are no dry spots.
- Knead the Dough: Turn the dough out onto a lightly floured surface. Knead by hand for about 10-15 minutes, or with a stand mixer for 8-10 minutes, until the dough is smooth, elastic, and passes the windowpane test (you can stretch a small piece thin enough to see light through it without tearing). This develops the strong gluten network crucial for French bread.
- First Rise (Bulk Fermentation): Lightly oil a clean bowl. Place the dough in the bowl, turning once to coat. Cover tightly with plastic wrap or a damp kitchen towel. Let it rise in a warm, draft-free place for 1.5 to 2 hours, or until doubled in size. During this rise, I like to perform one or two “stretch and folds” every 30-45 minutes. This strengthens the dough and distributes the yeast, contributing to a better crumb and crust.
- Divide and Preshape: Gently deflate the dough and turn it out onto a lightly floured surface. Divide the dough into 2 or 3 equal pieces, depending on how many baguettes or bâtards you want. Gently preshape each piece into a loose rectangle or oval, then cover with a damp cloth and let rest for 15-20 minutes. This allows the gluten to relax, making final shaping easier.
- Final Shaping: This step is crucial for good oven spring and a beautiful loaf. Take one preshaped piece. Flatten it gently into a rectangle. Fold the top third down to the center, pressing firmly to seal. Fold the bottom third up to the center, pressing firmly to seal. Then, fold the entire dough in half lengthwise and seal the seam tightly with the heel of your hand. Roll the loaf back and forth gently to create tension on the surface and taper the ends slightly. Repeat for remaining pieces.
- Second Rise (Proofing): Transfer the shaped loaves to a heavily floured couche (linen canvas) or a baking sheet lined with a floured kitchen towel, creating pleats between each loaf to support their shape. Cover loosely with plastic wrap or another damp towel. Let them proof for 45-60 minutes, or until they look noticeably puffy but spring back slowly when gently poked. Be careful not to overproof, as this can lead to a less robust crust.
- Preheat Oven & Prepare for Steam: About 30-40 minutes before baking, preheat your oven to a blazing 450-475°F (230-245°C) with a baking stone or steel inside. This direct heat is vital for crispness. Also, place a cast iron pan or an oven-safe broiler pan on the bottom rack of your oven. This will be for generating steam.
- Score & Bake: Carefully transfer your proofed loaves to the preheated baking stone/steel. Immediately score the tops of each loaf with a sharp lame or razor blade. Make 3-5 quick, confident, overlapping diagonal slashes.
- Generate Steam: Pour about 1/2 to 1 cup of boiling water into the hot pan on the bottom rack of your oven (be extremely careful of the steam!). Quickly close the oven door to trap the steam. Bake for 20-25 minutes, or until deep golden brown and the crust is wonderfully crispy and crackly. The steam in the initial phase of baking helps the crust stay pliable, allowing the loaf to expand fully, and gelatinizes the starches on the surface, which then dry out to form that signature crackly crust.
- Cool: Transfer the baked loaves to a wire rack to cool completely before slicing. This is crucial for the internal crumb structure to set and for the crust to maintain its crispness.
Tips & Suggestions
- Mastering the Steam: I cannot overstate how important steam is for that crispy, crackly crust. Beyond pouring boiling water into a hot pan, you can also place a few ice cubes in the hot pan. Another method I’ve used is to quickly spray the oven walls with a water bottle a few times during the first 5-10 minutes of baking. Just be quick and careful not to spray the light or elements.
- Don’t Skip the Baking Stone/Steel: A preheated baking stone or steel provides intense, even heat from below, which is vital for achieving a great oven spring and a deeply browned, crispy bottom crust. Without it, your loaves might be pale on the bottom and lack overall crispness.
- Flour Your Couche Liberally: When proofing, don’t be shy with the flour on your couche or towel. This prevents the dough from sticking, which can be disastrous when transferring to the oven. Rice flour is excellent for dusting as it doesn’t absorb into the dough as readily.
- Sharp Scoring is Key: A sharp lame or razor blade is non-negotiable for clean, effective scoring. Make your slashes quickly and confidently at about a 30-45 degree angle. Good scoring allows the bread to expand predictably and creates beautiful “ears” on the crust.
- Listen to Your Bread: A perfectly baked French loaf will sound hollow when you tap its bottom. Trust your ears as much as your eyes!
- Cool Completely: It’s tempting to tear into a warm loaf, but for the best crust and crumb texture, resist! Cooling on a wire rack allows residual steam to escape, preventing a gummy interior and ensuring the crust stays crisp.
- Serving Suggestions: French bread is wonderful simply with good quality butter. It also makes an incredible vehicle for bruschetta, garlic bread, or served alongside hearty soups, stews, or a cheese board. For an elegant touch, a drizzle of high-quality olive oil and a sprinkle of flaky sea salt is divine.
Storage
French bread is truly at its best consumed on the day it’s baked, especially if you cherish that crispy, crackly crust. However, if you have leftovers, here’s how I store them:
- Room Temperature (Short-Term): To maintain some of that crust, I recommend storing French bread unwrapped or loosely wrapped in a paper bag at room temperature for up to 12-24 hours. Avoid airtight plastic bags or containers, as these will trap moisture and quickly turn your beautiful crispy crust soft and chewy.
- Freezing (Long-Term): French bread freezes beautifully!
- Whole Loaf: Once completely cooled, wrap the entire loaf tightly in plastic wrap, then an additional layer of aluminum foil. It can be frozen for up to 2-3 months.
- Sliced Loaf: If you prefer, slice the cooled bread before freezing. This allows you to thaw only what you need. Stack the slices with parchment paper in between, then wrap tightly in plastic wrap and foil.
To reheat from frozen, remove the wrapping and place the frozen loaf directly into a preheated 350°F (175°C) oven for 15-20 minutes, or until warmed through and the crust has re-crisped. For slices, a toaster or toaster oven works perfectly.
- Re-crisping Stale Bread: If your bread has lost its crispness after a day or two, you can revive it! Lightly spritz the loaf with water (just a light mist, don’t soak it) and place it in a 350°F (175°C) oven for 5-10 minutes. This will bring back some of that wonderful crackle.
Final Thoughts
There’s truly nothing quite like the smell and taste of freshly baked bread straight from your own kitchen, and I can confidently say that this French Bread Recipe With A Crispy, Crackly Crust delivers an unparalleled experience. From the satisfying, audible crunch of that perfect, crackly crust to the airy, soft interior, every single bite is a testament to the simple magic of home baking. I really encourage you to set aside some time, gather your ingredients, and immerse yourself in the delightful process. You’ll be so incredibly proud of the beautiful, professional-looking loaves you pull from your oven. Trust me, once you try this French Bread Recipe With A Crispy, Crackly Crust, you’ll understand why it’s an absolute must-try and a true game-changer for homemade bread!
Homemade French Bread Recipe – Crispy, Crackly Perfection!
- Total Time: 45 minutes
- Yield: 2-3 loaves
Description
Experience the authentic taste of Parisian bread with this homemade French bread recipe. Enjoy a crispy, crackly crust and a soft, airy interior that will elevate your baking skills.
Ingredients
- Bread flour
- Water (lukewarm, around 95-105°F)
- Instant yeast (or active dry yeast)
- Fine sea salt or kosher salt
- Optional – Diastatic malt powder
Instructions
- In a large mixing bowl, whisk together your flour, salt, and instant yeast (if using active dry, proof it first as described in ingredient notes). If you’re adding malt powder, mix it in here too.
- Gradually add the lukewarm water to your dry ingredients, mixing with a wooden spoon or a stand mixer with a dough hook on low speed until a shaggy, cohesive dough forms. Make sure there are no dry spots.
- Turn the dough out onto a lightly floured surface. Knead by hand for about 10-15 minutes, or with a stand mixer for 8-10 minutes, until the dough is smooth, elastic, and passes the windowpane test.
- Lightly oil a clean bowl. Place the dough in the bowl, turning once to coat. Cover tightly with plastic wrap or a damp kitchen towel. Let it rise in a warm, draft-free place for 1.5 to 2 hours, or until doubled in size.
- Gently deflate the dough and turn it out onto a lightly floured surface. Divide the dough into 2 or 3 equal pieces. Gently preshape each piece into a loose rectangle or oval, then cover with a damp cloth and let rest for 15-20 minutes.
- Take one preshaped piece. Flatten it gently into a rectangle. Fold the top third down to the center, pressing firmly to seal. Fold the bottom third up to the center, pressing firmly to seal. Then, fold the entire dough in half lengthwise and seal the seam tightly.
- Transfer the shaped loaves to a heavily floured couche or a baking sheet lined with a floured kitchen towel. Cover loosely and let them proof for 45-60 minutes.
- About 30-40 minutes before baking, preheat your oven to a blazing 450-475°F with a baking stone or steel inside. Place a cast iron pan or an oven-safe broiler pan on the bottom rack of your oven.
- Carefully transfer your proofed loaves to the preheated baking stone/steel. Immediately score the tops of each loaf with a sharp lame or razor blade.
- Pour about 1/2 to 1 cup of boiling water into the hot pan on the bottom rack of your oven. Quickly close the oven door to trap the steam. Bake for 20-25 minutes, or until deep golden brown.
- Transfer the baked loaves to a wire rack to cool completely before slicing.
- Prep Time: 15 mins
- Cook Time: 30 mins
- Category: Bread
- Method: Baking
- Cuisine: French
Nutrition
- Serving Size: 1 slice
- Calories: 150
- Sugar: 0 g
- Sodium: 200 mg
- Fat: 1 g
- Saturated Fat: 0 g
- Unsaturated Fat: 0 g
- Trans Fat: 0 g
- Carbohydrates: 30 g
- Fiber: 1 g
- Protein: 5 g
- Cholesterol: 0 mg
Keywords: Mastering the steam is crucial for a crispy crust. Use a preheated baking stone for even heat, and flour your couche liberally to prevent sticking.
Leave a Comment