
Pumpkin Dirt Cups are more than just a dessert; they are a delightful invitation to autumn’s coziest flavors, presented in the most charming, no-fuss manner. I remember the pure joy of assembling classic dirt cups as a child, layering chocolate pudding with crushed cookies, and now, with a seasonal twist, this beloved treat takes on a wonderfully sophisticated yet playful character. While traditional dirt cups evoke cherished memories of digging in the garden, these particular Pumpkin Dirt Cups usher in the festive spirit of fall, making them an absolute hit from Halloween parties to Thanksgiving gatherings. People adore this dish for its irresistible combination of creamy pumpkin spice pudding, rich chocolate cookie “earth,” and its incredibly easy, no-bake preparation. It’s a wonderfully convenient option for hosts, offering a satisfying blend of smooth and crumbly textures, and captivates both young and old with its whimsical appearance and delicious, seasonal taste. Join me as we explore how to create this enchanting, autumnal delight.

Ingredients:
- For the Creamy Pumpkin Pudding Base:
- 1 (8-ounce) package full-fat cream cheese, softened to room temperature
- 1 cup powdered sugar (confectioners’ sugar)
- 1 (15-ounce) can pure pumpkin puree (be sure it’s not pumpkin pie filling)
- 1 teaspoon ground cinnamon
- ½ teaspoon ground ginger
- ¼ teaspoon ground nutmeg
- ⅛ teaspoon ground cloves (or a pinch of allspice)
- 2 (3.4-ounce) packages instant vanilla pudding mix
- 3 cups cold milk (whole milk or 2% milk works best for richness)
- 1 (8-ounce) container frozen whipped topping, thawed (like Cool Whip), or 2 cups homemade whipped cream (recipe below)
- For the “Dirt” Layer:
- 1 (14.3-ounce) package Oreo cookies (or similar chocolate sandwich cookies)
- Optional: 2 tablespoons melted unsalted butter (for a richer “dirt” texture)
- For Homemade Whipped Cream (if not using store-bought whipped topping):
- 1 ½ cups cold heavy cream (also known as heavy whipping cream)
- ¼ cup powdered sugar
- 1 teaspoon pure vanilla extract
- For Decoration (Optional but highly recommended for fun!):
- Candy corn or pumpkin-shaped candies
- Gummy worms or other Halloween-themed gummies
- Mini chocolate chips or chocolate shavings
- A few whole Oreo cookies or cookie halves for garnish
- Cinnamon sticks or a sprinkle of extra cinnamon/nutmeg
- Equipment You’ll Need:
- Large mixing bowls (at least two)
- Electric mixer (handheld or stand mixer)
- Rubber spatula
- Whisk
- Food processor (recommended for crushing cookies) or a large zip-top bag and rolling pin
- 8-10 individual serving cups or glasses (clear cups work best to show off the layers!)
- Measuring cups and spoons
- Piping bag with a large round tip (optional, but great for neat layers)
Preparing the Creamy Pumpkin Pudding Base
This is where the magic truly begins for our delightful “Pumpkin Dirt Cups.” A rich, spiced pumpkin pudding forms the heart of this dessert, providing that comforting fall flavor we all adore. Taking your time with each step here ensures a beautifully smooth and luscious base.
- Soften the Cream Cheese: First things first, ensure your cream cheese is properly softened to room temperature. This is absolutely critical for achieving a smooth, lump-free pumpkin mixture. If it’s too cold, you’ll end up with stubborn little cream cheese chunks that won’t blend in, and nobody wants that! You can leave it out on the counter for about an hour, or if you’re in a hurry, you can gently microwave it for 10-15 seconds at a time until soft, being careful not to melt it.
- Cream the Cream Cheese and Sugar: In a large mixing bowl, combine the softened cream cheese and the 1 cup of powdered sugar. Using your electric mixer (a stand mixer with the paddle attachment or a handheld mixer works perfectly), beat these ingredients together on medium speed until the mixture is light, fluffy, and completely smooth. This usually takes about 2-3 minutes. Make sure to scrape down the sides of the bowl occasionally with your rubber spatula to ensure everything is thoroughly incorporated. We’re aiming for a cloud-like consistency here, no grains of sugar or lumps of cream cheese should remain.
- Introduce the Pumpkin and Spices: Now it’s time to infuse that wonderful autumn flavor! Add the entire can of pure pumpkin puree to the cream cheese mixture. Remember, make sure it’s pure pumpkin and not pumpkin pie filling, which has added sugars and spices that would throw off our recipe’s balance. Along with the pumpkin, add your generous blend of ground cinnamon, ginger, nutmeg, and cloves. These spices are the key to that warm, inviting pumpkin pie taste. Beat again on medium speed until everything is beautifully combined and the mixture is a lovely, uniform orange color. Continue mixing for another minute to ensure the spices are evenly distributed throughout the pumpkin goodness. The aroma alone will start making your kitchen smell like fall!
- Whisk in the Instant Pudding and Milk: In a separate, medium-sized bowl, combine the two packages of instant vanilla pudding mix with the 3 cups of cold milk. Grab a whisk and vigorously whisk these together for about 2 minutes, or until the mixture starts to thicken considerably. Instant pudding works wonders here, providing a stable base that will help our pumpkin cups hold their shape beautifully. Ensure there are no dry pockets of pudding mix left. The mixture will become quite thick, almost like a soft-set gel.
- Combine the Mixtures: Once your instant pudding has thickened, pour it into the large bowl containing your pumpkin and cream cheese mixture. Using your electric mixer on low speed, or even just a sturdy rubber spatula, gently fold the two mixtures together until just combined. Be careful not to overmix at this stage; we just want a smooth, uniform base for our pumpkin pudding.
- Fold in the Whipped Topping: Now for the element that makes these cups truly light and airy! Take your thawed whipped topping (or freshly made whipped cream, which we’ll cover next) and gently fold it into the pumpkin pudding mixture. Use your rubber spatula and a delicate hand, lifting from the bottom of the bowl and folding over the top. The goal is to incorporate the whipped topping without deflating all the air. This step adds a wonderful lightness and creaminess to the pumpkin base. Think of it like folding egg whites – gentle movements are key! Continue until no white streaks of whipped topping remain and the entire mixture is a uniform pale orange.
- Chill the Pumpkin Base: This might be the hardest part – resisting the urge to eat it all now! Cover the bowl with plastic wrap and refrigerate the pumpkin pudding mixture for at least 30 minutes. This chilling time is essential. It allows the pudding to set even further, the flavors to meld beautifully, and ensures a firm, scoopable consistency for layering. Don’t skip this step! It truly makes a difference in the final texture and taste of your Pumpkin Dirt Cups.
Crafting the “Dirt” Layer and Other Elements
No “dirt cup” would be complete without its signature “dirt” layer! This simple yet crucial component provides a delightful textural contrast to the smooth pumpkin pudding. We’ll also briefly touch upon making homemade whipped cream if you’re opting for that fresh touch.
-
Prepare the “Dirt” Layer: Now, let’s make our delicious “dirt”! Take your entire package of Oreo cookies. You have a couple of options for crushing them:
- Food Processor Method (Recommended): This is by far the easiest and most efficient way. Place the cookies, cream filling and all, into the bowl of your food processor. Pulse them until they are finely crushed, resembling coarse dirt. You want a mix of fine crumbs and some slightly larger pieces for texture. Avoid processing into a fine powder; a little variation is nice. If you choose, you can add 2 tablespoons of melted unsalted butter to the crumbs and pulse briefly again. This will make the “dirt” a little richer and help it cling together slightly, but it’s completely optional.
- Manual Method: If you don’t have a food processor, no worries! Place the cookies in a large, sturdy zip-top bag. Seal the bag, pressing out as much air as possible. Lay the bag flat on a sturdy surface and use a rolling pin (or even the bottom of a heavy pan) to crush the cookies. Roll and pound until you reach the desired consistency. Again, aim for a mix of fine and slightly coarser crumbs.
Once crushed, set your cookie “dirt” aside. The anticipation is building!
-
Make Homemade Whipped Cream (Optional – if not using store-bought whipped topping): If you decided to make your own whipped cream instead of using store-bought whipped topping for the pumpkin base, or if you want extra for garnish, here’s how:
- Chill Your Tools: For the best results, place your mixing bowl (preferably a metal one) and your whisk attachment (from your stand mixer or handheld mixer beaters) in the freezer for 10-15 minutes before you start. Cold tools help the cream whip up faster and hold its shape better.
- Whip the Cream: Pour the cold heavy cream into the chilled bowl. Start beating on medium-low speed, gradually increasing to medium-high. As the cream begins to thicken, add the powdered sugar and vanilla extract. Continue beating until the cream forms soft to medium-stiff peaks. Be careful not to overbeat, or you’ll end up with butter! Soft peaks hold their shape but curl slightly at the tip, while stiff peaks stand straight up. This takes about 3-5 minutes depending on your mixer. Set aside, or use immediately.
Assembling Your Delightful Pumpkin Dirt Cups
Now for the truly fun part – bringing all these wonderful components together to create your visually stunning and incredibly tasty “Pumpkin Dirt Cups”! Clear cups are highly recommended so you can admire those beautiful layers.
- Choose Your Cups: Gather your 8-10 individual serving cups or glasses. Clear tumblers, mason jars, or even small glass bowls work wonderfully. The transparency truly enhances the visual appeal of the layers.
- Layer 1: The First Dirt Base: Spoon about 2-3 tablespoons of your crushed Oreo “dirt” into the bottom of each cup. Gently spread it out to form an even base layer. This creates the foundational “dirt” for our pumpkin patch!
-
Layer 2: The Creamy Pumpkin Pudding: This is where your beautiful pumpkin mixture comes in. You have two main options for adding it neatly:
- Spoon Method: Carefully spoon a generous amount of the chilled pumpkin pudding over the Oreo layer. Use the back of the spoon to gently smooth it out, creating an even layer. Aim for about ¼ to ⅓ cup per cup, depending on the size of your serving vessels. Try not to let the pumpkin mix touch the sides of the cup too much on its way down to keep the layers crisp.
- Piping Bag Method (Highly Recommended for Neatness): For truly pristine layers, transfer your pumpkin pudding mixture into a large piping bag fitted with a large round tip (or simply snip off a good corner of a sturdy zip-top bag). Pipe a layer of pumpkin pudding over the “dirt” layer, swirling it evenly from the center outwards to fill the cup. This method helps prevent smudging the sides of the cup with pumpkin, ensuring a cleaner visual separation of layers.
The thickness of this layer is key to a satisfying bite! Make sure it’s substantial enough to carry that wonderful pumpkin flavor.
- Layer 3: More Delicious Dirt: Sprinkle another layer of crushed Oreos over the pumpkin pudding. Again, about 1-2 tablespoons per cup should suffice. This creates that iconic “dirt” break between the creamy pumpkin layers.
- Repeat and Build: Continue layering your pumpkin pudding and cookie “dirt” until your cups are nearly full. Most cups will accommodate two layers of pumpkin and three layers of dirt (starting and ending with dirt). Pay attention to proportion – you want each bite to have a balance of both textures and flavors. Try to keep the layers as even as possible for the best presentation.
-
The Grand Finale – Top with “Dirt” and Decorate: For the very top layer, finish with a generous sprinkle of your remaining Oreo “dirt.” This gives the classic “dirt cup” appearance. Now comes the creative part! This is where you can truly make your Pumpkin Dirt Cups shine:
- Candy Corn & Pumpkins: Arrange a few candy corn pieces or small pumpkin-shaped candies on top of the “dirt” for a pop of autumnal color and festive charm.
- Gummy Worms: For a classic “dirt cup” look, have some gummy worms peeking out from the “dirt.” Kids absolutely love this!
- Chocolate Accents: Sprinkle mini chocolate chips or delicate chocolate shavings over the top for added decadence.
- Cookie Garnish: Place a whole or half Oreo cookie standing upright in the “dirt” for an elegant touch.
- Spice It Up: A light dusting of extra cinnamon or nutmeg, or even a small cinnamon stick, can add a beautiful aromatic finish.
Let your imagination run wild with the decorations! This is what truly makes each cup unique and inviting.
Chilling and Serving Suggestions
The final, essential step before diving into these delightful Pumpkin Dirt Cups is chilling. This step allows the flavors to deepen and the pudding layers to fully set, ensuring every spoonful is pure bliss. Proper storage also guarantees you can enjoy these treats for days to come!
- Chilling is Crucial: Once all your Pumpkin Dirt Cups are assembled and beautifully decorated, it’s time for them to take a well-deserved rest in the refrigerator. Cover each cup loosely with plastic wrap to prevent them from absorbing any fridge odors. Place them in the refrigerator for at least 2 hours. However, for the absolute best flavor and firmest texture, I highly recommend chilling them for 4 hours, or even better, overnight. This extended chill time allows the pumpkin pudding to fully set, becoming wonderfully firm, and gives all those delicious spices and pumpkin flavors a chance to meld and deepen. The Oreos will also soften ever so slightly, creating a perfect balance with the creamy pudding. Patience is a virtue, especially when it comes to delicious desserts!
- Serving Them Up: When you’re ready to serve, simply pull them out of the refrigerator. You can serve them as they are, or if you like, add a fresh sprig of mint for color or a tiny dollop of extra whipped cream just before serving. Provide small spoons for your guests to dig in. The visual appeal of these layered cups is a huge part of their charm, so let them shine! They are perfect for individual servings at any fall gathering, Halloween party, or as a cozy dessert on a crisp autumn evening.
- Storage Tips: If you happen to have any leftovers (which is a rare feat with these!), cover the individual cups tightly with plastic wrap. Store them in the refrigerator. These Pumpkin Dirt Cups will stay fresh and delicious for up to 3-4 days when properly stored. The Oreo “dirt” might soften a bit more over time, but the flavors will remain fantastic. They are an excellent make-ahead dessert, which is a huge bonus when you’re entertaining.
-
Creative Variations to Explore:
- Adult Version: For a grown-up twist, consider adding a tablespoon of Irish cream liqueur, spiced rum, or Kahlúa to the pumpkin pudding mixture along with the milk. It adds a wonderful depth of flavor!
- Chocolate Lover’s Dream: Mix mini chocolate chips into the pumpkin pudding layer, or alternate layers with a chocolate ganache or chocolate fudge sauce for an extra dose of decadence.
- Different “Dirt”: While Oreos are classic, don’t be afraid to experiment! Graham cracker crumbs, crushed ginger snaps, or even chocolate wafer cookies could offer interesting flavor variations for your “dirt” layer.
- Autumn Spice Boost: If you’re a true spice fiend, add an extra pinch of allspice or even a tiny amount of white pepper to the pumpkin mixture – it surprisingly enhances the warmth of the other spices!
- Cream Cheese Frosting Swirl: For an even richer dessert, pipe a thin layer of simple cream cheese frosting (cream cheese, butter, powdered sugar, vanilla) as one of your layers.
- Seasonal Candies: Beyond the suggestions, think about other seasonal candies or cookie sprinkles to really theme your cups for specific holidays.
No matter how you customize them, these Pumpkin Dirt Cups are sure to be a hit! They combine festive fall flavors with a playful presentation, making them an unforgettable treat for anyone who tries them. Enjoy the process of creating and, most importantly, devouring these delightful desserts!
Conclusion:
And there you have it, my friends! We’ve reached the sweet, satisfying end of our journey with this incredibly delightful recipe. I truly believe that these aren’t just any dessert; they’re a little cup of autumnal joy, packed with the comforting flavors of the season and a playful texture that will bring a smile to anyone’s face. The rich, creamy pumpkin pudding, perfectly spiced, layered with the earthy crunch of crushed chocolate cookies – it’s a symphony of textures and tastes that simply begs to be savored. What makes this recipe an absolute must-try, in my humble opinion, is its uncanny ability to be both incredibly sophisticated in flavor and delightfully simple to prepare. You don’t need to be a seasoned pastry chef to whip up a batch of these beauties; anyone can achieve dessert greatness with just a few ingredients and a sprinkle of enthusiasm. It’s the kind of treat that appeals to every palate, from the pickiest little eater to the most discerning adult, making it a universal crowd-pleaser for any gathering.
I find immense joy in crafting desserts that tell a story, and these Pumpkin Dirt Cups tell a tale of cozy fall evenings, crisp air, and the warmth of shared moments. They are the epitome of comfort food, elevated with that unmistakable pumpkin spice aroma that fills your kitchen and instantly signals that autumn has truly arrived. Beyond their irresistible taste, the visual appeal of these cups is undeniable. That distinctive “dirt” layer, whether made with classic chocolate sandwich cookies or a delightful variation, topped with a dollop of whipped cream and perhaps a whimsical garnish, makes them a showstopper. They’re effortlessly charming, making them perfect for themed parties, holiday potlucks, or simply a fun weekend activity with the kids. It’s an edible centerpiece, a conversation starter, and an instant mood lifter, all rolled into one easy-to-make dessert.
Serving Suggestions & Creative Variations:
While I adore serving these in individual clear cups, allowing each layer to shine through, don’t feel limited! For a grander presentation at a holiday table, consider layering everything in a large trifle bowl. This creates a stunning centerpiece that guests can scoop from themselves. Another fun idea for a party setting is to serve them in small, clean terracotta pots (with a saucer underneath for presentation, of course!), giving them an even more authentic “dirt cup” feel. If you’re packing them for school lunches or picnics, sturdy, lidded plastic containers work wonderfully to keep everything intact and fresh.
Now, let’s talk about making this recipe truly your own! The beauty of these Pumpkin Dirt Cups lies in their adaptability. Don’t be afraid to experiment with the cookie “dirt” layer. While chocolate sandwich cookies are classic, crushed ginger snaps would add an extra layer of warm spice, or even graham cracker crumbs could offer a delightful, buttery crunch. For the pudding itself, if you want to dial up the pumpkin flavor even further, consider adding a touch more pure pumpkin puree, or for a richer, creamier base, swirl in some softened cream cheese before chilling. You could even alternate layers of pumpkin pudding with a vanilla or chocolate pudding for an exciting visual and flavor contrast.
Toppings offer a playground for creativity! Beyond simple whipped cream, consider a sprinkle of cinnamon sugar, some mini chocolate chips, or even a handful of chopped candied pecans for added texture and richness. For a whimsical touch, especially around Halloween, gummy worms or candy corn emerging from the “dirt” are always a hit with kids (and adults!). Edible fall leaves or a small sprig of fresh mint can also elevate the presentation. For a grown-up twist, a tiny splash of rum or bourbon in the pudding mixture, or a drizzle of caramel sauce over the top, can transform these into an elegant dessert cocktail. And for those with dietary restrictions, fear not! You can easily adapt this recipe by using gluten-free sandwich cookies and dairy-free whipped topping and pudding mixes, ensuring everyone can enjoy this seasonal delight.
Your Turn to Create and Share!
So, what are you waiting for? I wholeheartedly encourage you to roll up your sleeves, gather your ingredients, and give these incredible Pumpkin Dirt Cups a try. They are an experience waiting to happen – a sweet, spiced adventure that promises smiles and satisfied sighs. Whether you stick to the original recipe, or get adventurous with your own unique twists and variations, I promise you won’t be disappointed. Once you’ve whipped up your batch of these autumn treasures, please, please, please come back and share your experience with me! I absolutely adore hearing about your culinary adventures. Did you find a new favorite variation? Did your kids help you create them? What garnishes did you choose? Your feedback, photos, and stories inspire me and our entire community of fellow food lovers. Let’s celebrate the joy of fall baking together!
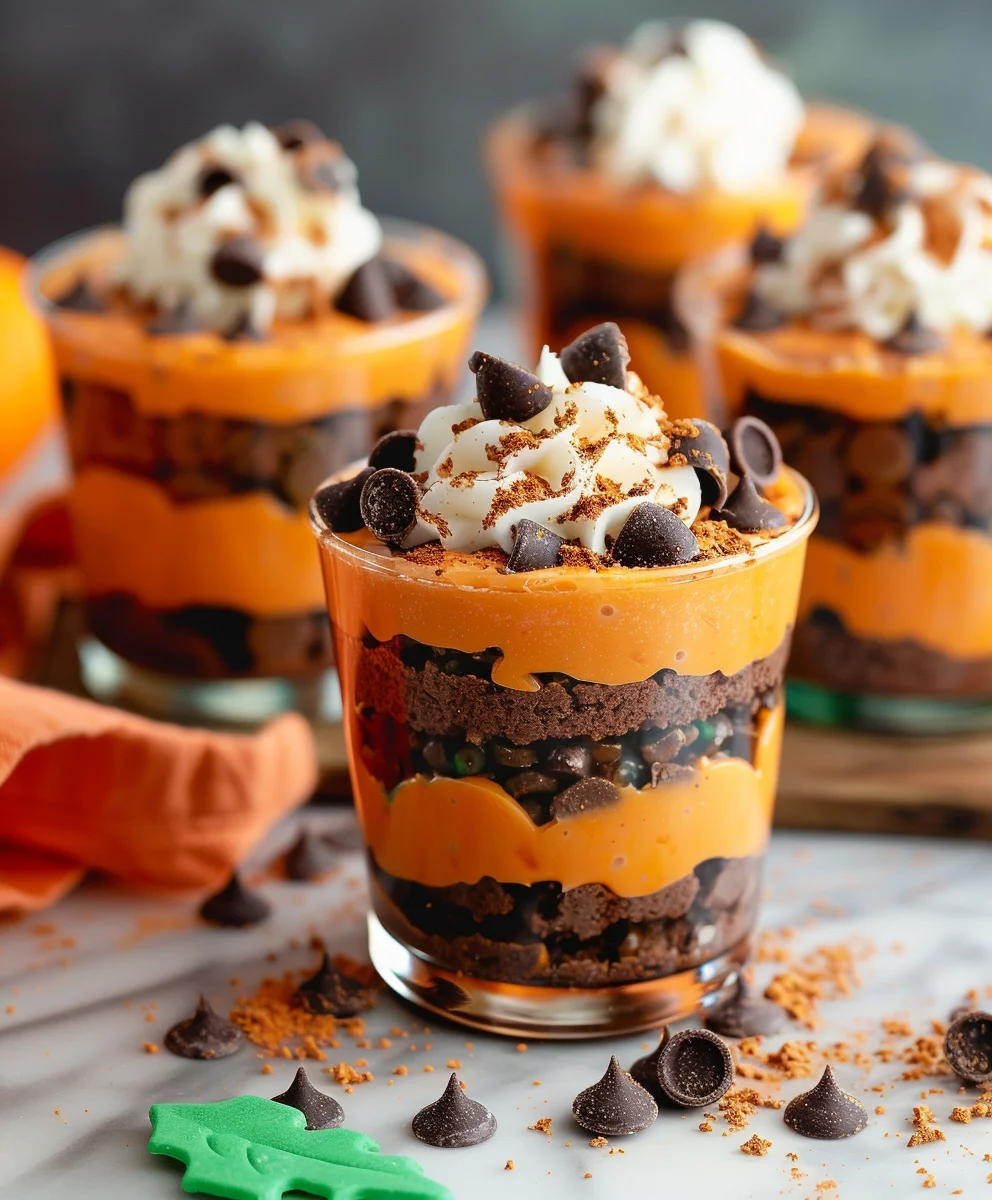
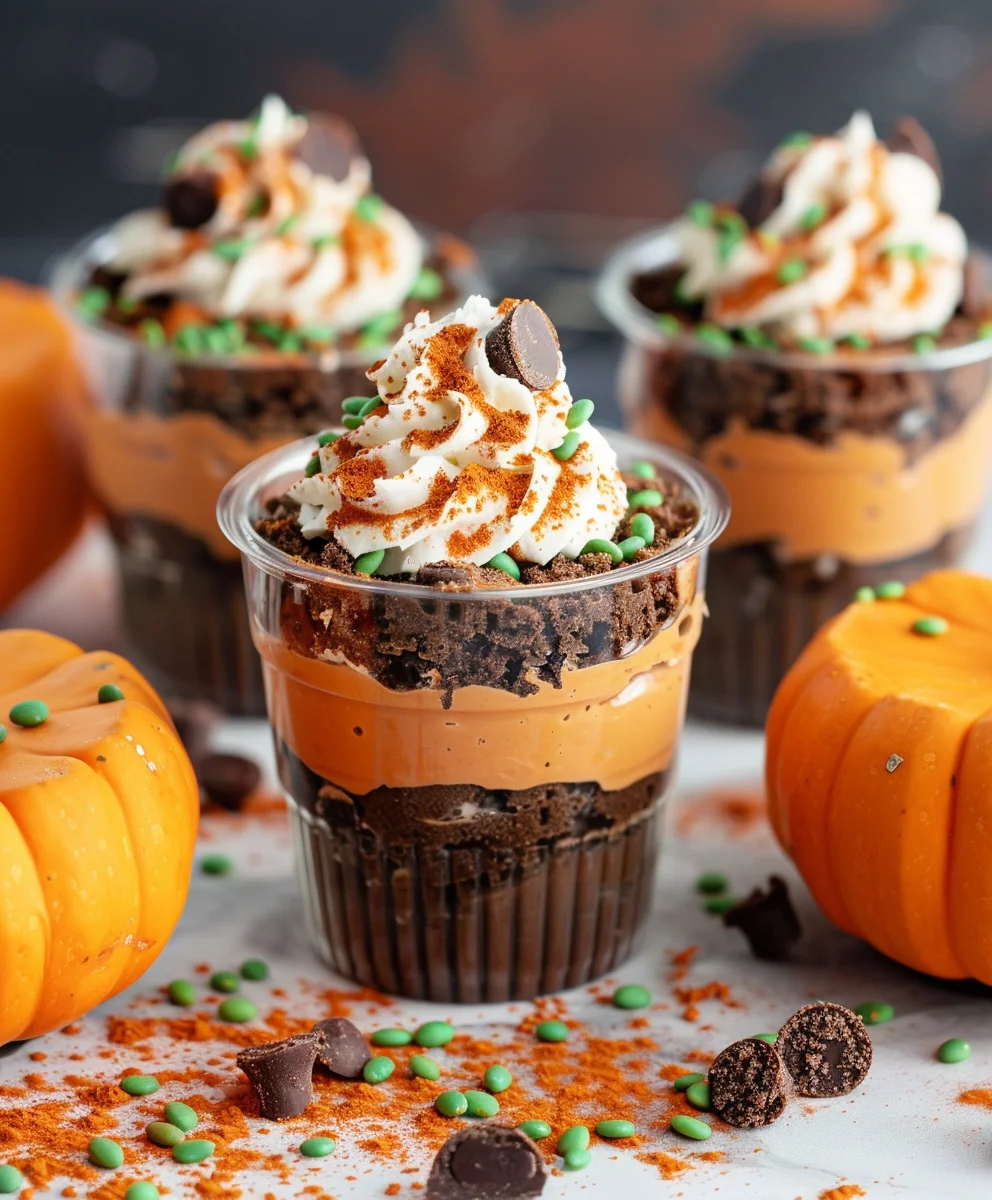
Pumpkin Dirt Cups
These delightful Pumpkin Dirt Cups offer a playful and easy no-bake dessert, perfect for fall gatherings. Layers of rich chocolate cookie ‘earth’ and creamy chocolate pudding are topped with festive candy pumpkins and green coconut ‘grass’, creating a charming autumnal treat that’s a hit with all ages.
Ingredients
-
1 package (3.9 oz) Chocolate Instant Pudding
-
2 cups Milk
-
8 ounce Cool Whip, thawed
-
1 regular size package of Oreo Cookies
-
Candy Pumpkins (for decoration)
-
Shredded Coconut (for decoration)
-
Green food coloring (for coconut)
Instructions
-
Step 1
Crush Oreo cookies (cream filling included) in a food processor or sturdy zip-top bag until fine crumbs, resembling coarse dirt. Set aside. -
Step 2
In a medium bowl, whisk together chocolate instant pudding mix and cold milk vigorously for 2 minutes, or until the mixture begins to thicken. -
Step 3
Gently fold the thawed Cool Whip into the thickened chocolate pudding mixture until fully combined and smooth. Avoid overmixing to maintain lightness. -
Step 4
For decoration, place shredded coconut in a small zip-top bag, add a few drops of green food coloring, and shake until the coconut is evenly colored green. This creates a ‘grass’ effect. -
Step 5
In 8-10 individual serving cups, spoon about 2-3 tablespoons of crushed Oreo ‘dirt’ at the bottom. Follow with a generous layer of the chocolate pudding mixture. Repeat layers until cups are nearly full, ensuring the top layer is crushed Oreo ‘dirt’. -
Step 6
Decorate the top of each cup with the green shredded coconut (as ‘grass’) and arrange Candy Pumpkins on top for a festive touch. Cover the cups loosely and refrigerate for at least 2 hours, or ideally 4 hours, to allow the pudding to set completely and flavors to meld. Serve chilled for best enjoyment.
Important Information
Nutrition Facts (Per Serving)
It is important to consider this information as approximate and not to use it as definitive health advice.
Allergy Information
Please check ingredients for potential allergens and consult a health professional if in doubt.
Leave a Comment