
Frankenstein Oreo Balls are not just a festive treat; they are a delightful testament to how much fun we can have in the kitchen, especially when celebrating the spooky season! I’m absolutely thrilled to share with you a recipe that promises to be the star of any Halloween gathering or simply a thrillingly sweet indulgence for a cozy evening in. Prepare to bring a monstrously delightful treat to life that will enchant everyone with its charm and incredible flavor. Imagine the excitement as these vibrant, green, and wonderfully monstrous creations emerge from your kitchen, ready to captivate and delight taste buds young and old.
While these particular confections don’t boast ancient culinary origins, their spirit is deeply rooted in the joy of seasonal festivities and the universal love for no-bake desserts. Think of the excitement of decorating for Halloween, the thrill of costume parties, and the sheer delight of a treat that perfectly captures that playful, slightly spooky vibe. That’s precisely where the magic of these Oreo balls lies – they embody the modern tradition of crafting visually stunning and incredibly delicious themed snacks that bring smiles to everyone’s faces. People adore this dish not only for its eye-catching, ghoulishly green appearance but also for its irresistible combination of creamy, rich texture and the familiar, beloved crunch of Oreo cookies. The simplicity of preparation, requiring no baking whatsoever, makes them a go-to favorite for busy hosts and eager dessert enthusiasts alike. Get ready to create some truly unforgettable Frankenstein Oreo Balls!

Ingredients:
- One (1) family-size package (19.1 oz / 542g) OREO Cookies: I always opt for the classic full-size chocolate sandwich cookies. The contrast of the dark cookie base with the vibrant green coating really makes these Frankenstein Oreo Balls pop! While you could experiment with other flavors, the original is truly the best for this recipe.
- Eight (8) ounces (226g) cream cheese: Make sure this is full-fat cream cheese, softened to room temperature. This is crucial for achieving that perfectly smooth and pliable consistency for our truffle base. If it’s too cold, it will be lumpy and difficult to mix evenly.
- Twenty-four (24) ounces (approximately 680g) green candy melts: These are specifically designed for melting and coating, giving our Frankenstein Oreo Balls their signature monstrous hue. I usually grab a bag of Wilton brand or similar. You might need a little more or less depending on your dipping technique and how thick you like your coating.
- One (1) tablespoon (15ml) vegetable shortening or coconut oil (optional): This can be added to your candy melts if they seem too thick, helping to achieve a smoother, more fluid consistency for easier dipping. Make sure it’s flavorless.
- Forty-eight (48) small edible googly eyes: These are essential for giving our Frankenstein monsters their distinct, watchful gaze. You can find these in the baking aisle of most grocery stores or craft stores.
- Twenty-four (24) mini pretzel sticks: These will serve as the iconic “bolts” protruding from our Frankenstein monsters’ heads. Break each one in half to get two shorter pieces.
- One (1) ounce (28g) dark chocolate or black candy melts: This is for piping the “stitches” and mouths onto our completed Frankenstein Oreo Balls. A small amount goes a long way.
- Parchment paper or wax paper: You’ll need this to line your baking sheets, preventing the truffles from sticking as they set.
- Baking sheets: At least two, to hold all your delicious creations as they chill.
Phase 1: Preparing the Oreo Base
My journey to creating truly memorable Frankenstein Oreo Balls always begins with the base, which is surprisingly simple but requires a little attention to detail. This is where we transform humble Oreos and cream cheese into a delicious, pliable dough that will be the heart of our monster treats.
- Crush the OREO Cookies: First things first, we need to completely pulverize those delicious OREO cookies. I find the easiest and most efficient way to do this is by using a food processor. Simply toss the entire package of cookies, filling and all, into your food processor. Pulse on high until the cookies are reduced to very fine crumbs. We’re talking about a texture similar to wet sand – no large chunks allowed! This ensures a smooth, uniform texture for your truffle base. If you don’t have a food processor, don’t despair! You can place the cookies in a large, heavy-duty zip-top bag, seal it tightly, and then use a rolling pin or the bottom of a heavy pan to crush them. This method might take a bit more arm power and time, but it’s just as effective. Just make sure to really get into those corners of the bag to break down any stubborn cookie pieces. The finer the crumbs, the better the final texture of your Frankenstein Oreo Balls will be.
- Combine with Cream Cheese: Once your OREO crumbs are perfectly fine, transfer them to a large mixing bowl. Now, it’s time to introduce the softened cream cheese. Remember, it’s vital that your cream cheese is at room temperature. If it’s too cold, it will be firm and challenging to incorporate evenly, leading to lumps in your mixture. Using a sturdy spatula or, even better, a stand mixer fitted with the paddle attachment, begin to mix the OREO crumbs and cream cheese together. Start on a low speed if using a mixer, then increase as the ingredients begin to combine. You’re aiming for a cohesive, well-blended dough. It will look quite thick and sticky, resembling a very dense cookie dough. Continue mixing until there are no streaks of cream cheese visible and the mixture is uniformly dark brown. It should be firm enough to hold its shape but still pliable. This magical combination is what gives Frankenstein Oreo Balls their characteristic richness and texture.
- Form the Truffle Balls: Now for the fun part – forming our monster bases! Line a couple of baking sheets with parchment paper or wax paper. Using a small cookie scoop (about 1 tablespoon in size) or simply a spoon, scoop out portions of the OREO mixture. Roll each portion between the palms of your hands to form smooth, uniform balls. Aim for a diameter of about 1 to 1.5 inches. Don’t worry if they’re not perfectly spherical; a little organic shape can add character to our monsters. As you roll, you might find the mixture becomes a little sticky. If this happens, a quick rinse of your hands with cold water and drying them thoroughly can help, or you can lightly dust your hands with a tiny bit of powdered sugar (though I usually find it’s not necessary). Place the formed balls onto your prepared baking sheets, making sure to leave a little space between each one. You should get approximately 48 balls from this recipe, meaning we’ll have plenty of Frankenstein Oreo Balls to share (or hoard!).
- Chill the Truffle Balls: This is a crucial step that absolutely cannot be skipped. Once all your OREO balls are neatly arranged on the baking sheets, place them in the refrigerator. We need to chill them for at least 30 to 60 minutes, or until they are very firm. This chilling time is essential because it prevents the balls from crumbling or melting when you dip them into the warm candy coating. A firm, cold base will make the dipping process much smoother and ensure your Frankenstein Oreo Balls hold their shape beautifully. If you’re in a hurry, you can pop them into the freezer for about 15-20 minutes, but be careful not to freeze them solid, as this can sometimes cause condensation issues when they warm up slightly during dipping. While they’re chilling, we can move on to preparing our vibrant green coating!
Phase 2: Melting the Candy Coating
The green candy coating is what truly transforms these delightful treats into unmistakable Frankenstein Oreo Balls. Getting the consistency right is key for a smooth, even finish that will make your monsters look their best.
-
Prepare the Green Candy Melts: Retrieve your green candy melts. There are a couple of popular methods for melting candy melts, and both work well, so choose whichever you’re most comfortable with.
Microwave Method: This is my go-to for speed and convenience. Place about two-thirds of your green candy melts (around 16 ounces) into a microwave-safe bowl. Microwave them on 50% power for 30-second intervals, stirring thoroughly after each interval. It’s important to stir even if they don’t look melted, as the heat distributes unevenly. Continue microwaving and stirring until the candy melts are mostly smooth with just a few small lumps remaining. At this point, add the remaining one-third of the candy melts and continue stirring off-heat. The residual heat from the melted candy will melt the remaining pieces, helping to temper the chocolate and prevent it from overheating and seizing. If, after all this, your candy melts still seem a bit too thick for easy dipping, you can add about half a tablespoon of vegetable shortening or coconut oil. Stir it in thoroughly until completely combined and the desired smooth, fluid consistency is achieved. Be cautious not to add too much, as it can thin the coating too much and make it harder to set.
Double Boiler Method: If you prefer a more controlled melting process, a double boiler is an excellent option. Place your green candy melts in the top bowl of a double boiler, ensuring the bottom of the bowl does not touch the simmering water below. Heat over low to medium heat, stirring frequently, until the candy melts are smooth and completely melted. Again, if needed, you can stir in a small amount of vegetable shortening or coconut oil to reach the perfect dipping consistency. This method gives you excellent control over the temperature, reducing the risk of scorching or seizing the candy.
Keeping it Warm: Once melted, you’ll want to keep your candy coating warm while you work, especially if you’re dipping a large batch of Frankenstein Oreo Balls. If using the microwave method, you can periodically pop the bowl back into the microwave for 10-15 seconds on low power, stirring each time. If using a double boiler, simply leave it over very low heat, stirring occasionally, or turn off the heat and leave it over the warm water bath. A warmed crockpot on its lowest setting can also work wonders for keeping candy melts perfectly fluid.
Phase 3: Dipping and Decorating the Frankenstein Oreo Balls
This is where our delightful OREO balls truly transform into the whimsical, spooky little monsters we envisioned! Dipping and decorating are the most creative and visually rewarding steps in making these charming Frankenstein Oreo Balls.
- Dip the Truffle Balls: Retrieve your thoroughly chilled OREO balls from the refrigerator. Their firmness is paramount for a successful dip. Using a dipping tool, a fork, or even a toothpick, carefully pick up one OREO ball. Submerge it completely into the melted green candy coating. Ensure the entire surface is covered. Gently tap the fork or tool against the side of the bowl to allow any excess candy coating to drip off. This is important for preventing a thick, clumpy layer of candy and for achieving a smooth, even finish. You might need to gently scrape the bottom of the truffle against the rim of the bowl to remove the final drip. Once adequately coated and free of drips, carefully transfer the dipped ball back onto your parchment-lined baking sheet. Repeat this process with all the remaining OREO balls. Work relatively quickly, as the coldness of the OREO ball will cause the candy coating to start setting quite rapidly. If your candy coating starts to get too thick, return it to your warming method for a few seconds and stir well.
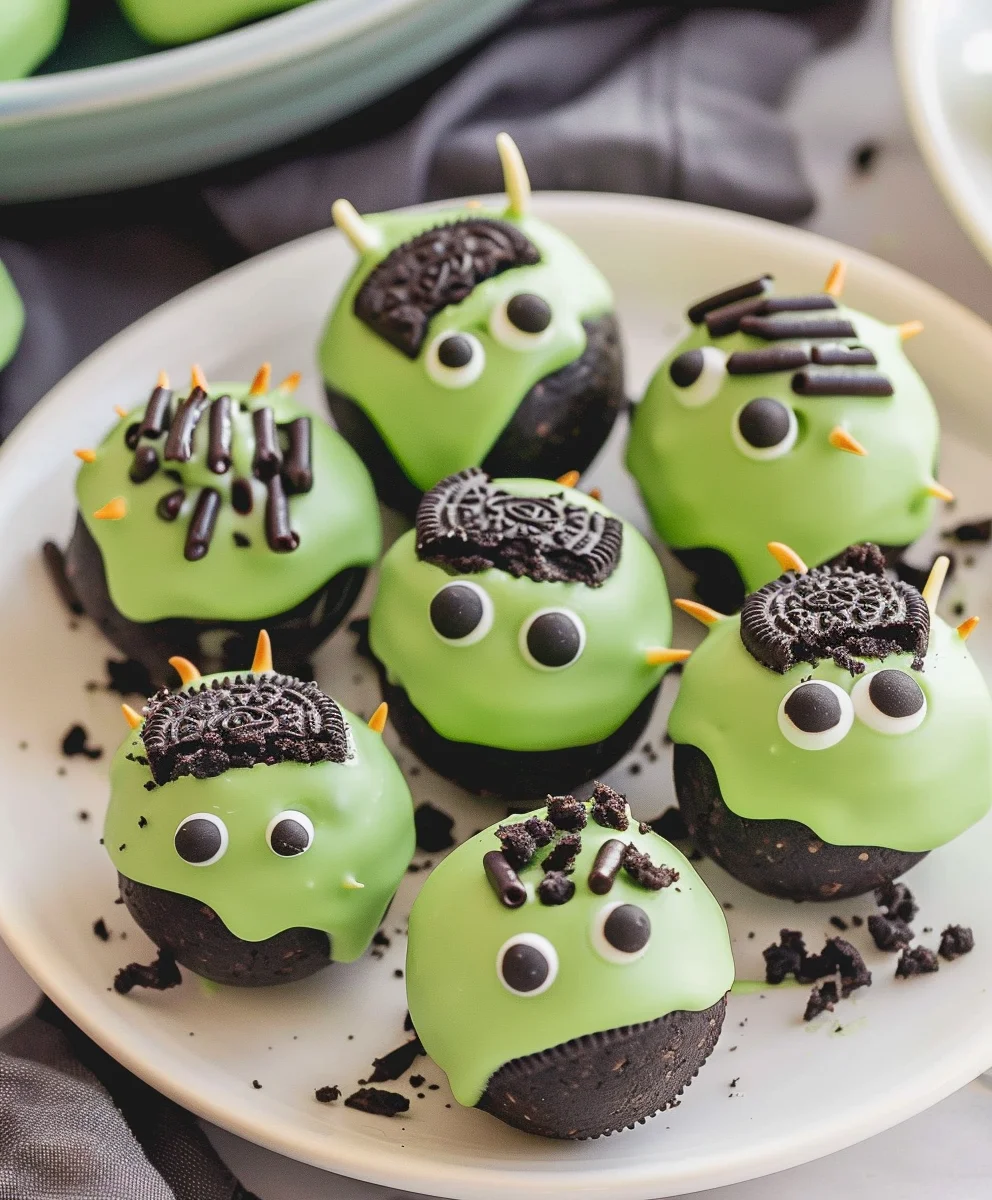
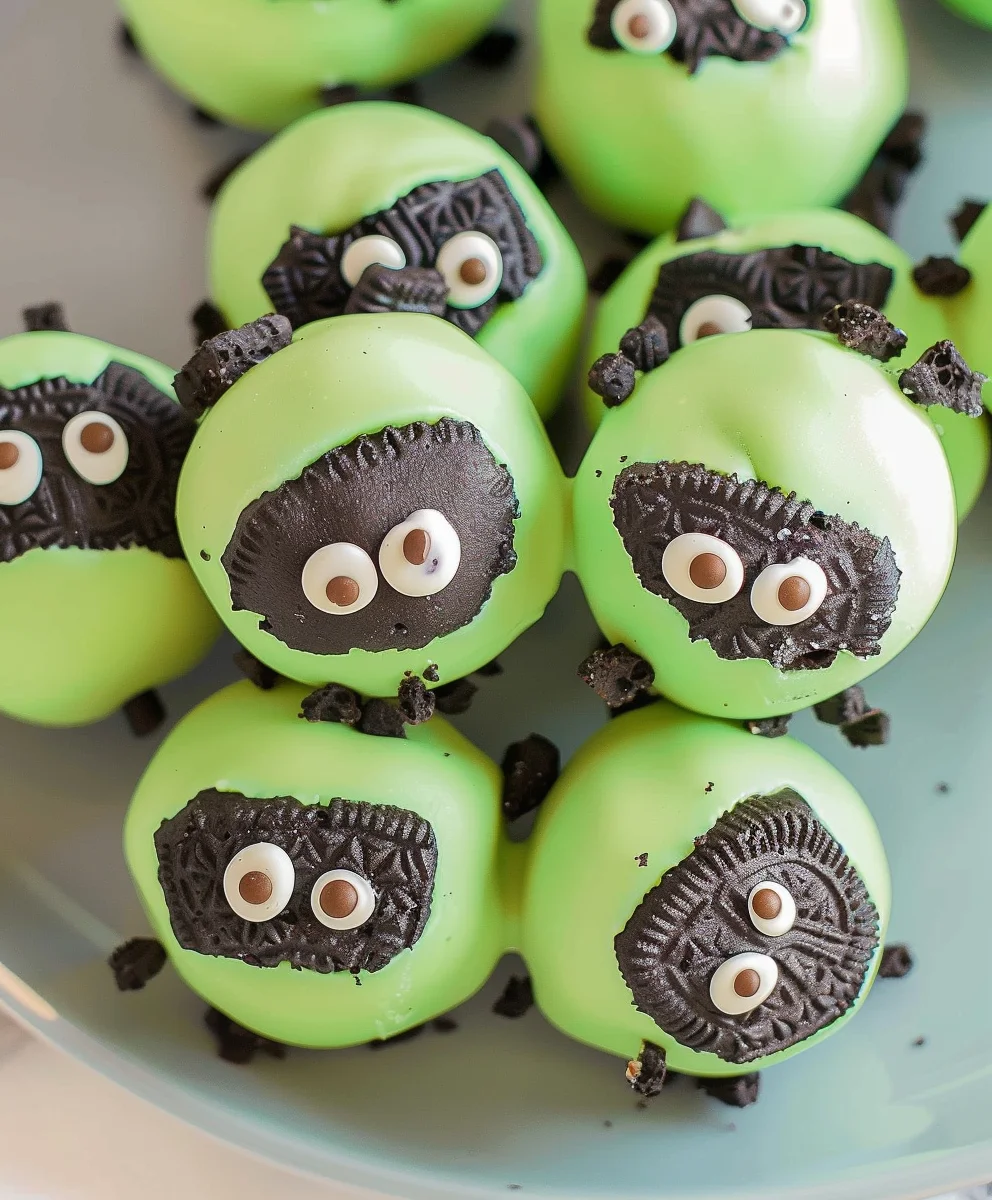
- Attach the Eyes and Bolts (While Wet): This step needs to happen immediately after dipping, while the green candy coating is still wet and pliable. As soon as you place a dipped Frankenstein Oreo Ball onto the parchment paper, quickly grab two edible googly eyes and gently press them onto the front of the ball, positioning them to look like the monster’s eyes. Then, take two halves of a mini pretzel stick and carefully insert them into the sides of the ball, near the top, to resemble Frankenstein’s iconic neck bolts. The wet candy coating will act as the “glue” to hold these decorations firmly in place as it sets. Don’t press too hard, as you don’t want to deform your perfectly rolled OREO ball. This rapid assembly is what gives our Frankenstein Oreo Balls their distinct, playful character. Continue dipping, eye-ing, and bolting each ball until all your monsters are assembled.
- Chill to Set the Coating: Once all your Frankenstein Oreo Balls are dipped and decorated with their eyes and bolts, it’s time for another round of chilling. Place the baking sheets back into the refrigerator for at least 15-20 minutes, or until the green candy coating is completely firm to the touch. This ensures that all the decorations are securely set and that the coating is solid, making them easy to handle without smudging. You’ll know they’re ready when they feel hard and cool.
-
Add Chocolate Details (Stitches and Mouth): Now for the final touch that brings our monsters to life! While your Frankenstein Oreo Balls are chilling, you can melt your small amount of dark chocolate or black candy melts. You can do this in a very small microwave-safe bowl in 15-second intervals, stirring until smooth, or in a small zip-top bag in hot water. Once melted, snip a tiny corner off the zip-top bag (or use a piping bag with a very fine tip) to create a small opening.
Retrieve your firm, green-coated Frankenstein treats. Carefully pipe small, short horizontal lines across the “forehead” and “cheeks” of each monster to create the classic Frankenstein stitches. You can also pipe a jagged line for a mouth, or even a small ‘O’ shape if you prefer a surprised expression. Be creative! This detailing really completes the monster look and adds to the charm of each individual Frankenstein Oreo Ball. Allow the chocolate details to set for another 5-10 minutes in the refrigerator, or simply at room temperature if your kitchen isn’t too warm, until the chocolate is firm.
- Serve and Enjoy!: Once all the chocolate details are set, your magnificent batch of Frankenstein Oreo Balls is complete and ready to be devoured! Arrange them on a platter for a festive Halloween party, or store them for a sweet treat throughout the week. They’re sure to be a showstopper and a conversation starter, bringing a touch of spooky fun to any occasion.
Tips for Perfect Frankenstein Oreo Balls
Creating these delightful Frankenstein Oreo Balls is a fun and relatively straightforward process, but a few expert tips can elevate your results from good to absolutely fantastic. I’ve learned these tricks over many batches, ensuring every monster is as delicious as it is adorable.
-
Don’t Rush the Chill Time:
I cannot emphasize this enough! The chilling steps are absolutely critical for the success of your Frankenstein Oreo Balls. If your OREO balls aren’t thoroughly chilled before dipping, they risk falling apart in the warm candy melts, or the coating will be too thick and uneven. Similarly, after dipping, allowing them to chill completely ensures the candy coating sets firmly, preventing smudges and securing all your fun decorations. Patience here truly pays off with perfectly structured and beautifully coated truffles.
-
Work in Batches if Needed:
If you’re making a very large batch, or if your kitchen is particularly warm, consider taking out only a portion of the OREO balls from the refrigerator at a time for dipping. Keeping the remaining balls chilled until ready for their green bath will maintain their firmness and make the dipping process much easier. This prevents the initial balls from warming up too much while you’re still forming others or preparing your coating. This strategy is especially helpful when dealing with sticky ingredients like candy melts and cream cheese mixtures.
-
Maintain Candy Melt Consistency:
The fluidity of your candy melts is paramount for achieving a smooth, professional-looking finish on your Frankenstein Oreo Balls. If your candy melts start to thicken as you work (which they will, especially if you’re taking your time), don’t hesitate to return them to your warming method (microwave for 10-15 seconds at 50% power, or back over the double boiler) and stir thoroughly. A tablespoon of vegetable shortening or coconut oil stirred in can also work wonders to thin them out if they become too viscous. Remember, a little goes a long way with the shortening, so add sparingly until you reach the desired consistency. Overheating can cause them to seize or burn, so gentle warming and constant stirring are your best friends.
-
Use the Right Tools:
While a fork can work for dipping, a proper candy dipping tool can make a huge difference in ease and efficiency. These tools often have thin, wire loops or prongs that allow excess coating to drip off cleanly, leading to smoother, less messy Frankenstein Oreo Balls. If you don’t have one, try bending a regular dinner fork slightly to create wider gaps between the tines – this can help with drainage. A small, deep bowl for your candy melts is also helpful, as it allows you to fully submerge the truffles without needing too much coating at once.
-
Storage and Shelf Life:
These delightful Frankenstein Oreo Balls are best stored in an airtight container in the refrigerator. They will remain fresh and delicious for up to a week. In fact, some people find that the flavors meld even more beautifully after a day or two in the fridge. If you want to make them further in advance, they can also be frozen in an airtight container for up to a month. Just be sure to thaw them in the refrigerator before serving, and allow them to come closer to room temperature for the best flavor and texture experience.
-
Get Creative with Decorations:
While the recipe specifies edible eyes, pretzel bolts, and chocolate stitches, don’t be afraid to let your imagination run wild! You could use mini chocolate chips for pupils, or even add a sprinkle of edible glitter for extra spooky sparkle. Different colored candy melts could be used for hair or other features. The key is to have fun with it! These Frankenstein Oreo Balls are designed to be playful and a little bit quirky, so embrace the monster-making process.
-
Troubleshooting Sticky Situations:
If your OREO and cream cheese mixture is too sticky to roll easily, try chilling it briefly (10-15 minutes) before rolling. Sometimes, the warmth from your hands can make it more pliable, but also stickier. If your hands are getting too messy, a quick rinse with cold water and thorough drying between rolling batches can help. You can also lightly dust your palms with a tiny bit of powdered sugar, though I rarely find this necessary if the mixture is properly chilled.
-
Making Ahead for Parties:
These Frankenstein Oreo Balls are fantastic for preparing in advance. You can make the OREO base balls and chill them for up to a few days before dipping and decorating. This breaks up the workload, making them a perfect treat for busy party preparations. Just ensure they are well-covered in the refrigerator to prevent them from drying out or absorbing any fridge odors.
-
Involve the Kids!:
This recipe is incredibly kid-friendly, especially the decorating part. Once the green coating is set, older children can have a blast piping on the stitches and mouths. Even younger ones can help attach the googly eyes and pretzel bolts immediately after dipping. It’s a wonderful way to get them involved in the kitchen and create lasting memories, all while making delicious Frankenstein Oreo Balls.
Conclusion:
Ultimately, what I adore most about this recipe is its uncanny ability to transform simple ingredients into something truly extraordinary and effortlessly fun. I truly believe that these aren’t just any dessert; they’re a celebration in every bite, a guaranteed smile-inducer, and a testament to how creative and delightful no-bake treats can be. From the moment I first conceptualized these, I knew they were destined to become a beloved classic in my kitchen, and I am so excited for them to become one in yours too. The ease with which they come together, combined with their undeniably charming appearance, makes them a hands-down winner for any occasion. They’re a fantastic project for a gloomy afternoon, a brilliant centerpiece for a spooky gathering, or just a delightful surprise to brighten someone’s day. There’s a profound joy in seeing the vibrant green candy melts come to life, transforming humble Oreo cookies into something that looks like it stepped right out of a whimsical, slightly mad scientist’s lab.
When it comes to serving, these delightful treats are incredibly versatile. Imagine presenting a platter of these eye-catching confections at your next Halloween party – they practically scream “fun!” Pair them with a tall, frosty glass of milk for the ultimate nostalgic snack, or serve them alongside a rich, dark coffee for a sophisticated contrast. They also make a fantastic addition to any dessert buffet, standing out with their unique color and playful design. For a truly show-stopping display, arrange them on a dark plate or a bed of crumbled chocolate cookies to enhance their vibrant green hue. Don’t limit yourself to just parties, though; these are perfect for an afternoon pick-me-up or a sweet ending to a family meal. I even love to package a few of them up in cute little cellophane bags tied with a ribbon as thoughtful, homemade gifts for friends and neighbors during the holiday season or just as a sweet gesture of appreciation.
But the fun doesn’t stop there! This recipe is also wonderfully adaptable, inviting you to unleash your inner mad scientist with variations. Feel free to experiment with different Oreo flavors – imagine Golden Oreos for a “Mummy” look with white candy melts, or perhaps Mint Oreos for an even more vibrant green base. You could also swap out the candy melt color entirely to match other themes; orange for pumpkins, purple for witches, or even a mix of colors for a rainbow effect. Consider adding a few drops of peppermint extract or almond extract to the cream cheese mixture for an extra layer of flavor complexity. For additional textural interest, try rolling some of the finished balls in finely chopped nuts, shredded coconut, or even a sprinkle of festive, colorful jimmies before the candy melts set. A drizzle of contrasting chocolate or caramel sauce over the set candy melt coating would also add another dimension of visual appeal and flavor. The possibilities are genuinely endless, and I encourage you to get creative and make these truly your own. Each variation offers a fresh take on the classic, allowing you to tailor the treat to your specific tastes or the theme of your event. Remember, cooking should always be an adventure, and these
Frankenstein Oreo Balls
are the perfect canvas for your culinary explorations.
So, I truly hope you’re feeling inspired to roll up your sleeves and give these fantastic treats a try! There’s an immense satisfaction in creating something so delightful from scratch, especially when the results are this charming and delicious. I promise you, the smiles and compliments you’ll receive will be well worth the minimal effort. And when you do whip up a batch, please don’t keep it a secret! I would absolutely love to hear about your experience. Did you try any fun variations? What kind of reactions did you get when you served them? Share your photos and your stories – I’m always so thrilled to see your creations come to life. Your feedback and creativity inspire not only me but also our entire community of fellow food enthusiasts. Happy baking, or rather, happy no-baking!
Frankenstein Oreo Balls
A delightful, no-bake Halloween treat, these Frankenstein Oreo Balls feature a creamy Oreo base, vibrant green candy coating, and playful monster decorations. Easy to make and a hit at any spooky gathering!
Ingredients
-
36 Oreos, finely crushed
-
8 oz cream cheese, softened at room temperature
-
1 tsp vanilla extract
-
2 cups light green melting wafers
-
½ cup black or dark chocolate melting wafers
-
1-½ tbsp Crisco shortening
-
Black sprinkles (long, not round)
-
Pretzel sticks
-
Small candy eyes
Instructions
-
Step 1
Finely crush 36 Oreos in a food processor or a sealed bag with a rolling pin. -
Step 2
In a bowl, combine crushed Oreos, 8 oz softened cream cheese, and 1 tsp vanilla extract until a cohesive dough forms. -
Step 3
Roll the mixture into approximately 38 (1 to 1.5-inch) balls. Place them on parchment-lined baking sheets. -
Step 4
Chill the Oreo balls in the refrigerator for 30-60 minutes until very firm. -
Step 5
Melt 2 cups light green melting wafers with 1-½ tbsp Crisco shortening in a microwave or double boiler until smooth and fluid. Keep warm. -
Step 6
Dip each chilled Oreo ball into the green coating, allowing excess to drip off. Place on parchment paper. -
Step 7
While the coating is still wet, immediately press two small candy eyes and two pretzel stick halves into each ball as ‘bolts’. -
Step 8
Refrigerate the decorated balls for 15-20 minutes until the green coating is completely set. -
Step 9
Melt ½ cup black or dark chocolate melting wafers. Pipe stitches and mouths onto the firm Frankenstein Oreo Balls. Optionally, add black sprinkles. -
Step 10
Allow chocolate details to set, then serve and enjoy!
Important Information
Nutrition Facts (Per Serving)
It is important to consider this information as approximate and not to use it as definitive health advice.
Allergy Information
Please check ingredients for potential allergens and consult a health professional if in doubt.
Leave a Comment