
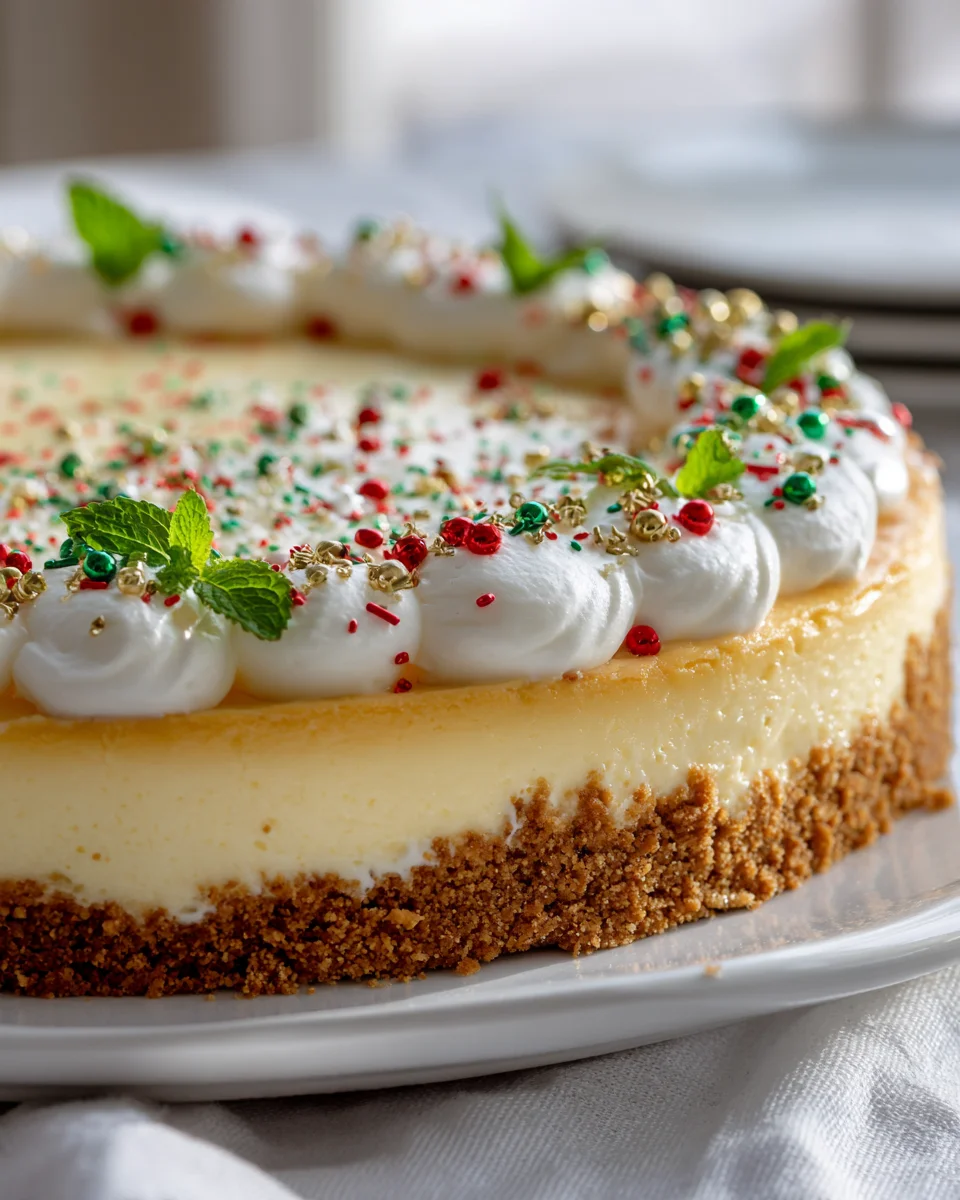
Holiday Cookie Crust Christmas Cheesecake
There’s nothing quite like the magic of the holiday season, and for me, that magic often revolves around delicious food – especially dessert! This year, I’m absolutely thrilled to share my recipe for Holiday Cookie Crust Christmas Cheesecake. What makes this cheesecake truly special, you ask? Well, it takes the classic, velvety smooth cheesecake we all adore and elevates it with a festive twist: a buttery, crumbly crust made from your favorite holiday cookies! Forget the usual graham crackers; we’re talking about a base that infuses every slice with that unmistakable taste of Christmas joy.
I know you’re going to love this recipe because it strikes the perfect balance between impressive and incredibly easy. It’s a showstopper centerpiece for any holiday gathering, guaranteed to wow your guests with its rich, creamy texture and delightful, unique cookie base. Imagine biting into that perfect slice: the cool, tangy cheesecake followed by the sweet, spiced crunch of a Christmas cookie. It’s pure holiday bliss! This dish is a celebration of flavors, combining that beloved cheesecake filling with the festive cheer of a homemade cookie crust, making it an irresistible treat that embodies the spirit of the season.

Ingredient Notes
When I set out to create a truly magical Holiday Cookie Crust Christmas Cheesecake, I knew every ingredient had to pull its weight to deliver that festive cheer and incredible flavor. Here’s a rundown of what you’ll need and why, along with some great substitutions to make it your own.
- Full-Fat Cream Cheese: This is the backbone of any great cheesecake, and for a rich, creamy texture, full-fat is non-negotiable. Make sure it’s softened to room temperature – I can’t stress this enough! Cold cream cheese will result in a lumpy batter, no matter how much you beat it.
- Granulated Sugar: For sweetness in the filling. You can slightly reduce the amount if your cookies for the crust are particularly sweet.
- Large Eggs: These act as a binder and provide structure to our cheesecake. Just like the cream cheese, have them at room temperature. This helps them incorporate smoothly into the batter, preventing overmixing.
- Non-Alcoholic Vanilla Extract: A classic flavor enhancer that truly rounds out the cheesecake. For an extra festive touch, consider a high-quality non-alcoholic vanilla extract or even a non-alcoholic rum or maple extract for a different holiday twist.
- Sour Cream or Full-Fat Greek Yogurt: I love adding sour cream because it contributes a beautiful tanginess that balances the richness of the cream cheese, and it helps create an incredibly smooth, velvety texture. Make sure this is also at room temperature. Full-fat plain Greek yogurt can be a fantastic substitute if you’re looking for a slightly lighter tang.
- Holiday Cookies for the Crust: Ah, the star of the crust! This is where the “holiday cookie” magic truly shines. I adore using crushed gingerbread cookies for their warm spice and crunch, or even speculoos (biscoff) cookies for a caramel note. Shortbread cookies are also fantastic for a buttery, crumbly base. You could even use classic sugar cookies if that’s your family’s holiday favorite. The key is to pick something with good flavor that complements the cheesecake.
- Unsalted Butter: Melted butter is what binds our crushed cookie crumbs together to form that perfect crust. Using unsalted butter gives you control over the overall saltiness, which is important for balance.
- Christmas Spices: To infuse our cheesecake with that unmistakable holiday aroma and flavor, I use a beautiful blend of ground cinnamon, nutmeg, and a hint of ground ginger. A tiny pinch of ground cloves can also add depth, but use it sparingly as it’s quite potent.
- Orange Zest: A little bit of fresh orange zest brightens up all those warm spices and adds a lovely, festive citrus note that just sings “Christmas.”
Step-by-Step Instructions
Making this Holiday Cookie Crust Christmas Cheesecake is a delightful journey, and I’m here to guide you through each step to ensure your holiday masterpiece turns out perfectly!
- Prepare Your Crust: First, preheat your oven to 350°F (175°C). Take your chosen holiday cookies (I typically use about 10-12 ounces) and crush them finely. You can do this in a food processor for speed and consistency, or place them in a Ziploc bag and crush them with a rolling pin – a fun way to release some holiday stress! Once crushed, transfer the crumbs to a bowl. Melt about ½ cup of unsalted butter and pour it over the crumbs, mixing well until every crumb is moistened. Press this mixture firmly and evenly into the bottom of a 9-inch springform pan. I find using the bottom of a flat-bottomed glass or a measuring cup helps create a really compact crust. Bake the crust for 8-10 minutes until lightly golden and fragrant. Remove from the oven and set aside to cool slightly while you prepare the filling. Reduce oven temperature to 325°F (160°C).
- Prepare for Water Bath (Optional, but Recommended!): This is my secret to a crack-free, perfectly creamy cheesecake. Wrap the bottom and sides of your springform pan tightly with several layers of heavy-duty aluminum foil. This prevents water from seeping into your crust when it bakes in the water bath.
- Create the Christmas Cheesecake Filling: In a large mixing bowl, using an electric mixer on medium-low speed, beat the softened cream cheese until it’s completely smooth and creamy, about 2-3 minutes. Make sure there are no lumps! Gradually add the granulated sugar, beating until just combined and fluffy, scraping down the sides of the bowl as needed. Now, beat in the Christmas spices (cinnamon, nutmeg, ginger) and orange zest until evenly distributed.
- Incorporate Eggs and Vanilla: Reduce the mixer speed to low. Add the eggs, one at a time, beating just until each egg is incorporated before adding the next. Be very careful not to overmix at this stage; overmixing introduces too much air, which can cause cracks later. Finally, gently fold in the room-temperature sour cream (or Greek yogurt) and the non-alcoholic vanilla extract until just combined. The batter should be smooth and luxurious.
- Bake Your Cheesecake: Pour the cheesecake filling over the cooled cookie crust in your prepared springform pan. Place the springform pan into a larger roasting pan. Carefully pour hot water into the roasting pan, coming about halfway up the sides of the springform pan. This creates our water bath. Carefully transfer the entire roasting pan with the cheesecake to the preheated oven.
- Bake and Cool Slowly: Bake for 60-75 minutes, or until the edges are set but the center still has a slight jiggle (like firm Jell-O). The internal temperature should be around 150°F (65°C). Once baked, turn off the oven, crack the oven door open slightly, and let the cheesecake cool in the oven for 1 hour. This slow cooling prevents drastic temperature changes that can lead to cracks.
- Chill Thoroughly: After cooling in the oven, remove the cheesecake from the water bath (carefully!), unwrap the foil, and let it cool completely on a wire rack at room temperature for another hour. Once cool, cover it loosely with plastic wrap and refrigerate for at least 6-8 hours, or ideally, overnight. Chilling is crucial for the cheesecake to fully set and achieve its perfect texture.
- Decorate and Serve: Once thoroughly chilled, carefully run a thin knife around the edge of the springform pan before releasing the sides. Now it’s time to unleash your inner holiday decorator! I love to garnish mine with sugared cranberries, a sprinkle of extra cinnamon, candied pecans, or a festive drizzle of melted white chocolate. Serve chilled and enjoy the holiday magic!
Tips & Suggestions
Creating the perfect Holiday Cookie Crust Christmas Cheesecake is an art, but with these tips, you’re sure to impress everyone at your holiday gathering!
- Room Temperature Ingredients are Non-Negotiable: I cannot emphasize this enough! Cold cream cheese, eggs, and sour cream will lead to a lumpy batter and a less-than-smooth cheesecake. Plan ahead and take them out of the fridge at least an hour or two before you start baking.
- Don’t Overmix the Batter: Once you add the eggs, mix on low speed just until combined. Overmixing incorporates too much air, which expands during baking and then collapses during cooling, often leading to unsightly cracks on the surface of your beautiful cheesecake.
- The Magic of a Water Bath: While optional, I truly believe a water bath is your best friend for a perfectly cooked, crack-free cheesecake. It provides a moist, even heat environment, ensuring gentle baking. If you skip it, your cheesecake might bake too quickly, dry out, and crack.
- Slow and Steady Cooling Wins the Race: Don’t rush the cooling process! Letting the cheesecake cool gradually in the turned-off oven and then at room temperature before chilling helps prevent cracks and ensures a creamy, even texture throughout.
- Elevate Your Cookie Crust: For an extra layer of flavor, consider adding a pinch of ground cinnamon or a teaspoon of brown sugar to your cookie crumbs before mixing with butter. This deepens the holiday flavor profile of the crust.
- Festive Flavor Enhancements: Beyond the suggested spices and orange zest, you could swirl a spoonful of non-alcoholic cranberry sauce or a spiced apple butter through the filling for an extra burst of Christmas flavor. A few drops of non-alcoholic almond extract can also add a delightful nuance.
- Picture-Perfect Presentation: For a stunning holiday centerpiece, get creative with your toppings! Sugared cranberries (simply boil fresh cranberries in a sugar syrup, then roll in granulated sugar once dry) and fresh rosemary sprigs look like frosted holly. A white chocolate ganache drizzle or edible glitter can also add sparkle. You could even use a cookie cutter to lightly dust powdered sugar in a festive shape (like a star or snowflake) on top of the chilled cheesecake just before serving.
- Know Your Oven: Every oven bakes a little differently. Keep an eye on your cheesecake and remember that the baking time can vary. The center should still have a slight wobble when you gently shake the pan.
Storage
Once you’ve gone to the effort of creating this glorious Holiday Cookie Crust Christmas Cheesecake, you’ll want to make sure it stays fresh and delicious!
- Refrigeration: Your Christmas cheesecake is best stored in an airtight container or covered tightly with plastic wrap in the refrigerator. It will stay wonderfully fresh for 3 to 5 days. I find that the flavors often meld and deepen even further the day after it’s made, so it’s a fantastic make-ahead dessert for holiday gatherings!
- Freezing for Longer Storage: If you’re planning to make this cheesecake well in advance or have leftovers, it freezes beautifully!
- Whole Cheesecake: Once the cheesecake is completely chilled and firm, remove it from the springform pan. Place it on a freezer-safe plate or cardboard round. Flash freeze it uncovered for about 1-2 hours until solid. This prevents the plastic wrap from sticking to the surface. Once frozen solid, wrap the cheesecake tightly first in plastic wrap, then in a layer of aluminum foil.
- Individual Slices: For easy portioning, you can cut the cheesecake into individual slices after it’s chilled. Wrap each slice tightly in plastic wrap, then place them in an airtight freezer-safe container or freezer bag.
- Thawing: When you’re ready to enjoy a frozen cheesecake (whole or slices), transfer it from the freezer to the refrigerator and let it thaw slowly overnight. Thawing slowly helps maintain its creamy texture. Avoid thawing at room temperature, as this can affect the texture and food safety.
- Best Enjoyed Chilled: Regardless of how you store it, this Holiday Cookie Crust Christmas Cheesecake truly shines when served cold, directly from the refrigerator.
Final Thoughts
There’s something truly magical about the holiday season, and for me, it always revolves around sharing delicious food with loved ones. That’s why I’m so excited for you to try this Holiday Cookie Crust Christmas Cheesecake. It’s not just any cheesecake; it’s a celebration in every slice, perfectly capturing the spirit of Christmas.
The delightful crunch of the festive cookie crust combined with the rich, creamy texture of the cheesecake creates a symphony of flavors and textures that simply screams ‘holidays’. It’s a showstopper, a conversation starter, and guaranteed to bring smiles to every face at your festive gathering. Imagine the joy of serving such a beautiful and incredibly tasty dessert!
So go ahead, embrace the holiday spirit, and treat yourself and your family to the unforgettable experience of making and tasting this incredible Holiday Cookie Crust Christmas Cheesecake. I promise, it’s a holiday tradition waiting to happen, a dessert that truly embodies the warmth and wonder of the season. Enjoy every single, blissful bite!
Festive Holiday Cookie Crust Christmas Cheesecake
- Total Time: 1 hour 45 minutes
- Yield: 12 servings 1x
Description
This Holiday Cookie Crust Christmas Cheesecake combines a rich, creamy filling with a delightful cookie crust, creating a perfect holiday dessert. It’s an impressive yet easy centerpiece for your festive gatherings.
Ingredients
- 16 oz Full-Fat Cream Cheese, softened
- 1 cup Granulated Sugar
- 3 Large Eggs, at room temperature
- 1 tsp Non-Alcoholic Vanilla Extract
- 1 cup Sour Cream or Full-Fat Greek Yogurt, at room temperature
- 10–12 oz Holiday Cookies for the Crust, crushed
- ½ cup Unsalted Butter, melted
- 1 tsp ground Cinnamon
- ½ tsp ground Nutmeg
- ½ tsp ground Ginger
- a pinch of ground Cloves
- 1 tbsp Orange Zest
Instructions
- Preheat your oven to 350°F (175°C). Crush your chosen holiday cookies finely and transfer the crumbs to a bowl.
- Melt about ½ cup of unsalted butter and pour it over the crumbs, mixing well until every crumb is moistened. Press this mixture firmly and evenly into the bottom of a 9-inch springform pan.
- Bake the crust for 8-10 minutes until lightly golden and fragrant. Remove from the oven and set aside to cool slightly while you prepare the filling. Reduce oven temperature to 325°F (160°C).
- Wrap the bottom and sides of your springform pan tightly with several layers of heavy-duty aluminum foil to prevent water from seeping in.
- In a large mixing bowl, using an electric mixer on medium-low speed, beat the softened cream cheese until smooth and creamy, about 2-3 minutes. Gradually add the granulated sugar, beating until just combined and fluffy.
- Beat in the Christmas spices (cinnamon, nutmeg, ginger) and orange zest until evenly distributed.
- Reduce the mixer speed to low. Add the eggs, one at a time, beating just until each egg is incorporated before adding the next. Gently fold in the room-temperature sour cream (or Greek yogurt) and the non-alcoholic vanilla extract until just combined.
- Pour the cheesecake filling over the cooled cookie crust in your prepared springform pan. Place the springform pan into a larger roasting pan and carefully pour hot water into the roasting pan, coming about halfway up the sides of the springform pan.
- Bake for 60-75 minutes, or until the edges are set but the center still has a slight jiggle. Once baked, turn off the oven, crack the oven door open slightly, and let the cheesecake cool in the oven for 1 hour.
- After cooling in the oven, remove the cheesecake from the water bath, unwrap the foil, and let it cool completely on a wire rack at room temperature for another hour. Cover it loosely with plastic wrap and refrigerate for at least 6-8 hours, or ideally, overnight.
- Once thoroughly chilled, carefully run a thin knife around the edge of the springform pan before releasing the sides. Garnish as desired and serve chilled.
- Prep Time: 30 mins
- Cook Time: 75 mins
- Category: Dessert
- Method: Baking
- Cuisine: American
Nutrition
- Serving Size: 1 slice
- Calories: 350
- Sugar: 25 g
- Sodium: 300 mg
- Fat: 25 g
- Saturated Fat: 15 g
- Unsaturated Fat: 5 g
- Trans Fat: 0 g
- Carbohydrates: 30 g
- Fiber: 1 g
- Protein: 6 g
- Cholesterol: 90 mg
Keywords: Ensure all ingredients are at room temperature for a smooth batter. Avoid overmixing after adding eggs to prevent cracks. A water bath is recommended for a creamy texture.
Leave a Comment