
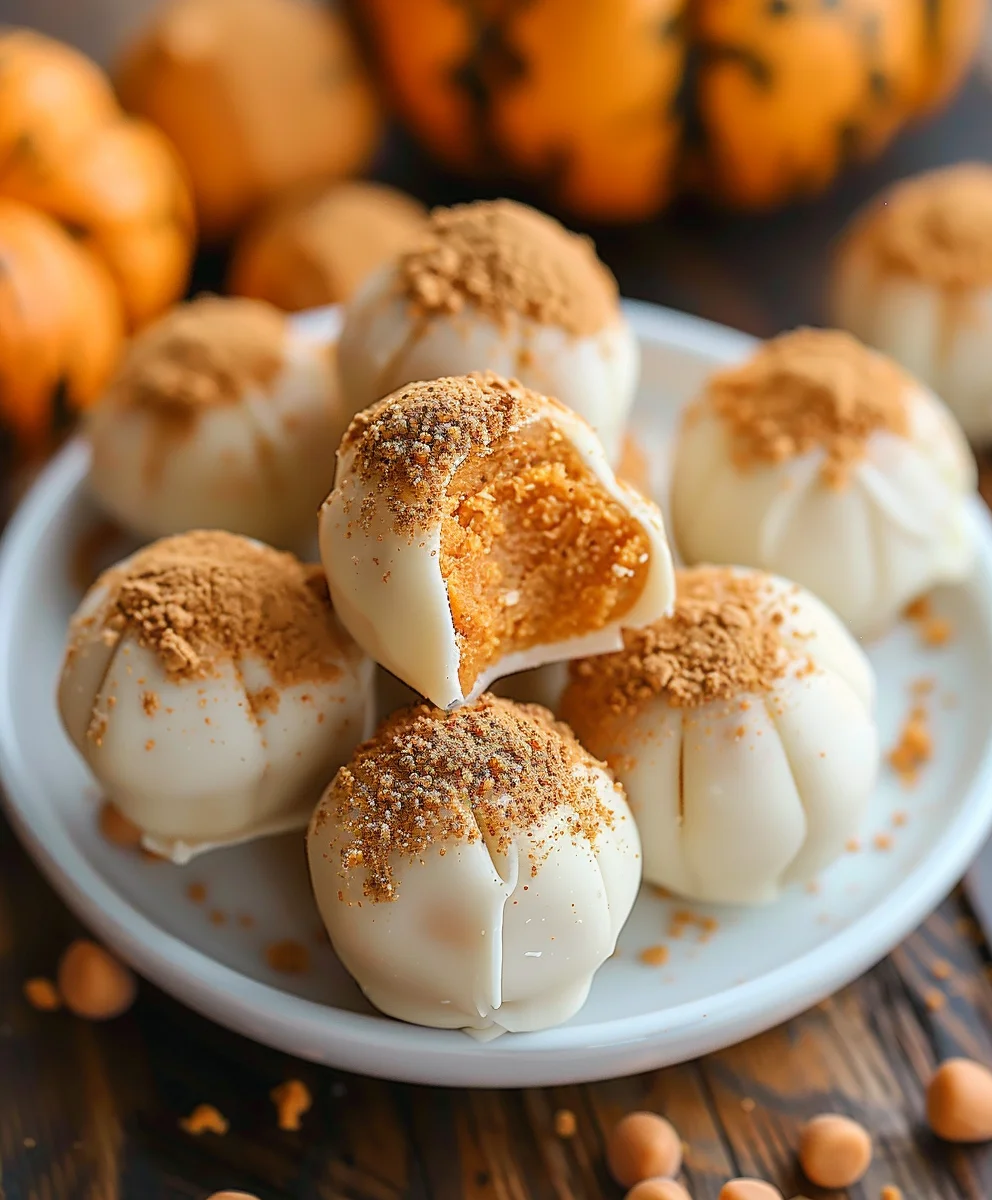
Pumpkin Cheesecake Truffles represent the quintessential autumn indulgence, transforming beloved seasonal flavors into a delightful, bite-sized confection. I find myself imagining a perfectly spiced pumpkin cheesecake, rich and creamy, rolled into a decadent sphere and often coated in a delicate white chocolate or a dusting of cinnamon. For me, the arrival of autumn always brings a yearning for the comforting tastes of pumpkin and warm spices, flavors deeply embedded in the cultural fabric of fall celebrations, from harvest festivals to Thanksgiving feasts. While traditional pumpkin pie and classic cheesecake hold their revered places, I believe these inventive truffles offer a modern, sophisticated twist that truly captures the essence of the season.
The Irresistible Appeal of These Autumnal Bites
What makes these little gems so universally adored? Firstly, it’s the unparalleled combination of creamy, tangy cheesecake infused with sweet pumpkin and aromatic spices like cinnamon, nutmeg, and ginger – a symphony for the palate that I simply adore. Secondly, their convenience is unmatched; often no-bake, they are remarkably easy to prepare, making them an ideal treat for busy hosts or a delightful project for a cozy afternoon. Each one is a miniature masterpiece, offering a luxurious texture and an explosion of flavor that makes them utterly irresistible. These Pumpkin Cheesecake Truffles are not just a dessert; they are an experience, perfect for sharing at gatherings or savoring as a personal moment of pure bliss. I invite you to get ready to fall in love with your new favorite autumn treat!

Ingredients:
- For the Pumpkin Cheesecake Filling:
- 16 ounces (two 8-ounce blocks) full-fat cream cheese, softened to room temperature
- 1 cup pure pumpkin puree (not pumpkin pie filling)
- 1 cup powdered sugar (confectioners’ sugar), sifted
- 1 teaspoon ground cinnamon
- ½ teaspoon ground nutmeg
- ¼ teaspoon ground ginger
- ⅛ teaspoon ground cloves (or a tiny pinch of allspice)
- 1 teaspoon pure vanilla extract
- ½ cup finely crushed graham cracker crumbs (optional, but highly recommended for texture and stability)
- For the Coating and Decoration:
- 24 ounces good quality white chocolate, chopped (or white chocolate melting wafers/candy melts for easier melting)
- 1 tablespoon coconut oil or vegetable shortening (optional, for smoother dipping)
- Optional garnishes:
- Additional graham cracker crumbs
- A sprinkle of ground cinnamon or pumpkin pie spice
- Melted dark or milk chocolate for drizzling
- Finely chopped pecans or walnuts
Preparing the Pumpkin Cheesecake Filling
- Soften the Cream Cheese: Before I even think about mixing, I make sure my full-fat cream cheese blocks are thoroughly softened to room temperature. This is absolutely critical for achieving a silky-smooth truffle filling without any lumps. If you forget to take it out in advance, you can carefully soften it in the microwave in 15-second intervals, but be very careful not to melt it. We’re aiming for pliable, not liquid.
- Cream the Cream Cheese: In a large mixing bowl, using an electric mixer (either a stand mixer with a paddle attachment or a hand-held mixer), I beat the softened cream cheese on medium speed for about 2-3 minutes until it’s wonderfully light, fluffy, and completely smooth. I always make sure to scrape down the sides and bottom of the bowl frequently during this step to ensure everything gets incorporated evenly. This aeration makes for an incredibly delightful texture in our finished Pumpkin Cheesecake Truffles.
- Add Pumpkin Puree and Vanilla: Next, I add the pure pumpkin puree and the vanilla extract to the creamed cream cheese. I continue to beat on medium speed until these ingredients are fully combined and the mixture is uniformly orange, about another 1-2 minutes. Again, don’t forget to scrape down the bowl. We want every bit of that pumpkin goodness distributed throughout. It’s so important that the pumpkin puree is pure and not pie filling; the latter has added spices and sweeteners that will throw off our carefully balanced flavor profile.
- Incorporate Dry Ingredients: Now it’s time for the sweetness and spice! I gradually add the sifted powdered sugar, ground cinnamon, nutmeg, ginger, and cloves to the pumpkin mixture. I always start mixing on low speed to prevent a cloud of powdered sugar from erupting in my kitchen, then increase to medium until everything is perfectly combined and the mixture is thick and luscious. This usually takes another 2-3 minutes. Sifting the powdered sugar beforehand is a small but mighty step that prevents any lumps and ensures an incredibly smooth filling. The aroma filling the kitchen at this stage is absolutely heavenly!
- Mix in Graham Cracker Crumbs (Optional but Recommended): If I’m using them, I gently fold in the finely crushed graham cracker crumbs at this point. I use a spatula for this, just until they are evenly distributed. The graham cracker crumbs aren’t just for flavor; they really help to firm up the filling, making the truffles much easier to roll and ensuring they hold their shape beautifully. They add a subtle, pleasant texture contrast too.
- First Chill: This is a crucial step! Once the filling is perfectly mixed, I cover the bowl tightly with plastic wrap and place it in the refrigerator for at least 4 hours, or preferably overnight. Don’t skip this chilling period! It’s essential for the mixture to firm up properly, which will make rolling the truffles significantly easier and prevent them from being too sticky. A well-chilled filling is the secret to perfectly formed Pumpkin Cheesecake Truffles.
Chilling and Shaping the Truffles
- Prepare Your Workspace: Once the filling is thoroughly chilled and firm, I line a large baking sheet with parchment paper or a silicone baking mat. This provides a non-stick surface for our rolled truffles and makes cleanup a breeze. I also find it helpful to have a small bowl of warm water and a clean towel nearby for cleaning my hands between rolling batches.
- Scoop and Roll: Using a small cookie scoop (about 1-inch in diameter or a tablespoon measure) is my go-to method for ensuring uniform truffle sizes. I scoop out portions of the chilled pumpkin cheesecake mixture. Then, with clean hands, I gently roll each portion into a smooth, round ball, about 1 to 1.5 inches in diameter. The mixture should be firm enough to handle without sticking too much. If it starts to get too soft, I pop the bowl back into the fridge for 15-20 minutes. Consistency is key for beautiful Pumpkin Cheesecake Truffles.
- Second Chill: As I finish rolling each truffle, I place it onto the prepared baking sheet. Once all the filling has been rolled into balls, I return the baking sheet to the refrigerator for another 30-60 minutes. This second chill is equally important because it ensures the truffles are very firm and cold before they are dipped in chocolate. A cold truffle will set the chocolate coating quickly and prevent it from melting the truffle itself.
Preparing the Coating
-
Melt the White Chocolate: While the truffles are undergoing their final chill, I prepare the white chocolate coating. There are a couple of ways to do this:
- Microwave Method: Place the chopped white chocolate (or candy melts) in a microwave-safe bowl. Microwave in 30-second intervals, stirring thoroughly after each interval, until the chocolate is smooth and completely melted. Be very careful not to overheat the white chocolate, as it can seize and become clumpy. If using, stir in the coconut oil or shortening for a smoother, more fluid consistency perfect for dipping.
- Double Boiler Method: Place the chopped white chocolate in a heatproof bowl set over a saucepan of simmering water (make sure the bottom of the bowl does not touch the water). Stir constantly until the chocolate is smooth and melted. Once again, stir in the coconut oil or shortening if desired. This method provides a more gentle and controlled melt, which is often preferred for white chocolate.
I always ensure my melted chocolate is smooth, glossy, and at a comfortable temperature for dipping, not too hot.
Dipping and Finishing the Pumpkin Cheesecake Truffles
- Prepare for Dipping: Once the chocolate is melted and smooth, I retrieve the chilled pumpkin cheesecake balls from the refrigerator. I keep the baking sheet lined with parchment paper ready for the dipped truffles. I also prepare any desired garnishes, having them ready in small bowls before I start dipping. Speed and organization are your friends here!
- Dip the Truffles: Using a dipping tool, a fork, or even a toothpick, I carefully drop one chilled truffle ball into the melted white chocolate. I make sure it’s fully submerged. Then, I lift the truffle out, tapping the fork gently against the side of the bowl to allow any excess chocolate to drip off. The goal is a thin, even coating. If the chocolate starts to thicken as you dip, you can gently reheat it for a few seconds.
- Place and Garnish: As soon as I lift each chocolate-coated truffle from the bowl, I gently place it back onto the parchment-lined baking sheet. While the chocolate is still wet, this is the perfect moment to add any garnishes. I might sprinkle a pinch of ground cinnamon, a few more graham cracker crumbs, or a tiny sprinkle of pumpkin pie spice on top. If I’m feeling fancy, I’ll let the white chocolate coating set slightly, then drizzle with melted dark or milk chocolate for a beautiful contrast. The quick setting of the chocolate on the cold truffle makes this process quite satisfying.
- Allow to Set: After all the Pumpkin Cheesecake Truffles have been dipped and garnished, I place the baking sheet back into the refrigerator. They need about 15-30 minutes for the chocolate coating to fully set and harden. You’ll know they’re ready when the chocolate is firm to the touch and has lost its glossy sheen.
- Final Touches and Storage: Once completely set, these delightful truffles are ready to be enjoyed! If there are any slight imperfections on the bottoms from the parchment paper, I sometimes trim them gently with a small, sharp knife for a perfectly round finish. I store the finished Pumpkin Cheesecake Truffles in an airtight container in the refrigerator. They will stay fresh and delicious for up to one week. Sometimes, I like to bring them out of the fridge for about 10-15 minutes before serving to allow the cheesecake filling to soften just slightly, enhancing that creamy texture. These are truly a wonderful, festive treat, and I always love seeing the happy faces when I serve them! They are perfect for holiday gatherings or just as a special indulgence on a cozy autumn evening.

Conclusion:
Why These Pumpkin Cheesecake Truffles Are Your Next Favorite Dessert:
I truly hope you’re as excited as I am about these incredible no-bake treats! After pouring my heart into perfecting this recipe, I can confidently say that these Pumpkin Cheesecake Truffles are more than just a dessert; they’re a little bite of autumnal bliss, a culinary hug that encapsulates everything wonderful about the season. What makes them an absolute must-try? Well, for starters, there’s the unparalleled combination of creamy, tangy cheesecake filling infused with the warm, comforting spices of pumpkin pie.
Imagine sinking your teeth into a perfectly chilled, velvety smooth center, surrounded by a delicate, crisp chocolate shell. It’s a texture sensation that’s truly out of this world. Beyond the sheer deliciousness, the ease of this recipe is a game-changer. No oven required, minimal fuss, and maximum flavor. They’re quick enough to whip up for an impromptu gathering but elegant enough to grace your holiday dessert table. These truffles offer all the beloved flavors of pumpkin pie and cheesecake in a convenient, poppable format, making them an irresistible crowd-pleaser for any occasion, from casual family nights to festive celebrations.
Elevate Your Truffle Experience: Serving & Creative Twists
Now that you’ve mastered the art of making these divine truffles, let’s talk about how to present them and how you can get even more creative in your kitchen. For serving, these truffles are best enjoyed chilled, straight from the refrigerator. Arrange them artfully on a dessert platter, perhaps alongside a sprinkling of ground cinnamon, a few candied pecans, or even some fresh cranberries for a pop of color during the holidays. They pair beautifully with a warm cup of coffee or a chai latte, making them a perfect afternoon pick-me-up or a sophisticated after-dinner treat. Consider serving them with a small bowl of melted white chocolate or dark chocolate for an interactive dipping experience, allowing your guests to customize their own. For those who love a little extra flair, a drizzle of caramel sauce over the plate just before serving can add another layer of indulgence.
But don’t stop there! The beauty of these truffles lies in their versatility. Want to experiment with the coating? While classic chocolate is always a winner, imagine them dipped in white chocolate, then drizzled with milk chocolate for a striking contrast. Or, for a truly festive look, try rolling them in crushed graham crackers, chopped nuts (like pecans or walnuts), or even a spiced sugar blend before the chocolate sets. You could also infuse the cheesecake filling with a hint of orange zest for a brighter, citrusy note, or add a tiny splash of rum extract or bourbon for an adult-friendly twist (just remember to adjust the liquid consistency if you do). For a different texture inside, consider folding in some finely chopped candied ginger or a few mini chocolate chips into the pumpkin cheesecake mixture before chilling. Each variation offers a new adventure for your taste buds, ensuring that you can tailor this recipe to perfectly suit your preferences or the theme of your gathering.
Your Turn to Create and Share!
I genuinely hope that reading through this recipe has inspired you to step into your kitchen and give these magnificent treats a try. Trust me, the joy of biting into one of your own homemade Pumpkin Cheesecake Truffles is an experience you won’t want to miss. They are simple enough for even beginner bakers (or no-bakers, in this case!) to master, yet impressive enough to wow anyone who tries them. I can’t wait to hear about your experience! Please, don’t be shy; share your truffle triumphs with me and the community. Did you try a fun new variation? Did they disappear instantly at your potluck? Snap a photo, leave a comment, and let me know how they turned out for you. Your feedback and creativity are what make this culinary journey so much fun for all of us. So go ahead, embrace the flavors of the season, and make these irresistible Pumpkin Cheesecake Truffles. I promise, your taste buds will thank you, and you might just discover your new favorite fall dessert tradition!
Easy Pumpkin Cheesecake Truffles
These delightful no-bake pumpkin cheesecake truffles capture the essence of autumn. Creamy pumpkin and warm spices are combined with graham cracker crumbs and white chocolate chips for a perfect, bite-sized fall treat.
Ingredients
-
4 oz cream cheese, softened
-
½ cup canned pumpkin puree
-
1 (14 oz) can sweetened condensed milk
-
½ cup graham cracker crumbs
-
⅓ cup white chocolate chips
Instructions
-
Step 1
In a mixing bowl, beat softened cream cheese until smooth. Add pumpkin puree and sweetened condensed milk; mix until fully combined and smooth. -
Step 2
Fold in graham cracker crumbs and white chocolate chips until evenly distributed throughout the mixture. -
Step 3
Cover the bowl tightly and refrigerate the mixture for at least 2-4 hours, or until it is firm enough to easily roll into balls. -
Step 4
Line a baking sheet with parchment paper. Scoop portions of the chilled mixture (about 1 tablespoon each) and roll them gently into smooth, 1-inch balls. Place them onto the prepared baking sheet. -
Step 5
Return the shaped truffles to the refrigerator for an additional 30 minutes to firm up completely. Serve chilled. Store leftover truffles in an airtight container in the refrigerator for up to one week.
Important Information
Nutrition Facts (Per Serving)
It is important to consider this information as approximate and not to use it as definitive health advice.
Allergy Information
Please check ingredients for potential allergens and consult a health professional if in doubt.
Leave a Comment