
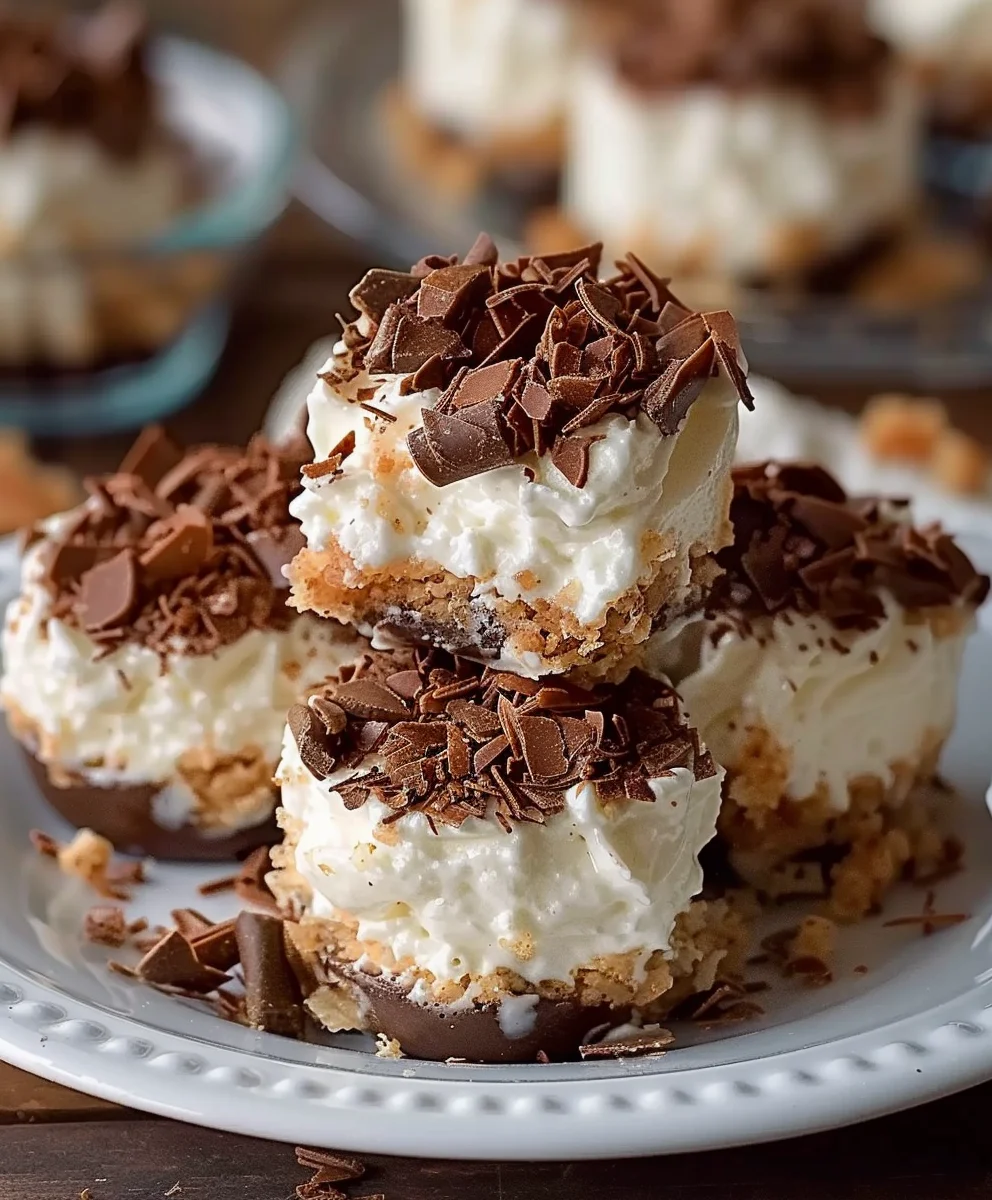
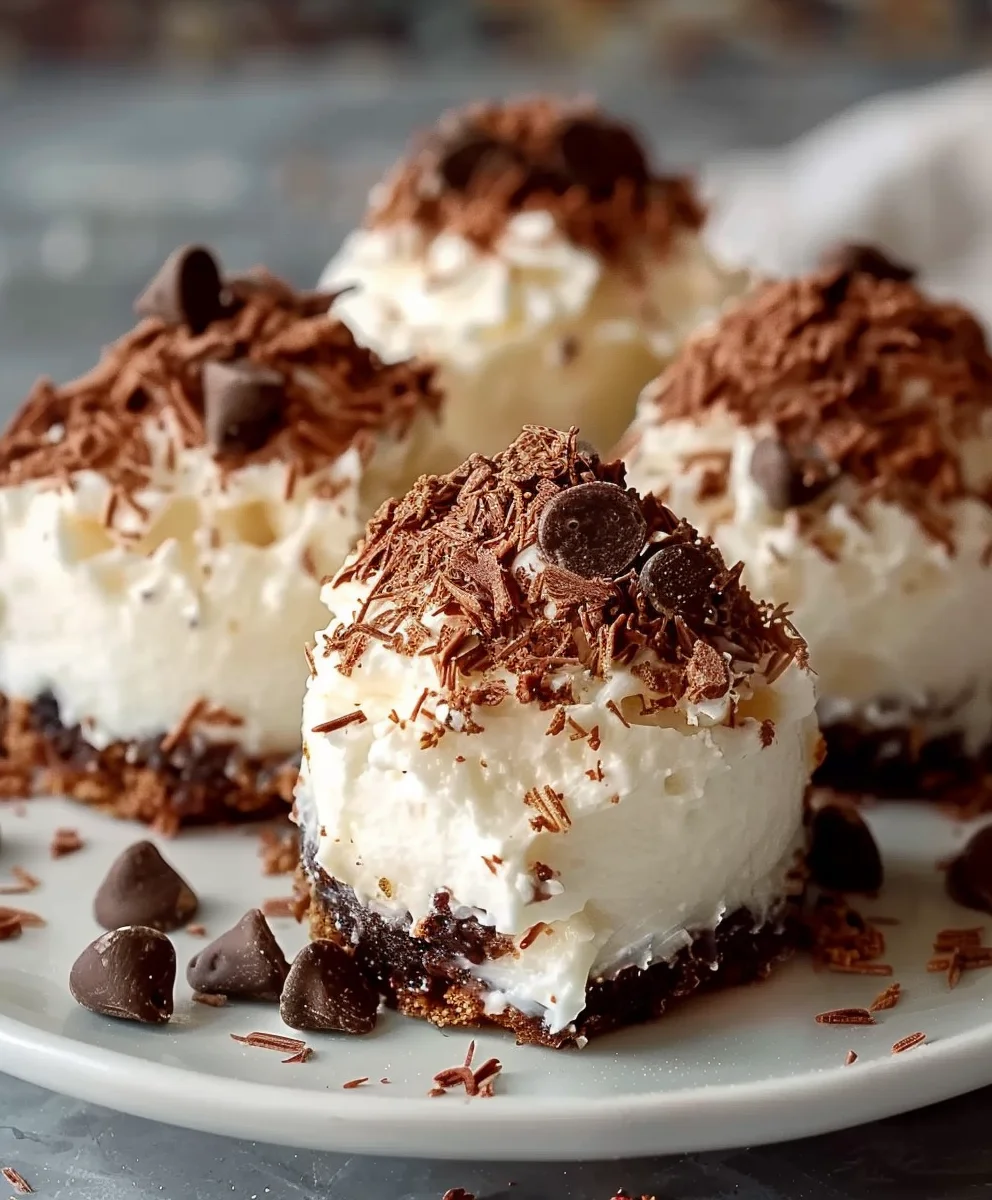
Easy No Bake Moose Farts – a name that promises a chuckle and delivers an utterly delicious, incredibly simple treat! Have you ever found yourself yearning for a sweet confection that’s not only bursting with flavor but also requires absolutely no oven time and minimal effort? Look no further, because you’ve stumbled upon a truly remarkable recipe that ticks all those boxes and more. These charming, bite-sized delights, despite their whimsical moniker, have become a beloved fixture in many kitchens, particularly cherished for their convenience and universal appeal at potlucks, holiday gatherings, and impromptu cravings.
While the playful origins of the “Moose Farts” name are part of their endearing charm, the concept of quick, no-bake, sweet morsels has a rich tradition in home baking, offering a perfect solution for satisfying a sweet tooth without the fuss. People adore this dish for its irresistible combination of chewy texture and rich, comforting flavors—often a delightful medley of chocolate, coconut, and crushed graham crackers. They are remarkably versatile and always a hit! I personally love how quickly they come together, making them an ideal candidate for a last-minute dessert or a fun project with kids. This recipe for Easy No Bake Moose Farts isn’t just a treat; it’s a testament to how simple ingredients can create something truly memorable and joyously fuss-free.

Ingredients:
- Unsalted Butter: 1/2 cup (113g), softened to room temperature
- Powdered Sugar (Confectioners’ Sugar): 2 cups (240g), plus an additional 1/2 cup for rolling
- Unsweetened Cocoa Powder: 1/2 cup (60g), good quality for rich flavor
- Milk: 1/4 cup (60ml), I prefer whole milk for its richness, but any milk will work
- Vanilla Extract: 1 teaspoon, pure vanilla extract for the best aroma
- Old-Fashioned Rolled Oats: 2 cups (180g), not quick oats, as we want that satisfying chewiness
- Optional Add-ins (choose one or a combination):
- Shredded Coconut: 1/2 cup (45g), unsweetened or sweetened
- Creamy Peanut Butter: 1/2 cup (125g)
- Finely Chopped Nuts: 1/2 cup (60g), such as pecans, walnuts, or almonds
- Mini Chocolate Chips: 1/4 cup (40g)
Preparing the Base Mixture for Your Easy No Bake Moose Farts
- Creaming the Butter and Sugar: To begin our journey to delicious Easy No Bake Moose Farts, I grab a large mixing bowl. If I’m feeling fancy or making a double batch, my stand mixer with the paddle attachment is my best friend for this step. Otherwise, a hand mixer or even a sturdy whisk and a little elbow grease will do just fine. I add the softened unsalted butter and the 2 cups of powdered sugar to the bowl. It’s absolutely crucial that the butter is properly softened – not melted, but truly at room temperature. This allows it to cream beautifully with the sugar. I beat them together on medium speed for about 2-3 minutes, until the mixture becomes wonderfully light, fluffy, and almost pale in color. I make sure to pause and scrape down the sides of the bowl with a rubber spatula a few times to ensure every speck of sugar and butter is thoroughly incorporated. This initial step creates a smooth, airy foundation that is key to the melt-in-your-mouth texture of these delightful treats.
- Incorporating Cocoa and Liquid: With the butter and sugar creamed to perfection, it’s time to add the chocolatey goodness. I reduce the mixer speed to low and carefully add the 1/2 cup of unsweetened cocoa powder. Adding it slowly helps prevent a “cocoa cloud” from enveloping my kitchen, which is always a bonus! Once the cocoa is mostly mixed in and no longer dusty, I pour in the 1/4 cup of milk and the 1 teaspoon of vanilla extract. I continue to mix on low speed until all the ingredients are just combined. I’m careful not to overmix at this stage; we just want everything to come together into a rich, dark brown, slightly thick mixture that resembles a dense chocolate frosting. This luscious chocolate base is what makes these Easy No Bake Moose Farts truly irresistible and a beloved treat.
- Folding in the Oats and Optional Add-ins: Now for the ingredient that gives our Easy No Bake Moose Farts their wonderful texture: the oats! I add the 2 cups of old-fashioned rolled oats to the chocolate mixture. I strongly recommend using old-fashioned oats over quick oats; they retain their shape better and provide a satisfying chewiness that quick oats just can’t match. If you’ve decided to include any of the optional add-ins, such as shredded coconut, creamy peanut butter, finely chopped nuts, or mini chocolate chips, this is the perfect moment to fold them in. I switch from my mixer to a sturdy spoon or a durable rubber spatula for this part, as the mixture will become quite thick. I gently, but thoroughly, fold until all the oats and any other additions are completely coated in the rich chocolate mixture. It might feel a bit stiff and dense at first, but with a little persistence, everything will come together into a cohesive, thick mass. The mixture should be firm enough that it holds its shape when pressed together, which is vital for the next steps. This ensures your Easy No Bake Moose Farts have that perfect balance of chewiness and chocolate flavor.
Chilling the Mixture for Optimal Rolling
- Chilling for Firmness: This step is non-negotiable for success when making Easy No Bake Moose Farts! Once all the ingredients are beautifully combined and you have a thick, uniform mixture, I cover the bowl tightly with plastic wrap. Then, I pop it into the refrigerator. I let it chill for at least 30 minutes, and often up to an hour.
Trust me, a well-chilled mixture is the secret to perfectly formed Easy No Bake Moose Farts that are easy to handle and don’t become a sticky mess.
The cold temperature allows the butter to firm up again and helps the oats absorb some of the moisture, making the mixture much less sticky and significantly easier to roll into neat balls. If you try to roll them too soon, you’ll likely end up with sticky hands and misshapen treats. If I’m pressed for time, I might place the bowl in the freezer for about 15-20 minutes, but I make sure to keep a close eye on it to prevent it from freezing solid. The ideal consistency is firm but still pliable.
Forming and Finishing Your Delicious Easy No Bake Moose Farts
- Preparing for Rolling: While our mixture is firming up in the fridge, I take a moment to set up my rolling station. I grab a shallow plate or a piece of parchment paper and spread about 1/2 to 1 cup of extra powdered sugar evenly across it. This powdered sugar will be our delightful coating, giving the finished Easy No Bake Moose Farts their classic, slightly snow-dusted, and wonderfully sweet exterior. While powdered sugar is traditional, you could also get creative here! Finely shredded coconut, additional cocoa powder, or even festive sprinkles can be used for coating if you want to customize your treats. Having this ready before you start rolling makes the process seamless and keeps things tidy.
- Scooping and Rolling: Once the mixture is perfectly chilled and firm, I remove it from the refrigerator. I use a small cookie scoop (about 1-inch in diameter) or two teaspoons to scoop out uniform portions of the mixture. Then, with clean hands, I gently roll each portion between my palms to form a smooth, round ball. I aim for a consistent size, usually about 1 to 1.5 inches in diameter, which makes them perfect for a bite-sized treat. If I notice the mixture becoming too soft or sticky as I roll, I’ll put the bowl back into the fridge for another 10-15 minutes to firm up again. A little trick I’ve found helpful is to slightly dampen my hands with water occasionally; this can help reduce stickiness. Uniformity in size isn’t just for aesthetics; it also ensures that each of your Easy No Bake Moose Farts delivers the same delightful experience.
- Coating for Perfection: Immediately after rolling each individual ball, I gently drop it into the plate of powdered sugar (or your chosen coating). I then roll it around until it is thoroughly and completely coated on all sides. This coating serves multiple purposes: it adds an extra layer of sweetness, prevents the balls from sticking to each other, and provides that lovely visual contrast. Once fully coated, I transfer the finished Easy No Bake Moose Farts to a serving platter or directly into an airtight container. I continue this process until all the mixture has been transformed into these delectable little morsels. This final step is where the magic truly happens, turning a simple mixture into a beautiful, ready-to-enjoy treat.
Storage and Enjoyment Tips for Your Easy No Bake Moose Farts
- Storing Your Treats: To keep your wonderful Easy No Bake Moose Farts fresh and delicious, I recommend storing them in an airtight container in the refrigerator. They will maintain their excellent quality for about 1-2 weeks. I’ve actually found that their flavors tend to deepen and meld together even more after a day or two in the fridge, making them an even more delightful snack. For longer-term storage, these treats are surprisingly freezer-friendly! You can freeze them for up to 2-3 months. If I’m planning to freeze them, I usually arrange them in a single layer on a baking sheet until they’re firm, then transfer them to a freezer-safe bag or container, using parchment paper between layers to prevent sticking. When I’m ready to enjoy a frozen treat, I simply let them thaw in the refrigerator for an hour or two, or sometimes I even enjoy them directly from the freezer for a lovely, fudge-like texture!
- Serving Suggestions and Variations: These versatile Easy No Bake Moose Farts are absolutely perfect for any occasion – whether it’s a casual get-together, a school lunchbox surprise, or just to satisfy a sudden sweet craving. Don’t be shy about experimenting with the flavors and textures; that’s part of the fun!
-
Nut Butter Twist:
For a richer, more substantial treat, you can replace a portion of the softened butter with additional creamy peanut butter, or even try almond butter or cashew butter for a unique twist. This adds a lovely nutty depth.
-
Chocolate Variations:
Feel free to play with the type of cocoa powder. Using a darker cocoa powder will result in a more intense, less sweet chocolate flavor, which can be wonderfully sophisticated. A tiny pinch of espresso powder (about 1/2 teaspoon) added with the cocoa can also dramatically enhance the chocolate notes without making the treats taste like coffee.
-
Extract Adventures:
Beyond the classic vanilla, consider adding a different extract to your mixture. A drop of almond extract can provide a beautiful marzipan-like flavor, while peppermint extract (especially around the holidays!) creates a refreshing mint-chocolate sensation. Orange extract also pairs surprisingly well with chocolate for a bright, zesty note.
-
Crunchy Additions:
Boost the texture by folding in other crunchy elements with the oats. Mini chocolate chips are always a hit, but you could also try finely crushed graham crackers, a handful of dried cranberries for a chewy tartness, or even some mini marshmallows for a different kind of sweetness.
The most important thing is to let your creativity shine! These treats are designed to be incredibly easy, forgiving, and deeply satisfying, guaranteed to be a hit with everyone who tries them. Enjoy the simple pleasure of making these delightful morsels, and prepare to have your “secret” recipe requested time and time again. They truly are a crowd-pleaser and have become a cherished staple in my repertoire of no-bake desserts.
-
Conclusion:
Well, my friends, we’ve reached the sweet finale of our delicious journey! I truly hope you’re as excited as I am about this incredible dessert. What makes this recipe an absolute must-try, in my humble opinion, is its sheer simplicity combined with an utterly addictive flavor profile. Imagine a treat that requires zero oven time, minimal ingredients you likely already have on hand, and comes together faster than you can say “delicious” – that’s precisely what we’ve created here. It’s the kind of recipe that rescues you when unexpected guests arrive, satisfies that late-night sweet craving without a fuss, and earns you rave reviews at potlucks and family gatherings. The rich, chocolatey goodness balanced with the subtle crunch and chewiness is simply irresistible, making it a crowd-pleaser for both kids and adults alike. There’s a certain magic in creating something so delightful with such little effort, and I promise you, that magic is palpable in every single bite of these delectable morsels.
One of the best things about this recipe, beyond its ease, is its versatility. While they are absolutely perfect served chilled, straight from the fridge, don’t hesitate to get creative with how you present and enjoy them. For a charming dessert platter, arrange them alongside fresh berries or a dollop of whipped cream. You could even skewer them onto small sticks with pieces of fruit for a fun, bite-sized party treat. And the variations? Oh, the possibilities are endless! Imagine rolling them in different toppings: finely chopped pecans, colorful sprinkles for a festive occasion, or even a dusting of cocoa powder for an extra layer of sophisticated bitterness. For a holiday twist, try adding a tiny hint of peppermint extract to the mix, then roll them in crushed candy canes. Or, if you’re a coffee lover like me, a touch of espresso powder can deepen the chocolate flavor beautifully.
Don’t be afraid to experiment with extracts
– almond, orange, or even rum extract could add a wonderfully unique twist to the classic.
Now, for the part I’m most excited about: I genuinely encourage each and every one of you to roll up your sleeves and give this recipe a try. You won’t regret it. There’s a special kind of satisfaction that comes from creating something delicious with your own hands, especially when it’s as foolproof as this. Don’t be intimidated; this recipe is designed for success, even for the most novice of kitchen adventurers. Once you’ve whipped up your batch, I would absolutely love to hear about your experience! Your feedback truly makes my day and helps this community grow. Did you try a fun variation? Did they disappear in minutes at your party? Share your stories, your photos, and your tips in the comments section below or on social media. I’m always thrilled to see your culinary creations and learn from your unique interpretations.
So, what are you waiting for? Embrace the simplicity, savor the flavors, and get ready to impress everyone (including yourself!) with a batch of these delightful treats.
This isn’t just another dessert recipe; it’s a gateway to effortless culinary joy
. I promise you, once you discover how wonderfully simple and incredibly tasty these are, they’ll quickly become a cherished staple in your go-to recipe collection. The convenience, the flavor, and the sheer fun of making them make the Easy No Bake Moose Farts a standout. They are a testament to the fact that some of the best things in life truly require the least amount of fuss. Go forth, create, and most importantly, enjoy every single bite. Happy cooking, and I can’t wait to hear all about your delicious adventures!
Easy No Bake Moose Farts
Easy No Bake Moose Farts are a fun, simple, and delicious treat requiring no oven time. These bite-sized delights, featuring graham cracker crumbs, rich cocoa, creamy peanut butter, and a hint of vanilla, are perfect for potlucks, holidays, or a quick sweet craving. They are versatile, easy to make with kids, and a beloved fuss-free dessert.
Ingredients
-
1 cup graham cracker crumbs
-
1/2 cup unsweetened cocoa powder
-
1/2 cup powdered sugar
-
1/2 cup creamy peanut butter
-
1/2 cup softened cream cheese
-
1 teaspoon vanilla extract
-
1/4 cup mini chocolate chips
-
Extra powdered sugar for rolling (optional)
-
Whipped cream (optional)
Instructions
- Step 1
In a large mixing bowl, beat together the softened cream cheese, creamy peanut butter, and vanilla extract until smooth. Gradually add the 1/2 cup powdered sugar and 1/2 cup unsweetened cocoa powder, mixing until well combined and smooth. - Step 2
Stir in the graham cracker crumbs and mini chocolate chips using a sturdy spoon or spatula until all ingredients are evenly distributed and coated. The mixture will be thick and cohesive. - Step 3
Cover the bowl tightly with plastic wrap and refrigerate for at least 30 minutes to 1 hour. This chilling step is crucial to firm up the mixture, making it much easier to handle and roll. - Step 4
Once chilled, scoop out small portions of the mixture (about 1-inch in diameter) and roll them into smooth, round balls between your palms. For a classic finish, roll each ball in extra powdered sugar, or get creative with shredded coconut or cocoa powder. Place finished moose farts on a platter or in an airtight container. - Step 5
Store your Easy No Bake Moose Farts in an airtight container in the refrigerator for 1-2 weeks. For longer storage, freeze for up to 2-3 months. Serve chilled, optionally topped with whipped cream. For dietary variations: use sunflower seed butter for a nut-free option, substitute cream cheese with a dairy-free alternative, or use gluten-free graham crackers for a gluten-free version.
Important Information
Nutrition Facts (Per Serving)
It is important to consider this information as approximate and not to use it as definitive health advice.
Allergy Information
Please check ingredients for potential allergens and consult a health professional if in doubt.
Leave a Comment