
Vampire Fudge Recipe: Are you ready to sink your teeth into a confection that’s as mystifyingly delicious as it is effortlessly made? I’m absolutely thrilled to share with you a treat that promises to be the star of any gathering, captivating palates with its deep, intense flavors and unbelievably smooth texture. This isn’t just any ordinary fudge; it’s a journey into a world of decadent delight, perfect for those who crave something a little extraordinary. While fudge itself boasts a rich history dating back to the late 19th century as a happy accident, this particular incarnation, with its “vampiric” allure, often emerges around autumn festivities, becoming a beloved staple for Halloween parties or any occasion demanding a dramatic, indulgent touch. People adore this dish not only for its incredibly rich, dark chocolate base and creamy melt-in-your-mouth consistency but also for the playful mystery its name suggests. It’s surprisingly simple to prepare, yet yields a gourmet result that feels wonderfully sophisticated. Get ready to master this enchanting Vampire Fudge Recipe and become the legend of your kitchen!

Ingredients:
- 3 cups (about 18 ounces or 510g) high-quality dark chocolate chips or finely chopped dark chocolate (I prefer one around 60-70% cocoa for that deep, rich “vampiric” flavor, but you can adjust based on your preference).
- 1 (14-ounce or 396g) can sweetened condensed milk. Make sure it’s condensed milk, not evaporated milk – it’s crucial for the fudge’s creamy texture!
- 1/2 cup (1 stick or 113g) unsalted butter, cut into smaller pieces.
- 1 teaspoon pure vanilla extract.
- 1/4 teaspoon fine sea salt. This little touch helps to balance the sweetness and really brings out the chocolate flavor.
- 1-2 tablespoons unsweetened cocoa powder (optional, but I find it deepens the chocolate color and intensity, perfect for a dark “vampire” base).
- 1/2 cup (120g) raspberry jam or a thick raspberry puree (ensure it’s smooth, no seeds if possible, for that rich “blood” swirl effect). Alternatively, you could use a concentrated red velvet extract or even just a vibrant red gel food coloring mixed with a little cream cheese frosting for a thicker swirl. I’m going for a raspberry jam swirl for both color and fruity tang!
- 1-2 teaspoons red gel food coloring (high-quality, concentrated gel works best for a truly vibrant, deep red without adding too much liquid). Adjust amount based on desired intensity for your “blood” swirl or drizzle.
- Optional Topping: 1 cup crushed dark chocolate sandwich cookies (like Oreos, with the cream removed and finely crushed). This adds a lovely textural contrast and a somewhat “earthy” or “coffin dirt” aesthetic, which I think is a fun touch for our Vampire Fudge Recipe.
- Optional Garnish: A few fresh raspberries or edible glitter for an extra flourish.
Preparing the Fudge Base
Alright, my friends, let’s dive into making this wonderfully decadent and spooky Vampire Fudge Recipe! We’re going to start by creating the rich, dark chocolate foundation that makes this fudge so irresistible. Get ready for some serious chocolate aroma to fill your kitchen.
- First things first, let’s get our pan ready. Take a 9×13 inch baking pan and line it completely with parchment paper, leaving an overhang on the sides. This overhang will act as little handles later, making it super easy to lift your fudge out once it’s set. If you don’t have parchment, you can lightly grease the pan, but I highly recommend parchment for a clean removal and less mess. Trust me on this one; it’s a game-changer for fudge.
- Now, let’s gather our main fudge ingredients. In a large, heavy-bottomed saucepan, combine your dark chocolate chips or chopped chocolate, the full can of sweetened condensed milk, the cut-up unsalted butter, and the pinch of sea salt. If you’re using the optional cocoa powder for extra depth, add it in now too.
- Place the saucepan over low to medium-low heat. This is where patience is key! We want everything to melt slowly and gently without scorching the chocolate. Continuously stir the mixture with a sturdy spatula or a wooden spoon. Stirring constantly prevents the chocolate from sticking to the bottom and burning, which can give your fudge an unpleasant taste and grainy texture. Keep stirring until all the chocolate and butter are completely melted and the mixture is smooth, glossy, and beautifully uniform. This usually takes about 5-8 minutes. Don’t rush this step; a perfectly melted base is the secret to creamy fudge.
- Once everything is fully melted and wonderfully combined, remove the saucepan from the heat. Now, stir in the vanilla extract. Give it a good stir until the vanilla is thoroughly incorporated. The aroma at this stage is truly heavenly!
- Immediately pour about two-thirds to three-quarters of this dark chocolate fudge mixture into your prepared 9×13 inch pan. Use your spatula to spread it evenly across the bottom. We’re leaving some fudge in the saucepan for our “bloody” swirl, so don’t empty it completely.
Adding the “Vampire” Elements
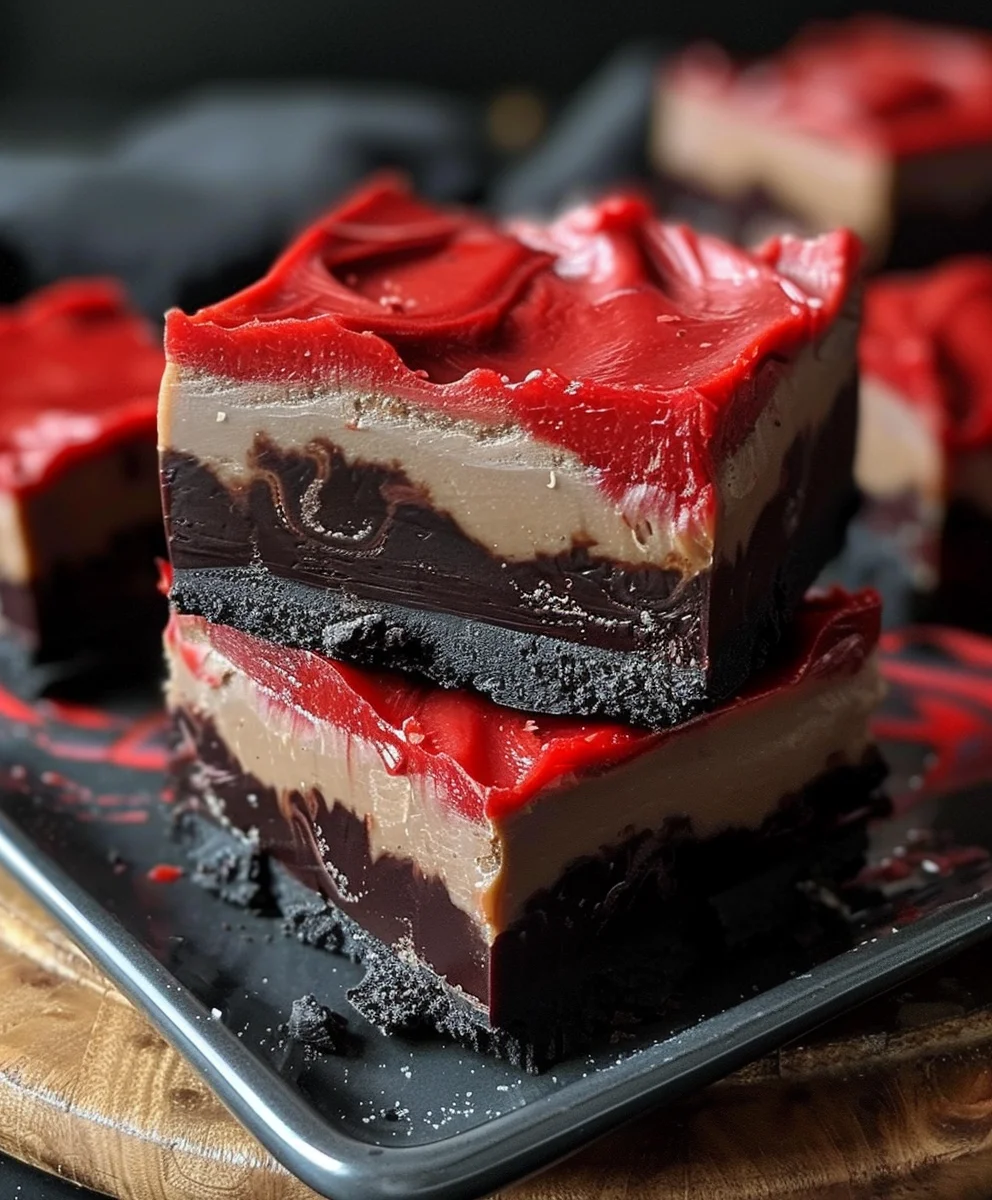
This is where our Vampire Fudge Recipe truly comes to life, taking on its signature spooky and alluring appearance. We’re going to create a vibrant “blood” swirl that contrasts beautifully with the dark chocolate base. This step allows for a lot of creative expression, so have fun with it!
- Back to the saucepan with the remaining fudge mixture. To this, add your raspberry jam (or puree) and the red gel food coloring. Start with about one teaspoon of the red gel coloring, stir it in, and assess the color. You’re aiming for a deep, vibrant, almost unsettling red, so don’t be shy if you need to add more. Gel coloring is very potent, so add small amounts incrementally until you achieve your desired “blood” hue. Mix thoroughly until the color is completely uniform and the jam is well integrated into the remaining fudge. The goal here is a striking contrast against the dark base.
- Now, take spoonfuls of this vibrant red fudge mixture and carefully dollop them over the dark chocolate layer in the pan. Don’t worry about being too neat; random dollops will create a more organic and interesting swirl.
- Once you’ve distributed all the red fudge, take a butter knife, a skewer, or even a chopstick, and gently swirl it through the two layers. Create beautiful, haunting patterns – zigzags, figure eights, or simple loops. Don’t overmix, though, or you’ll lose the distinct red and dark chocolate layers. You want to see clear veins of red running through the dark fudge, like marbled blood. This is the artistic part of our Vampire Fudge Recipe!
- If you’re opting for the optional crushed dark chocolate sandwich cookies, now is the time to sprinkle them generously over the top of your swirled fudge. Press them down ever so slightly with the back of your hand or a spatula to ensure they adhere well to the still-soft fudge. These crushed cookies will provide a delightful crunch and that thematic “coffin dirt” look, really enhancing the spooky vibe of your Vampire Fudge.
Setting and Finishing
Patience, my dear cooks, is a virtue, especially when it comes to setting fudge. This final phase ensures your Vampire Fudge Recipe transforms from a gooey delight into perfectly sliceable, irresistible squares. The wait will be worth every moment, I promise!
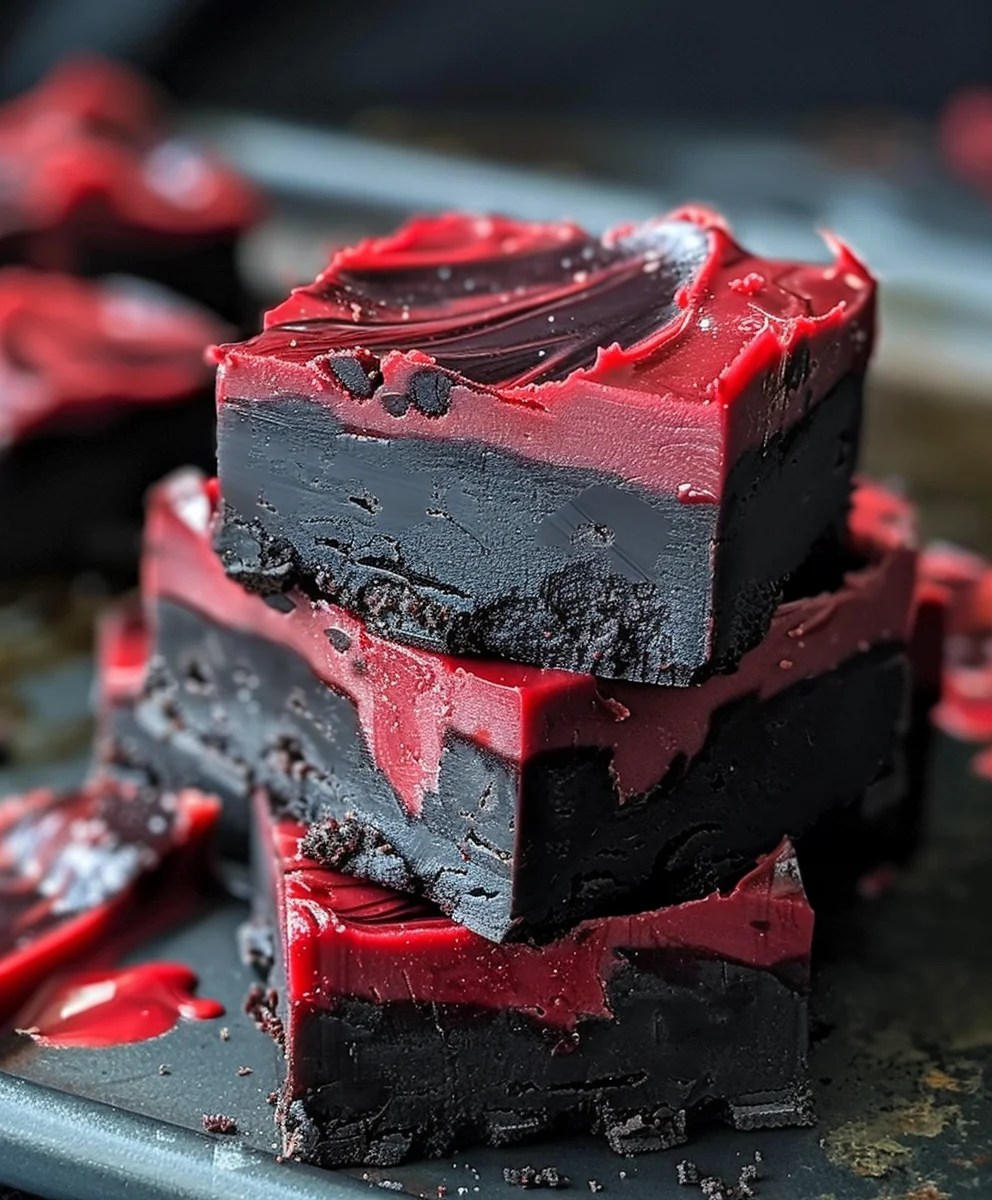
- Once your fudge is swirled and topped (if using), cover the pan loosely with plastic wrap or aluminum foil. Then, carefully transfer the pan to the refrigerator. This fudge needs a good amount of time to set up properly – at least 4 hours, but ideally overnight. The longer it chills, the firmer and easier it will be to cut into clean, beautiful squares. Resist the urge to peek or cut too early! A properly set fudge is much more enjoyable and easier to handle.
- When your Vampire Fudge is completely firm and chilled through, it’s time for the grand reveal! Use the parchment paper overhangs you wisely left earlier to lift the entire slab of fudge out of the pan and onto a clean cutting board. This makes cutting so much simpler and keeps your pan pristine.
- Now for the cutting: For beautifully neat pieces, I recommend heating your knife. You can do this by running it under hot water for a few seconds, then wiping it completely dry with a clean cloth. A warm, dry knife will glide through the fudge much more smoothly. Cut the fudge into squares or rectangles of your desired size. I usually aim for about 1-inch squares for a rich fudge like this, as a little goes a long way. After each cut, wipe your knife clean to prevent smearing and ensure every piece looks perfect. You can also get creative with cutters if you have them – perhaps a small bat or skull shape for an extra Halloween touch, especially since this Vampire Fudge Recipe is so perfect for spooky season!
- Once cut, arrange your delightful Vampire Fudge pieces on a serving platter. If you’re feeling extra fancy, you can garnish with a few fresh raspberries placed artfully on top of some pieces, or a dusting of edible red glitter for that extra magical, blood-like shimmer.
- Store any leftover Vampire Fudge in an airtight container at room temperature for up to a week, or in the refrigerator for up to two weeks. If stored in the fridge, I recommend letting it sit at room temperature for about 10-15 minutes before serving to soften slightly and bring out its full flavor and creamy texture.
And there you have it! Your very own batch of homemade Vampire Fudge, ready to delight and perhaps a little bit spook your friends and family. This recipe is not just a treat for the taste buds but also a feast for the eyes, perfect for Halloween parties or any occasion where a touch of dark elegance is desired. Enjoy your delicious, ghoulishly good creation!
Conclusion:
Well, my friends, we’ve reached the sweet end of our journey, but the real adventure is just beginning in your own kitchen! I truly believe this isn’t just another fudge recipe; it’s an experience waiting to happen. What makes this particular treat an absolute must-try, you ask? For starters, it’s undeniably decadent, with a rich, velvety texture that melts in your mouth and a depth of flavor that lingers deliciously. It strikes that perfect balance of sweetness without being cloyingly so, thanks to its carefully chosen ingredients. But beyond the incredible taste, there’s a certain magic to it. It’s surprisingly simple to prepare, making it perfect for both seasoned bakers and complete novices looking to impress. And let’s not forget its captivating appearance – a visual feast that promises an extraordinary taste sensation even before the first bite. This isn’t just dessert; it’s a conversation starter, a mood enhancer, and a testament to the fact that sometimes, the simplest things bring the most profound joy. I promise you, once you try this, you’ll understand exactly what I mean. It’s truly a delight that stands out from the crowd.
Now, about serving this delightful creation: while it’s absolutely divine chilled straight from the fridge, allowing it to come to room temperature for about 15-20 minutes before serving can truly enhance its creamy texture and unleash its full flavor profile. Imagine serving small, elegant squares alongside a steaming mug of dark roast coffee for an afternoon pick-me-up, or with a glass of cold milk for a comforting evening treat. For those special occasions, consider arranging an assortment of these fudgy bites on a platter with fresh berries – raspberries or strawberries provide a lovely tart contrast that cuts through the richness beautifully.
But don’t stop there! The beauty of fudge lies in its versatility. Want to elevate your Vampire Fudge Recipe even further? Try a sprinkle of flaky sea salt over the top just before it sets for a sophisticated sweet-and-salty kick. Or, for a textural contrast, fold in a handful of chopped toasted pecans, walnuts, or even mini marshmallows just before pouring it into your pan. If you’re feeling adventurous, a hint of orange zest or a touch of cayenne pepper can introduce an unexpected, intriguing layer of flavor that will leave your guests guessing. For a truly grown-up treat, a splash of raspberry liqueur or a coffee-flavored spirit stirred in during the final stages of cooking can transform it into an even more indulgent dessert. You could also experiment with different toppings: a drizzle of white chocolate, a dusting of cocoa powder, or even a scattering of edible glitter for an extra touch of sparkle. Don’t feel confined to squares; use cookie cutters to create fun shapes – hearts for Valentine’s Day, stars for holidays, or even mini bats for Halloween. Each variation offers a unique spin on an already fantastic recipe, making it perfect for any occasion or personal preference.
I genuinely can’t wait for you to experience the magic of this recipe for yourself. It’s more than just an instruction set; it’s an invitation to create something truly special. So, please, gather your ingredients, set aside some time, and dive into making this incredible treat. Once you’ve whipped up your batch, I would absolutely love to hear about your experience! Did you stick to the original, or did you try one of the variations? What was your favorite part? Share your photos with me, tell me about your triumphs, and let’s celebrate the joy of home baking together. Your feedback and creativity inspire not just me, but countless other home cooks looking for their next delicious adventure. Don’t hesitate – give this Vampire Fudge Recipe a try and let the sweetness unfold!
Vampire Fudge Recipe
Sink your teeth into a deliciously decadent Vampire Fudge. This darkly sweet Halloween delight features a rich, dark chocolate base swirled with vibrant raspberry ‘blood’ and is surprisingly simple to make, yielding a gourmet result perfect for any spooky gathering.
Ingredients
-
3 cups (510g) dark chocolate chips or chopped dark chocolate (60-70% cocoa)
-
1 (396g) can sweetened condensed milk
-
1/2 cup (113g) unsalted butter, cut into pieces
-
1 teaspoon pure vanilla extract
-
1/4 teaspoon fine sea salt
-
1-2 tablespoons unsweetened cocoa powder (optional)
-
1/2 cup (120g) smooth raspberry jam or puree
-
1-2 teaspoons red gel food coloring
-
1 cup crushed dark chocolate sandwich cookies (optional topping)
-
Fresh raspberries or edible glitter (optional garnish)
Instructions
-
Step 1
Line a 9×13 inch baking pan with parchment paper, leaving an overhang on the sides for easy removal. -
Step 2
In a large, heavy-bottomed saucepan, combine dark chocolate, sweetened condensed milk, butter, sea salt, and optional cocoa powder. Heat over low to medium-low heat, stirring constantly, until chocolate and butter are completely melted and the mixture is smooth and glossy (about 5-8 minutes). Remove from heat and stir in vanilla extract. -
Step 3
Pour about two-thirds to three-quarters of the dark chocolate fudge mixture into the prepared pan and spread evenly. -
Step 4
To the remaining fudge in the saucepan, add raspberry jam and red gel food coloring. Stir thoroughly until the color is a deep, vibrant red and the jam is well integrated. -
Step 5
Carefully dollop spoonfuls of the red fudge mixture over the dark chocolate layer in the pan. Use a butter knife or skewer to gently swirl the red into the dark fudge, creating marbled patterns. Do not overmix. -
Step 6
If using, sprinkle the crushed dark chocolate sandwich cookies generously over the swirled fudge and gently press them down. -
Step 7
Cover the pan loosely and refrigerate for at least 4 hours, or ideally overnight, until completely firm. -
Step 8
Once firm, use the parchment paper overhangs to lift the fudge slab onto a cutting board. Heat a knife under hot water, wipe dry, and cut the fudge into desired squares or rectangles. Garnish with fresh raspberries or edible glitter if desired. Store leftovers in an airtight container at room temperature for up to a week.
Important Information
Nutrition Facts (Per Serving)
It is important to consider this information as approximate and not to use it as definitive health advice.
Allergy Information
Please check ingredients for potential allergens and consult a health professional if in doubt.
Leave a Comment