
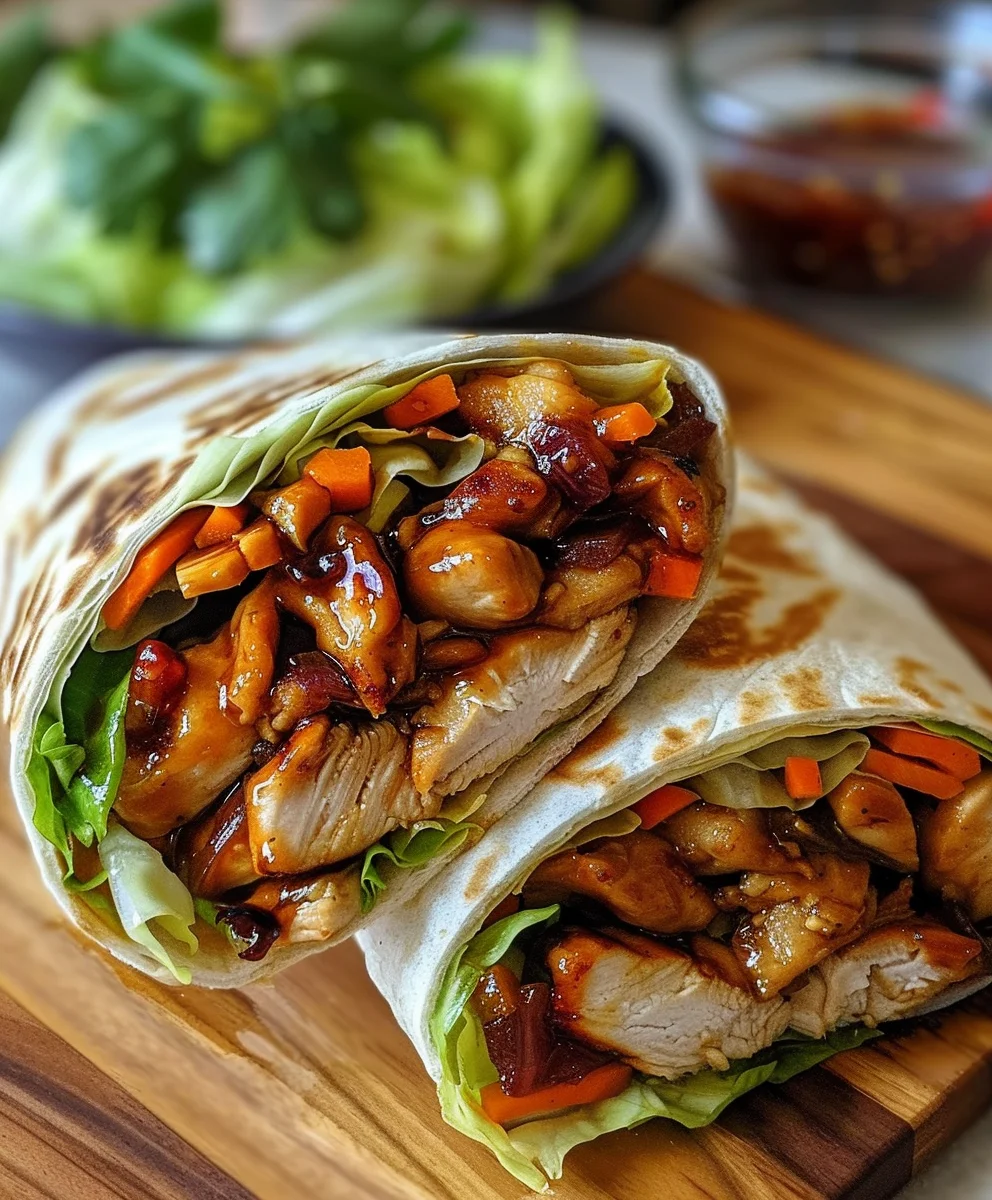
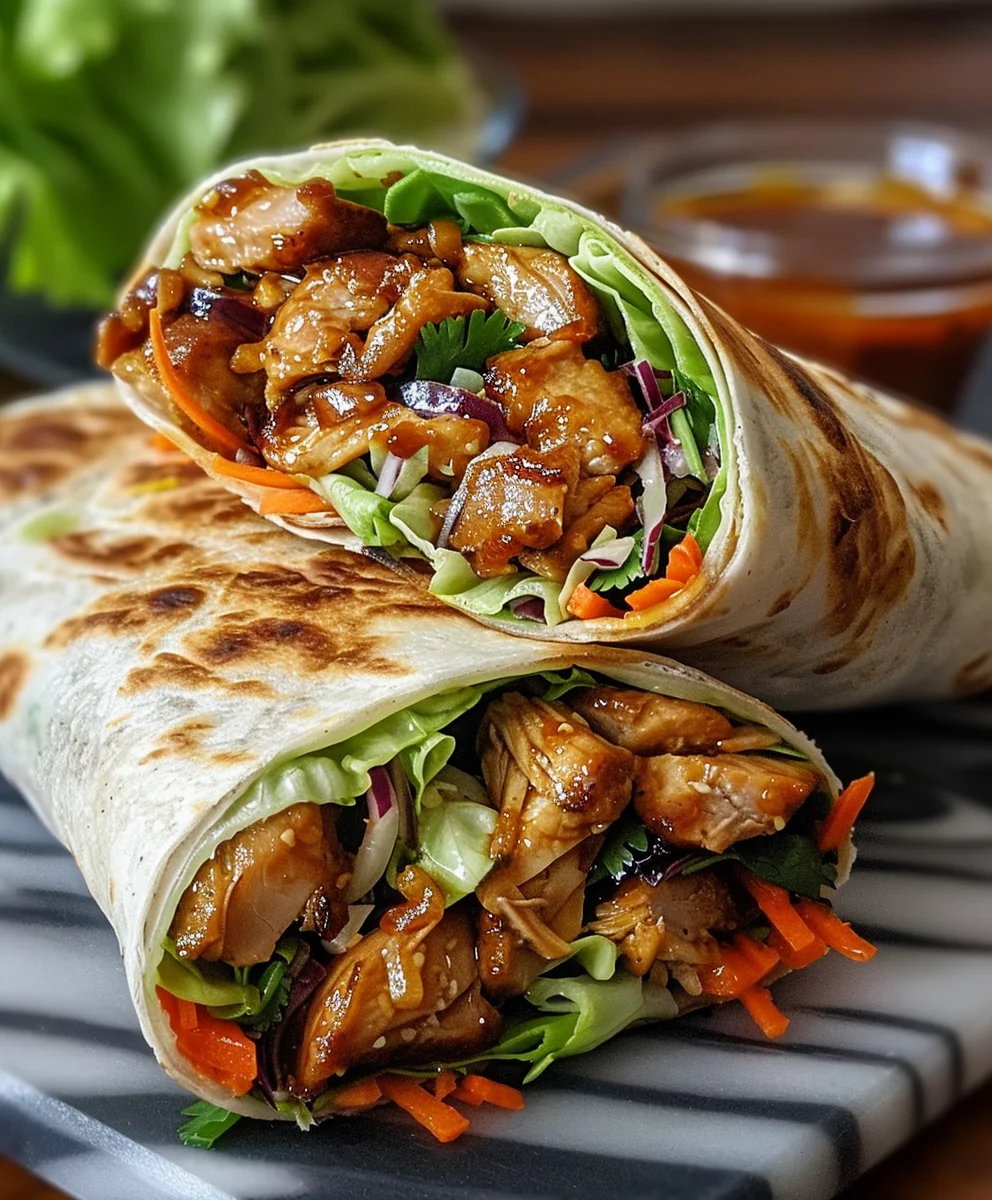
Teriyaki Chicken Wrap Recipe A Quick Flavor Adventure is more than just a meal; it’s a vibrant journey for your taste buds that I’m thrilled to share with you today. Imagine succulent, perfectly cooked chicken, bathed in a rich, glossy teriyaki glaze, all nestled harmoniously with fresh, crisp vegetables within a soft, pliable tortilla. This dish, in my humble opinion, is a testament to how simple ingredients can come together to create something truly extraordinary and utterly delightful, making it an instant crowd-pleaser.
The beloved teriyaki sauce itself, with its delightful balance of sweet, savory, and umami notes, hails from Japan. Traditionally, it was a masterful grilling and broiling marinade, deriving its name from ‘teri’ (luster) and ‘yaki’ (grill). Its incredible flavor profile, however, has captivated palates worldwide, inspiring countless adaptations and fusions, including the modern, convenient wrap format. I believe this culinary evolution speaks volumes about its universal and enduring appeal.
Why This Recipe Becomes an Instant Favorite
People absolutely adore this dish for numerous compelling reasons. Firstly, the taste is simply irresistible – that signature sweet and savory teriyaki punch paired with tender chicken and the refreshing crunch of fresh greens creates a sensational symphony of textures and flavors in every bite. Secondly, its convenience factor is unmatched; it’s surprisingly quick to assemble, making it an ideal choice for a busy weeknight dinner or a vibrant, portable lunch. This particular Teriyaki Chicken Wrap Recipe A Quick Flavor Adventure perfectly marries exotic flavor with everyday practicality, ensuring it will become a firm favorite in your culinary repertoire, just as it has in mine.

Ingredients:
- For the Teriyaki Chicken:
- 1.5 lbs boneless, skinless chicken thighs (or breast), cut into 1/2-inch bite-sized strips or cubes. I personally find thighs remain much juicier, but chicken breast works wonderfully if you prefer.
- 1 tablespoon neutral oil (like canola, vegetable, or grapeseed) for cooking the chicken.
- 1/2 teaspoon salt, or to taste.
- 1/4 teaspoon black pepper, freshly ground if possible.
- For My Signature Homemade Teriyaki Sauce:
- 1/2 cup low-sodium soy sauce. Using low-sodium allows me to control the saltiness better.
- 1/2 cup mirin, a sweet rice wine. This is key for that authentic Japanese flavor and gloss!
- 1/4 cup sake (optional, but highly recommended for depth) or substitute with an additional 1/4 cup mirin or dry sherry. If you’re avoiding alcohol, use chicken or vegetable broth.
- 1/4 cup packed light brown sugar. You can adjust this slightly to your sweetness preference.
- 2 cloves garlic, minced very finely. I love a garlicky kick!
- 1 tablespoon fresh ginger, grated. Fresh is non-negotiable here for that vibrant zing.
- 1 tablespoon cornstarch, dissolved in 2 tablespoons cold water (this is our magical thickening slurry).
- For the Wraps and Fresh Fillings:
- 8 large flour tortillas or wraps (about 10-inch diameter). I like a good sturdy wrap that won’t tear easily.
- 2 cups finely shredded green cabbage or coleslaw mix. The crunch is essential!
- 1 large carrot, julienned or shredded. Adds color and sweetness.
- 1 red bell pepper, thinly sliced into short strips. For a pop of color and mild sweetness.
- 1/2 cup chopped fresh cilantro. For a burst of freshness; if you’re not a fan, try fresh parsley or omit.
- 1/4 cup sliced green onions (scallions), for garnish and a mild oniony bite.
- Optional: 2 tablespoons sesame seeds, toasted, for garnish.
- Optional: Sriracha mayonnaise or a drizzle of sriracha for those who like a little heat in their Teriyaki Chicken Wrap Recipe A Quick Flavor Adventure!
Prepping Our Star: The Teriyaki Chicken
-
Preparing the Chicken for Its Flavor Journey:
Before we dive into cooking, let’s get our chicken ready. I always start by patting my chicken thighs or breasts thoroughly dry with paper towels. This crucial step helps achieve a beautiful sear and prevents the chicken from steaming in the pan, which can make it rubbery. Once dry, I carefully cut the chicken into uniform 1/2-inch bite-sized strips or cubes. Aim for consistency here; it ensures even cooking and makes for a much more pleasant bite in your wrap. After cutting, I season the chicken simply with 1/2 teaspoon of salt and 1/4 teaspoon of freshly ground black pepper. Just a little seasoning helps to enhance its natural flavor before it’s bathed in our delicious teriyaki sauce.
Chef’s Tip: If you’re using chicken breast, consider cutting it slightly thinner, perhaps 1/4-inch strips, as it tends to cook faster and can dry out more easily than thigh meat. My personal preference for this Teriyaki Chicken Wrap Recipe A Quick Flavor Adventure definitely leans towards the juicy chicken thighs!
-
Cooking the Chicken to Golden Perfection:
Now, it’s time to cook our seasoned chicken. I place a large, heavy-bottomed skillet or wok over medium-high heat and add 1 tablespoon of neutral oil. I wait until the oil is shimmering gently, indicating it’s hot enough to create that lovely golden crust. Carefully add the chicken strips to the hot pan in a single layer, ensuring not to overcrowd the skillet. Overcrowding can lower the pan’s temperature dramatically, leading to steamed rather than seared chicken – and we want a beautiful sear! If needed, I cook the chicken in two or even three batches to maintain that high heat. Let the chicken cook undisturbed for about 3-4 minutes on the first side until it develops a beautiful golden-brown crust. Then, using tongs, I flip each piece and cook for another 2-3 minutes, or until the chicken is thoroughly cooked through and no longer pink in the center. Once cooked, I remove the chicken from the skillet and set it aside on a plate, reserving any glorious pan drippings in the skillet – these drippings are packed with flavor that will contribute wonderfully to our teriyaki sauce.
Safety Note: Always ensure chicken is cooked to an internal temperature of 165°F (74°C) for food safety.
Crafting My Homemade Teriyaki Sauce
-
Combining the Flavor Symphony:
This is where the magic happens for our Teriyaki Chicken Wrap Recipe A Quick Flavor Adventure! Using the same skillet where you cooked the chicken (don’t clean it yet, those fond bits are flavor gold!), reduce the heat to medium-low. In a medium bowl or a liquid measuring cup, I combine the 1/2 cup low-sodium soy sauce, 1/2 cup mirin, 1/4 cup sake (or your chosen substitute), 1/4 cup packed light brown sugar, 2 finely minced cloves of garlic, and 1 tablespoon of freshly grated ginger. I whisk these ingredients together thoroughly until the brown sugar is mostly dissolved. The aroma alone is usually enough to get my taste buds tingling!
Why Homemade? While store-bought teriyaki sauce is convenient, making it from scratch allows me to control the sweetness, saltiness, and freshness of the ginger and garlic. It truly elevates the entire dish.
-
Thickening the Velvety Sauce:
Pour the whisked sauce mixture into the skillet. Increase the heat to medium and bring the sauce to a gentle simmer, stirring occasionally. Let it simmer for about 3-5 minutes, allowing the flavors to meld and deepen slightly. While the sauce is simmering, prepare your cornstarch slurry: In a small separate bowl, whisk together 1 tablespoon of cornstarch with 2 tablespoons of cold water until completely smooth and no lumps remain. This slurry is what gives our teriyaki sauce its signature glossy, thick consistency. Once the sauce has simmered, slowly pour the cornstarch slurry into the simmering sauce in a steady stream, whisking continuously. You’ll notice the sauce almost immediately begin to thicken and become beautifully glossy. Continue to whisk and simmer for another 1-2 minutes until it reaches your desired consistency – I aim for a consistency that coats the back of a spoon. If it gets too thick, you can always add a tiny splash of water or broth to thin it out slightly.
-
Glazing Our Perfectly Cooked Chicken:
Once the teriyaki sauce has reached that perfect, luscious thickness, it’s time to reunite it with our cooked chicken! Gently add the reserved cooked chicken strips back into the skillet with the teriyaki sauce. Toss the chicken thoroughly, ensuring every single piece is beautifully coated in the glossy, flavorful sauce. Let the chicken simmer in the sauce for just 1-2 minutes, allowing it to heat through and absorb all that amazing teriyaki goodness. This step is crucial for infusing the chicken with the full depth of flavor. Once evenly coated and heated through, remove the skillet from the heat. Our magnificent teriyaki chicken is now ready for assembly into our wraps! The aroma filling my kitchen at this point is simply irresistible, promising a truly quick flavor adventure.
Getting Our Veggies Ready
-
Preparing Our Fresh and Crunchy Fillings:
For me, a great wrap isn’t just about the main protein; the freshness and crunch from the vegetables are absolutely key to balancing the richness of the teriyaki chicken. While the chicken is cooking or resting, I get to work on the veggies. I start by finely shredding 2 cups of green cabbage. If you’re short on time, a pre-shredded coleslaw mix works wonderfully here and saves a step! Next, I julienne or finely shred one large carrot. A vegetable peeler can create lovely thin ribbons if you don’t have a mandoline or struggle with julienning. Then, I thinly slice one red bell pepper into short, manageable strips – these add a lovely pop of color and a mild sweetness. Finally, I chop about 1/2 cup of fresh cilantro and slice 1/4 cup of green onions. These vibrant additions provide freshness, aroma, and a slight peppery bite that truly complements the sweet and savory teriyaki chicken.
Pro Tip for Presentation: Try to keep your vegetable cuts relatively uniform in size. This not only looks appealing but also ensures each bite of your Teriyaki Chicken Wrap has a harmonious texture.
-
Optional Light Sauté for a Different Texture (My Personal Twist):
While I love the crisp raw texture of the vegetables in my Teriyaki Chicken Wrap, sometimes I like to add a slightly different dimension. If you prefer a softer texture for some of your veggies, you can quickly sauté the shredded cabbage, julienned carrots, and sliced bell pepper in a separate pan with a tiny drizzle of oil for about 2-3 minutes over medium-high heat. You’re not looking to cook them until limp, but just enough to slightly soften them and bring out their natural sweetness while still retaining a bit of a bite. I usually do this if I want the wraps to feel a little more “cooked” and comforting. However, for a truly fresh and vibrant Teriyaki Chicken Wrap Recipe A Quick Flavor Adventure, keeping them raw is perfectly delightful!
Assembling Our Delicious Teriyaki Chicken Wraps
-
Warming the Tortillas for Flexibility:
Before we pile on all our wonderful fillings, it’s important to warm our tortillas. Cold tortillas tend to be stiff and can crack when rolled, which is the last thing we want after all this effort! I usually warm them in a dry skillet over medium heat for about 15-20 seconds per side, just until they’re soft, pliable, and slightly fragrant. Alternatively, you can stack them, wrap them in a damp paper towel, and microwave them for 20-30 seconds until warm. This simple step makes all the difference in achieving a beautifully rolled wrap.
Why warm them? A warm tortilla is much more flexible and less likely to tear, making the rolling process a breeze and ensuring your Teriyaki Chicken Wrap stays perfectly intact.
-
Building the Flavor Base:
Now for the fun part – assembling! Lay a warm tortilla flat on a clean surface. If you like a little extra creamy richness or a touch of heat, this is where I would spread a thin layer of sriracha mayonnaise over the entire surface of the tortilla. It adds another layer of flavor and helps to “glue” everything together. Even if you’re not using mayo, I sometimes drizzle a tiny bit of extra teriyaki sauce right on the tortilla itself to ensure every bite is packed with that amazing flavor. Don’t go overboard though; we want to wrap these beauties!
-
Layering the Star and Its Supporting Cast:
Next, arrange a generous portion of our delicious teriyaki chicken in the center of the tortilla, leaving about a 1-inch border around the edges. I usually aim for about 1/2 to 3/4 cup of chicken per wrap, depending on the size of your tortillas and your appetite! On top of the chicken, I evenly distribute a handful of the shredded cabbage, julienned carrots, and sliced bell pepper. The vibrant colors are so inviting at this stage! Then, I sprinkle a good amount of fresh cilantro and sliced green onions over the vegetables. If I’m feeling fancy, I’ll also add a pinch of toasted sesame seeds here for a nutty crunch.
Balance is Key: Try not to overfill your wraps. It’s tempting, but an overstuffed wrap is a messy wrap! Aim for a good balance of chicken and vegetables. This ensures you can actually roll it up properly and enjoy every ingredient in each bite of your Teriyaki Chicken Wrap Recipe A Quick Flavor Adventure.
-
Mastering the Wrap Technique:
This is perhaps the most crucial step for a successful wrap. To roll, first, fold in the sides of the tortilla over the filling, just enough to cover the edges of your ingredients. Then, starting from the bottom edge closest to you, tightly fold it up and over the filling. As you roll, tuck the filling in with your fingers to keep it compact and form a tight cylinder. Continue rolling upwards until you reach the top edge of the tortilla. You want a snug roll that holds its shape. If you’ve warmed your tortillas correctly and haven’t overfilled, this should be quite easy!
Presentation Suggestion: Once rolled, I often slice the wraps in half diagonally right through the middle. This not only makes them easier to eat but also beautifully showcases all the colorful layers inside. These Teriyaki Chicken Wraps are truly a quick flavor adventure waiting to be devoured!
Serving Suggestions & My Personal Touch
-
Ready to Enjoy:
Your homemade Teriyaki Chicken Wraps are now ready to be savored! I love serving them immediately while the chicken is still warm and the vegetables are crisp. They make a fantastic quick lunch, a satisfying dinner, or even a delightful snack cut into smaller pinwheels for a party appetizer. The combination of savory teriyaki chicken, fresh crunchy vegetables, and the soft tortilla creates a symphony of textures and flavors that truly embodies a quick flavor adventure in every single bite.
-
Optional Additions to Elevate Your Wrap:
While the recipe as written is absolutely delicious, feel free to get creative and personalize your wraps!
- Extra Heat: A drizzle of sriracha or a pinch of red pepper flakes inside the wrap can add a welcome kick.
- Creamy Element: Beyond sriracha mayo, a little avocado slices or a dollop of plain Greek yogurt mixed with a squeeze of lime can add creaminess.
- Nutty Crunch: Toasted cashews or peanuts chopped finely can offer another layer of texture and flavor.
- Different Veggies: Feel free to experiment with other thinly sliced vegetables like cucumber, red onion, or even a touch of bean sprouts for an extra crunch.
-
Storage Tips for Future Adventures:
If you happen to have any leftover teriyaki chicken, it stores wonderfully in an airtight container in the refrigerator for up to 3-4 days. I typically store the chicken and the prepared vegetables separately to maintain their freshness and texture. When you’re ready to enjoy another wrap, simply warm the chicken gently in a skillet or microwave, prepare a fresh tortilla and your raw veggies, and assemble as directed. This makes for a fantastic meal prep option, allowing you to quickly whip up a fresh wrap on demand, extending your Teriyaki Chicken Wrap Recipe A Quick Flavor Adventure through the week!
Conclusion:
As we reach the culmination of our culinary journey, I truly hope you’re feeling inspired and excited to dive into your kitchen and experience the magic of this dish firsthand. What makes this particular recipe an absolute non-negotiable for your weekly meal rotation? It’s a harmonious symphony of everything you crave in a fantastic meal: speed, irresistible flavor, and incredible versatility. We’re talking about a dish that effortlessly balances the rich, savory notes of perfect teriyaki glaze with the freshness and crunch of vibrant vegetables, all encased in a soft, satisfying wrap. It’s a testament to the idea that truly delicious, wholesome food doesn’t have to be complicated or time-consuming. This recipe is your secret weapon for those busy weeknights when you crave something extraordinary but only have minutes to spare, or for a delightful weekend lunch that feels special without any fuss.
I find immense joy in sharing recipes that genuinely make life easier and tastier, and this one certainly ticks all those boxes. It’s a fantastic way to introduce new flavors to picky eaters or to simply brighten up your own meal routine. The chicken, marinated and cooked to tender perfection, combined with the crispness of the vegetables, creates a textural and flavor profile that is utterly addicting. It truly encapsulates the essence of what I believe is a remarkable Teriyaki Chicken Wrap Recipe A Quick Flavor Adventure. It’s not just a meal; it’s an invitation to explore a world of balanced, umami-packed goodness that you’ll want to revisit again and again.
Now, let’s talk about making this recipe uniquely yours with some delightful serving suggestions and variations. While the core recipe is stellar on its own, a little customization can elevate it even further. For a different texture, consider warming your tortillas slightly in a dry pan before wrapping – it makes them more pliable and adds a lovely toasted note. You can also experiment with different types of tortillas; whole wheat adds a nutty earthiness, while spinach tortillas can add a subtle color and flavor boost. Want to amp up the heat? A drizzle of sriracha mayo or a sprinkle of red pepper flakes inside the wrap will give it a fiery kick. For an extra layer of richness, a few slices of fresh avocado would be an exquisite addition, lending a creamy counterpoint to the savory chicken.
Beyond the wrap itself, consider transforming this dish into a vibrant bowl. Simply layer the teriyaki chicken and fresh vegetables over a bed of fluffy jasmine rice, brown rice, or even quinoa for a gluten-free and hearty meal. Top it with some toasted sesame seeds, chopped green onions, and maybe even a few edamame for added protein and color. If you’re looking for a lighter option, turn it into a magnificent salad! Arrange the teriyaki chicken and all the fresh veggies over a bed of mixed greens, and use a light sesame-ginger dressing. For an appetizer, you could even cut the wraps into smaller, bite-sized pinwheels, perfect for entertaining or a snack. Don’t be afraid to switch up the vegetables too; shredded carrots, thinly sliced bell peppers, or even a handful of bean sprouts can add new dimensions of crunch and flavor. The beauty of this recipe lies in its adaptability; it truly is a canvas for your culinary creativity.
So, dear reader, my final plea to you is this: Don’t just read about this incredible dish; go out and make it! Gather your ingredients, put on some music, and enjoy the process of creating something truly delicious and satisfying. I am genuinely excited for you to experience the ease and fantastic flavor that this recipe brings to the table. Once you’ve whipped up your batch of these amazing teriyaki chicken wraps, I would absolutely love to hear about your experience. Did you add a unique twist? Did your family rave about it? Please, come back and share your thoughts in the comments section below. Your feedback and creative variations not only inspire me but also help build a wonderful community of fellow food lovers. If you snap any photos of your culinary creation, I encourage you to share them on social media – you can even tag me if you like! There’s nothing more rewarding than seeing our recipes come to life in your kitchens. Thank you for joining me on this flavorful adventure; I can’t wait to hear how much you loved it!
Delicious Teriyaki Chicken Wrap Recipe – Your Flavor Adventure!
A vibrant journey for your taste buds, this Teriyaki Chicken Wrap features succulent chicken in a rich, glossy teriyaki glaze, nestled with fresh, crisp vegetables within a soft tortilla. This dish marries the beloved sweet, savory, and umami notes of traditional Japanese teriyaki with the convenience of a modern wrap, creating an extraordinary and utterly delightful meal.
Ingredients
-
1.5 lbs boneless, skinless chicken thighs (or breast), cut into 1/2-inch strips or cubes
-
1 tablespoon neutral oil
-
1/2 teaspoon salt
-
1/4 teaspoon black pepper
-
1/2 cup low-sodium soy sauce
-
1/2 cup non-alcoholic mirin substitute (e.g., seasoned rice vinegar with added sugar)
-
1/4 cup chicken broth (non-alcoholic alternative for sake)
-
1/4 cup packed light brown sugar
-
2 cloves garlic, minced
-
1 tablespoon fresh ginger, grated
-
1 tablespoon cornstarch
-
2 tablespoons cold water
-
8 large flour tortillas (10-inch diameter)
-
2 cups finely shredded green cabbage
-
1 large carrot, julienned or shredded
-
1 red bell pepper, thinly sliced
-
1/2 cup chopped fresh cilantro
-
1/4 cup sliced green onions
-
2 tablespoons sesame seeds, toasted (optional)
-
Sriracha mayonnaise or sriracha (optional)
Instructions
-
Step 1
Prepare Chicken: Pat chicken dry, cut into 1/2-inch strips or cubes, and season with 1/2 tsp salt and 1/4 tsp black pepper. -
Step 2
Cook Chicken: Heat 1 tbsp neutral oil in a large skillet over medium-high heat. Cook chicken in batches for 3-4 minutes per side until golden brown and cooked through (165°F/74°C). Remove chicken and set aside, reserving pan drippings. -
Step 3
Make Teriyaki Sauce: In the same skillet, combine 1/2 cup low-sodium soy sauce, 1/2 cup non-alcoholic mirin substitute, 1/4 cup chicken broth, 1/4 cup packed light brown sugar, 2 minced garlic cloves, and 1 tbsp grated fresh ginger. Whisk until sugar dissolves. -
Step 4
Thicken Sauce: Bring sauce to a gentle simmer over medium heat for 3-5 minutes. In a small bowl, whisk 1 tbsp cornstarch with 2 tbsp cold water until smooth. Slowly pour slurry into simmering sauce, whisking continuously until thickened and glossy (1-2 minutes). -
Step 5
Glaze Chicken: Return cooked chicken to the skillet with the teriyaki sauce. Toss to thoroughly coat and simmer for 1-2 minutes until heated through. Remove from heat. -
Step 6
Prepare Fillings: Finely shred 2 cups green cabbage, julienne 1 large carrot, thinly slice 1 red bell pepper, chop 1/2 cup fresh cilantro, and slice 1/4 cup green onions. (Optional: Lightly sauté these vegetables for 2-3 minutes for a softer texture.) -
Step 7
Warm Tortillas: Warm 8 large flour tortillas in a dry skillet for 15-20 seconds per side, or microwave for 20-30 seconds, until soft and pliable. -
Step 8
Assemble Wraps: Lay a warm tortilla flat. Spread with sriracha mayonnaise (optional) or a drizzle of teriyaki sauce. Arrange 1/2-3/4 cup teriyaki chicken in the center, leaving a 1-inch border. Top with shredded cabbage, carrots, bell pepper, cilantro, green onions, and optional toasted sesame seeds. -
Step 9
Roll Wraps: Fold in the sides of the tortilla over the filling, then tightly fold the bottom edge up and over, rolling upwards to form a snug cylinder. Slice diagonally if desired. -
Step 10
Serve: Enjoy immediately. Store leftover chicken and vegetables separately in the refrigerator for up to 3-4 days.
Important Information
Nutrition Facts (Per Serving)
It is important to consider this information as approximate and not to use it as definitive health advice.
Allergy Information
Please check ingredients for potential allergens and consult a health professional if in doubt.
Leave a Comment