
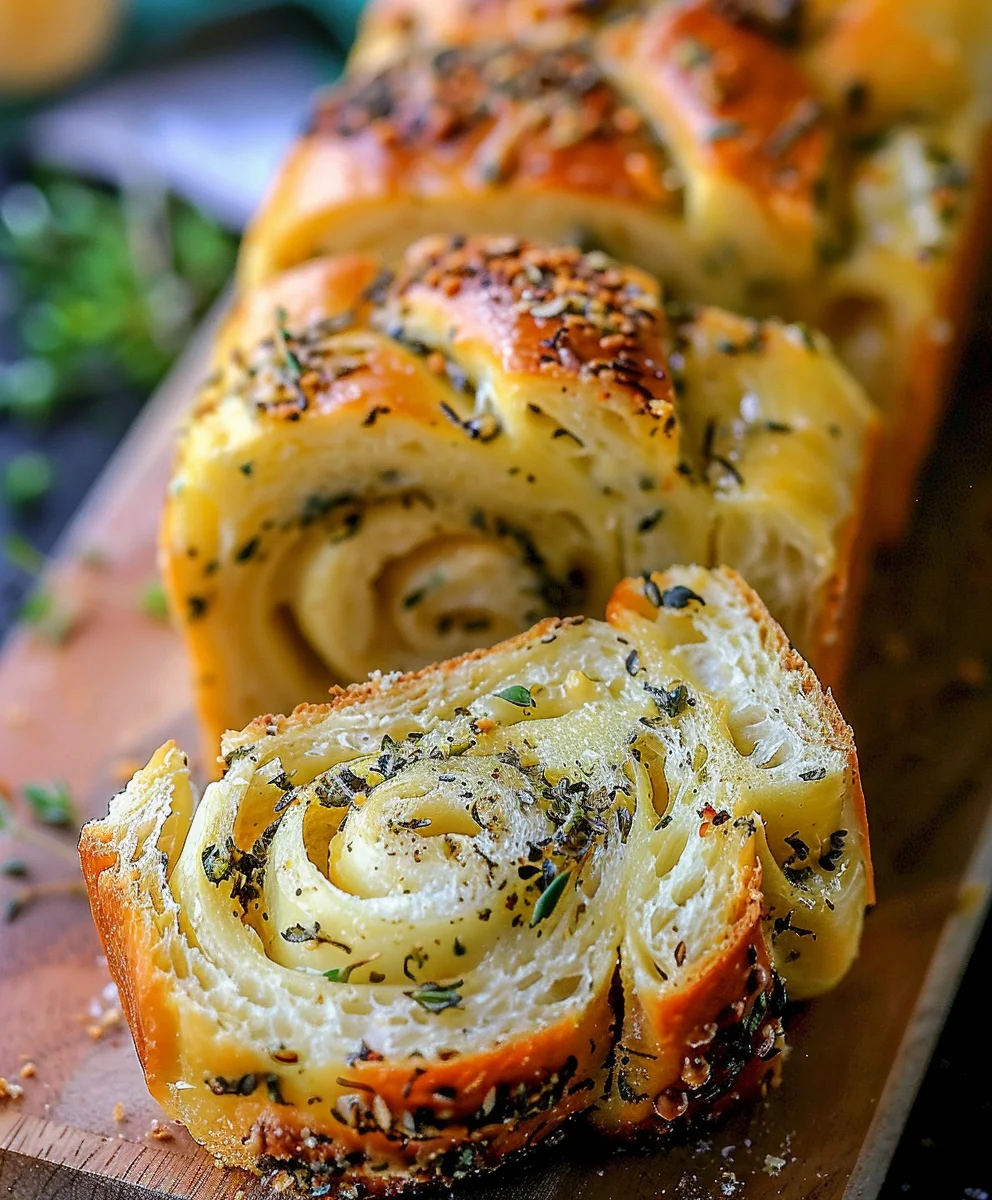
Swirled Garlic Herb And Cheese Bread is more than just a simple accompaniment; it’s a culinary masterpiece that promises to captivate both your eyes and your palate. Imagine the pure delight of pulling apart a warm, golden slice, revealing enchanting spirals of aromatic garlic, vibrant fresh herbs, and luscious melted cheese. The irresistible aroma alone will fill your kitchen with a welcoming embrace, setting the stage for a truly memorable dining experience. This isn’t just bread; it’s an edible work of art, designed to be the undisputed star of your table and an instant crowd-pleaser.
While the precise historical lineage of this beautifully swirled bread might be a delightful modern culinary evolution, it undeniably draws its delicious essence from age-old comfort foods like classic Italian garlic bread and various savory cheese breads celebrated across diverse cultures. It perfectly embodies the spirit of shared meals, homemade warmth, and joyful gatherings. People absolutely adore this dish, not only for its stunning visual appeal but for the exquisite interplay of textures and tastes: the tender, pillowy softness of the bread contrasting with a subtly crisp crust, the pungent depth of garlic harmonizing with fragrant herbs, and the rich, savory hug of cheese in every single bite. Crafting your own batch of this magnificent Swirled Garlic Herb And Cheese Bread is a wonderfully rewarding process, guaranteeing smiles and satisfied appetites all around.

Ingredients:
-
For the Enriched Bread Dough:
- 3 ½ cups (approximately 420g) all-purpose flour, plus more for dusting
- 2 ¼ teaspoons (one standard packet) active dry yeast
- 2 tablespoons granulated sugar
- 1 teaspoon fine sea salt
- 1 cup whole milk, warmed to about 105-115°F (40-46°C)
- ¼ cup (56g) unsalted butter, melted and cooled slightly
- 1 large egg, at room temperature
-
For the Irresistible Garlic Herb and Cheese Filling:
- ½ cup (113g) unsalted butter, softened to room temperature
- 6-8 cloves fresh garlic, minced very finely (or pressed)
- ¼ cup fresh parsley, finely chopped
- 2 tablespoons fresh chives, finely chopped
- 1 tablespoon fresh oregano, finely chopped (optional, but highly recommended for depth)
- 1 ½ cups (about 170g) shredded mozzarella cheese
- ½ cup (about 55g) shredded sharp cheddar cheese or Parmesan cheese for extra tang
- ½ teaspoon fine sea salt
- ¼ teaspoon freshly ground black pepper
-
For the Egg Wash:
- 1 large egg
- 1 tablespoon water or milk
Preparing the Dough for Your Swirled Garlic Herb And Cheese Bread
- Activate the Yeast: In the bowl of your stand mixer (or a large mixing bowl if kneading by hand), combine the warm milk and granulated sugar. Sprinkle the active dry yeast over the top. Give it a gentle stir and let it sit for 5-10 minutes. You’ll know your yeast is alive and well when it becomes foamy and bubbly, a sure sign that it’s ready to make your bread beautifully light and airy. If it doesn’t foam, your milk might have been too hot or too cold, or your yeast might be expired, and you’ll need to start this step over.
- Combine Dry Ingredients: While the yeast is activating, in a separate medium bowl, whisk together the all-purpose flour and fine sea salt. This ensures the salt is evenly distributed throughout the flour, which is crucial for flavor and proper yeast activity.
- Add Wet Ingredients: Once your yeast is foamy, add the melted and slightly cooled unsalted butter and the room-temperature large egg to the yeast mixture in the mixer bowl. Give it a quick whisk to combine these wet ingredients thoroughly.
- Mix the Dough: Gradually add the dry flour mixture to the wet ingredients in three additions, mixing on low speed with the dough hook attachment (or with a sturdy spoon if kneading by hand). Mix until a shaggy dough forms, and all the flour is incorporated. Don’t be tempted to add all the flour at once; doing it in stages helps prevent a dry dough.
-
Knead the Dough: Increase the mixer speed to medium-low and knead the dough for 7-10 minutes. If kneading by hand, turn the dough out onto a lightly floured surface and knead vigorously for 10-15 minutes.
What to look for during kneading:
The dough will start out sticky, but as you knead, it will become smooth, elastic, and less sticky. It should pull away from the sides of the bowl (or your hands if hand-kneading) and be pliable. A great test is the “windowpane test”: tear off a small piece of dough and gently stretch it. If you can stretch it thin enough to see light through it without it tearing, your gluten is well-developed, and your dough is ready. This development of gluten is what gives our Swirled Garlic Herb And Cheese Bread its characteristic chewiness and structure.
-
First Proofing (Bulk Fermentation): Lightly grease a large bowl with a little oil. Place the kneaded dough into the bowl, turning it once to coat the entire surface with oil. This prevents it from drying out. Cover the bowl tightly with plastic wrap or a clean kitchen towel. Place the bowl in a warm, draft-free spot.
Optimizing Your Dough’s First Rise:
An ideal temperature for proofing is around 75-80°F (24-27°C). You can achieve this by placing the bowl in a turned-off oven with just the light on, or near a warm window (avoiding direct sunlight). Let the dough rise for 1 to 1 ½ hours, or until it has visibly doubled in size. This slow fermentation is key to developing the rich flavor and tender texture of our bread.
Crafting the Flavorful Garlic Herb and Cheese Filling
- Prepare the Aromatics: While the dough is proofing, let’s get our incredibly aromatic filling ready. Mince your fresh garlic very finely. Finely chop your fresh parsley, chives, and oregano. The fresher the herbs, the more vibrant the flavor will be in our Swirled Garlic Herb And Cheese Bread.
- Soften the Butter: Ensure your unsalted butter is genuinely soft, but not melted. If it’s too hard, it won’t spread easily, and if it’s melted, it will be messy. Room temperature butter is perfect.
-
Combine Filling Ingredients: In a medium bowl, combine the softened butter, minced garlic, chopped fresh parsley, chives, and oregano. Add the shredded mozzarella cheese, your chosen sharp cheddar or Parmesan, sea salt, and black pepper. Mix everything together thoroughly with a spoon or a spatula until all the ingredients are well incorporated and the mixture is uniform. You want every bite of your bread to have that amazing garlic, herb, and cheese punch!
Experimenting with Herbs and Cheeses:
Feel free to adjust the herbs to your preference. Rosemary or thyme can also be lovely additions. For the cheese, a blend of Gruyère and Parmesan would offer a more complex, nutty flavor profile. Don’t be afraid to make this recipe your own!
Assembling Your Magnificent Swirled Garlic Herb And Cheese Bread
- Prepare Your Work Surface: Once the dough has doubled in size, gently punch it down to release the air. Turn the dough out onto a lightly floured surface. I usually use just a tablespoon or two of flour; too much can make the dough tough.
- Roll Out the Dough: Using a rolling pin, roll the dough into a large rectangle, approximately 18×12 inches (45×30 cm) and about ¼ inch (0.6 cm) thick. Try to keep the edges as straight as possible, as this will make rolling easier and result in a more uniform spiral.
- Spread the Filling: Evenly spread the entire garlic herb and cheese filling over the rolled-out dough, leaving a small ½-inch border along one of the longer edges. This border will help seal the roll. Ensure the filling goes all the way to the other three edges. Don’t be shy; spread it generously! The rich filling is what gives our Swirled Garlic Herb And Cheese Bread its signature flavor.
- Roll Up the Dough: Starting from one of the long edges (the one without the border), tightly roll the dough into a log. Roll as tightly as you can without tearing the dough. A tight roll is crucial for achieving those beautiful, defined spirals of filling throughout the bread. Pinch the seam gently to seal it.
- Prepare for Shaping: Carefully transfer the rolled log to a cutting board. Using a sharp knife or even unflavored dental floss, cut the log into 12-14 equal slices, each approximately 1 to 1 ¼ inches (2.5-3 cm) thick. If using dental floss, slide it under the log, cross the ends over the top, and pull to cut cleanly through the dough without squishing it.
- Prepare Baking Pan: Lightly grease a 9×5 inch (23×13 cm) loaf pan or line it with parchment paper, leaving an overhang on the longer sides to easily lift the bread out later. For an extra non-stick measure, you can lightly flour the greased pan.
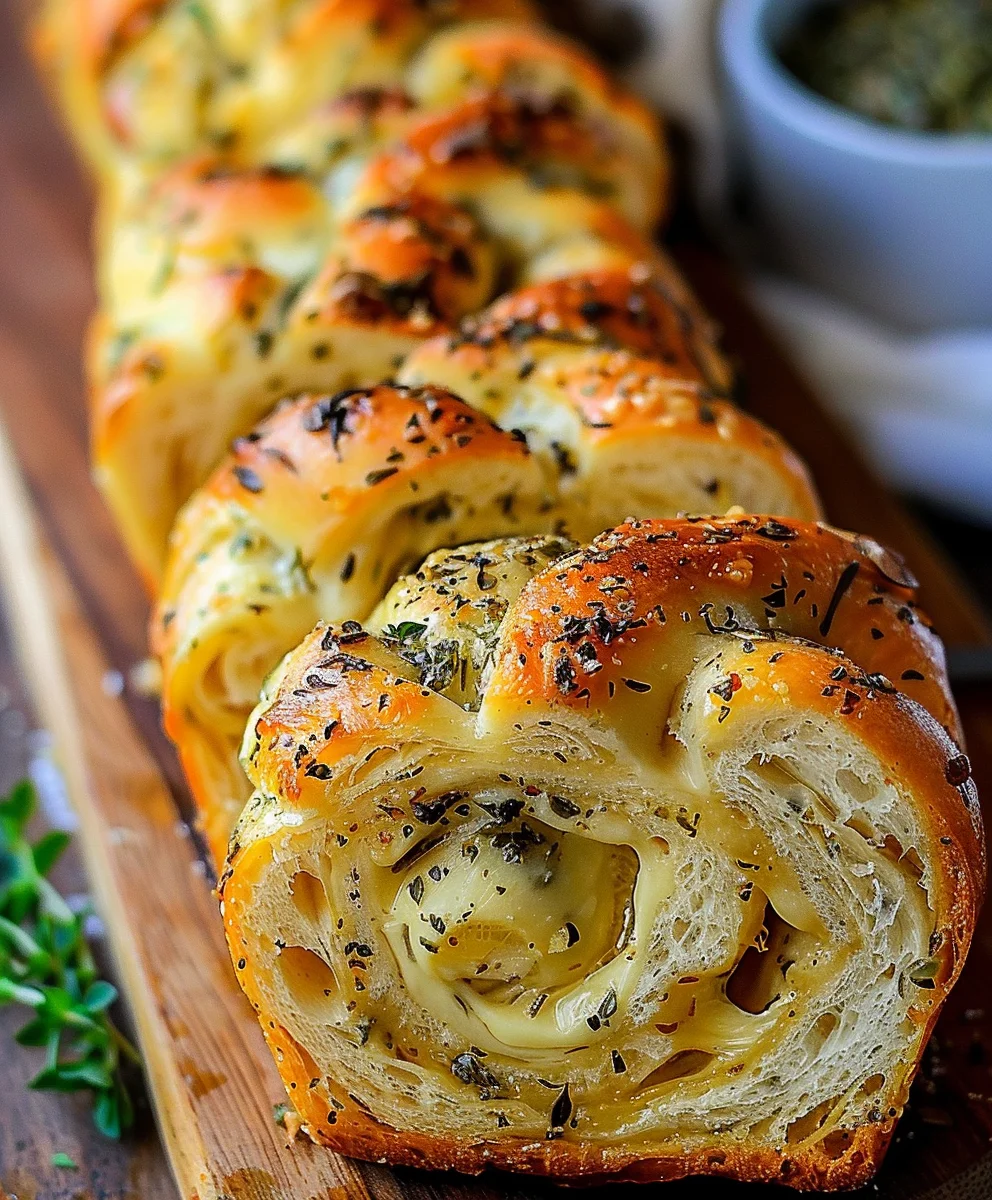
- Arrange Dough in Pan: Arrange the cut slices of the Swirled Garlic Herb And Cheese Bread vertically in the prepared loaf pan, cut-side up. Overlap them slightly if necessary, but try to keep them relatively upright. They should fit snugly but not be overly compressed. This arrangement creates a pull-apart style loaf, making it easy to serve.
The Final Rise and Baking Your Swirled Garlic Herb And Cheese Bread
- Second Proofing: Cover the loaf pan loosely with plastic wrap or a clean kitchen towel. Place it back in your warm, draft-free spot for another 30-45 minutes, or until the bread has risen again and the slices look puffy and have nearly doubled in size, filling out the pan nicely. This second rise is crucial for a light and tender crumb.
- Preheat Oven: While the bread is on its second rise, preheat your oven to 375°F (190°C).
- Prepare Egg Wash: In a small bowl, whisk together the large egg and 1 tablespoon of water or milk until well combined. This egg wash will give our Swirled Garlic Herb And Cheese Bread a beautiful golden-brown crust and a lovely sheen.
-
Apply Egg Wash and Bake: Gently brush the top of the risen bread with the egg wash. Be careful not to deflate the delicate dough. Place the loaf pan in the preheated oven. Bake for 30-35 minutes, or until the bread is deeply golden brown on top and cooked through.
Checking for Doneness:
If the top starts to brown too quickly, you can loosely tent the loaf with aluminum foil for the remaining baking time. The internal temperature of the bread should reach 200-205°F (93-96°C) when checked with an instant-read thermometer. This ensures it’s fully baked and not gummy in the center. The aroma filling your kitchen will be absolutely incredible – a true testament to the deliciousness of your homemade Swirled Garlic Herb And Cheese Bread.
- Cooling: Once baked, remove the loaf pan from the oven. Let the bread cool in the pan for about 10-15 minutes. This allows the bread to set and firm up slightly. Then, using the parchment paper overhang or carefully inverting, remove the bread from the pan and transfer it to a wire rack to cool completely. Cooling on a wire rack prevents the bottom from becoming soggy.
Serving and Storing Your Delicious Creation
- Serving Suggestions: While it’s tempting to tear into your warm Swirled Garlic Herb And Cheese Bread immediately, allowing it to cool a bit will give it a better texture. Serve it warm, sliced or pulled apart, as a fantastic side dish to pasta, salads, soups, or stews. It’s also absolutely delightful on its own, perhaps with a little extra butter, though it hardly needs it! It makes a stunning appetizer for gatherings or a comforting addition to any family meal.
- Storage Tips: Leftovers, if you have any, can be stored in an airtight container or wrapped tightly in plastic wrap at room temperature for up to 2-3 days. For longer storage, you can freeze individual slices or the entire loaf (once completely cooled) for up to 1 month. To reheat, simply warm slices in a toaster oven, microwave, or a regular oven until fragrant and soft again. This bread is truly a versatile and flavorful star, and its unique swirled design makes it as beautiful to look at as it is to eat.
Conclusion:
And there you have it, my friends! We’ve reached the delicious culmination of this recipe, and I truly hope you’re as excited as I am about what you’re about to create. I’ve poured my heart into perfecting every step, and I genuinely believe that this isn’t just another bread recipe; it’s an invitation to experience something truly special in your own kitchen. This bread is a must-try for so many reasons. Imagine your home filled with the intoxicating aroma of freshly baked bread, intertwined with the savory notes of garlic and a medley of aromatic herbs. It’s an scent that promises comfort, warmth, and an unparalleled culinary delight. Then, consider the texture: a perfectly golden-brown crust, giving way to an incredibly soft, tender interior that’s riddled with swirls of fragrant garlic-herb butter and generous pockets of melted, gooey cheese. Every single bite is a symphony of flavors and textures that tantalizes the taste buds, making it utterly irresistible. It elevates any meal from ordinary to extraordinary, promising not just food, but a memorable dining experience. The joy of pulling this magnificent loaf from your oven, knowing you crafted such a masterpiece, is a reward in itself, a true testament to the magic of homemade baking.
Serving Suggestions & Variations: Elevate Your Meals
The beauty of this bread extends far beyond its incredible taste; its versatility makes it an indispensable addition to countless meals. Imagine serving thick, warm slices alongside a hearty bowl of your favorite pasta – perhaps a rich spaghetti bolognese or a creamy fettuccine Alfredo – allowing it to soak up every last drop of that delicious sauce. It’s also the ultimate companion to a comforting bowl of soup, whether it’s a rustic minestrone, a creamy tomato bisque, or a simple chicken noodle. On a crisp autumn evening, there’s nothing quite like dipping a piece of this aromatic bread into a steaming, savory broth. For a lighter touch, pair it with a fresh, crisp green salad, transforming a simple side into the star of the show. It’s equally magnificent as an appetizer; slice it generously, arrange it on a rustic wooden board, and serve it with a side of warm marinara for dipping, or a vibrant pesto, or even just a high-quality olive oil and balsamic vinegar for a touch of Italian flair. Planning a weekend brunch? A slice of this bread, perhaps lightly toasted again, is wonderful alongside fluffy scrambled eggs, a savory frittata, or a vibrant shakshuka, adding a dimension of flavor that you won’t find with plain toast. It can even be the foundation for mini pizzas or open-faced sandwiches, making it the hero of any lunch spread. The possibilities truly are as boundless as your imagination.
And don’t hesitate to get creative with your own variations! While my recipe provides a solid, foolproof foundation, feel free to experiment to suit your personal preferences. You could try different cheese blends – perhaps a sharp, tangy aged cheddar for more bite, or a smoky gouda for a unique, sophisticated twist. If you crave a little heat, a pinch of red pepper flakes mixed into the herb butter will add a delightful warmth. For a different aromatic profile, substitute some of the parsley with fresh rosemary or thyme, infusing the bread with earthy, woody notes. You could also shape this dough into individual rolls, perfect for dinner parties or as a delightful surprise in lunchboxes, creating miniature explosions of flavor. Or, for a show-stopping centerpiece, shape it into a beautiful pull-apart wreath or a tear-and-share ring, encouraging everyone at the table to dive in and enjoy the communal experience. No matter how you choose to customize or serve it, the heart and soul of this incredible Swirled Garlic Herb And Cheese Bread will always shine through, promising an unforgettable taste sensation. I promise you, the effort involved is absolutely minimal when compared to the extraordinary reward you’ll reap.
Your Turn to Create & Share!
Now, it’s truly your moment to shine! I wholeheartedly encourage you to roll up your sleeves, gather your ingredients, and embark on this wonderful baking adventure. There is an unparalleled satisfaction, a deep sense of accomplishment, that comes from creating something so incredibly delicious from scratch, especially when it fills your home with such inviting aromas. Don’t be intimidated; trust the process, follow the steps, and prepare to be utterly amazed by the results. This recipe is designed to bring you success, and I have every confidence that your homemade bread will be nothing short of spectacular. Once you’ve baked your very own, perfect loaf of Swirled Garlic Herb And Cheese Bread, I would absolutely, truly love to hear about your experience. Did you make any exciting variations? What did you serve it with? Please come back and leave a comment below sharing your thoughts and triumphs! And if you capture the beauty of your creation with photos on social media, be sure to tag me! I genuinely adore seeing your culinary masterpieces and hearing about your journey in the kitchen. Happy baking, my dear readers, and get ready to enjoy some of the most phenomenal homemade bread you’ve ever tasted!
Swirled Garlic Herb And Cheese Bread
Swirled Garlic Herb And Cheese Bread is a culinary masterpiece, captivating with enchanting spirals of aromatic garlic, vibrant fresh herbs, and luscious melted cheese. This edible work of art combines the tender, pillowy softness of bread with a subtly crisp crust, offering a pungent depth of garlic, fragrant herbs, and the rich, savory hug of cheese in every pull-apart bite. It’s designed to be the undisputed star of your table and an instant crowd-pleaser for any gathering.
Ingredients
-
3 ½ cups all-purpose flour
-
2 ¼ tsp active dry yeast (1 standard packet)
-
¼ cup granulated sugar
-
1 tsp fine sea salt (for dough)
-
1 cup whole milk, warmed to 105-115°F (40-46°C)
-
¼ cup unsalted butter, softened (for dough)
-
1 large egg, at room temperature (for dough)
-
½ cup (113g) unsalted butter, softened to room temperature (for filling)
-
6-8 cloves fresh garlic, minced
-
¼ cup fresh parsley, finely chopped
-
2 tablespoons fresh chives, finely chopped
-
1 tablespoon fresh oregano, finely chopped (optional)
-
2 cups (approx. 226g) shredded mozzarella cheese
-
½ cup (approx. 55g) grated Parmesan cheese
-
½ tsp fine sea salt (for filling)
-
¼ tsp freshly ground black pepper
-
1 large egg (for egg wash)
-
1 tablespoon water or milk (for egg wash)
Instructions
-
Step 1
In a mixer bowl, combine warm milk, sugar, and yeast; let foam for 5-10 min. Whisk flour and 1 tsp fine sea salt separately. Add softened butter and 1 large egg to yeast mixture; whisk. Gradually add dry ingredients to wet; mix on low until shaggy dough forms. Knead for 7-10 min until smooth, elastic, and passes the windowpane test. -
Step 2
Lightly oil a large bowl, place dough, turn to coat, cover, and let rise in a warm, draft-free spot for 1 to 1 ½ hours until doubled in size. -
Step 3
While dough proofs, mince garlic and finely chop parsley, chives, and oregano. In a medium bowl, combine ½ cup softened butter, minced garlic, chopped herbs, mozzarella, Parmesan, ½ tsp fine sea salt, and black pepper; mix thoroughly until uniform. -
Step 4
Punch down dough and turn onto a lightly floured surface. Roll dough into an 18×12 inch (45×30 cm) rectangle. Evenly spread filling over dough, leaving a ½-inch border on one long edge. Tightly roll the dough into a log from the long edge without the border; pinch seam to seal. Cut log into 12-14 slices (1-1.25 inches thick). -
Step 5
Lightly grease a 9×5 inch (23×13 cm) loaf pan or line with parchment paper. Arrange slices vertically, cut-side up, in the prepared pan, fitting snugly. -
Step 6
Cover pan loosely and let rise in a warm spot for another 30-45 minutes until puffy and nearly doubled. Preheat oven to 375°F (190°C). Whisk 1 large egg with 1 tbsp water or milk for egg wash. Gently brush top of risen bread with egg wash. Bake for 30-35 min until deeply golden and cooked through (internal temp 200-205°F). Tent with foil if browning too quickly. -
Step 7
Cool in pan for 10-15 min, then transfer to a wire rack to cool completely. Serve warm, pulled apart, as a side or appetizer. Store leftovers airtight at room temperature for 2-3 days, or freeze for up to 1 month. Reheat as desired.
Important Information
Nutrition Facts (Per Serving)
It is important to consider this information as approximate and not to use it as definitive health advice.
Allergy Information
Please check ingredients for potential allergens and consult a health professional if in doubt.
Leave a Comment