
Strawberry Custard Delight Cake Recipe Guide – prepare to embark on a truly enchanting culinary adventure that promises to transform your dessert table into an unforgettable spectacle of flavor and elegance. Have you ever craved a dessert that’s both comforting and sophisticated, bursting with fresh fruit and velvety smooth textures? This is it! While the precise origin of combining these specific elements into one iconic cake may be a modern culinary marvel, each component boasts a rich heritage. Custard, a staple since Roman times, has long been cherished for its creamy indulgence, perfectly complementing the refreshing zest of strawberries, a fruit beloved across continents. And who can deny the universal appeal of a tender, moist cake acting as the perfect canvas?
People absolutely adore this cake for so many reasons. The bright, juicy burst of fresh strawberries cuts through the richness of the luscious, creamy custard, all nestled between layers of impossibly soft sponge cake. It’s a symphony of textures and tastes: the delicate crumb, the silky custard, and the slight chew of the fruit. It’s not just a dessert; it’s an experience, making it perfect for celebrations, family gatherings, or simply elevating an ordinary afternoon into something special. With this comprehensive Strawberry Custard Delight Cake Recipe Guide, I’m thrilled to share a recipe that is surprisingly approachable yet yields truly show-stopping results. Get ready to bake something truly delightful!

Ingredients:
Embarking on the journey to create this magnificent Strawberry Custard Delight Cake Recipe Guide, you’ll find that each component plays a vital role in building layers of flavor and texture. My approach is to ensure you have everything at your fingertips, so let’s gather our treasures!
-
For the Vanilla Sponge Cake Base:
- 1 ½ cups (190g) all-purpose flour, spooned and leveled
- 1 ½ teaspoons baking powder
- ½ teaspoon salt
- ¾ cup (170g) unsalted butter, softened to room temperature
- 1 ½ cups (300g) granulated sugar
- 3 large eggs, at room temperature
- 1 teaspoon pure vanilla extract
- 1 cup (240ml) whole milk, at room temperature
-
For the Silky Strawberry Custard:
- 2 cups (about 300g) fresh strawberries, hulled and quartered, plus extra for garnish
- ½ cup (100g) granulated sugar (adjust to your strawberry sweetness preference)
- ¼ cup (30g) cornstarch
- ¼ teaspoon salt
- 2 large egg yolks
- 2 cups (480ml) whole milk
- 2 tablespoons (28g) unsalted butter, cold and cut into small pieces
- 1 teaspoon pure vanilla extract
-
For the Dreamy Whipped Cream Frosting (Optional, but highly recommended!):
- 2 cups (480ml) heavy cream or heavy whipping cream, very cold
- ¼ cup (30g) powdered sugar (confectioners’ sugar), sifted
- 1 teaspoon pure vanilla extract
-
For Garnish:
- Fresh strawberries, sliced or halved, for decoration
- A sprig of fresh mint (optional)
Phase 1: Preparing the Vanilla Sponge Cake Base
-
Preheat Oven and Prep Pans:
Let’s kick things off by getting our oven ready! Preheat your oven to a comfortable 350°F (175°C). Then, meticulously prepare two 8-inch round cake pans. I always grease them thoroughly with butter or a non-stick spray, then dust with flour, tapping out any excess. For an extra layer of security, especially with sponge cakes, you might even consider lining the bottoms with parchment paper. This preparation ensures your beautiful cake layers release effortlessly, saving you from any potential baking woes later on. This step is crucial for achieving perfectly shaped cake layers.
-
Whisk Dry Ingredients:
In a medium bowl, take a moment to whisk together your all-purpose flour, baking powder, and salt. Sifting these ingredients together isn’t strictly necessary if your flour is fresh, but a good whisk ensures they are evenly distributed and aerated. This aeration helps create a lighter crumb for our cake. Set this dry mixture aside, ready for its big moment.
-
Cream Wet Ingredients (Butter and Sugar First!):
Now, in a large mixing bowl, preferably using an electric mixer with the paddle attachment, cream together the softened unsalted butter and granulated sugar. You want to beat them on medium-high speed for about 3-5 minutes, until the mixture becomes pale in color and wonderfully fluffy. This process, known as creaming, incorporates air into the butter, which is absolutely vital for the cake’s light and tender texture. Don’t rush this step; it’s the foundation of a great sponge! Scrape down the sides of the bowl often to ensure everything is evenly combined.
Next, one by one, add the large eggs, beating well after each addition until fully incorporated. You’ll notice the mixture becoming richer and slightly more emulsified. Finally, stir in the pure vanilla extract. The aroma alone will start making your kitchen smell divine!
-
Alternate Dry and Wet to Combine:
With your mixer on low speed, it’s time to bring everything together. Gradually add about one-third of your dry ingredient mixture to the wet mixture, mixing just until combined. Then, pour in half of the whole milk and mix again until just incorporated. Repeat this process: another third of the dry ingredients, then the remaining milk, and finally, the last third of the dry ingredients. The key here is to mix only until the ingredients are just combined. Overmixing can develop the gluten in the flour, leading to a tough cake. We’re aiming for tenderness, so stop mixing as soon as you see no more streaks of flour.
-
Bake to Golden Perfection:
Divide the batter evenly between your two prepared cake pans. You can use a kitchen scale for precision if you like, to ensure perfectly symmetrical layers. Smooth the tops with a spatula. Transfer the pans to your preheated oven and bake for 25-30 minutes, or until a wooden skewer or toothpick inserted into the center of the cakes comes out clean. The cakes should spring back lightly when gently touched, and the edges might just begin to pull away from the sides of the pan. Their golden-brown hue will signal they’re ready.
-
Cool Completely:
Once baked, remove the cakes from the oven and let them cool in their pans on a wire rack for about 10-15 minutes. This allows them to firm up slightly, making them easier to handle. After this initial cooling, carefully invert the cakes onto the wire rack, remove the pans, and peel off any parchment paper. Allow the cakes to cool completely at room temperature before you even think about assembling them. Attempting to frost or fill warm cakes is a recipe for a melty, crumbly disaster! Patience here is truly a virtue.
Phase 2: Crafting the Silky Strawberry Custard
This custard is the heart and soul of our Strawberry Custard Delight Cake Recipe Guide, providing that luscious, fruity creaminess that sets this dessert apart.
-
Prepare the Strawberry Puree:
Start by taking your hulled and quartered fresh strawberries (about 2 cups worth) and combining them with about 2 tablespoons of the granulated sugar in a small saucepan. Cook this mixture over medium heat, stirring occasionally, until the strawberries soften and release their juices, usually about 5-7 minutes. Once soft, remove from the heat and mash the strawberries with a fork or a potato masher, or for a smoother consistency, briefly pulse them in a food processor. You can strain this puree through a fine-mesh sieve if you prefer a perfectly smooth custard without any seeds, but I personally love the little flecks of strawberry in mine! Set this vibrant puree aside to cool slightly.
-
Whisk the Custard Base:
In a medium saucepan, whisk together the remaining granulated sugar, cornstarch, and salt until there are no lumps. This dry whisking prevents the cornstarch from clumping when the liquids are added. In a separate small bowl, lightly whisk your two egg yolks. Gradually whisk the egg yolks into the sugar and cornstarch mixture in the saucepan. This combination forms the thickening base for our custard.
-
Temper and Thicken the Custard:
Now, gradually whisk in the whole milk into the saucepan with your egg yolk mixture. Place the saucepan over medium heat, and here’s where your arm gets a workout! You need to cook the mixture, stirring constantly with a whisk, especially getting into the corners of the pan, until it thickens significantly. This usually takes about 8-12 minutes. The custard should reach a consistency where it coats the back of a spoon and holds a distinct line when you run your finger across it. It should also be visibly bubbling and thickening. Constant stirring is non-negotiable to prevent scorching and ensure a smooth, lump-free custard.
-
Infuse with Strawberry and Finish:
Once the custard is thick, remove it from the heat. Stir in the cold butter pieces, one at a time, until they are fully melted and incorporated, making the custard wonderfully glossy and rich. Then, gently fold in your prepared strawberry puree and the pure vanilla extract. Mix until evenly combined. Immediately transfer the hot custard to a clean bowl, press a piece of plastic wrap directly onto the surface of the custard to prevent a skin from forming, and refrigerate for at least 3-4 hours, or ideally overnight, until it is completely chilled and set. A perfectly chilled custard is essential for proper cake assembly.
Phase 3: Whipping Up the Dreamy Cream Frosting (Optional but Highly Recommended!)
A light, airy whipped cream frosting provides a beautiful contrast to the rich custard and sponge, making this Strawberry Custard Delight Cake Recipe Guide truly complete.
-
Chill Your Tools:
For the best whipped cream, cold is key! Place your large mixing bowl (preferably metal) and your whisk attachment (if using an electric mixer) into the freezer for 10-15 minutes before you begin. This helps the cream whip up faster and hold its volume better.
-
Whip the Cream:
Pour your very cold heavy cream into the chilled bowl. Begin whipping on medium-low speed, gradually increasing to medium-high. Watch it carefully! The cream will start to thicken and form soft peaks. It’s important not to over-whip, as it can quickly turn into butter!
-
Sweeten and Flavor:
Once soft peaks form, reduce the mixer speed to low and sift in the powdered sugar. Sifting prevents lumps and ensures a silky smooth frosting. Add the pure vanilla extract. Increase the speed to medium-high again and whip until firm peaks form. The cream should be thick and hold its shape beautifully. Be careful not to whip it too stiff; we want it luscious and airy. Cover and refrigerate immediately until you’re ready to assemble your cake.
Phase 4: Assembling Your Strawberry Custard Delight Cake
This is where all your hard work comes together, creating a show-stopping dessert that embodies the spirit of our Strawberry Custard Delight Cake Recipe Guide.
-
Level Your Cake Layers:
Before assembly, ensure your cake layers are completely cool. Using a serrated knife or a cake leveler, carefully trim the domed tops off your cake layers so they are perfectly flat. This creates a stable and even surface for stacking, resulting in a much neater final cake. You can save the scraps for snacking or to make cake pops!
-
First Custard Layer:
Place one leveled cake layer onto your serving plate or cake stand. If you want, you can spread a very thin layer of whipped cream or even a little extra strawberry jam on the plate first to help anchor the cake. Spread about half of your thoroughly chilled strawberry custard evenly over the first cake layer, extending almost to the edges. The custard should be firm enough to hold its shape. Ensure an even layer for a balanced bite in every slice.
-
Second Cake Layer:
Carefully place the second leveled cake layer on top of the custard. Gently press down to ensure it’s secure and level. Don’t press too hard, or the custard might squish out too much. You want a nice, even stack.
-
Remaining Custard:
Spread the remaining strawberry custard over the top of the second cake layer, again creating an even layer. If you plan to fully frost the sides with whipped cream, you might leave a slight border around the top to act as a dam. However, for this delightful cake, a simple top layer of custard is often enough for that beautiful rustic look.
-
Chill Again for Setting:
Once assembled with the custard layers, I highly recommend chilling the cake in the refrigerator for at least 30 minutes to an hour. This allows the custard to firm up further around the cake layers, making the final decoration and slicing much easier. A well-chilled cake is a well-behaved cake!
-
Decorate with Whipped Cream:
Retrieve your chilled cake and your dreamy whipped cream. You can either spread the whipped cream over the top and sides of the cake for a fully frosted look, or for a simpler, elegant presentation, just pipe decorative swirls or dollops around the top edge using a piping bag fitted with a star tip. Alternatively, a rustic spread of whipped cream on top, leaving some custard exposed, is also incredibly charming. The beauty of this cake is that it looks stunning even with minimal decoration.
-
Arrange Fresh Strawberries:
Now for the crowning glory! Artfully arrange your fresh strawberry slices or halves over the top of the whipped cream. You can create a beautiful pattern, pile them high in the center, or simply scatter them for a more natural look. Don’t be shy; the fresh strawberries are a visual and textural delight.
-
Final Chill and Serve:
For optimal flavor and structural integrity, give your fully assembled Strawberry Custard Delight Cake one last chill in the refrigerator for at least 15-30 minutes before serving. This allows all the flavors to meld beautifully and ensures a clean slice. When you’re ready, slice with a sharp, warm knife (wipe the knife clean between slices for the neatest cuts) and serve immediately. Enjoy the fruits of your labor!
Conclusion:
And there you have it, dear baking enthusiasts! We’ve journeyed through the creation of what I truly believe is not just a cake, but an experience – a symphony of textures and flavors that will undoubtedly become a treasured addition to your recipe repertoire. This isn’t just another dessert; it’s a celebration, a moment of pure, unadulterated bliss waiting to happen in your kitchen. From the very first bite, you’ll understand why I’m so passionate about this particular creation. The tender, airy cake base provides the perfect foundation, absorbing just a hint of that incredible moisture and richness that follows. Then comes the star: that luscious, velvety custard, so creamy and indulgent, practically melting on your tongue. It’s painstakingly crafted to achieve that perfect balance of sweetness and depth, often enhanced with a whisper of vanilla or a subtle citrus note that elevates its profile.
But what truly sets this dessert apart, and what makes it an absolute showstopper, are those vibrant, fresh strawberries. Their natural tang and juicy burst cut through the richness of the custard and cake, creating a harmonious balance that is nothing short of sublime. Every element plays its part to perfection, resulting in a dessert that feels both incredibly sophisticated and wonderfully comforting all at once. It’s the kind of dessert that elicits gasps of delight and immediate requests for the recipe, making you feel like a true culinary artist. I’ve poured my heart into perfecting this balance, ensuring that each spoonful delivers a consistent, delightful experience. This recipe isn’t just about following steps; it’s about crafting edible happiness.
If you’ve been searching for that one special dessert to truly impress guests, or simply to treat yourself and your loved ones to something extraordinary, look no further. This Strawberry Custard Delight Cake Recipe Guide is designed to walk you through every step, ensuring your success even if you’re new to baking. I promise you, the effort is minimal compared to the incredible reward you’ll reap. The visual appeal alone is enough to make mouths water – the contrasting reds and creams, the elegant layers, it’s truly a feast for the eyes before it even touches the palate. It’s a dessert that speaks of warmth, generosity, and an appreciation for the finer things in life, yet remains wonderfully approachable to make at home.
Why This Recipe is a Game-Changer
What makes this specific rendition stand out is the attention to detail in balancing the textures – the light sponge, the firm yet yielding custard, and the soft, fresh fruit. It avoids being overly sweet, allowing the natural flavors of the strawberries to shine through, complemented by the creamy, rich custard. The secret lies in a few crucial techniques I’ve shared, ensuring your custard sets perfectly without being rubbery, and your cake remains moist and tender. It’s a versatile dessert too, perfect for a casual afternoon tea, a grand celebratory dinner, or even a cozy family gathering. Trust me when I say, once you try this recipe, you’ll be making it again and again.
Unleashing Your Creativity: Serving Suggestions & Variations
Now that you’ve mastered the art of creating this magnificent cake, let’s talk about taking it even further! While truly divine on its own, a few thoughtful additions can elevate your Strawberry Custard Delight Cake to new heights. For a simple yet elegant finish, a dusting of powdered sugar just before serving adds a touch of sophistication and a hint of extra sweetness. Or, if you’re feeling a little more indulgent, a generous dollop of freshly whipped cream, perhaps infused with a touch of vanilla bean paste or a whisper of almond extract, can provide an ethereal cloudiness that beautifully complements the cake’s richness. A sprig of fresh mint or a few extra whole strawberries on top can also add a professional flourish and visual appeal that makes your dessert truly photo-worthy.
But don’t stop there! Think about the possibilities for variations. Imagine swapping out some of the strawberries for other seasonal berries. Fresh raspberries or blueberries would introduce a different kind of tartness and color, creating a brand-new flavor profile that’s equally enchanting. For those who love a bit of texture, a sprinkle of toasted slivered almonds or chopped pistachios over the top could add a delightful crunch. If you’re entertaining adults, a subtle splash of a complementary liqueur, like Grand Marnier or a strawberry schnapps, brushed onto the cake layers before applying the custard could introduce a sophisticated depth of flavor. You could even experiment with different cake bases – a lemon zest sponge would add a wonderful bright counterpoint to the creamy custard, or a delicate almond flour cake for a slightly different texture and nuttier flavor.
For a whimsical twist, consider preparing this recipe in individual ramekins or small dessert glasses, creating stunning mini Strawberry Custard Delights that are perfect for portion control and elegant presentation at a dinner party. You could even layer crumbled shortbread or ladyfingers at the bottom for an added textural dimension reminiscent of a trifle. The beauty of this recipe lies in its adaptability; it’s a canvas for your culinary imagination. Don’t be afraid to experiment with different spices in your custard – a pinch of cardamom or a hint of orange blossom water could transform it into something truly unique and exotic. The core elements are so robust and delicious that they can handle a touch of creative freedom.
So, my fellow food lovers, my heartfelt plea to you is this: don’t just read this conclusion and move on. Take the leap! Gather your ingredients, clear your schedule for a delightful baking session, and immerse yourself in the joy of creating this spectacular dessert. I promise you, the moment you slice into your perfectly set, beautifully layered cake, and witness the joy on the faces of those you share it with, you’ll know it was all worth it. There’s a profound satisfaction that comes from bringing such a delightful creation to life with your own hands. This isn’t just about eating; it’s about making memories around the table.
Your Baking Journey Starts Now!
I genuinely can’t wait to hear about your experiences. Please, once you’ve baked and savored your own Strawberry Custard Delight, come back and share your stories with me. Did you try a variation? What was your favorite part? How did your family react? Your feedback, your photos, and your triumphs are what truly fuel my passion for sharing these recipes. Join our growing community of happy bakers and let’s celebrate the sheer pleasure of homemade deliciousness together. Happy baking, and may your kitchen be filled with the sweet aroma of success!
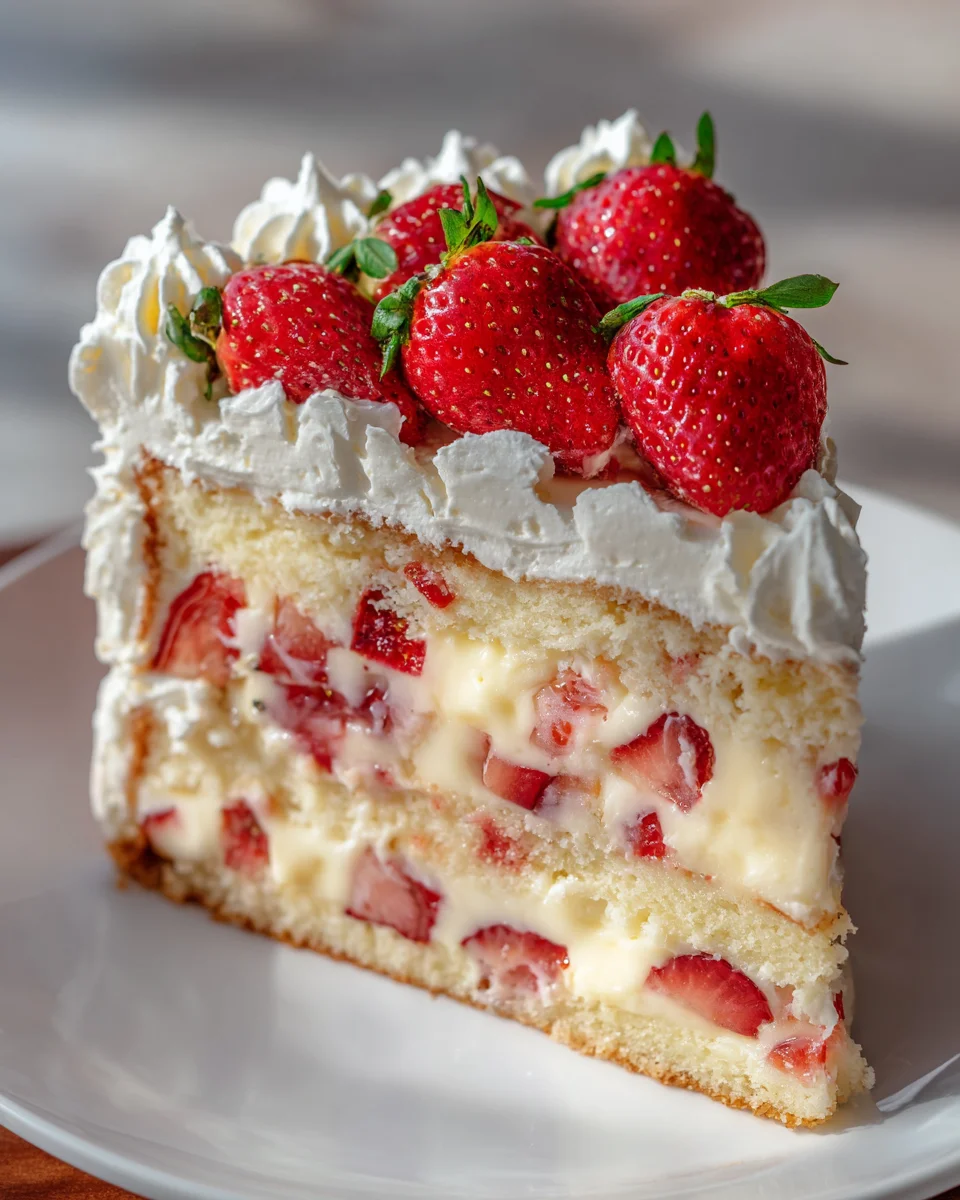
Strawberry Custard Delight Cake
A comforting and sophisticated dessert, this Strawberry Custard Delight Cake features layers of moist vanilla sponge, silky strawberry custard, and dreamy whipped cream, bursting with fresh fruit flavor. Perfect for any celebration.
Ingredients
Instructions
Important Information
Nutrition Facts (Per Serving)
It is important to consider this information as approximate and not to use it as definitive health advice.
Allergy Information
Please check ingredients for potential allergens and consult a health professional if in doubt.
Leave a Comment