
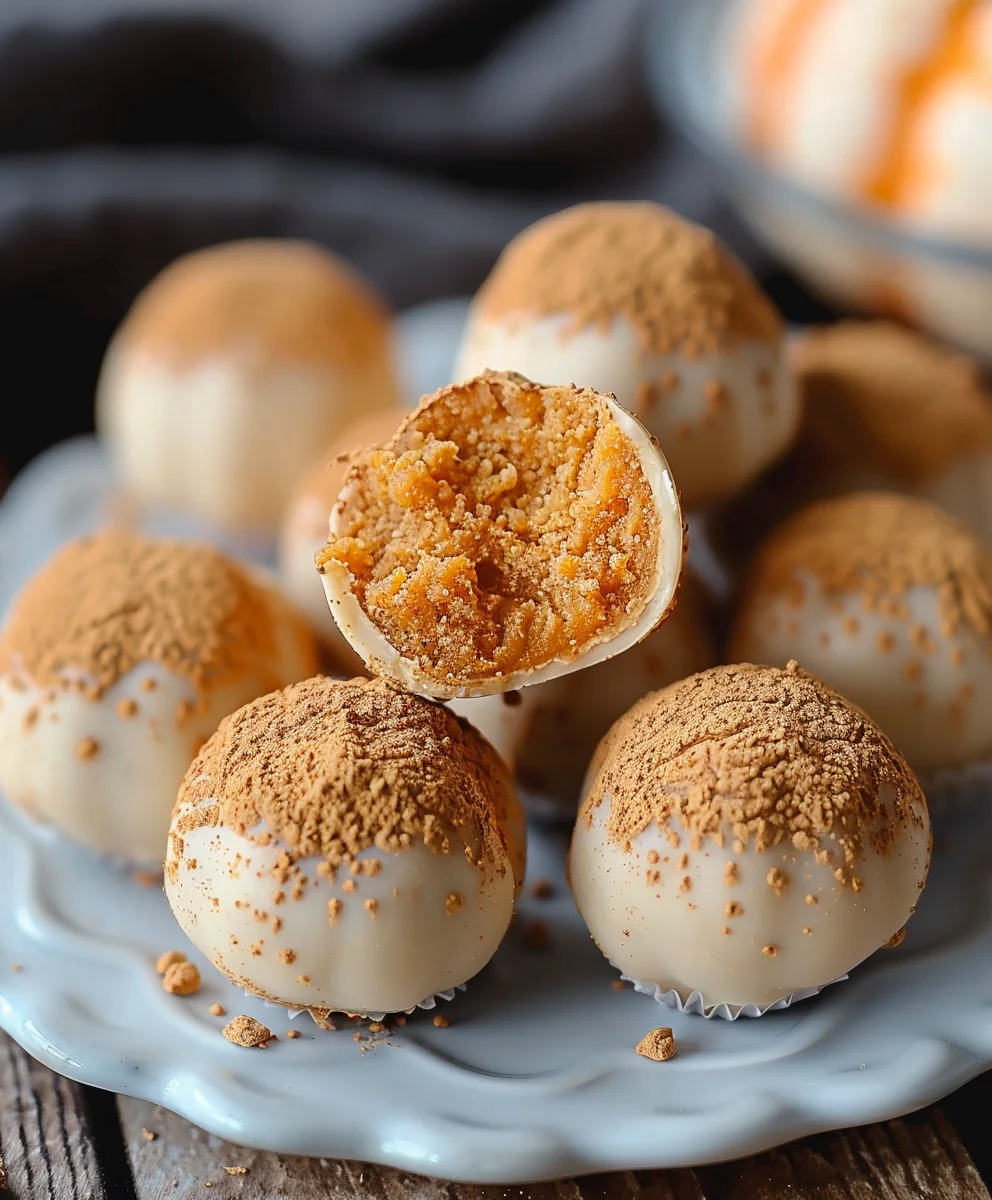
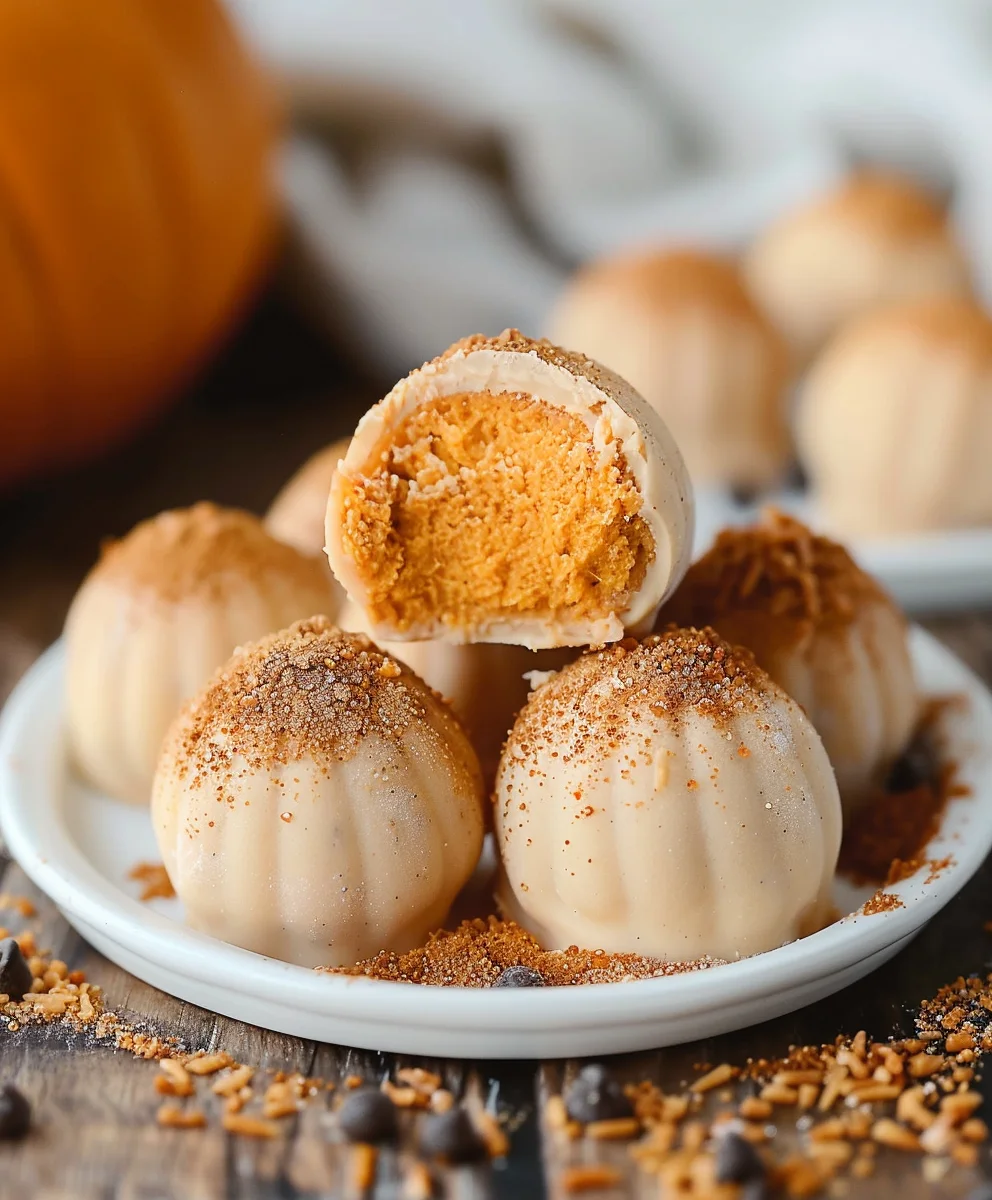
Pumpkin Cheesecake Truffles are more than just a dessert; they are a delightful culinary experience, encapsulating the very essence of autumn in a single, exquisite bite. Imagine the luxurious creaminess of a classic pumpkin cheesecake, perfectly spiced and subtly tangy, all rolled into a decadent, no-bake confection that promises to be the star of your seasonal spread.
While the history of traditional cheesecake dates back to ancient Greece and the concept of truffles emerged as a luxurious confection in French patisseries, these particular Pumpkin Cheesecake Truffles represent a modern, ingenious fusion. They seamlessly blend comforting autumn flavors with sophisticated presentation, bringing beloved seasonal tastes into a conveniently portioned, utterly irresistible treat. I’m personally thrilled by how they perfectly capture the comforting spirit of fall holidays, making them an ideal addition to any gathering from Halloween parties to Thanksgiving feasts, offering all the joy without the fuss of a whole cake.
Why Everyone Adore These Delectable Bites
People absolutely adore this dish for countless compelling reasons. Firstly, there’s the incredible flavor profile: the warm notes of cinnamon, nutmeg, and ginger beautifully complement the smooth, rich cream cheese, while the pumpkin adds a natural sweetness and a vibrant hue. Then, there’s the truly exceptional texture – a velvety-smooth interior that literally melts in your mouth, often encased in a delicate chocolate shell for an added textural contrast that’s simply divine. And let’s not forget the sheer convenience; these no-bake wonders are remarkably easy to prepare, making them a stress-free yet impressive dessert option that allows you to enjoy all the beloved flavors of a traditional pumpkin cheesecake without any oven time. They are truly a culinary gem for busy hosts and sweet-tooth enthusiasts alike.

Ingredients:
- For the Pumpkin Cheesecake Filling:
- 8 ounces (226g) cream cheese, softened to room temperature
- 1/2 cup (120g) canned pumpkin puree (not pumpkin pie filling)
- 1 cup (120g) powdered sugar (confectioners’ sugar), sifted
- 1 teaspoon pumpkin pie spice
- 1/2 teaspoon pure vanilla extract
- 1 cup (100g) finely crushed graham cracker crumbs (about 7-8 full sheets)
- For the Chocolate Coating:
- 16 ounces (450g) white chocolate melting wafers or good quality white chocolate chips, divided
- 1 tablespoon coconut oil or vegetable shortening (optional, helps with melting consistency)
- For Optional Decoration:
- 2 ounces (56g) milk chocolate or dark chocolate, for drizzling
- A pinch of extra pumpkin pie spice or ground cinnamon for sprinkling
Preparing the Pumpkin Cheesecake Filling
Hello there, fellow dessert lover! Let’s dive into making these utterly delightful Pumpkin Cheesecake Truffles. The journey begins with crafting the rich, creamy, and perfectly spiced pumpkin cheesecake filling that forms the heart of our truffles. This step is crucial for achieving that signature velvety texture we all adore in a good cheesecake.
- Ensure Cream Cheese is Softened: First things first, pull your 8 ounces of cream cheese out of the refrigerator at least an hour before you plan to start. Room temperature cream cheese is non-negotiable for a smooth, lump-free filling. Trust me on this; cold cream cheese will leave you with an unappealing, chunky mixture, and we’re aiming for silky perfection.
- Cream the Cream Cheese: In a medium-sized mixing bowl, using an electric hand mixer or a stand mixer fitted with the paddle attachment, beat the softened cream cheese on medium speed for about 2-3 minutes. You want to whip it until it’s incredibly smooth, light, and airy. This aeration step helps to create that signature creamy texture and ensures it blends beautifully with the other ingredients. Scrape down the sides of the bowl frequently to ensure everything is incorporated evenly.
- Add Pumpkin Puree and Vanilla: Next, add the 1/2 cup of canned pumpkin puree to the creamed cheese. It’s vital to use pure pumpkin puree, not pumpkin pie filling, which already contains spices and sweeteners. We want control over our flavor profile! Also, add the 1/2 teaspoon of pure vanilla extract. Continue beating on medium-low speed until the pumpkin and vanilla are fully incorporated into the cream cheese mixture. The mixture should now have a lovely, pale orange hue.
- Incorporate Sweetness and Spice: Now, it’s time for the sweetness and signature pumpkin pie spice. Gradually add the 1 cup of sifted powdered sugar and the 1 teaspoon of pumpkin pie spice to the mixture. Sifting the powdered sugar beforehand is a small but mighty step that prevents lumps and ensures a smoother, more uniform consistency. Start your mixer on low speed to avoid a cloud of powdered sugar, then increase to medium until everything is well combined and smooth. Taste a tiny bit of the mixture here – this is your chance to adjust the spice level if you desire a stronger pumpkin spice kick.
- Fold in Graham Cracker Crumbs: This is a key ingredient for truffle structure! Gently fold in the 1 cup of finely crushed graham cracker crumbs. The graham cracker crumbs act as a binder, helping to firm up the cheesecake mixture and make it easier to roll into truffles. Without them, your filling would be too soft and difficult to handle. Use a spatula for this step to gently incorporate the crumbs without overmixing, which can make the mixture tough. The mixture should be thick and moldable.
- Chill the Filling: Once everything is perfectly combined, cover the bowl tightly with plastic wrap and refrigerate the pumpkin cheesecake mixture for a minimum of 2-3 hours. For best results and easier handling, an overnight chill is highly recommended. This chilling period is crucial for the mixture to firm up properly, allowing you to easily scoop and roll it into perfect truffle balls. Don’t skip this step, no matter how tempting it is to rush ahead! A well-chilled mixture is the secret to perfectly shaped Pumpkin Cheesecake Truffles.
Shaping the Truffles
After a patient wait, your pumpkin cheesecake filling should be firm and ready for its transformation into delightful truffles. This stage is where our Pumpkin Cheesecake Truffles really start to take shape. It’s a fun and somewhat meditative process!
- Prepare Your Workspace: Line a large baking sheet with parchment paper or a silicone baking mat. This will be where your shaped truffles rest before their final chocolate bath. Having a prepared surface makes the next steps much smoother.
- Scoop the Filling: Remove the chilled pumpkin cheesecake mixture from the refrigerator. Using a small cookie scoop (about 1 tablespoon in size) or two spoons, scoop out uniform portions of the filling. Consistency in size will lead to uniformly beautiful truffles that also coat evenly.
- Roll into Balls: Gently roll each scooped portion between the palms of your hands to form smooth, round balls. If the mixture starts to get too sticky, you can lightly dust your hands with a tiny bit of powdered sugar, or even better, pop the mixture back into the fridge for 10-15 minutes to firm up again. The warmth from your hands can soften the mixture, so work quickly but gently. Aim for perfectly round spheres, as these will be the foundation of your elegant truffles.
- Second Chill for Firmness: Arrange the rolled truffles on your prepared baking sheet. Once all the filling has been shaped, return the baking sheet with the truffles to the refrigerator for another 30-60 minutes. This second chill is critical. It ensures the truffles are very firm and cold, which helps them hold their shape when dipped into warm chocolate. It also helps the chocolate set more quickly and prevents the truffles from breaking apart. A truly cold truffle is your best friend in the coating process!
Preparing the Chocolate Coating
Now for the luscious outer shell of our Pumpkin Cheesecake Truffles! A smooth, evenly melted chocolate coating is what elevates these treats from delicious filling to decadent truffle. Take your time with this step to ensure a beautiful finish.
-
Choose Your Melting Method: You have a couple of options for melting your white chocolate, both aiming for a smooth, pourable consistency. We’re working with 16 ounces of white chocolate melting wafers or good quality white chocolate chips, and optionally, 1 tablespoon of coconut oil or vegetable shortening.
- Double Boiler Method (Recommended for Best Results): If you have a double boiler, this is often the most forgiving method. Fill a saucepan with about an inch or two of water and bring it to a simmer over medium heat. Place a heatproof bowl (make sure it’s larger than the saucepan, so it doesn’t touch the water) over the simmering water. Add your white chocolate and the optional coconut oil/shortening to the bowl. Stir frequently with a dry rubber spatula until the chocolate is completely melted and smooth. Be careful not to let any water or steam get into the chocolate, as this will cause it to seize. Remove from heat as soon as it’s smooth, but keep it over the warm water to maintain fluidity if needed.
- Microwave Method: If using a microwave, place the white chocolate and optional coconut oil/shortening in a microwave-safe bowl. Microwave on 50% power for 30-second intervals, stirring thoroughly after each interval. White chocolate can scorch easily, so stirring and checking frequently is crucial. Continue until the chocolate is mostly melted, then stir vigorously until completely smooth. The residual heat will melt the remaining small pieces.
- Achieve the Right Consistency: The melted white chocolate should be smooth, glossy, and thin enough to coat the truffles evenly without being too thick or clumpy. If it feels too thick, you can add another 1/2 teaspoon of coconut oil or shortening, stir, and reassess, but be conservative – too much will make it greasy. A perfectly melted chocolate is key for a professional-looking finish on your Pumpkin Cheesecake Truffles.
Coating the Pumpkin Cheesecake Truffles
This is arguably the most satisfying part – giving your chilled pumpkin cheesecake balls their luxurious chocolate shell! Get ready for some dipping fun, but remember, patience and precision lead to the most beautiful results.
- Prepare for Dipping: Set up your dipping station. Have your bowl of melted white chocolate ready, a fork or a dipping tool (specific for candy making is ideal), and your baking sheet lined with parchment paper, ready to receive the coated truffles. Work quickly, as the cold truffles will cause the chocolate to set rather fast.
- Dip Each Truffle: Take one very cold pumpkin cheesecake truffle from the refrigerator. Drop it gently into the bowl of melted white chocolate. Use your fork or dipping tool to gently submerge the truffle completely.
- Remove Excess Chocolate: Lift the truffle out of the chocolate with your fork. Gently tap the fork against the side of the bowl to allow any excess chocolate to drip off. This step is important for a smooth, even coating and to prevent pools of chocolate at the base of your truffles. You can also use a toothpick to gently push off any drips from the bottom if desired.
- Place on Baking Sheet: Carefully transfer the coated truffle to the prepared parchment-lined baking sheet. Allow the chocolate to begin setting before attempting any decorations. Repeat this process with all remaining truffles, ensuring they are spaced out on the baking sheet so they don’t touch.
Optional Decorations and Finishing Touches
To make your Pumpkin Cheesecake Truffles truly spectacular and give them that extra touch of gourmet flair, consider adding some simple decorations. These little details can make a big difference in presentation and appeal.
- Prepare Drizzle Chocolate (Optional): If you’re adding a drizzle, melt your 2 ounces of milk or dark chocolate using the same methods described in step 11 (double boiler or microwave), but perhaps in a smaller bowl. Aim for a slightly thinner consistency if possible, as it will make drizzling easier.
- Drizzle and Decorate: Once your white chocolate coating has mostly set (it should no longer be wet to the touch, but not completely hardened), use a spoon or a piping bag with a very small hole cut in the tip to drizzle the melted milk/dark chocolate over the truffles in a decorative pattern. Alternatively, while the white chocolate is still slightly wet, you can sprinkle a tiny pinch of extra pumpkin pie spice or ground cinnamon over some of the truffles for a rustic, aromatic finish. This adds a beautiful contrast and reinforces the flavor profile of the Pumpkin Cheesecake Truffles.
- Final Chill to Set: Once all your truffles are coated and decorated, return the baking sheet to the refrigerator for at least 30 minutes, or until the chocolate coating is completely firm and set. This final chill locks in all the flavors and textures, making them perfect for serving.
Tips for Success and Variations
Making homemade Pumpkin Cheesecake Truffles is a rewarding experience, and with a few extra tips and ideas, you can ensure your batch is absolutely perfect every time. These insights will help you navigate any potential challenges and explore creative variations.
Ingredient Temperature Matters
As mentioned earlier, the temperature of your ingredients is critical. For the filling, ensure your cream cheese is truly at room temperature. This allows for smooth incorporation of all ingredients, preventing lumps and ensuring a velvety texture. For the coating, make sure your truffles are very cold before dipping. The contrast in temperature helps the chocolate set quickly, minimizing drips and ensuring a crisp, firm coating. If your truffles soften too much during the rolling or dipping process, don’t hesitate to pop them back into the freezer for 10-15 minutes.
Choosing Your Chocolate Wisely
The quality of your white chocolate for the coating will significantly impact the final taste and appearance of your Pumpkin Cheesecake Truffles. Opt for high-quality melting wafers or confectionery coating specifically designed for dipping, as they melt smoothly and set beautifully without tempering. If using white chocolate chips or bars, look for brands with higher cocoa butter content, and consider adding a bit of coconut oil or vegetable shortening to improve fluidity and shine. Avoid using chocolate chips that are designed to hold their shape during baking, as these often contain stabilizers that make them difficult to melt smoothly for dipping.
The Art of the Perfect Roll
When rolling your pumpkin cheesecake filling into balls, aim for consistent size. A small cookie scoop (1 tablespoon) is your best friend here. Uniformly sized truffles not only look more professional but also ensure even coating and setting times. If the mixture starts to stick to your hands, give your hands a quick wash with cold water or a light dusting of powdered sugar. Alternatively, place the entire bowl of filling back in the fridge for 10-15 minutes to re-firm. Don’t be afraid to take breaks if the mixture becomes too warm to handle.
Flavor Enhancements and Variations
- Spiced Crumbs: For an extra layer of flavor, consider tossing your graham cracker crumbs with a tiny pinch of cinnamon or nutmeg before adding them to the filling.
- Nutty Crunch: While the chocolate coating is still wet, roll some truffles in finely chopped pecans or walnuts for a delightful texture contrast and nutty flavor.
- Gingerbread Twist: Replace graham cracker crumbs with crushed gingerbread cookies for a more festive and spicy twist, perfect for holiday seasons.
- Citrus Zest: A tiny bit of orange zest added to the pumpkin cheesecake filling can brighten the flavors and add an unexpected, delightful aroma.
- Dark Chocolate Coating: While white chocolate provides a beautiful color contrast with the pumpkin, feel free to use dark chocolate for the main coating if you prefer a richer, more intense chocolate experience. This would create a truly decadent version of Pumpkin Cheesecake Truffles.
Storage Instructions
Once completely set, store your Pumpkin Cheesecake Truffles in an airtight container in the refrigerator. They will keep well for up to 1 week. For optimal flavor and texture, it’s best to let them sit at room temperature for about 10-15 minutes before serving, allowing the cheesecake filling to soften slightly. These truffles also freeze beautifully for up to 1 month. To freeze, place them in a single layer on a baking sheet until solid, then transfer to a freezer-safe airtight container or bag. Thaw in the refrigerator overnight before serving.
Troubleshooting Common Issues
- Chocolate Seizing: If your chocolate becomes thick, grainy, and unworkable, it means water has gotten into it. Unfortunately, once chocolate seizes, it’s very difficult to rescue. Prevention is key – ensure all your tools are completely dry and avoid steam getting into the bowl during melting.
- Soft Truffles: If your truffles are too soft to roll or dip, they need more chilling time. Don’t rush the refrigeration steps. The colder they are, the easier they are to work with.
- Uneven Coating: This often happens if the chocolate is too thick or too hot, or if the truffles aren’t cold enough. Adjust the chocolate consistency with a bit more shortening/coconut oil if needed, and ensure your truffles are thoroughly chilled.
With these comprehensive instructions and helpful tips, you’re now fully equipped to create absolutely stunning and incredibly delicious Pumpkin Cheesecake Truffles that will impress everyone!
Conclusion:
There’s a certain magic that happens when classic fall flavors meet the irresistible allure of a no-bake treat, and I truly believe this recipe for Pumpkin Cheesecake Truffles perfectly encapsulates that enchanting synergy. From the very first moment I perfected this recipe, I knew I had stumbled upon something truly special – a dessert that wasn’t just delicious, but also incredibly versatile and joyfully simple to prepare. It’s the kind of confection that brings a genuine smile to people’s faces, conjuring memories of crisp autumn days and cozy evenings. The ease of preparation is, without a doubt, one of its most compelling attributes. Forget about the stress of water baths or cracking crusts; these truffles deliver all the decadent, creamy richness of a traditional pumpkin cheesecake without any of the fuss. You’re left with more time to savor the season and enjoy the company of loved ones, which, to me, is what baking is truly all about.
The texture is absolutely divine – a luscious, velvety smooth interior that melts on your tongue, encased in a delicate, crisp chocolate shell. Each bite is a harmonious symphony of flavors: the subtle tang of cream cheese, the earthy sweetness of pumpkin, and that quintessential blend of cinnamon, nutmeg, and ginger that signals the arrival of fall. It’s rich without being overly heavy, and perfectly sweet without being cloying, making it an ideal ending to any meal, from a casual weeknight dinner to a festive holiday feast. I’ve found that even those who claim not to be big pumpkin fans find themselves utterly captivated by these truffles. They’re a sophisticated twist on a beloved classic, offering a concentrated burst of flavor in a convenient, bite-sized package. Trust me when I say, once you try these, they will undoubtedly become a cherished part of your seasonal dessert repertoire.
Now, let’s talk about enjoying these little spheres of joy. While they are utterly delightful straight from the fridge, perfectly chilled and ready to impress, I have a few suggestions to elevate your experience even further. Imagine them artfully arranged on a beautiful platter, perhaps dusted with a whisper of extra cinnamon or a finely crushed graham cracker sprinkle – they make an elegant statement on any dessert table. They pair exquisitely with a warm mug of coffee, a robust espresso, or a spiced chai latte, transforming an ordinary afternoon break into a moment of pure indulgence. For those looking for a charming hostess gift or a thoughtful treat for a neighbor, packaging a small box of these truffles tied with a festive ribbon is always a winning idea. Their portable nature also makes them perfect for potlucks or office parties, ensuring you’re the star of the dessert spread with minimal effort.
And don’t be afraid to get creative with variations! While I adore the classic milk chocolate coating, feel free to experiment with dark chocolate for a more intense cocoa hit, or even white chocolate for a sweeter, creamier finish. A sprinkle of sea salt flakes over the chocolate coating can also add a wonderfully sophisticated counterpoint to the sweetness. For an extra layer of texture, consider mixing finely chopped pecans or walnuts into the pumpkin cheesecake base before chilling. You could also roll some of them in a mixture of powdered sugar and cinnamon, or even toasted coconut flakes, for a different aesthetic and flavor profile. The possibilities are truly endless, allowing you to tailor these treats to your exact preferences or to suit different occasions. I genuinely implore you to give this recipe a try. They are such a rewarding bake (or rather, no-bake!), offering immense satisfaction with every bite.
I am always so thrilled to see your culinary creations, so please, once you’ve made these sensational truffles, come back and share your experience with me! Did you try a unique variation? What was your favorite part? Did they disappear as quickly as they did in my kitchen? Share your photos and comments below – I’d absolutely love to hear all about it. Happy “no-baking,” and enjoy every single delightful moment with your homemade Pumpkin Cheesecake Truffles!
Pumpkin Cheesecake Truffles
Delicious Pumpkin Cheesecake Truffles are a delightful culinary experience, encapsulating the essence of autumn in a single, exquisite bite. These no-bake treats blend comforting fall flavors with sophisticated presentation, perfect for any seasonal gathering.
Ingredients
-
4 ounces cream cheese, softened
-
½ cup canned pumpkin puree
-
1 (14-ounce) can sweetened condensed milk
-
1 teaspoon pumpkin pie spice
-
½ teaspoon pure vanilla extract
-
½ cup graham cracker crumbs
-
⅓ cup white chocolate chips
-
1 tablespoon coconut oil or vegetable shortening, optional
-
2 ounces milk or dark chocolate, for drizzling, optional
Instructions
-
Step 1
Prepare Filling: In a medium mixing bowl, beat softened cream cheese until smooth and airy. Add pumpkin puree, sweetened condensed milk, pumpkin pie spice, and vanilla extract; mix until well combined. -
Step 2
Add Crumbs & Chill: Gently fold in graham cracker crumbs using a spatula until just combined. Cover the bowl tightly with plastic wrap and refrigerate for at least 3 hours (or overnight) until the mixture is firm. -
Step 3
Shape Truffles: Line a baking sheet with parchment paper. Scoop filling into 1-tablespoon portions and roll each into a smooth, round ball between your palms. Place shaped truffles on the prepared baking sheet. -
Step 4
Second Chill: Return the baking sheet with truffles to the refrigerator for another 30-60 minutes to ensure they are very firm and cold. -
Step 5
Melt Chocolate for Decoration: Melt the ⅓ cup white chocolate chips (with optional coconut oil or vegetable shortening) using a double boiler or microwave until smooth. For additional decoration, melt the optional 2 ounces of milk or dark chocolate separately. -
Step 6
Decorate & Set: Drizzle the melted white chocolate over the chilled truffles in a decorative pattern. If desired, drizzle with milk or dark chocolate, or sprinkle with a pinch of extra pumpkin pie spice. Return truffles to the refrigerator for at least 30 minutes until all chocolate is completely firm and set. -
Step 7
Serve & Store: Store finished Pumpkin Cheesecake Truffles in an airtight container in the refrigerator for up to 1 week. For optimal flavor and texture, let them sit at room temperature for 10-15 minutes before serving.
Important Information
Nutrition Facts (Per Serving)
It is important to consider this information as approximate and not to use it as definitive health advice.
Allergy Information
Please check ingredients for potential allergens and consult a health professional if in doubt.
Leave a Comment