
One sunny afternoon, I found myself in the kitchen with my niece, Mia, who was determined to create something magical for her birthday party. We decided to whip up a batch of Funfetti Pastel Cakesicles, a delightful treat that always brings a smile. As we mixed the vibrant sprinkles into the batter, I could see her eyes light up with each colorful splash. The sweet aroma of vanilla wafted through the air, instantly transporting me back to my own childhood birthdays filled with laughter and sugary delights.
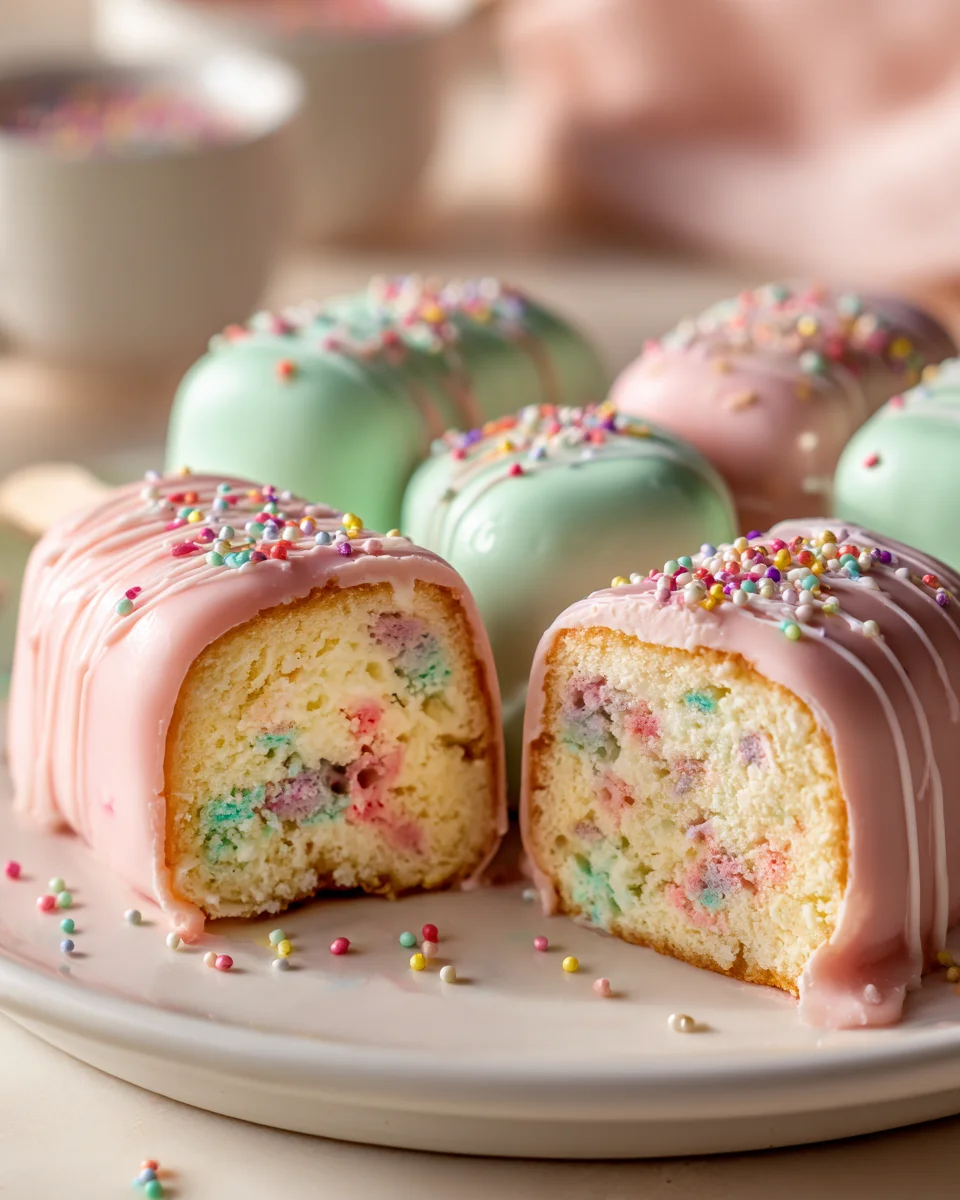
These Funfetti Pastel Cakesicles are not just visually stunning; they’re a celebration of joy in every bite. Imagine creamy, soft cake coated in a smooth pastel-colored shell that glistens like a rainbow. The first bite is a wonderful explosion of sweetness, with hints of vanilla and the delightful crunch of sprinkles that remind you of festive confetti. It’s a treat that evokes nostalgia while feeling fresh and fun at the same time.
What makes my version special is the addition of a rich cream cheese frosting that adds a tangy twist to the sweetness, perfectly complementing the cake’s texture. Plus, I’ve perfected the balance of flavors so that each bites feels like a mini party on a stick! Now, are you ready to create your own batch of these whimsical delights? Let me show you exactly how to make it.

Why You’ll Love This Recipe
- Ready in under 1 hour, including baking and chilling time, making it an ideal treat for last-minute celebrations.
- Irresistibly moist cake combined with a creamy buttercream frosting creates a delightful texture contrast.
- Budget-friendly, with ingredients that are commonly found in your pantry — no need for specialty items!
- Customizable with various pastel colors and sprinkles, perfect for any occasion, from birthdays to baby showers.
- A fun, interactive treat that kids can help assemble, making it a great activity for family time!
Ingredients
- For the Cake:
- 1 ½ cups all-purpose flour
- 1 cup granulated sugar
- ½ cup unsalted butter, softened (1 stick)
- 3 large eggs
- 1 teaspoon vanilla extract
- ½ cup milk (whole or 2%)
- 1 ½ teaspoons baking powder
- ¼ teaspoon salt
- ½ cup rainbow sprinkles (jimmies)
- For the Buttercream Frosting:
- ½ cup unsalted butter, softened (1 stick)
- 2 cups powdered sugar
- 2 tablespoons heavy cream (or milk)
- 1 teaspoon vanilla extract
- Food coloring (pastel colors of your choice)
- For the Coating:
- 1 cup white chocolate chips or candy melts
- 1 tablespoon coconut oil (optional, for thinning)
- Additional rainbow sprinkles for decoration
- For Assembly:
- 10-12 popsicle sticks
- Silicone molds (cakesicle molds or popsicle molds)
The star of our Funfetti Pastel Cakesicles is undoubtedly the all-purpose flour, which provides the necessary structure and fluffiness for the cake. Choosing a high-quality flour ensures your cakesicles have that perfect soft texture. If you’re gluten-sensitive, you can easily substitute with a 1:1 gluten-free flour blend without compromising too much on texture.
Equally important is the unsalted butter. It not only adds moisture but also richness to the flavor. Be sure to use butter that is at room temperature to achieve a smooth batter. If you find yourself without butter, you can swap in an equal amount of vegetable oil, though it may slightly alter the texture.
Step-by-Step Instructions
- Preheat your oven to 350°F (175°C) and grease a 9×9-inch square baking pan. This will ensure your cakesicle comes out easily once baked.
- In a large mixing bowl, cream together ½ cup of softened unsalted butter and 1 cup of granulated sugar until light and fluffy, about 3-5 minutes. You’ll know it’s ready when the mixture appears pale and has a slightly airy texture.
- Add in 3 large eggs, one at a time, mixing well after each addition. The batter should be smooth and slightly thick. Be cautious not to overmix; stop as soon as there are no visible egg streaks.
- Stir in 1 teaspoon of vanilla extract and ½ cup of milk until just combined. The batter will loosen slightly, making it easier to incorporate the dry ingredients.
- In a separate bowl, whisk together 1 ½ cups of all-purpose flour, 1 ½ teaspoons of baking powder, and ¼ teaspoon of salt. Gradually add this dry mixture to the wet ingredients, stirring gently until no flour streaks remain.
- Gently fold in ½ cup of rainbow sprinkles. This is where the fun begins! Be careful not to overmix, or the sprinkles may bleed color into the batter.
- Pour the batter into your prepared baking pan and spread it evenly. Bake for 25-30 minutes, or until a toothpick inserted in the center comes out clean. The top should be golden and spring back when lightly touched.
- Once baked, allow the cake to cool in the pan for 10 minutes before transferring it to a wire rack to cool completely. This prevents sogginess.
- While the cake cools, prepare the buttercream frosting. In a medium bowl, beat ½ cup of softened unsalted butter until creamy. Gradually add 2 cups of powdered sugar, mixing on low speed to prevent a sugar cloud.
- Add in 2 tablespoons of heavy cream and 1 teaspoon of vanilla extract, mixing until smooth. If you want to achieve pastel colors, divide the frosting into separate bowls and add food coloring to achieve your desired shades.
- Once the cake has cooled, crumble it into a large mixing bowl. Add about ¾ of the buttercream frosting to the crumbled cake, mixing with your hands until combined. The mixture should be moist but hold together when pressed.
- Using your silicone molds, pack the cake mixture into each cavity, making sure to leave enough room for the coating later. Use a popsicle stick to create a small opening for the stick.
- Freeze the molds for at least 1 hour, or until firm. This ensures that your cakesicles hold their shape when coating them.
- To coat the cakesicles, melt 1 cup of white chocolate chips or candy melts in a microwave-safe bowl, heating in 30-second intervals until smooth. If the mixture is too thick, stir in 1 tablespoon of coconut oil to thin it out.
- Remove the cakesicles from the molds and dip them into the melted chocolate, ensuring they are fully coated. Allow any excess to drip off before placing them on a baking sheet lined with parchment paper.
- While the chocolate is still wet, sprinkle additional rainbow sprinkles on top for decoration. Let the cakesicles sit at room temperature until the coating is set, about 30 minutes.
Pro Tips for the Best Funfetti Pastel Cakesicles
- Make sure your butter is softened to room temperature for both the cake and frosting. Cold butter can lead to a lumpy frosting that won’t spread easily.
- When mixing the cake batter, avoid overmixing after adding the flour. This can result in a dense cake instead of the light, fluffy texture we want.
- Use a silicone mold for easy release. If you’re using a metal mold, be sure to grease it well to prevent sticking.
- For the best flavor, use high-quality vanilla extract. It enhances the sweetness and adds depth to both the cake and frosting.
- One common mistake is not allowing the cakesicles to cool completely before coating. If they’re still warm, the chocolate will melt and won’t adhere properly.
Variations & Serving Ideas
Get creative with your Funfetti Pastel Cakesicles! For a seasonal twist, consider adding pumpkin spice to your cake batter during fall or a peppermint extract for winter holidays. You can also try substituting half of the all-purpose flour with cocoa powder for a chocolate funfetti version. For a healthier version, consider using Greek yogurt in place of butter for a low-fat alternative.
When serving, consider pairing these cakesicles with a scoop of vanilla ice cream or a dollop of whipped cream for an indulgent treat. They also go wonderfully with a glass of cold milk, enhancing the sweet flavor. For a themed party, serve them alongside colorful fruit skewers to add freshness and balance to the sweetness!
Storage, Make-Ahead & Reheating
Store your Funfetti Pastel Cakesicles in an airtight container in the refrigerator for up to 5 days. They also freeze well for up to 3 months. To freeze, wrap each cakesicle individually in plastic wrap and place them in a freezer-safe bag. Just remember to let them thaw in the fridge before enjoying!
Interestingly, these cakesicles often taste even better the next day! The flavors meld beautifully overnight, making it a great make-ahead treat for parties and gatherings.
Frequently Asked Questions
Can I make Funfetti Pastel Cakesicles ahead of time?
Yes — in fact, they taste even better the next day! You can prepare the cakesicles a day in advance and store them in the refrigerator. Just ensure they are well-wrapped to maintain freshness.
What kind of sprinkles should I use for the cake?
For the best results, use jimmies or regular rainbow sprinkles. Nonpareils tend to bleed color into the batter, which can affect the final look of your cakesicles.
Can I use a different type of chocolate for coating?
Absolutely! While white chocolate is traditional, you can use milk chocolate, dark chocolate, or even colored candy melts for a fun twist. Just remember to adjust the melting times accordingly!
How can I prevent the chocolate from cracking?
To prevent cracking,
Final Thoughts
Funfetti Pastel Cakesicles are a delightful treat that perfectly blend nostalgia and creativity, making them a joy to both make and eat. The vibrant colors and sprinkles not only brighten your day but also bring a sense of celebration to any occasion, big or small.
This is the kind of recipe I come back to again and again, especially when I want to add a splash of joy to my gatherings or simply indulge my sweet tooth. The combination of soft cake and creamy coating is utterly satisfying, and the fun of dipping and decorating makes it a fantastic activity to share with loved ones.
I encourage you to give these cakesicles a try! Don’t hesitate to experiment with your favorite flavors or decorations, and I’d love to see your creations—share your results or add your own twist!

Delicious Funfetti Pastel Cakesicles for Any Celebration
- Total Time: 45 minutes
- Yield: 10-12 cakesicles 1x
Description
These Funfetti Pastel Cakesicles are a delightful treat that brings joy in every bite. Coated in a smooth pastel-colored shell, they are perfect for any celebration.
Ingredients
- 1 ½ cups all-purpose flour
- 1 cup granulated sugar
- ½ cup unsalted butter, softened (1 stick)
- 3 large eggs
- 1 teaspoon vanilla extract
- ½ cup milk (whole or 2%)
- 1 ½ teaspoons baking powder
- ¼ teaspoon salt
- ½ cup rainbow sprinkles (jimmies)
- ½ cup unsalted butter, softened (1 stick)
- 2 cups powdered sugar
- 2 tablespoons heavy cream (or milk)
- 1 teaspoon vanilla extract
- Food coloring (pastel colors of your choice)
- 1 cup white chocolate chips or candy melts
- 1 tablespoon coconut oil (optional, for thinning)
- Additional rainbow sprinkles for decoration
- 10–12 popsicle sticks
- Silicone molds (cakesicle molds or popsicle molds)
Instructions
- Preheat your oven to 350°F (175°C) and grease a 9×9-inch square baking pan.
- In a large mixing bowl, cream together ½ cup of softened unsalted butter and 1 cup of granulated sugar until light and fluffy, about 3-5 minutes.
- Add in 3 large eggs, one at a time, mixing well after each addition.
- Stir in 1 teaspoon of vanilla extract and ½ cup of milk until just combined.
- In a separate bowl, whisk together 1 ½ cups of all-purpose flour, 1 ½ teaspoons of baking powder, and ¼ teaspoon of salt.
- Gradually add this dry mixture to the wet ingredients, stirring gently until no flour streaks remain.
- Gently fold in ½ cup of rainbow sprinkles.
- Pour the batter into your prepared baking pan and spread it evenly. Bake for 25-30 minutes, or until a toothpick inserted in the center comes out clean.
- Once baked, allow the cake to cool in the pan for 10 minutes before transferring it to a wire rack to cool completely.
- While the cake cools, prepare the buttercream frosting. In a medium bowl, beat ½ cup of softened unsalted butter until creamy.
- Gradually add 2 cups of powdered sugar, mixing on low speed to prevent a sugar cloud.
- Add in 2 tablespoons of heavy cream and 1 teaspoon of vanilla extract, mixing until smooth.
- Once the cake has cooled, crumble it into a large mixing bowl. Add about ¾ of the buttercream frosting to the crumbled cake, mixing with your hands until combined.
- Using your silicone molds, pack the cake mixture into each cavity, making sure to leave enough room for the coating later.
- Freeze the molds for at least 1 hour, or until firm.
- To coat the cakesicles, melt 1 cup of white chocolate chips or candy melts in a microwave-safe bowl, heating in 30-second intervals until smooth.
- If the mixture is too thick, stir in 1 tablespoon of coconut oil to thin it out.
- Remove the cakesicles from the molds and dip them into the melted chocolate, ensuring they are fully coated.
- Allow any excess to drip off before placing them on a baking sheet lined with parchment paper.
- While the chocolate is still wet, sprinkle additional rainbow sprinkles on top for decoration. Let the cakesicles sit at room temperature until the coating is set, about 30 minutes.
- Prep Time: 15 mins
- Cook Time: 30 mins
- Category: Dessert
- Method: Baking
- Cuisine: American
Nutrition
- Serving Size: 1 cakesicle
- Calories: 200
- Sugar: 15 g
- Sodium: 150 mg
- Fat: 8 g
- Saturated Fat: 4 g
- Unsaturated Fat: 2 g
- Trans Fat: 0 g
- Carbohydrates: 30 g
- Fiber: 1 g
- Protein: 2 g
- Cholesterol: 40 mg
Keywords: Make sure your butter is softened to room temperature for both the cake and frosting. Avoid overmixing after adding the flour to maintain a light, fluffy texture.
Leave a Comment