
Crispy Cottage Cheese Chips High Protein Low Carb Snack
Crispy Cottage Cheese Chips High Protein Low Carb Snack – I’ve discovered a snack revelation, and I am absolutely bursting to share it with you! This isn’t just another recipe; it’s a total game-changer for anyone who loves a good crunch but wants to keep things healthy and delicious.
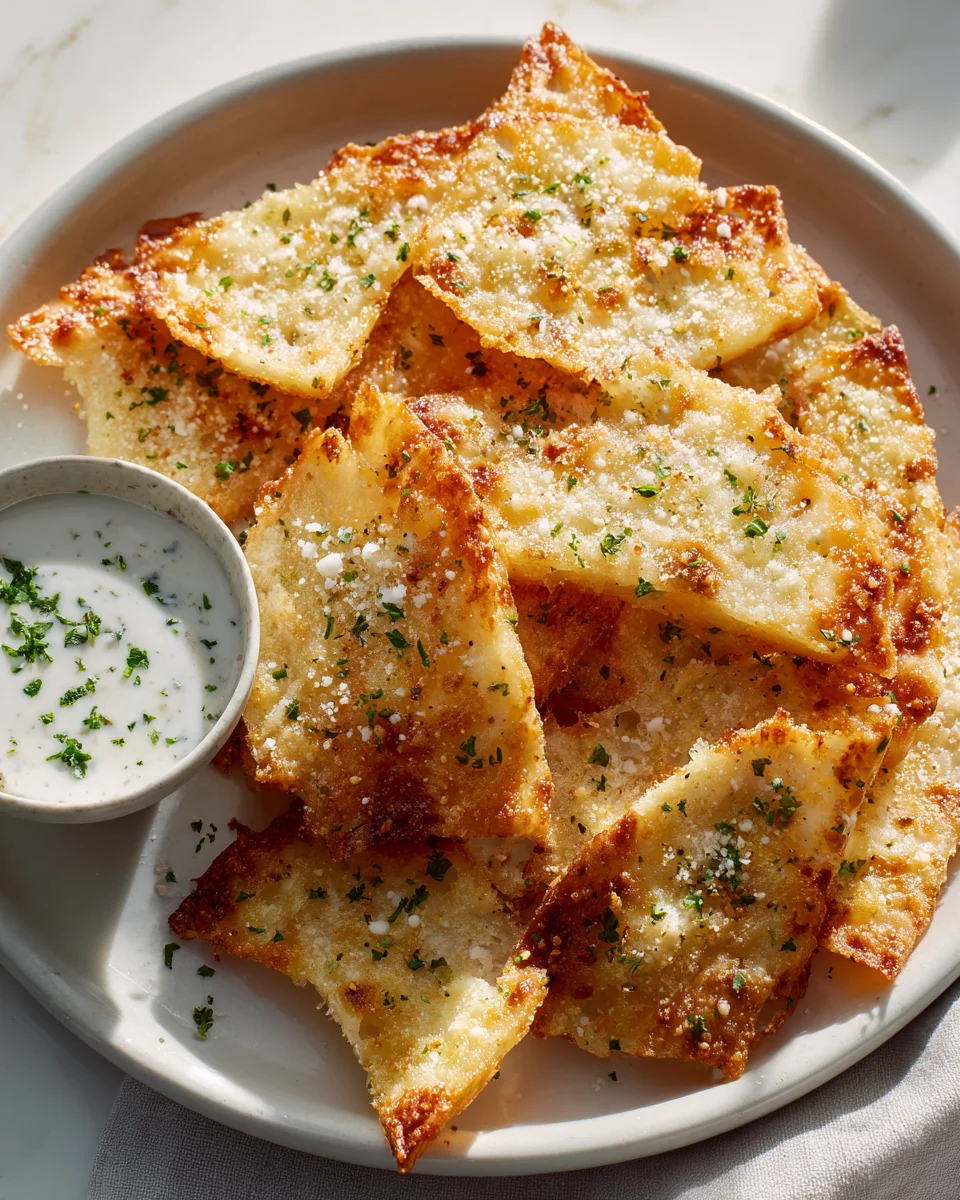
Let’s be honest, who doesn’t crave a crispy chip sometimes? The problem is, most of them come with a hefty carb count and not much protein. That’s where this ingenious snack steps in! We’re taking simple, unassuming cottage cheese and, with a little oven magic, transforming it into incredibly thin, golden, and unbelievably crispy chips that are packed with protein and wonderfully low in carbs.
You’ll love these because they perfectly satisfy that salty, savory craving without any of the guilt. They’re fantastic on their own, brilliant for dipping into your favorite salsa or guacamole, or even as a crunchy topping for salads. Get ready to bake up a batch of these little wonders and revolutionize your snack time!

Ingredient Notes
Making delicious Crispy Cottage Cheese Chips is all about understanding the few key ingredients and how they contribute to that satisfying crunch and flavor. This snack is remarkably simple, but each component plays a vital role in achieving the perfect high-protein, low-carb treat.
Cottage Cheese
This is, naturally, our star ingredient! I find that full-fat cottage cheese (small curd or large curd) generally yields the best results for crispiness and flavor, but low-fat options can work too. The most critical step here is draining it thoroughly. Cottage cheese has a lot of moisture, and if it’s not removed, your chips will be chewy, not crispy. I like to use a fine-mesh sieve lined with cheesecloth, or even just a few layers of paper towels, to press out as much liquid as possible. Let it sit and drain for at least 30 minutes, or even an hour, pressing occasionally. The drier the cottage cheese, the crispier your chips will be!
Egg White
Just one egg white acts as a fantastic binder for our cottage cheese mixture. It helps everything hold together beautifully as it bakes and contributes to that desirable crispy texture. If you don’t have fresh eggs, you can use liquid egg whites from a carton, about 2 tablespoons per large egg white.
Nutritional Yeast
This magical ingredient is what gives our cottage cheese chips a truly savory, cheesy, and slightly umami flavor without adding dairy. It’s also packed with B vitamins. Don’t skip it if you want that classic “chip” taste! If you absolutely can’t find nutritional yeast, you could try a small amount of finely grated hard cheese like Parmesan, but be aware it will change the nutritional profile and might alter the texture slightly. For the best low-carb, high-protein result, nutritional yeast is my top recommendation.
Seasonings
Here’s where you can really personalize your chips! My go-to base includes a generous pinch of sea salt, freshly ground black pepper, garlic powder, onion powder, and a touch of smoked paprika for a lovely depth of flavor. These basic spices create a universally appealing savory chip. However, feel free to experiment!
- For a “cheesy” boost: Add a bit more nutritional yeast or a tiny sprinkle of cheddar powder.
- For a kick: A pinch of cayenne pepper or chili powder works wonders.
- Herby goodness: Dried oregano, thyme, or an Italian seasoning blend can transform the flavor profile.
- Taco night vibes: A spoonful of your favorite low-carb taco seasoning blend is fantastic.
- Everything Bagel: Sprinkle in some everything bagel seasoning blend for a unique twist (be mindful of the salt content if your blend is salty).
Remember to taste your mixture before baking and adjust the salt and spices to your preference. Since this is a “chip,” don’t be shy with the salt!
Step-by-Step Instructions
Ready to make some seriously addictive Crispy Cottage Cheese Chips? This process is straightforward, but attention to detail, especially in draining and spreading, will lead to chip perfection!
Step 1: Preheat and Prep Your Baking Sheets
First things first, let’s get the oven ready. Preheat your oven to a low temperature, around 250°F (120°C). This low and slow approach is key to drying out the chips thoroughly and achieving maximum crispiness without burning them. Line two large baking sheets with parchment paper or silicone baking mats. I highly recommend parchment paper for easy removal and preventing sticking.
Step 2: Drain the Cottage Cheese
This is the most crucial step for crispy chips! Place your cottage cheese in a fine-mesh sieve lined with a double layer of cheesecloth or several layers of paper towels. Set the sieve over a bowl to catch the liquid. Gently press down on the cottage cheese with a spoon or your hand to encourage more liquid to drain out. Let it sit and drain for at least 30-60 minutes, pressing occasionally. You want your cottage cheese to be as dry as possible. The more moisture you remove now, the crispier your chips will be.
Step 3: Combine Ingredients
Once your cottage cheese is thoroughly drained, transfer it to a medium-sized bowl. Add the single egg white, nutritional yeast, sea salt, black pepper, garlic powder, onion powder, and smoked paprika (or your chosen seasonings). Mix everything together very well until all the ingredients are evenly distributed and you have a relatively uniform, thick paste-like mixture. I like to use a fork to really mash it together and ensure there are no large lumps of cottage cheese.
Step 4: Form the Chips
Now for the fun part! Using a small spoon (about a teaspoon or half a teaspoon), drop small dollops of the cottage cheese mixture onto your prepared baking sheets. Leave about an inch of space between each dollop. Then, using the back of the spoon, gently spread each dollop into a thin, even circle or oval shape. The thinner you spread them, the crispier they will become. Aim for a thickness of about 1/16 to 1/8 inch (1-2 mm). Try to make them as uniform in size and thickness as possible for even baking.
Step 5: Bake Low and Slow
Carefully transfer your baking sheets to the preheated oven. Bake for approximately 60-90 minutes, or even longer, depending on your oven and how thin you spread your chips. You’re looking for them to become firm, golden brown at the edges, and dry to the touch. Around the 45-60 minute mark, you might want to gently flip the chips using a thin spatula. This helps ensure even crisping on both sides. Continue baking until they are fully crisp and hard. They will continue to crisp up a bit more as they cool, so don’t be afraid to take them out just as they reach that perfect golden, firm stage.
Step 6: Cool Completely
Once the chips are baked to your desired crispiness, remove the baking sheets from the oven. Let the chips cool completely on the parchment paper on the baking sheets or transfer them to a wire rack. This cooling period is absolutely essential for them to reach their final, satisfying crisp texture. They will firm up considerably as they cool down. Resist the urge to snack on them right away!
Tips & Suggestions
I’ve learned a few tricks over time that really make a difference when crafting these Crispy Cottage Cheese Chips. Here are my top tips and some serving suggestions to help you get the most out of this awesome snack!
Achieving Maximum Crispiness
- Drain, Drain, Drain: I cannot stress this enough! The more moisture you remove from the cottage cheese before mixing, the crispier your chips will be. Take your time with this step.
- Spread Them Thin: Thinner chips dry out and crisp up much better than thicker ones. Aim for almost paper-thin edges. If some are thicker than others, they might not be uniformly crispy.
- Low Oven Temperature, Long Bake Time: Resist the urge to crank up the heat. A low oven temperature (250°F / 120°C) slowly dehydrates the chips without burning them. Patience is key here.
- Flip for Evenness: Gently flipping the chips halfway through baking (around the 45-60 minute mark) ensures both sides get exposed to the direct heat, resulting in a more uniform crisp.
- Cool Completely: Just like cookies, these chips firm up significantly as they cool. Make sure they are entirely cooled before tasting or storing for ultimate crispness.
Flavor Variations to Try
While the basic garlic, onion, and paprika blend is fantastic, these chips are a blank canvas for flavor exploration!
- Spicy Kick: Add a pinch of red pepper flakes or a dash of chili powder to the mixture.
- Herbal Bliss: Mix in dried oregano, basil, or a blend of Italian herbs.
- Smoky Goodness: A little extra smoked paprika goes a long way, or even a tiny touch of liquid smoke (sugar-free, of course).
- “Cheesy” Boost: Beyond nutritional yeast, a tiny sprinkle of finely grated sharp cheddar (if your macros allow) or a cheese powder can intensify the flavor.
- Everything Bagel: Sprinkle a generous amount of everything bagel seasoning on top of the formed chips before baking.
- Chili-Lime: Add some chili powder and a pinch of citric acid (or a squeeze of fresh lime juice after baking, though this might slightly soften them).
Dipping & Serving Suggestions
These chips are fantastic on their own, but they’re also robust enough for dipping!
- Classic Dips: Enjoy them with your favorite low-carb salsa, guacamole, or a sugar-free beef chili.
- Creamy Dips: They’re perfect with a creamy avocado ranch dip, a spinach dip, or even just plain sour cream.
- Snack Time: Serve them as an appetizer at a party, a healthy afternoon snack, or alongside a simple salad instead of croutons.
- Cheese Board Alternative: If you’re building a low-carb cheese board, these chips make an excellent crunchy vessel for cheeses and spreads.
Troubleshooting – Why Aren’t My Chips Crispy?
If your chips aren’t reaching that ideal crispiness, here are the most common culprits:
- Too Much Moisture: The cottage cheese wasn’t drained enough.
- Too Thick: The chips were spread too thickly on the baking sheet.
- Not Baked Long Enough: They simply needed more time in the oven. Low and slow is the mantra!
- Oven Temperature Too High: If your oven was too hot, they might brown before they fully dehydrate, leaving them chewy.
Storage
Proper storage is essential to maintain the crispiness of your delicious Crispy Cottage Cheese Chips. No one wants a soggy chip after all that effort!
Cool Completely Before Storing
This is a non-negotiable step. Just like I mentioned in the baking instructions, your chips must be completely cool before you even think about putting them into a container. If you store them while they’re still warm, condensation will form inside the container, turning your crispy chips into a sad, soft mess. I usually let them cool on the baking sheets or a wire rack for at least an hour, or until they’re at room temperature.
Airtight Container
Once fully cooled, transfer your Crispy Cottage Cheese Chips to an airtight container. A glass container with a tight-fitting lid or a plastic container specifically designed for food storage works best. This prevents moisture from the air from getting in and softening the chips. Avoid using zipper-lock bags for long-term storage, as they might not be as airtight as a solid container.
Room Temperature Storage
For optimal crispness, I recommend storing these chips at room temperature. The refrigerator can introduce moisture, which will make them lose their crunch. Keep the airtight container in a cool, dry place away from direct sunlight or heat sources, like your pantry or a kitchen cabinet.
Shelf Life
When stored properly in an airtight container at room temperature, your Crispy Cottage Cheese Chips should retain their crispness for about 3-5 days. Beyond that, while they’re still perfectly safe to eat, they might start to lose some of their crunch. I find they are best enjoyed within the first 2-3 days for maximum crispiness.
Reheating for Renewed Crispness
If your chips do start to lose some of their crunch after a few days, don’t despair! You can easily revive them. Spread them in a single layer on a baking sheet and pop them back into a preheated oven at 275-300°F (135-150°C) for about 5-10 minutes, or until they are crispy again. Alternatively, you can use an air fryer at 300°F (150°C) for 3-5 minutes. Let them cool completely after reheating to ensure they crisp up fully.
Final Thoughts
I truly hope you’re as excited as I am about this fantastic discovery! Making your own Crispy Cottage Cheese Chips High Protein Low Carb Snack is not just a recipe, it’s a revelation for your snack drawer. I mean, who knew cottage cheese could transform into something so incredibly satisfyingly crunchy, packed with protein, and perfectly low carb? It’s a genuine game-changer for anyone looking to enjoy a delicious bite without compromising their health goals.
From the first crisp bite, you’ll understand why I believe this recipe is an absolute must-try. It’s the perfect answer to those savory cravings, offering a guilt-free indulgence that’s both easy to make and incredibly rewarding. So go ahead, give the Crispy Cottage Cheese Chips High Protein Low Carb Snack a whirl. I have a feeling they’re about to become your new go-to snack obsession!

Crispy Cottage Cheese Chips: High Protein Low Carb Snack
- Total Time: 1 hour 45 minutes
- Yield: 4 servings 1x
Description
Discover the ultimate guilt-free snack with these Crispy Cottage Cheese Chips! Packed with protein and low in carbs, they’re perfect for satisfying your crunchy cravings.
Ingredients
- 1 cup full-fat cottage cheese (small curd or large curd)
- 1 egg white
- 2 tablespoons nutritional yeast
- 1 pinch sea salt
- 1 pinch freshly ground black pepper
- 1/2 teaspoon garlic powder
- 1/2 teaspoon onion powder
- 1/2 teaspoon smoked paprika
Instructions
- Preheat your oven to 250°F (120°C) and line two large baking sheets with parchment paper.
- Drain the cottage cheese in a fine-mesh sieve lined with cheesecloth or paper towels for at least 30-60 minutes.
- In a medium-sized bowl, combine the drained cottage cheese, egg white, nutritional yeast, sea salt, black pepper, garlic powder, onion powder, and smoked paprika. Mix until well combined.
- Drop small dollops of the mixture onto the prepared baking sheets, leaving about an inch of space between each. Spread each dollop into a thin, even circle or oval shape.
- Bake in the preheated oven for 60-90 minutes, flipping the chips halfway through, until they are firm, golden brown, and dry to the touch.
- Remove from the oven and let the chips cool completely on the baking sheets or transfer them to a wire rack.
- Prep Time: 15 mins
- Cook Time: 90 mins
- Category: Snack
- Method: Baking
- Cuisine: American
Nutrition
- Serving Size: 1 serving
- Calories: 120
- Sugar: 3 g
- Sodium: 300 mg
- Fat: 5 g
- Saturated Fat: 2 g
- Unsaturated Fat: 2 g
- Trans Fat: 0 g
- Carbohydrates: 6 g
- Fiber: 0 g
- Protein: 12 g
- Cholesterol: 5 mg
Keywords: Ensure the cottage cheese is thoroughly drained for maximum crispiness. Feel free to experiment with seasonings like cayenne pepper, dried herbs, or everything bagel seasoning for different flavor profiles.
Leave a Comment