
Baked Mac Cheese With Crispy Topping – the very mention conjures images of bubbling cheese, tender pasta, and that utterly irresistible golden crust we all adore. This isn’t just any comfort food; it’s a culinary icon, a dish that transcends mere sustenance to become a warm embrace on a plate. It’s a classic for a reason, promising to satisfy the deepest cravings and bring smiles to every face at the table.
A Legacy of Delicious Comfort
While the exact origins of mac and cheese are debated, its roots stretch back to European pasta and cheese casseroles, making its way to America with a notable endorsement from Thomas Jefferson, who famously served it at Monticello. Since then, it has evolved into a beloved staple, synonymous with family gatherings, potlucks, and holidays. Its timeless appeal lies in its simplicity and profound ability to evoke feelings of nostalgia and pure, unadulterated contentment.
What makes this particular rendition so universally cherished? It’s the perfect harmony of textures and flavors: the rich, velvety cheese sauce, often a blend of several cheeses for maximum depth, coating every single piece of al dente macaroni. But the true magic, the element that elevates it from great to legendary, is that glorious, crunchy, golden-brown topping. That contrast between the creamy interior and the savory, crisp exterior is what keeps us coming back for more, time and time again. Whether you’re seeking a taste of childhood or simply craving something deeply satisfying, a good Baked Mac Cheese With Crispy Topping delivers every single time.

Ingredients:
- For the Pasta:
- 1 pound (about 450g) elbow macaroni or other small pasta shape (like cavatappi or medium shells)
- 1 tablespoon olive oil (to prevent sticking)
- 2 teaspoons salt (for pasta water)
- For the Velvety Cheese Sauce:
- 6 tablespoons unsalted butter, divided (4 tablespoons for roux, 2 tablespoons for topping)
- ½ cup all-purpose flour
- 5 cups whole milk, warmed slightly (don’t boil, just take the chill off)
- 1 teaspoon dry mustard powder (enhances cheese flavor)
- ½ teaspoon smoked paprika (adds depth and color)
- ¼ teaspoon freshly grated nutmeg (a secret weapon for cheese sauces)
- ½ teaspoon black pepper, freshly ground
- 1 teaspoon salt, or to taste
- 12 ounces (about 340g) sharp cheddar cheese, freshly grated
- 8 ounces (about 225g) Gruyere cheese, freshly grated (or another good melting cheese like Fontina or Monterey Jack)
- 2 ounces (about 55g) cream cheese, softened (for extra silkiness, optional but highly recommended)
- For the Crispy Topping:
- 2 cups panko breadcrumbs
- 2 tablespoons unsalted butter, melted (from the sauce ingredients above, or additional)
- ¼ cup grated Parmesan cheese (optional, for extra flavor)
- A pinch of salt and pepper
Preparing the Pasta for Your Baked Mac Cheese With Crispy Topping
- Boil the Water: Grab a large, heavy-bottomed pot – I always reach for my biggest one to give the pasta plenty of room to swim. Fill it about two-thirds full with water. Add the 2 teaspoons of salt and the 1 tablespoon of olive oil. The salt is crucial for seasoning the pasta from within, and the olive oil helps prevent the pasta from sticking together once it’s cooked. Bring this mixture to a rolling boil over high heat. Don’t rush this step; you want a vigorous boil.
- Cook the Macaroni: Once the water is enthusiastically bubbling, add the 1 pound of elbow macaroni. Give it a good stir immediately to prevent the pasta from clumping at the bottom. We’re aiming for al dente here, which means “to the tooth” – slightly firm when bitten. Check your pasta package for recommended cooking times, but I typically cook my macaroni for about 1-2 minutes less than the package directions suggest. This is super important because the pasta will continue to cook in the oven later. If you overcook it now, you’ll end up with mushy mac and cheese, and nobody wants that! Stir occasionally throughout the cooking process to ensure even cooking.
- Drain and Rinse (or Don’t!): Once your pasta is perfectly al dente, drain it thoroughly in a colander. Now, here’s a little tip that sparks debate: some people advocate rinsing pasta with cold water to stop the cooking process and remove excess starch. For mac and cheese, however, I actually prefer not to rinse it. The residual starch on the pasta helps the cheese sauce cling beautifully to every single noodle, making for an even creamier result. Give it a good shake to remove as much water as possible without rinsing.
- Set Aside: Transfer the drained pasta back to the empty pot (or a large mixing bowl) and set it aside for a moment. You can drizzle a tiny bit more olive oil over it and toss gently if you’re worried about sticking, but if you’re moving quickly to the sauce, it often isn’t necessary. This prepped pasta is now patiently waiting for its glorious cheese bath.
Crafting the Velvety Cheese Sauce for Your Baked Mac Cheese With Crispy Topping
- Melt the Butter for the Roux: In the same large, heavy-bottomed pot (or a clean one if you prefer, but I love minimizing dishes!), melt 4 tablespoons of the unsalted butter over medium heat. Let it melt completely and start to foam slightly. The depth of flavor in your “Baked Mac Cheese With Crispy Topping” really starts right here, with a perfectly executed roux.
- Whisk in the Flour to Form a Roux: Once the butter is melted and foamy, add the ½ cup of all-purpose flour. Immediately begin whisking vigorously. You’re creating what’s called a roux, which is the thickening agent for your cheese sauce. Continue whisking constantly for 1-2 minutes. You want to cook out the raw flour taste, so look for a pale, nutty aroma and a smooth, paste-like consistency. It shouldn’t get too dark – we’re aiming for a blonde roux, not a dark one, as we want a light-colored, creamy sauce.
- Gradually Add Warm Milk: This is a crucial step for a lump-free sauce! Slowly, a little at a time, pour in your warmed whole milk, whisking constantly as you do. I usually add about ½ to 1 cup at a time, incorporating it fully before adding more. The roux will initially absorb the milk, forming a very thick paste. Keep whisking, and as you add more milk, it will gradually loosen and smooth out. The key is continuous whisking to ensure a completely smooth, velvety béchamel sauce – the foundation of our incredible “Baked Mac Cheese With Crispy Topping.” Take your time with this; it usually takes about 5-7 minutes to incorporate all the milk and get a silky-smooth consistency.
- Thicken the Sauce: Once all the milk is incorporated, continue to cook the sauce, whisking frequently, over medium heat. Bring it to a gentle simmer. You’ll notice it gradually thickening. It should coat the back of a spoon thickly, but still be pourable. This typically takes another 5-8 minutes after all the milk is added. Don’t let it come to a rolling boil, just a nice, steady simmer. If it gets too thick, you can always add a splash more warm milk later.
- Season the Base: Remove the pot from the heat. This is important before adding the cheese to prevent it from seizing up. Whisk in the 1 teaspoon of dry mustard powder, ½ teaspoon of smoked paprika, ¼ teaspoon of freshly grated nutmeg, ½ teaspoon of freshly ground black pepper, and 1 teaspoon of salt. Taste and adjust the salt if needed. These seasonings add incredible depth and complement the cheese beautifully without overpowering it. The mustard powder, in particular, is a secret weapon that really makes the cheese flavor pop.
- Melt the Cheeses: Now for the star of the show! Gradually add your freshly grated cheeses – the 12 ounces of sharp cheddar and 8 ounces of Gruyere – to the warm sauce, a handful at a time. Whisk constantly until each batch of cheese is fully melted and incorporated before adding more. This slow addition helps prevent the cheese from clumping and ensures a smooth, homogeneous sauce. If using, whisk in the 2 ounces of softened cream cheese at this stage as well; it adds an unbeatable silkiness and richness. Continue to whisk until you have a gloriously smooth, glistening, and utterly irresistible cheese sauce. Taste it again and adjust any seasonings one last time – perhaps a little more salt or pepper. Remember, the sauce will be coating pasta, so it should taste quite flavorful on its own.
Assembling Your Baked Mac Cheese With Crispy Topping
- Preheat the Oven and Prepare Baking Dish: Position an oven rack in the center of your oven and preheat it to 375°F (190°C). Lightly grease a 9×13-inch baking dish (or a similar size, about 3-quart capacity) with butter or cooking spray. A well-greased dish ensures easy serving and prevents sticking.
- Combine Pasta and Sauce: Pour the drained, al dente macaroni into the pot with your spectacular cheese sauce. Using a large spatula or spoon, gently fold the pasta into the sauce until every single piece of macaroni is thoroughly coated in that rich, creamy goodness. Make sure you get all the way to the bottom to ensure no dry spots remain. This step is where your “Baked Mac Cheese With Crispy Topping” truly comes together.
- Transfer to Baking Dish: Spoon the pasta and cheese mixture evenly into your prepared 9×13-inch baking dish. Spread it out so it’s a relatively even layer. Don’t pack it down too much; we want some air circulation for even baking.
- Prepare the Crispy Topping: In a medium bowl, combine the 2 cups of panko breadcrumbs with the remaining 2 tablespoons of melted unsalted butter. Panko breadcrumbs are fantastic because they create a much crunchier, lighter topping than regular breadcrumbs. If you’re using it, stir in the ¼ cup of grated Parmesan cheese, along with a pinch of salt and pepper. Toss everything together until the breadcrumbs are evenly coated in the butter. This buttery coating is what helps them turn golden brown and delightfully crispy in the oven, giving your “Baked Mac Cheese With Crispy Topping” its signature crunch.
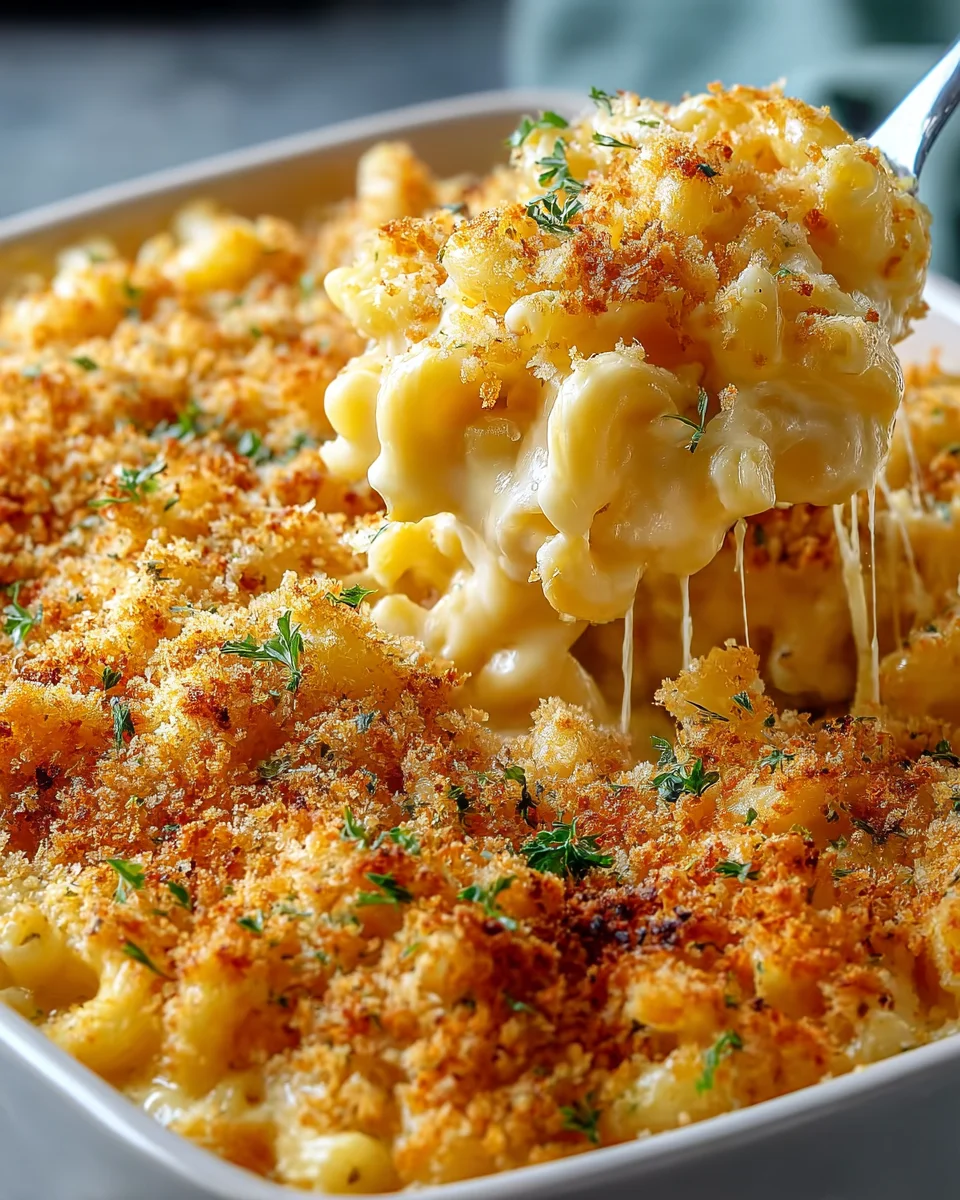
- Top the Mac and Cheese: Sprinkle the buttery panko mixture evenly over the top of the macaroni and cheese in the baking dish. Cover the entire surface, ensuring a good, thick layer of breadcrumbs. This golden crown is what will give you that irresistible texture contrast with the creamy interior.
Baking to Golden Perfection
- Bake the Mac and Cheese: Carefully place the baking dish into your preheated oven. Bake for 25-30 minutes, uncovered, or until the mac and cheese is bubbly around the edges and the crispy topping is beautifully golden brown and crunchy. The exact timing can vary slightly depending on your oven, so keep an eye on it. You’re looking for that perfect textural contrast – a gloriously bubbling, creamy interior contrasted with a deeply golden, crisp exterior. If you notice the topping browning too quickly, you can loosely tent it with aluminum foil, but I rarely find this necessary with my particular recipe. The aromas filling your kitchen right now will be absolutely heavenly – a sure sign of the deliciousness to come!
Serving Your Delicious Baked Mac Cheese
- Rest Before Serving: Once your “Baked Mac Cheese With Crispy Topping” emerges from the oven, resist the urge to dive in immediately! It will be incredibly hot, and letting it rest for 10-15 minutes on a wire rack allows the cheese sauce to set slightly. This makes for cleaner scoops and prevents it from being too runny, ensuring that gorgeous, creamy consistency you worked so hard for. Plus, it gives the flavors a moment to meld even further.
- Serve and Enjoy: After resting, scoop generous portions onto plates. This dish is hearty enough to be a meal on its own, perhaps with a simple green salad to cut through the richness, or it makes an exceptional side dish for roasted meats or a barbecue spread. Garnish with a sprinkle of fresh parsley or chives, if you like, for a touch of color and freshness. Prepare for rave reviews – this “Baked Mac Cheese With Crispy Topping” is truly a crowd-pleaser and a testament to comfort food done right!
Conclusion:
And there you have it, my friends! We’ve reached the delicious conclusion of our journey with what I genuinely believe will become a staple in your culinary repertoire. If you’ve been following along, you already know why this particular rendition of comfort food royalty stands head and shoulders above the rest. It’s not just mac and cheese; it’s an experience. It’s the incredibly smooth, rich, and creamy interior, bursting with a symphony of cheesy flavors that melt in your mouth, perfectly contrasted by that absolutely irresistible golden-brown, crunchy topping. That textural interplay is truly what elevates this dish, making every single bite a delightful surprise. Forget dry, forget bland – this recipe promises an indulgence that warms the soul and satisfies even the most demanding comfort food cravings. I’ve personally perfected this recipe over countless iterations, ensuring it delivers maximum flavor with surprising ease, proving that gourmet comfort doesn’t have to be complicated. It’s the kind of dish that brings smiles to faces and joy to gatherings, transforming ordinary meals into memorable occasions. Trust me, once you try this, you’ll understand exactly what I mean.
Now, let’s talk about making this already magnificent dish even more versatile for your table. While a generous scoop of this creamy, crunchy delight is utterly perfect on its own, I love to offer a few ideas to round out your meal or even transform it entirely. For a simple weeknight supper, I often pair it with a crisp green salad tossed in a tangy vinaigrette. The freshness cuts through the richness beautifully, creating a balanced plate. You could also serve it alongside some simply roasted vegetables – think tender-crisp asparagus, broccoli florets, or even sweet bell peppers – for added nutrients and color. For a heartier meal, grilled chicken breast, smoky sausage, or even a perfectly seared steak make fantastic companions, allowing the Baked Mac Cheese With Crispy Topping to shine as a luxurious side dish. And let’s not forget the classic garlic bread; dipping a warm, buttery slice into the creamy sauce is pure bliss! For a more casual affair, consider serving smaller portions as a side with pulled pork sandwiches or juicy BBQ ribs, creating the ultimate comfort food feast. Don’t underestimate the power of a well-paired beverage either; a crisp cider or a light-bodied red wine can perfectly complement the richness of the cheese, making your meal even more enjoyable.
Endless Possibilities for Your Palate
But wait, the fun doesn’t stop there! This recipe is incredibly forgiving and truly encourages creative experimentation. If you’re feeling adventurous, don’t hesitate to play around with the cheese blend. I often swap in a smoked gouda for a deeper, more complex flavor, or a sharp Gruyère for a nutty, earthy note. A little Monterey Jack can add extra meltiness, or even a touch of cream cheese for an ultra-velvety texture. Want to boost the protein? Crispy bacon bits folded into the sauce, shredded rotisserie chicken, diced ham, or even some spicy crumbled sausage can take this dish to a whole new level of hearty satisfaction. Vegetarians can rejoice too, by incorporating sautéed mushrooms, wilted spinach, roasted cherry tomatoes, or even a touch of finely chopped jalapeños for a subtle kick. And when it comes to that glorious crispy topping, feel free to personalize it! Crushed buttery crackers (like Ritz) offer a rich, salty crunch, while panko breadcrumbs mixed with Parmesan and fresh herbs (like parsley or chives) provide a lighter, aromatic crispness. A pinch of smoked paprika or a dash of cayenne pepper can also add a delightful warmth and subtle spice throughout the cheese sauce, further customizing your culinary creation. Remember, the goal is to make this recipe truly your own, adapting it to your taste preferences and whatever ingredients you have on hand.
Your Turn to Create and Share!
My hope is that I’ve inspired you to roll up your sleeves and dive into making this incredible recipe. It truly is more than just a meal; it’s an opportunity to create something wonderful, to gather loved ones around the table, and to share moments of pure, unadulterated comfort. Don’t just take my word for it – experience the magic for yourself. I absolutely urge you to try this recipe this week, whether it’s for a cozy family dinner or to impress at your next potluck. And when you do, please, please share your experience! I love hearing about your culinary adventures. Did you add a unique twist? What was your favorite part? Share your photos, your tips, and your feedback. Your stories inspire me and help others discover the joy of home cooking. This is a recipe designed to be loved, shared, and savored, and I can’t wait for you to make it your own. Happy cooking, and get ready to fall head over heels for the ultimate mac and cheese!
Crispy Baked Mac & Cheese: Ultimate Comfort Food!
Baked Mac Cheese With Crispy Topping – the very mention conjures images of bubbling cheese, tender pasta, and that utterly irresistible golden crust we all adore. This isn’t just any comfort food; it’s a culinary icon, a dish that transcends mere sustenance to become a warm embrace on a plate. It’s a classic for a reason, promising to satisfy the deepest cravings and bring smiles to every face at the table.
Ingredients
Instructions
Important Information
Nutrition Facts (Per Serving)
It is important to consider this information as approximate and not to use it as definitive health advice.
Allergy Information
Please check ingredients for potential allergens and consult a health professional if in doubt.
Leave a Comment