
Homemade Baked Chicken Tenders are a dish that truly brings joy to any dinner table, offering that perfect balance of crispy texture and juicy, tender chicken without the deep-fried guilt. We all have fond memories of chicken tenders, whether they were a cherished childhood treat or a reliable weeknight meal, and their enduring popularity is no accident. This beloved comfort food has transcended generations, becoming a staple in homes and restaurants alike. While their exact origin is debated, the concept of delicious, easy-to-eat chicken pieces has been a culinary delight across many cultures for decades, eventually evolving into the crispy perfection we crave today.
What makes this particular recipe so universally adored? For me, it’s the sheer delight of biting into a perfectly golden, seasoned crust to reveal succulent, moist chicken on the inside. It’s that satisfying crunch followed by tenderness that keeps everyone coming back for more. Beyond the incredible taste and texture, the convenience factor is unparalleled; these tenders are quick to prepare, versatile enough for any dipping sauce imaginable, and a guaranteed hit with even the pickiest eaters. Opting for homemade means you control the ingredients, ensuring a healthier, equally delicious alternative to store-bought options. You’ll be amazed at how simple it is to achieve restaurant-quality Homemade Baked Chicken Tenders right in your own kitchen.

Ingredients:
- For the Chicken Tenders:
- 2 pounds boneless, skinless chicken breasts or chicken tenderloins. I often opt for full breasts and slice them myself into tender-sized strips, as it can sometimes be more cost-effective and allows for uniform sizing, which is really helpful for even cooking.
- 1 teaspoon salt (I prefer fine sea salt, but kosher salt works beautifully too, just ensure it’s finely ground enough to stick well).
- ½ teaspoon black pepper, freshly ground for the best flavor and aroma.
- ½ teaspoon garlic powder, adding that foundational savory note to the chicken itself.
- ¼ teaspoon onion powder, which complements the garlic powder wonderfully.
- A pinch of cayenne pepper (optional, but I love the subtle warmth it adds without making the tenders overtly spicy – it just brightens the overall flavor profile).
- For the Breading Station:
- 1 cup all-purpose flour. This creates the essential base for the egg wash to adhere to.
- 2 large eggs. These are the binding agent for our amazing panko crust.
- 2 tablespoons milk (any kind will do – dairy or non-dairy, just helps thin the egg wash slightly, making it easier to coat the chicken evenly).
- 2 cups panko breadcrumbs. Panko is truly the secret to achieving that incredible, airy crunch in Homemade Baked Chicken Tenders, far superior to regular breadcrumbs in my opinion. Don’t skimp on the panko!
- 1 teaspoon paprika (I use sweet paprika for beautiful color and a mild, earthy flavor, but smoked paprika could add a lovely depth if you’re feeling adventurous).
- ½ teaspoon garlic powder, to infuse the breading with more deliciousness.
- ½ teaspoon onion powder, continuing the savory theme in our crust.
- ½ teaspoon salt, crucial for seasoning the breading layer directly.
- ¼ teaspoon black pepper, adding another layer of aromatic spice.
- 2 tablespoons grated Parmesan cheese (optional, but it adds a fantastic savory, umami note to the crust and helps with browning. Use real Parmesan for the best results!).
- For Baking:
- 2-3 tablespoons olive oil or cooking spray (for coating the baking sheet and potentially drizzling over the tenders for extra crispness and a golden finish).
- Suggested Dipping Sauces (Optional, but highly recommended for the full experience – because what are tenders without dipping sauces?):
- Honey Mustard (a classic for a reason!)
- BBQ Sauce (tangy and sweet!)
- Ranch Dressing (creamy and herbaceous!)
- Ketchup (the ultimate simple go-to!)
- Sriracha Mayo (for a spicy kick!)
Preparing the Chicken
- Get Organized: Before you even think about touching the chicken, take a moment to set up your workspace. This seemingly small step can make a huge difference in the efficiency and cleanliness of your cooking process. Clear your counter, grab your cutting board (I always use a designated one for raw poultry), and have a waste bowl ready for any trimmings. I always recommend having a separate small plate or bowl ready for the prepped and seasoned chicken once it’s ready. This ensures a smooth flow from one step to the next and helps maintain kitchen hygiene, preventing cross-contamination. Thinking ahead truly saves time and stress in the kitchen.
- Pat It Dry: This step is absolutely crucial for achieving a crispy coating on your Homemade Baked Chicken Tenders. Take each chicken breast or tenderloin and pat it thoroughly dry with paper towels. And I mean, really, really dry it. Excess moisture on the surface of the chicken will create steam when it bakes, which in turn prevents the breading from crisping up properly. Imagine trying to make toast out of soggy bread – it just doesn’t work! A dry surface allows the initial seasoning to adhere better and, most importantly, provides the ideal base for the flour and then the breading to stick firmly. This meticulous drying process is a cornerstone for achieving fantastic texture in your baked tenders, so don’t rush it.
- Trim and Slice (if using breasts): If you’re working with full chicken breasts, you’ll want to transform them into tender-sized pieces that are ideal for baking. Lay a breast flat on your cutting board. Using a sharp chef’s knife or utility knife, carefully slice the breast lengthwise into strips that are roughly ¾ to 1 inch thick and about 4-5 inches long. The goal here is uniformity; pieces that are similar in size will cook at the same rate, preventing some tenders from being overcooked and dry while others are still underdone. Take this opportunity to trim off any visible fat, gristle, or undesirable tough bits. If you’re using pre-packaged chicken tenderloins, you might still want to trim off the small, tough white tendon that sometimes runs through them – simply hold the tenderloin firmly, slide your knife under the tendon, and pull it away. This extra step makes for a more pleasant eating experience and ensures every bite is tender.
- Season the Chicken: In a medium-sized mixing bowl, combine the 1 teaspoon of salt, ½ teaspoon of black pepper, ½ teaspoon of garlic powder, ¼ teaspoon of onion powder, and the optional pinch of cayenne pepper. Give these dry spices a quick whisk with a fork to ensure they’re evenly distributed. Now, add your thoroughly dried and sliced chicken pieces to this bowl. Using your hands (I often wear food-safe gloves for this step), gently toss and massage the chicken, ensuring every single piece is thoroughly coated with the seasoning blend. Don’t be shy; really work those spices into the chicken. This initial seasoning is vital because it penetrates the meat itself, infusing flavor directly into the chicken. This means the deliciousness isn’t just on the surface breading, but throughout each tender. It’s an important foundational step for truly delicious Homemade Baked Chicken Tenders.
Setting Up the Dredging Station
- Prepare Your Workspace: Find a nice, clear stretch of countertop that provides enough room. You’re going to need three shallow dishes or wide, low bowls that are wide enough to comfortably fit your chicken tenders without having to bend or fold them. I often use pie plates or shallow baking dishes for this setup as they provide ample surface area and make the dipping process much easier. Arrange them in a clear, linear row: the first dish will be for the flour, the second for the egg wash, and the third (and most exciting!) for the seasoned breadcrumbs. This assembly line approach is absolutely key to an efficient and, mercifully, less messy breading process. Trust me, trying to do this with tiny, deep bowls will just lead to frustration, clumpy hands, and flour everywhere!
- The Flour Station: In your first shallow dish, pour the 1 cup of all-purpose flour. There’s no need to season this flour separately for this particular recipe, as we’ve already seasoned the chicken directly, and the panko will carry a lot of the flavor. The primary purpose of this flour dredge is to provide a dry, slightly rough surface for the wet egg wash to cling to. This, in turn, helps the breadcrumbs adhere firmly and evenly. Think of it as the essential primer coat before you paint – it ensures everything else sticks properly.
- The Egg Wash Station: In the second shallow dish, crack the two large eggs. Add the 2 tablespoons of milk. Using a fork or a small whisk, vigorously beat the eggs and milk together until the mixture is completely smooth, uniform in color, and slightly frothy, with no visible streaks of egg white or yolk. This creates the “glue” that will bind the breading to the chicken. It’s important that it’s well-beaten to ensure even coverage; a lumpy egg wash leads to patchy breading.
- The Breading Station (The Star of the Show!): In your third and final shallow dish, combine the 2 cups of panko breadcrumbs, 1 teaspoon of paprika, ½ teaspoon of garlic powder, ½ teaspoon of onion powder, ½ teaspoon of salt, ¼ teaspoon of black pepper, and the optional 2 tablespoons of grated Parmesan cheese. Use a fork or your clean hands to thoroughly mix these ingredients together until the spices and cheese are evenly distributed throughout the panko. You want every single panko crumb to be coated with these delicious seasonings. This seasoned panko breading is where a significant portion of the flavor and, crucially, the characteristic crispiness for your Homemade Baked Chicken Tenders will come from. Take your time mixing it well; you want every bite to be bursting with flavor and texture.
Breading the Chicken Tenders
- Prepare Your Hands for Efficiency: This is inherently a sticky job, so I highly recommend employing the “wet hand/dry hand” method to keep things as clean and smooth as possible. Designate one hand (your non-dominant hand usually works best) as your “wet hand” – this hand will handle the chicken once it’s gone into the egg wash. Designate your other hand (your dominant hand) as your “dry hand” – this hand will exclusively handle the flour and the breadcrumbs. This technique minimizes clumping of flour and panko onto your fingers, preventing your hands from becoming completely encased in a thick, unusable breading mess.
- Flour First: Pick up one seasoned chicken tender from your prepared plate with your designated dry hand. Place it into the flour dish. Using your dry hand, gently toss and turn the chicken tender, ensuring it is completely coated in flour on all sides. Make sure there are absolutely no wet spots remaining. Lightly tap off any excess flour – you want a thin, even coat, not a thick, caked-on layer. Excess flour can lead to a gummy or pasty texture once cooked, which we definitely want to avoid for our perfectly crispy tenders.
- Into the Egg Wash: With your dry hand, transfer the floured chicken tender from the flour dish to the egg wash dish. Now, switch to your wet hand. Use your wet hand to submerge the chicken tender fully in the egg mixture, ensuring it is thoroughly coated on all sides. Allow any excess egg wash to drip off back into the bowl before moving to the next step. Again, a thin, even layer of egg wash is all you need here to act as the adhesive.
- Panko Power! With your wet hand, carefully transfer the egg-washed chicken tender to the breading dish, specifically designed for our glorious seasoned panko. Now, switch back to your dry hand. Use your dry hand to generously sprinkle and firmly press the panko breadcrumbs onto all sides of the chicken tender. Don’t be shy; really press those panko crumbs onto the chicken; you want them to adhere firmly and completely. The more panko, the crispier and more satisfyingly crunchy your Homemade Baked Chicken Tenders will be. Gently turn the tender over and repeat the pressing motion until it’s thoroughly and densely covered. This firm pressing action is vital for the breading to stay on during baking and not flake off.
- Prepare for Baking: As each chicken tender is fully breaded and beautifully coated in panko, carefully place it onto your prepared baking sheet. It’s very important to ensure there is a little space (about ½ an inch) between each tender; overcrowding the pan can lead to the tenders steaming rather than baking, which will prevent that desirable crispy exterior. If you’re working with a large batch of chicken, you might need two baking sheets to accommodate all the tenders without overcrowding. Repeat steps 2-5 for all remaining chicken tenders, diligently maintaining your wet hand/dry hand method. If at any point your egg wash or breading gets too clumpy from accumulated flour or chicken bits, you can gently stir them to break up lumps or add a little more fresh ingredient if needed to maintain consistency.
- A Little Extra Crispness (Optional but Highly Recommended): For an even crispier finish and a gorgeous golden-brown color, you can lightly mist the tops of the breaded chicken tenders with a little olive oil spray, or gently drizzle a very small amount of olive oil over them. This light coating of oil helps the panko brown beautifully in the oven and achieve a truly irresistible golden, crunchy crust that mimics a fried texture without all the heavy oil of deep-frying. It’s a small step that yields big results for texture!
Baking the Homemade Baked Chicken Tenders
- Preheat Your Oven: This step is absolutely non-negotiable for achieving perfectly cooked and wonderfully crispy Homemade Baked Chicken Tenders. Preheat your oven to a robust 400°F (200°C). A hot oven is crucial because it allows for immediate crisping of the breading upon contact and ensures the chicken cooks through quickly without drying out. Make sure your oven is fully preheated to the correct temperature before placing the chicken inside – using an oven thermometer can confirm accuracy. Don’t rush this part; patience here truly pays off!
- Prepare Your Baking Sheets: While the oven is preheating, take a moment to prepare your baking sheets. Line one or two large, sturdy baking sheets with parchment paper or a silicone baking mat. This not only prevents sticking (which would be a tragedy for our crispy breading!) but also makes cleanup an absolute breeze. Lightly spray the parchment paper or silicone mat with cooking spray or lightly brush with olive oil. This extra bit of fat helps promote browning of the underside of the tenders and further prevents any precious breading from sticking to the sheet. If you’re planning to use two sheets, ensure your oven has two racks ready and positioned to allow for even heat distribution.
- Arrange the Tenders: Carefully place the breaded chicken tenders on the prepared baking sheets in a single, even layer. It is extremely important to ensure there is ample space between each tender; do not overcrowd the pan. If the tenders are too close together, they will release steam and trap it, causing them to steam rather than bake, leading to a disappointingly soggy breading rather than the desired crispy one. Proper air circulation is absolutely key for achieving that golden-brown, satisfying crunch. If necessary, use two baking sheets and either bake them in batches or on separate racks, rotating them halfway through baking for even cooking.
- Initial Bake: Once your oven is at the correct temperature and ready, carefully place the baking sheet(s) into the preheated oven. Bake for an initial period of 10-12 minutes. During this initial baking period, the glorious panko breading will begin to set, firm up, and start to crisp, and the chicken within will begin its journey to being cooked through. Resist the urge to open the oven door too frequently, as this causes temperature fluctuations which can adversely affect cooking evenness and crispness.
- Flip and Finish: After the initial 10-12 minutes, carefully remove the baking sheet(s) from the oven. Using a pair of kitchen tongs, individually and gently flip each Homemade Baked Chicken Tender to its other side. This critical step ensures both sides of the tender get evenly golden brown and become super crispy. Return the baking sheet(s) to the oven and continue baking for another 8-12 minutes, or until the chicken is cooked through, and the breading is a beautiful, deep golden brown and feels wonderfully crisp to the touch when gently tapped.
- Check for Doneness: The absolute best and safest way to ensure your Homemade Baked Chicken Tenders are perfectly cooked and safe to eat is to use an instant-read meat thermometer. Insert the thermometer into the thickest part of a couple of the tenders, making sure not to touch any bone (though these are boneless, it’s good practice for general chicken cooking). The internal temperature should register a safe 165°F (74°C). If it hasn’t reached this temperature, return them to the oven for a few more minutes and check again. Do not rely solely on visual cues; an instant-read thermometer is your ultimate best friend for achieving perfectly cooked, juicy chicken every single time.
- Rest and Serve: Once your magnificent Homemade Baked Chicken Tenders have reached the correct internal temperature, carefully remove them from the oven. You can transfer them to a wire rack set over a baking sheet to cool slightly. Allowing them to rest for 5 minutes before serving is a small but important step; it allows the juices within the meat to redistribute throughout, resulting in more tender, succulent, and flavorful chicken. This resting period also helps maintain their delightful crispness by allowing any trapped steam to escape rather than softening the breading.
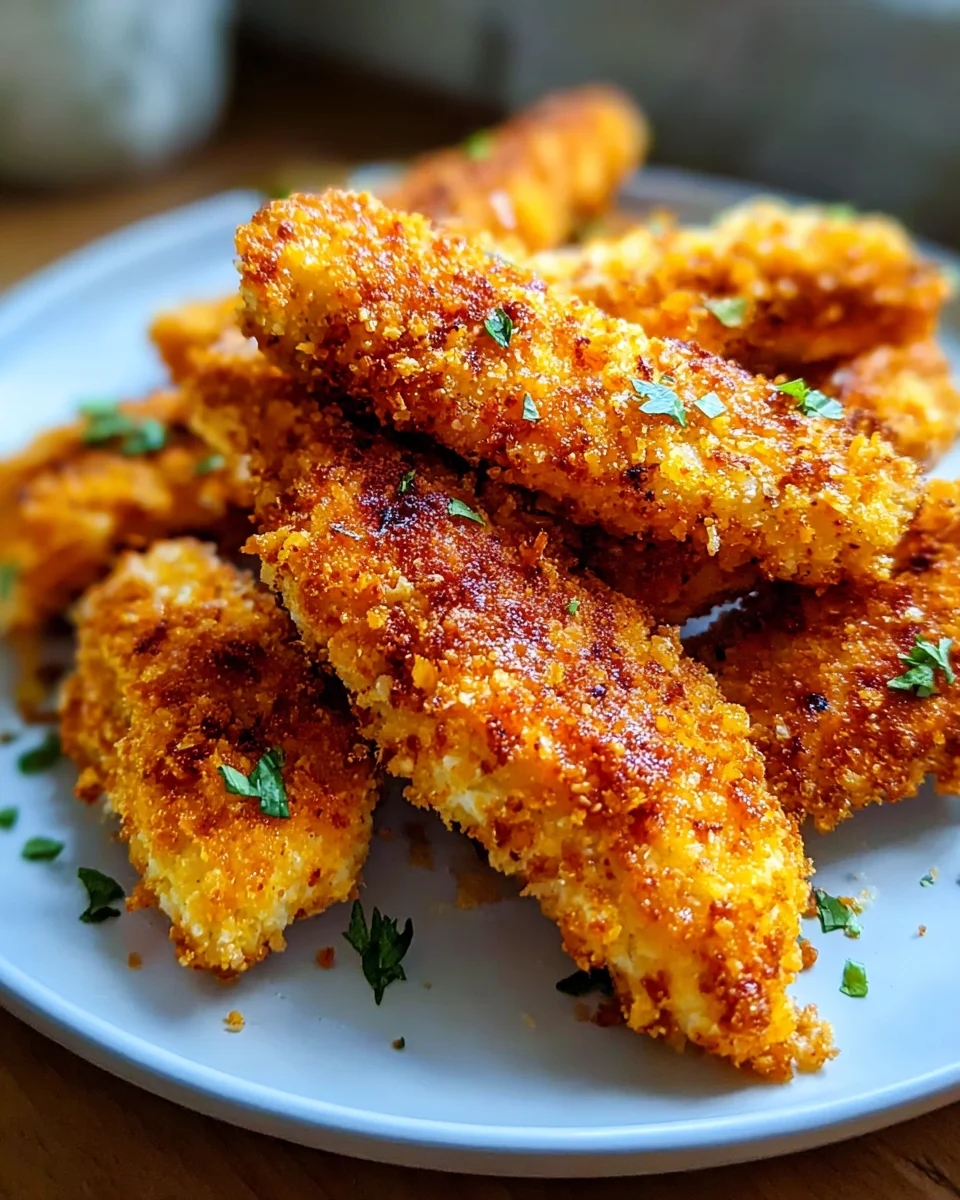
- Enjoy! Serve your incredible Homemade Baked Chicken Tenders hot and fresh, immediately from the resting rack, alongside your favorite dipping sauces. I love setting up a little dipping station with a variety like classic honey mustard, tangy BBQ sauce, and even a simple, creamy ranch. These tenders are fantastic as a satisfying main meal with a side of crispy oven fries, a fresh green salad, or some vibrant steamed veggies, or they make a phenomenal, crowd-pleasing appetizer. The delightful crispness from the panko and the juicy tenderness of the perfectly seasoned chicken will undoubtedly make these a family favorite, guaranteed! You’ve successfully made truly irresistible Homemade Baked Chicken Tenders that are far superior to anything store-bought or deep-fried.
Conclusion:
Well, my friends, we’ve reached the delicious finale of our culinary journey, and I genuinely hope you’re feeling as excited as I am about this incredible recipe. What we’ve just explored isn’t just another way to cook chicken; it’s a revelation! This method consistently delivers tenders that are gloriously crispy on the outside, unbelievably juicy and tender within, and packed with a flavor that will have everyone, from the pickiest eaters to the most seasoned foodies, asking for more. Forget the greasy, heavy versions you might be used to; this recipe offers all the satisfying crunch and delightful taste without any of the deep-frying fuss or guilt. It truly is a game-changer for weeknight dinners, party appetizers, or a comforting lunch.
I truly believe this recipe for Homemade Baked Chicken Tenders is going to become a cherished staple in your kitchen, much like it has in mine. The beauty of it lies not just in its undeniable deliciousness, but also in its sheer simplicity and the wholesome satisfaction of knowing exactly what you’re serving your loved ones. We’re talking about real chicken, coated in a perfectly seasoned crust, and baked to golden perfection. It’s an effortless way to create a meal that feels both indulgent and surprisingly light. The prep is minimal, the cleanup is a breeze, and the oven does most of the heavy lifting, leaving you more time to enjoy the delightful aromas filling your home and, ultimately, the incredible meal itself.
Now, let’s talk about making these beauties even more fantastic! The serving possibilities are practically endless. Of course, a classic spread of dipping sauces is a must: think creamy ranch, tangy honey mustard, smoky BBQ, or a fiery sweet chili. But don’t stop there! Pair them with a side of crispy homemade sweet potato fries for an extra healthy twist, a vibrant green salad with a light vinaigrette, or a hearty scoop of coleslaw for that perfect diner-style experience. For more creative meal ideas, slice them up and tuck them into soft slider buns with a dollop of your favorite sauce, or layer them into a fresh, crisp Caesar salad. They even make a fantastic protein addition to wraps, turning a simple lunch into a truly satisfying feast.
Feeling adventurous? This recipe is incredibly adaptable, inviting you to experiment with your own creative variations. For a little heat, sprinkle some cayenne pepper or smoked paprika into your breading mixture. If you love an herby kick, dried oregano, thyme, or rosemary can elevate the flavor beautifully. Want to go cheesy? Finely grated Parmesan or Pecorino Romano mixed into the breadcrumbs adds an irresistible savory depth. For those seeking a gluten-free option, almond flour or your favorite gluten-free breadcrumbs work wonderfully, often adding an even richer, nuttier flavor. And if you have a little extra time, a quick buttermilk soak before breading can make the chicken even more tender and moist, though it’s certainly not necessary for an amazing result. The versatility of these tenders is truly one of their greatest strengths!
So, my dear readers, what are you waiting for? This isn’t just a recipe; it’s an invitation to bring incredible flavor, health, and joy into your kitchen with minimal effort. I genuinely can’t wait for you to experience the magic of these tender, crispy bites. Don’t just take my word for it; gather your ingredients, fire up that oven, and treat yourself and your loved ones to a batch of these glorious chicken tenders. And once you do, please, please share your experience with me! Drop a comment below to tell me how it went, what dips you used, or any brilliant variations you came up with. Your feedback, tips, and photos truly make my day and inspire others to embark on their own delicious culinary adventures. Happy cooking, and I look forward to hearing all about your
Homemade Baked Chicken Tenders
success!
Homemade Baked Chicken Tenders
Homemade Baked Chicken Tenders offer a perfect balance of crispy texture and juicy, tender chicken without deep-fried guilt. This beloved comfort food is quick to prepare, versatile, and a guaranteed hit, providing a healthier, restaurant-quality alternative right in your own kitchen.
Ingredients
Instructions
Important Information
Nutrition Facts (Per Serving)
It is important to consider this information as approximate and not to use it as definitive health advice.
Allergy Information
Please check ingredients for potential allergens and consult a health professional if in doubt.
Leave a Comment