
Halloween Pizza Skulls are poised to become the undisputed stars of your spooky season spread, offering a delightful blend of ghoulish charm and irresistible flavor. As the air chills and autumn leaves fall, there’s an undeniable magic in creating culinary masterpieces that reflect the spirit of Halloween. While the origins of specific “pizza skulls” might be a modern invention born from our collective love for themed holiday treats, the tradition of crafting special foods for Halloween dates back centuries, evolving from simple harvest feasts to elaborate costume parties with equally elaborate snacks. I find immense joy in bringing a touch of playful macabre to the kitchen, especially when the result is as incredibly delicious as these.
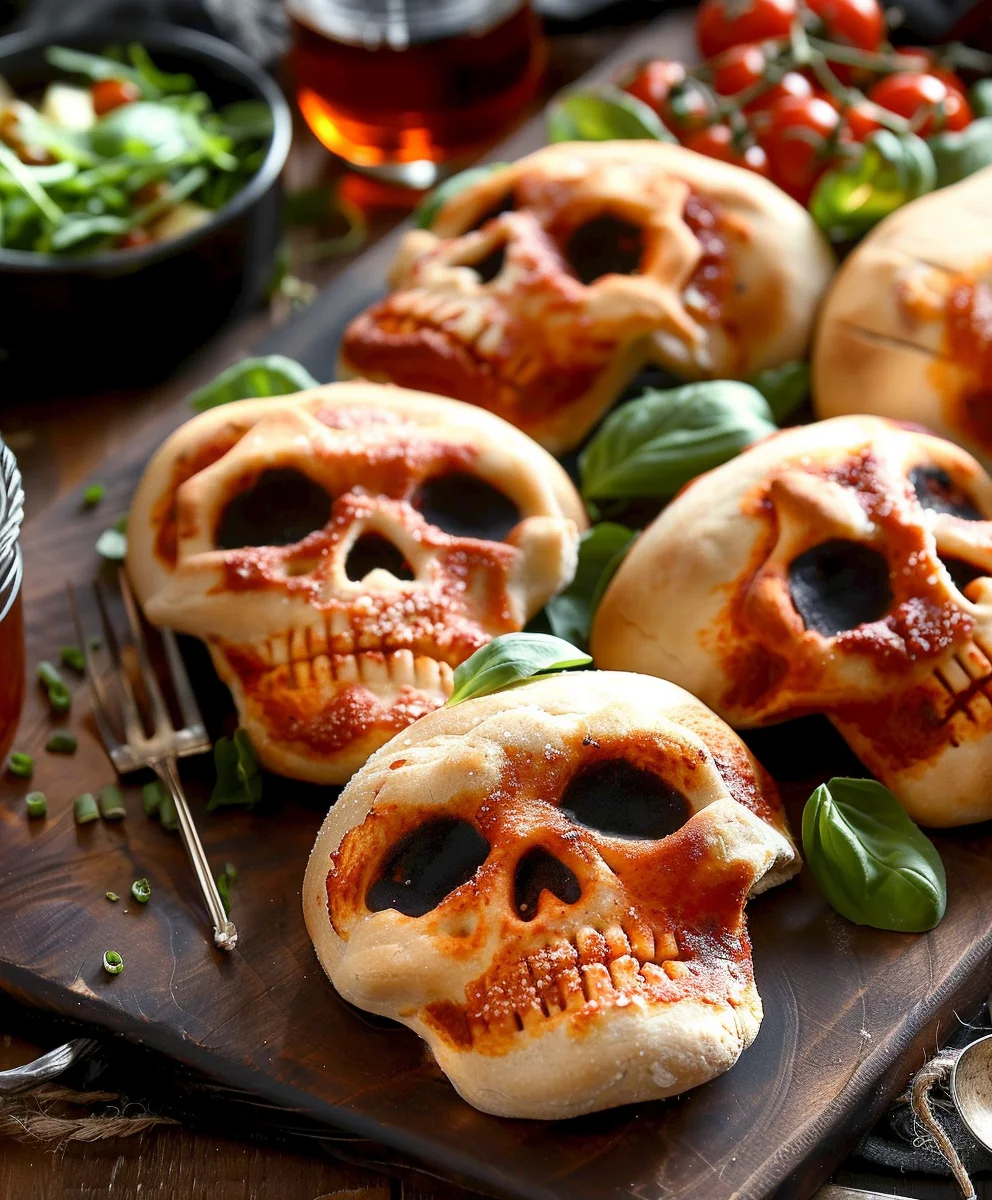
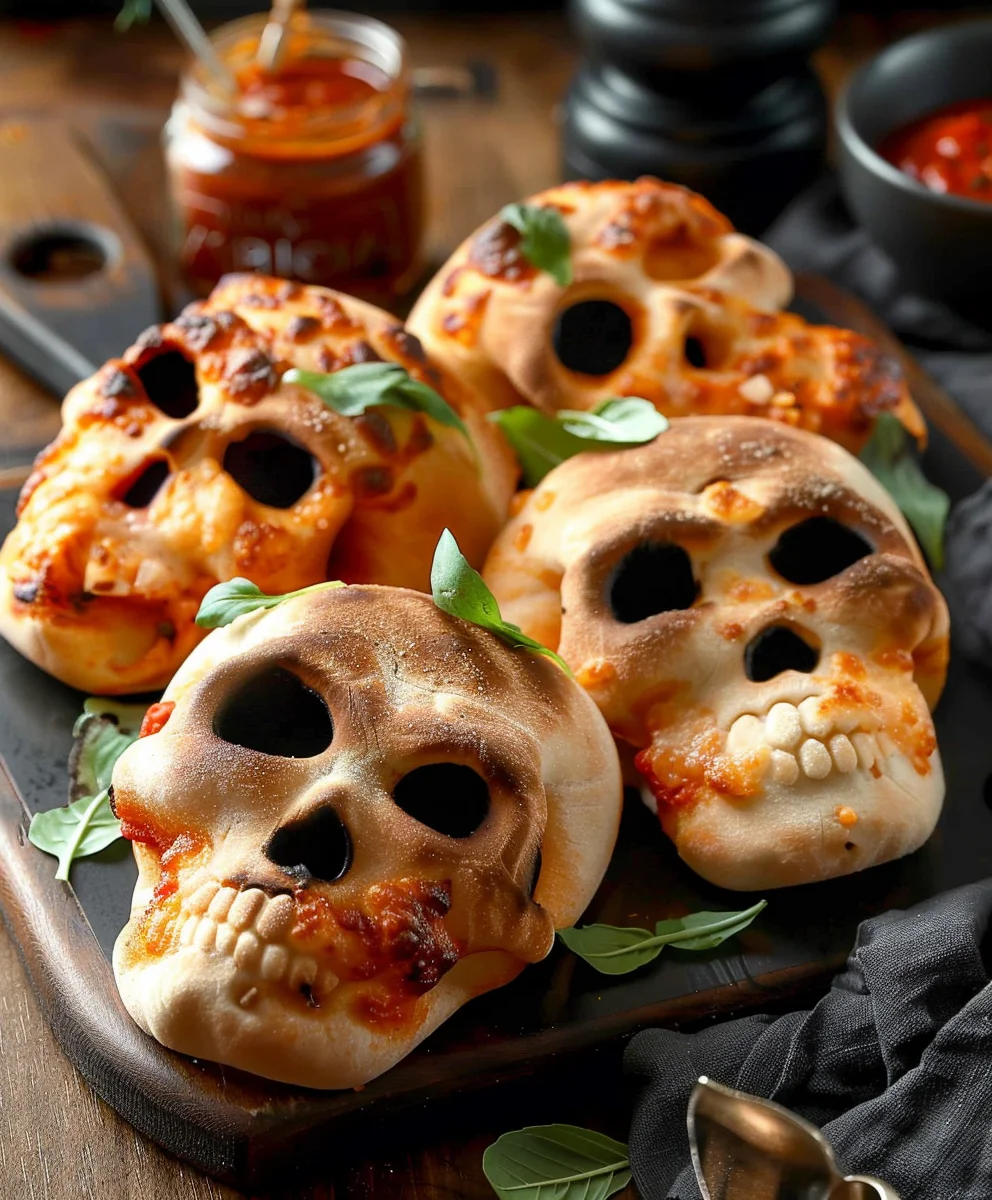
What makes these creative concoctions so beloved? Beyond their undeniably eye-catching appearance, Halloween Pizza Skulls deliver on every front. Imagine individual servings of warm, gooey pizza, with a perfectly golden crust, rich tomato sauce, melted cheese, and your favorite toppings, all shaped into a fun, spooky skull. They’re convenient for parties, perfect for little hands, and a fantastic conversation starter. Everyone, from the pickiest eaters to the most seasoned foodies, will adore the classic comfort of pizza transformed into a festive, frightfully good treat. Get ready to impress your guests and satisfy those ghoulish cravings!

Ingredients:
- For the Pizza Skulls:
- 2 pounds store-bought pizza dough, or your favorite homemade recipe (I usually opt for a good quality store-bought one to save time, and it works wonderfully for these Halloween Pizza Skulls!)
- 1 cup pizza sauce, your preferred brand (I love a rich, slightly sweet marinara for this recipe)
- 2 cups shredded low-moisture mozzarella cheese, divided (freshly shredded melts beautifully and avoids the anti-caking agents found in pre-shredded)
- 1/4 cup finely grated Parmesan cheese (for a little extra savory punch!)
- 1 tablespoon olive oil, plus extra for brushing
- All-purpose flour or cornmeal, for dusting
- For the Spooky Features (Toppings):
- 1 package (3-ounce) mini pepperoni slices (these are perfect for creating eye sockets and other small details)
- 1/2 cup pitted black olives, thinly sliced into rings and some halved (great for pupils, noses, or just general shadowy areas)
- 1/4 cup finely diced red bell pepper or green bell pepper (for creating “scars” or other textural elements, cut into very thin strips)
- 1/4 cup finely chopped mushrooms, small pieces (these can add some eerie texture to the skulls)
- A pinch of dried oregano or Italian seasoning (to sprinkle over the sauce for extra flavor)
- Optional: A tiny bit of fresh basil for garnish, if you want some “hair” or a splash of fresh green.
Gathering Your Ghastly Goods and Prep Work
Before we dive into creating our wonderfully eerie Halloween Pizza Skulls, it’s always a fantastic idea to have all your ingredients ready and your workspace organized. This “mise en place” approach truly makes the cooking process smoother and more enjoyable. Trust me, nobody wants to be scrambling for cheese with dough on their hands!
First things first, let’s get our oven preheating. I like to set mine to a toasty 400°F (200°C). This ensures the oven is consistently hot when your spooky creations go in, leading to a perfectly crisp crust. While the oven warms up, line two large baking sheets with parchment paper. This simple step is a lifesaver for easy cleanup and prevents your precious Halloween Pizza Skulls from sticking.
If you’re using store-bought pizza dough that’s been chilling in the fridge, it’s best to let it come to room temperature for about 30-60 minutes before you start. This makes it much more pliable and easier to roll out, saving you a lot of effort and frustration. While your dough relaxes, take a moment to prepare all your toppings. Grate your mozzarella if you haven’t already, slice your black olives into rings and some halves, and dice your bell peppers and mushrooms into tiny, manageable pieces. The smaller the pieces, the easier it will be to sculpt them into spooky skull features later on.
Set up your workstation. I always dust my clean countertop generously with a little all-purpose flour. This provides a non-stick surface for rolling out the dough. Have your rolling pin, pizza sauce, shredded cheese, and all your carefully prepared toppings within easy reach. A small bowl of olive oil for brushing the dough will also come in handy. We’re aiming for efficiency here, so everything should be just a quick grab away. Being prepared is the secret to a stress-free and fun cooking experience, especially when you’re crafting something as detailed as these Halloween Pizza Skulls!
Crafting the Crusty Craniums
Now for the really fun part: transforming that humble pizza dough into frightfully fantastic skull shapes! This is where the magic of our Halloween Pizza Skulls truly begins to take form.
On your generously floured surface, take one pound of your pizza dough. I usually divide my two-pound package in half, working with one portion at a time. This prevents the dough from getting too cold or sticky while you’re focusing on shaping. Using your rolling pin, roll the dough out evenly until it’s about 1/4 inch thick. You want it thin enough to cook through nicely but not so thin that it tears when you try to move it or gets flimsy when loaded with toppings. Aim for a roughly rectangular or oval shape to maximize the number of skulls you can cut from it.
Now, for the skull shapes! If you happen to have a skull-shaped cookie cutter (which would be absolutely perfect for these Halloween Pizza Skulls!), by all means, use it! Simply press it firmly into the rolled-out dough and carefully lift your skull shapes. If you don’t have one, don’t fret – freehanding is totally doable and can even add to the unique, rustic charm of your spooky snacks.
To freehand, start by cutting out oval shapes from the dough, about 4-5 inches long. Think of these as the basic head shape. Once you have an oval, gently pinch one end to create a more defined “chin” or jawline. Then, using a small knife or even just your fingertips, very gently indent two spots for the eye sockets. You can also make a small, inverted V-shape for the nose area. Don’t worry about perfection; slightly misshapen skulls add to the eerie appeal! You can even use the back of a spoon to gently scoop out a little dough in the eye sockets to create more depth. This attention to detail really helps in making them look like proper Halloween Pizza Skulls.
Carefully transfer your newly shaped dough skulls onto the parchment-lined baking sheets, leaving about an inch of space between each one. They will puff up slightly in the oven, so giving them a little breathing room is important. Gather any dough scraps, gently knead them together, and re-roll to create more skulls until all your dough is used up. I find this process quite meditative, and the anticipation of seeing these little dough shapes transform into delicious Halloween Pizza Skulls is truly exciting!
Assembling Your Spooky Skulls
With our skull-shaped dough patiently waiting, it’s time to bring them to life with some vibrant color and delicious flavor! This is the part where your artistic flair really comes into play, as we layer on the toppings to create truly ghoulish Halloween Pizza Skulls.
First, take that extra olive oil you set aside and lightly brush the edges of each skull-shaped dough. This will help them turn a beautiful golden brown as they bake and will add a lovely subtle flavor to the crust.
Next, it’s sauce time! Spoon about 1-2 tablespoons of your favorite pizza sauce onto the center of each dough skull. Using the back of the spoon, spread the sauce evenly, making sure to leave a small border (about 1/2 to 1 inch) around the edges. This border will become your delightful, slightly chewy crust. As you spread the sauce, you might want to sprinkle a tiny pinch of dried oregano or Italian seasoning over it for an extra layer of classic pizza flavor. This really elevates the taste of our Halloween Pizza Skulls.
Now for the cheese, glorious cheese! Sprinkle a generous amount of your shredded mozzarella over the sauced area of each skull. I usually aim for a good, even layer that covers most of the sauce. Remember, we divided the cheese earlier, so you’ll use most of the first half here. Don’t be shy; cheese is the heart and soul of any good pizza, and these Halloween Pizza Skulls are no exception!
Here’s where the fun really begins with the spooky features. Let’s start with the eyes. For large, hollow eye sockets, you can use two mini pepperoni slices or two halves of black olive. If you want more defined pupils, place a small, round black olive slice inside a pepperoni ring. For the nose, a small, triangular piece of black olive or a tiny snipped piece of bell pepper works wonders. Get creative!
For the mouth, you have several options. You can arrange thin strips of red bell pepper to look like jagged, bloody teeth, or even lay them out as a creepy, stitched-up smile. Small pieces of black olive can also be used for teeth, especially if you want a more sunken, skeletal look. The finely chopped mushrooms can be placed strategically around the “cheekbones” or temples to add a textured, almost decayed look, or simply scattered for extra flavor.
Don’t be afraid to experiment with your design. Each of your Halloween Pizza Skulls can have its own unique personality! Some can be winking, others can have a wide, maniacal grin, and some might look like they’re silently screaming. This creative process is what makes these Halloween Pizza Skulls such a fantastic project for the season. Once all your skulls are topped, give them a final, light sprinkle of the remaining mozzarella and a dusting of Parmesan cheese for that extra golden crunch and flavor.
Baking Your Bewitching Bites
With all your Halloween Pizza Skulls beautifully assembled and eagerly awaiting their transformation, it’s time to usher them into the heat of the oven! This is where the magic truly happens, turning soft dough and fresh toppings into bubbling, golden, and utterly delicious spooky treats.
Carefully transfer your baking sheets, laden with their cheesy, skull-faced cargo, into your preheated 400°F (200°C) oven. I usually place one sheet on the middle rack and another on the lower-middle rack to ensure even cooking, especially if my oven has hot spots.
The baking time for these Halloween Pizza Skulls will typically be between 12 to 18 minutes, but remember, every oven is a little different, so it’s essential to keep a close eye on them. What you’re looking for is a crust that’s beautifully golden brown, cheese that’s melted and bubbly with some delightful golden-brown spots, and toppings that look cooked and slightly caramelized. The aroma filling your kitchen will be absolutely incredible – a sure sign that something delicious is happening!
About halfway through the baking time, around the 8 to 10-minute mark, I like to rotate the baking sheets. If you have two sheets in the oven, switch their positions (top to bottom) and rotate them 180 degrees. This helps ensure that all your Halloween Pizza Skulls get evenly exposed to the heat, preventing some from being undercooked while others are overdone. This little step makes a big difference in achieving perfectly baked results.
As they near completion, watch for the edges of the dough to turn a deep golden hue and for the cheese to achieve that irresistible bubbly, slightly browned appearance. If you notice one tray is browning faster than the other, you can always remove it a minute or two earlier. The goal is a uniform bake across all your Halloween Pizza Skulls.
Once they emerge from the oven, they will be piping hot and look absolutely spectacular. The crust will be crisp, the cheese will be a delightful melty blanket, and the toppings will have intensified in flavor. The house will smell like the best pizzeria in town, only with an added touch of Halloween mischief!
Bringing Your Skulls to Life: The Finishing Touches
Your Halloween Pizza Skulls have emerged from the oven, golden, bubbly, and smelling absolutely divine! But before you dive in, a few final touches can truly elevate their appearance and flavor, bringing them fully to life – or rather, to an even more convincing state of spooky un-life!
First, allow the hot Halloween Pizza Skulls to cool on the baking sheets for about 5 minutes. They will be incredibly hot straight out of the oven, and this brief cooling period allows the cheese to set slightly, making them easier to handle and preventing you from burning your mouth with that molten mozzarella.
While they cool, this is the perfect moment to consider any last-minute garnishes that will enhance their visual appeal. For instance, if you want to add a touch of “gore,” a tiny, very light drizzle of extra pizza sauce, strategically placed near the mouth or eyes, can give the illusion of fresh blood – perfect for a Halloween vibe! You could also sprinkle a tiny bit of fresh, finely chopped basil or oregano over a few of the skulls. This adds a lovely fresh aroma and a pop of green, almost like a ghostly wisp or unkempt “hair” on your skeletal snacks.
Another fantastic option is to use a very fine grater to dust a little more Parmesan cheese over the warm skulls just before serving. The residual heat will slightly melt the Parmesan, creating a delicate, savory layer that adds depth of flavor and a beautiful finish. This little sprinkle of extra cheese can also highlight the contours of the skull, making the “bones” seem more pronounced.
Consider using a small, sharp knife to gently etch a few more “cracks” or “scars” into the crust if you want to make them look even more ancient and eerie. Just be careful not to cut too deeply. This step isn’t about flavor, but purely about enhancing the visual terror – in the best possible way, of course!
Once you’re satisfied with your finishing touches, your Halloween Pizza Skulls are ready to be presented. Transfer them carefully from the baking sheets to a large serving platter. Arrange them artfully; perhaps some facing one way, some another, creating a truly impressive and slightly unnerving display for your guests. The subtle details you’ve added will make all the difference, transforming a simple pizza into a thematic masterpiece.
Serving Your Sinister Snacks
And there you have it! Your magnificent batch of Halloween Pizza Skulls is complete, beautifully baked, and ready to be devoured. This is the moment to truly enjoy the fruits of your labor and watch as everyone marvels at your culinary (and spooky!) creativity.
These Halloween Pizza Skulls are best served warm, as soon as they’ve had a few minutes to cool down from the oven’s fiery embrace. The crust will be perfectly crisp, the cheese wonderfully melted and stretchy, and the flavors of the sauce and toppings will be at their peak.
Arrange your Halloween Pizza Skulls on a large, festive platter. You can even line the platter with some dark, Halloween-themed fabric or prop them up slightly to create a more dramatic presentation. Seeing them all together, with their unique, eerie expressions, is truly a sight to behold and will undoubtedly be the centerpiece of your Halloween spread.
For dipping, consider offering small bowls of extra marinara sauce, ranch dressing, or even a spicy ghost pepper ranch if you want to lean into the “scary” theme. A little dip can add another layer of flavor and makes these already fun Halloween Pizza Skulls even more interactive for your guests.
These pizza skulls are incredibly versatile. They make for the perfect appetizer at a Halloween party, a fun and thematic dinner for the family, or even a ghoulishly delightful snack during a spooky movie night. They pair wonderfully with other festive treats like “witch’s brew” punch, monster-themed cookies, or even a simple green salad to balance out the richness.
Watching your friends and family light up with delight (or a little playful fear!) as they see and taste these Halloween Pizza Skulls is truly the most rewarding part. The effort you put into shaping and decorating each one will not go unnoticed. They are more than just food; they are an experience, a conversation starter, and a memorable part of any Halloween celebration. So, go ahead, grab one of these delightful, creepy bites, and savor the spirit of the season! They are guaranteed to be a hit and will likely become a new Halloween tradition in your home. Enjoy every spooky, cheesy, delicious mouthful!
Conclusion:
And there you have it, my friends! We’ve journeyed together through the delightful process of creating a dish that is as much a conversation starter as it is a treat for the taste buds. I truly believe that this recipe isn’t just another item to add to your list; it’s an experience waiting to happen in your kitchen. These incredible Halloween Pizza Skulls are, without a doubt, a must-try for anyone looking to infuse some spooky fun into their culinary adventures. Their irresistible charm lies in the perfect marriage of a universally loved comfort food – pizza – with an utterly playful and seasonal presentation. Imagine the smiles, the gasps, and the immediate reach for a second piece as your guests or family encounter these adorable, yet slightly eerie, creations. They’re incredibly versatile, surprisingly simple to master, and pack a punch of flavor that goes far beyond their ghoulish good looks. What makes them stand out is their ability to transform a simple meal or snack into a festive occasion, proving that sometimes, the best recipes are those that combine deliciousness with a generous helping of creativity and a dash of holiday spirit.
But the fun doesn’t have to stop at just the basic recipe! One of my favorite things about these pizza skulls is how easily adaptable they are. For serving, consider pairing them with a variety of dips; a classic marinara is always a winner, but don’t shy away from a creamy ranch, a zesty garlic aioli, or even a spicy buffalo dip for those who crave a little heat. They make spectacular appetizers for any Halloween gathering, a fantastic movie night snack, or a fun, themed dinner that even the pickiest eaters will adore. You could even pack them cold in lunchboxes for a delightful surprise! As for variations, the possibilities are practically endless. Feel free to experiment with different cheeses – a sharp cheddar blend could add a fantastic tang, or a smoked provolone could introduce a deeper flavor profile. For the sauce, why not try a creamy white garlic sauce instead of tomato, or perhaps a vibrant pesto for an earthy twist? And when it comes to toppings, let your imagination run wild! Mini pepperonis are always a hit, but consider adding finely chopped black olives to create more defined “eyes” or “noses,” tiny bits of red bell pepper for a sinister smile, or even some crumbled cooked sausage for a heartier bite. For a truly unique texture, thinly sliced mushrooms or jalapeños could also find their place. Don’t be afraid to customize these skulls to suit your family’s preferences or dietary needs; a gluten-free pizza crust works beautifully, and vegan cheese with plant-based toppings would make for an equally delicious and inclusive treat. Perhaps you could even create a “mad scientist” theme with a variety of colorful vegetable toppings, cut into small, eerie shapes.
So, what are you waiting for? I’m genuinely excited for you to bring these delightful Halloween Pizza Skulls to life in your own kitchen. It’s a journey that promises not just a delicious outcome, but also a joyful and engaging cooking experience. Gather your ingredients, crank up some spooky tunes, and let your creativity flow. I promise you, the satisfaction of pulling these perfectly golden, delightfully shaped pizza treats from the oven is unparalleled. Once you’ve made them, please, please, please share your triumphs with me! I absolutely adore seeing your culinary creations and hearing about your experiences. Did you discover a brilliant new topping combination? Did your kids have a blast decorating them? Was it the star of your Halloween party? Tag me on social media or drop a comment below; I can’t wait to see your fantastic results and celebrate your spooky cooking success! Let’s make this Halloween season the most delicious and fun one yet, one pizza skull at a time!
Halloween Pizza Skulls
Halloween Pizza Skulls are individual servings of warm, gooey pizza, with a perfectly golden crust, rich tomato sauce, melted cheese, and your favorite toppings, all shaped into a fun, spooky skull. They are convenient for parties, perfect for little hands, and a fantastic conversation starter, transforming classic comfort food into a festive, frightfully good treat.
Ingredients
-
13-16 ounces pre-made pizza dough
-
3/4 to 1 cup pizza sauce
-
2 cups shredded mozzarella cheese
-
1/4 cup Parmesan cheese
-
1 tablespoon olive oil, plus extra for brushing
-
All-purpose flour or cornmeal (for dusting)
-
8 ounces cooked beef sausage
-
6 ounces mini beef pepperoni
-
Sliced black olives
-
Chopped deli beef
-
Crumbled crispy beef bacon
-
Mini Italian beef meatballs
-
Cooked corn kernels
-
Baby spinach
-
Fresh basil
-
Marinara sauce (for dipping)
-
Chopped fresh parsley or basil (for garnish)
-
1/4 cup finely diced red or green bell pepper (optional, for features)
-
1/4 cup finely chopped mushrooms (optional, for features)
-
A pinch of dried oregano or Italian seasoning (optional)
Instructions
-
Step 1
Preheat oven to 400°F (200°C). Line two large baking sheets with parchment paper. Let store-bought pizza dough come to room temperature (30-60 min). Prepare all desired toppings (shred cheese, slice olives, dice bell peppers/mushrooms, etc.). Dust a clean countertop generously with all-purpose flour. -
Step 2
On the floured surface, roll out half of the pizza dough to about 1/4 inch thick. Use a skull-shaped cookie cutter, or freehand cut 4-5 inch oval shapes. Gently pinch one end for a jawline and use fingertips or a small knife to indent eye sockets and a nose area. Carefully transfer shaped dough to the prepared baking sheets, leaving about 1 inch between each. Gather and re-roll dough scraps to make more skulls until all dough is used. -
Step 3
Lightly brush the edges of each skull-shaped dough with olive oil. Spoon 1-2 tablespoons of pizza sauce onto the center of each skull, spreading evenly but leaving a small border. Sprinkle with a pinch of dried oregano or Italian seasoning if desired. Layer a generous amount of shredded mozzarella over the sauced area. Arrange your chosen toppings (mini beef pepperoni, cooked beef sausage, sliced black olives, chopped deli beef, crumbled crispy beef bacon, mini Italian beef meatballs, cooked corn kernels, baby spinach, finely diced bell pepper, finely chopped mushrooms) to create skull features like eyes, nose, and mouth. Sprinkle with remaining mozzarella and Parmesan cheese. -
Step 4
Carefully transfer baking sheets to the preheated oven. Bake for 12-18 minutes, rotating sheets halfway through, until the crust is golden brown and the cheese is melted and bubbly with some golden spots. Allow the Halloween Pizza Skulls to cool on the baking sheets for about 5 minutes. Optionally, add a light drizzle of extra pizza sauce for a ‘gore’ effect, sprinkle with fresh basil or chopped parsley for ‘hair’, or dust with more Parmesan cheese. -
Step 5
Transfer the Halloween Pizza Skulls to a large, festive platter. Serve warm with small bowls of marinara sauce or ranch dressing for dipping. Enjoy your creepy and delicious party treats!
Important Information
Nutrition Facts (Per Serving)
It is important to consider this information as approximate and not to use it as definitive health advice.
Allergy Information
Please check ingredients for potential allergens and consult a health professional if in doubt.
Leave a Comment