
Halloween Skull Potatoes! As the crisp autumn air settles and spooky season approaches, I find myself drawn to culinary creations that are both delightfully delicious and eerily captivating. What could be more fitting for a Halloween feast than a dish that perfectly marries comfort food with a touch of macabre charm? This year, prepare to amaze your guests and delight your family with a platter of these incredible skull-shaped spuds. I am truly excited to share this recipe with you, as it promises to be the centerpiece of any ghostly gathering.
Halloween, with its rich tapestry of traditions spanning centuries, has always been a time for playful transformations and embracing the whimsical side of the macabre. Turning simple, wholesome potatoes into these fun, spooky shapes is a nod to that festive spirit of playful fright. People adore this dish not just for its undeniable visual appeal – those perfectly golden, crisp skulls that seem to wink from the plate – but also for the universally beloved taste and texture of roasted potatoes: wonderfully fluffy on the inside, with a satisfying crunch on the outside. They are surprisingly simple to create, making these delightful Halloween Skull Potatoes an accessible yet impressively festive addition to your holiday spread. They are more than just a side dish; they are an experience, a conversation starter, and a delicious way to embrace the spirit of the season.

Ingredients:
- 6 large Russet baking potatoes (about 1.5-2 lbs each), scrubbed clean
- 1/2 cup (1 stick) unsalted butter, softened or melted
- 1/2 cup warm milk or half-and-half (whole milk will yield a creamier texture)
- 1/2 cup sour cream or cream cheese, at room temperature
- 1 1/2 teaspoons fine sea salt, or to taste
- 1/2 teaspoon freshly ground black pepper, or to taste
- 1 teaspoon garlic powder
- 1/2 teaspoon onion powder
- 1/4 teaspoon smoked paprika (for a subtle color and depth)
- 1 1/2 cups shredded sharp cheddar cheese, divided (or a blend of your favorite melting cheeses like Monterey Jack)
- For Decoration:
- Small pitted black olives, sliced or halved (for eyes and nose)
- Thin strips of red bell pepper or pimento (for mouths)
- Fresh chives, finely chopped (optional, for ‘hair’ or green accent)
Prepping Our Canvas: Baking the Potatoes
Alright, let’s get started on our spooktacular Halloween Skull Potatoes! The foundation of any great twice-baked potato is, naturally, perfectly baked potatoes. This initial step is crucial for achieving that fluffy, tender interior that will be so easy to mash and shape later.
- First things first, we need to make sure our potatoes are sparkling clean. Grab those beautiful Russet potatoes and give them a good scrub under cold running water. We’re talking about removing any dirt or debris, because even though we’re mostly using the insides, a clean skin makes for a better handling experience and ensures no earthy flavors sneak into our final dish. Pat them completely dry with a paper towel.
- Now, for a little trick of the trade that prevents any potato-explosions in your oven and helps the steam escape, ensuring an evenly cooked interior: take a fork and pierce each potato several times all over. I usually go for about 6-8 jabs around the circumference of each potato. This also helps the skin get nice and crisp, which is a lovely contrast to the creamy filling.
- Preheat your oven to a nice and hot 400°F (200°C). While some recipes suggest rubbing the potatoes with oil and salt at this stage, for our Halloween Skull Potatoes, I find it’s better to keep the skins somewhat plain for easier handling and shaping later, as we’re going to be scooping out almost all the flesh. Place the pierced potatoes directly onto an oven rack in the preheated oven.
- Bake them for a good 60 to 75 minutes, or until they are completely fork-tender. How do you know they’re ready? When you can easily insert a fork into the center of the potato without much resistance, they’re done. You can also give them a gentle squeeze (careful, they’re hot!) – they should yield quite a bit. The skins will look a little wrinkly and feel firm. Don’t rush this step; undercooked potatoes will be dense and won’t mash up into that light, airy filling we’re aiming for.
- Once baked, carefully remove the potatoes from the oven and let them cool on a wire rack for about 15-20 minutes. This cooling period is essential! It allows them to firm up slightly, making them easier to handle without burning your fingers, and it also helps the internal moisture redistribute, which can lead to a fluffier mash. We don’t want them stone cold, just cool enough to comfortably handle.
- With your cooled potatoes, using a sharp knife, carefully slice each potato lengthwise, right down the middle. Be precise here, as we want two even “boats” from each potato.
- Now for the fun part: scooping! Using a spoon, carefully scoop out the hot, fluffy potato flesh into a large mixing bowl. Make sure to leave about a 1/4-inch border of potato attached to the skin all around. This creates a sturdy shell, or “skull casing,” for our filling. Be gentle to avoid tearing the skins, as these are going to be the vessels for our spooky creations. Place the empty potato skins back on the baking sheet.
Crafting the Creamy, Dreamy Skull Filling
Now that we have our perfectly baked potato flesh and sturdy skins, it’s time to transform that fluffy interior into the delectable, pipeable filling that will become our Halloween Skull Potatoes. This is where all the flavors come together to create a truly irresistible treat.
- Into that large mixing bowl containing your scooped-out potato flesh, add the softened butter, warm milk (or half-and-half), sour cream (or cream cheese), salt, black pepper, garlic powder, onion powder, and smoked paprika.
- Now, it’s mashing time! Using a potato masher, a large fork, or even a ricer for an ultra-smooth texture (my personal preference for the silkiest mash!), begin to mash all the ingredients together. Mash until the potatoes are smooth and creamy, with no large lumps remaining. A little tip: if you like a chunkier texture, just mash a little less. If you prefer it super smooth, keep going!
- Once mashed, gently fold in 1 cup of the shredded cheddar cheese. The warmth of the potatoes will start to melt the cheese, incorporating it beautifully into the mixture, adding both flavor and a lovely gooeyness. We’re saving the remaining 1/2 cup of cheese for topping later.
- Give the mixture a taste. This is your chance to adjust the seasonings! Do you need more salt? A little extra pepper? Perhaps a dash more garlic powder to really pop? Don’t be shy; make it perfect for your palate. Remember, a well-seasoned potato filling makes all the difference.
- The consistency of your potato mixture is key here, especially since we’ll be piping it to form our skull shapes. It should be creamy and smooth, but firm enough to hold its shape. If it feels too stiff, you can add a tiny splash more warm milk, a tablespoon at a time, until it reaches a pipeable consistency. If it’s too loose, you might have to add a small amount of extra mashed potato (if you have any on hand) or a little more cheese to help it firm up. We want it to be thick, like a very firm mashed potato, not runny.
Bringing Our Ghoulish Vision to Life: Shaping the Skulls
This is where the magic truly happens and our plain twice-baked potatoes transform into impressive Halloween Skull Potatoes! This step requires a little patience and creativity, but trust me, the results are incredibly rewarding and will be the talk of your Halloween gathering. Get ready to sculpt!
- First, prepare your piping bag. I find that a large piping bag fitted with a large round tip (like an Ateco #808 or #809) works best for creating smooth, rounded skull shapes. If you don’t have a piping bag, you can improvise by using a large, sturdy zip-top bag and snipping off one corner to create an opening of about 3/4 to 1 inch. Fill your piping bag about two-thirds full with the creamy potato mixture. Don’t overfill it, as it makes it harder to control.
- Pick up one of your potato skin halves. Using your piping bag, start by piping a generous mound of potato filling into the center of the skin, completely filling the cavity. We want to build a good base first.
- Now, let’s start shaping our skull. Begin by piping more potato onto the mound, focusing on building up the “forehead” area. You want to create a slightly rounded, prominent brow ridge. Use gentle pressure on the bag, guiding the potato into shape.
- To create the “eye sockets,” pipe two small, slightly depressed circles or ovals below the brow ridge. You can use the tip of your piping bag to create a slight indentation, or gently use the back of a small spoon to hollow them out once the potato is piped. Think of two deep-set eyes staring out!
- For the “nose cavity,” create a smaller, inverted-heart or triangular indentation just below and between the eye sockets. Again, you can pipe a small mound and then use the spoon or the very tip of your piping bag to make the indentation. This detail really helps sell the skull effect.
- Next, gently pipe outwards from the cheekbones, slightly widening the potato mass to form the mid-face region. Continue piping downwards to define the “jawline.” You can create a subtle, rounded jawline by piping a slightly flatter section below the cheekbones.
- Now for the “teeth” – this is where you can get really creative! You can use the edge of a small butter knife or even a toothpick to gently etch in horizontal lines along the jawline you just piped, creating the illusion of teeth. Or, for a more defined look, you can pipe small, short lines of potato mixture side-by-side to create individual teeth. Don’t worry about perfection; rustic, slightly uneven teeth can actually enhance the spooky vibe of your Halloween Skull Potatoes.
- Repeat this intricate shaping process for all 12 potato halves. Take your time with each one. Each skull can have its own unique, ghoulish character! Arrange the shaped skull potatoes back onto your baking sheet.
- Finally, sprinkle the remaining 1/2 cup of shredded cheddar cheese over the tops of your sculpted skull potatoes. Focus on the higher points and edges of the skulls; this cheese will melt beautifully, adding an extra layer of flavor and creating lovely golden-brown highlights on our bony faces.
The Final Haunting Touch: Baking and Decorating
Our sculpted Halloween Skull Potatoes are looking fantastic! Now, it’s time to give them their final bake to heat them through, melt that cheese to perfection, and get those beautiful golden-brown tops. Then, we’ll add the eerie finishing details that truly make them Halloween-ready.
- Preheat your oven to 375°F (190°C). We’re going for a slightly lower temperature than the initial bake to ensure the filling heats through evenly without over-browning the potato too quickly.
- Carefully place the baking sheet with your skull potatoes into the preheated oven. Bake for 15-20 minutes, or until the potatoes are heated all the way through, the cheese is gloriously melted, and the tops are starting to turn a beautiful golden brown.
- For an extra touch of crispiness and a more pronounced ‘browning’ effect on the skull features: If you desire, you can switch your oven to the broiler setting for the last 2-3 minutes. Keep a very close eye on them, as broilers can brown things very quickly! You want just a nice, toasted golden crust, not burnt. This really makes the raised features of our Halloween Skull Potatoes pop!
- Once baked to perfection, carefully remove the baking sheet from the oven.
- Now for the truly fun, artistic, and spooky part: the decoration! While the potatoes are still hot, it’s time to add those haunting details.
- For the Eyes: Take your small pitted black olive slices or halves and carefully place them into the eye sockets you created. The warmth of the potato will help them adhere.
- For the Mouth: Use those thin strips of red bell pepper or pimento to create eerie, grinning, or frowning mouths just below the nose cavity. You can gently press them into the potato filling.
- Optional ‘Hair’ or Accents: If you’re feeling extra fancy, sprinkle a tiny bit of finely chopped chives around the top of the skull for a touch of ‘hair’ or to outline some of the features with a vibrant green.
- Your spooky Halloween Skull Potatoes are now ready to make a grand, ghoulish entrance at your table! Serve them immediately while they’re warm and the cheese is still wonderfully gooey. They are fantastic as a side dish for any Halloween feast or as a standalone appetizer that’s sure to impress all your ghastly guests. Enjoy creating these delightfully creepy treats, and have a truly Happy Halloween!
Conclusion:
So, there you have it – my absolute favorite recipe for turning a simple potato into a spooky masterpiece! I truly believe these aren’t just any side dish; they’re an experience, a conversation starter, and a testament to how much fun you can inject into your cooking. What makes these Halloween Skull Potatoes an absolute must-try, you ask? Well, it’s the magical combination of their undeniably delicious flavor profile – crispy on the outside, fluffy and tender on the inside, perfectly seasoned to tantalize your taste buds – coupled with their jaw-dropping visual appeal. Imagine the delighted gasps when you present a platter of these ghastly yet gorgeous spuds! They are surprisingly simple to create, meaning you don’t need to be a culinary artist to achieve stunning results. The carving process, which might seem daunting at first glance, is actually incredibly therapeutic and rewarding. It’s an activity that truly gets you into the spirit of the season, a creative outlet that results in a snack that’s as delightful to eat as it is to behold. This recipe promises not just a meal, but an adventure in your kitchen, a chance to impress your guests, and an opportunity to create lasting memories. They’re the perfect blend of culinary comfort and festive flair, guaranteed to elevate any autumnal gathering from ordinary to extraordinary. Trust me, once you try them, you’ll understand why I’m so enthusiastic about them; they truly are that special, that unique, and that utterly irresistible.
But the fun doesn’t stop there! While these savory delights are spectacular on their own, I’ve got a few ideas to make them even more versatile and exciting.
Perfect Pairings:
For a complete Halloween feast, consider serving your spooky spuds alongside some hearty chili, a succulent roasted chicken, or even a ghoulishly green monster-themed dip. They’d be fantastic with a classic BBQ pulled pork or some smoky ribs, adding a playful contrast to the main course. For a lighter touch, a crisp garden salad with a vibrant vinaigrette would offer a wonderful balance. Don’t forget the dipping sauces! A classic ketchup is always a hit, but why not elevate it with a spicy Sriracha aioli, a creamy garlic herb dip, or even a tangy homemade ranch? For an extra-special treat, a warm cheese sauce would take them straight to comfort food heaven, making each bite an indulgent delight. Consider also pairing them with a vibrant, seasonal vegetable like roasted Brussels sprouts or asparagus for a balanced plate that’s still full of festive charm. The contrast in textures and flavors will only amplify the deliciousness of your carved potatoes, making every meal a celebration.
Creative Variations to Try:
Feeling adventurous? Let’s talk about some fantastic twists you can put on your Halloween Skull Potatoes. First off, seasoning is your playground. Experiment with different spice blends – a smoky paprika and cumin for a Tex-Mex vibe, a sprinkle of Italian herbs for a Mediterranean touch, or even a dash of ghost pepper seasoning if you dare to crank up the heat! You could also stuff them! Once baked, carefully scoop out some of the fluffy interior, mix it with cheese, bacon bits, chives, or even some leftover pulled pork, then stuff it back into the potato shell before a quick final bake until golden and bubbly. Imagine mini loaded skulls – pure genius!
Another fantastic idea is to vary the type of potato. While russets are ideal for their size and fluffiness, smaller new potatoes could be carved into tiny, adorable skull ‘bites’ for a tapas-style serving. Sweet potatoes, too, offer a wonderful alternative; their natural sweetness would pair beautifully with warming spices like cinnamon and nutmeg, perhaps even a drizzle of maple syrup after baking, transforming them into a surprisingly delightful sweet and savory treat. You could even get creative with the ‘eyes’ and ‘noses’ – use small pieces of black olive or capers for a truly haunting effect. For a cheesy twist, sprinkle some grated Parmesan or cheddar over the skulls in the last 10 minutes of baking, allowing it to melt and create a delicious, savory crust. The possibilities are truly endless, limited only by your imagination! You could even experiment with food-safe edible paints or dusts to add a touch of eerie realism or vibrant colors, making each potato truly a work of art. Think about a dash of edible silver or gold luster dust for an unexpectedly elegant touch, proving that spooky can also be sophisticated.
So, now it’s your turn! I’ve shared all my tips and tricks, and I genuinely can’t wait for you to experience the joy of creating these incredible Halloween Skull Potatoes for yourself. Don’t be shy; embrace the fun, get a little messy, and most importantly, savor every single bite of your deliciously spooky creation. Whether you’re making them for a grand Halloween party, a cozy family dinner, or simply as a fun afternoon snack to get into the autumnal spirit, I promise they will bring a smile to everyone’s face. They’re more than just food; they’re an expression of festive cheer and culinary creativity. Once you’ve whipped up your batch, I would absolutely love to hear all about your experience. Did you try a new seasoning blend? Did you come up with an ingenious serving suggestion? Did your friends and family go wild for them? Please, share your stories, your photos, and your triumphs! Tag me on social media, leave a comment below, or send me an email – I live for your kitchen adventures and always find so much inspiration in what you create. Your feedback and creative interpretations are truly what make this cooking community so vibrant and exciting. So go ahead, preheat that oven, grab your potatoes, and let the spooky culinary magic begin!

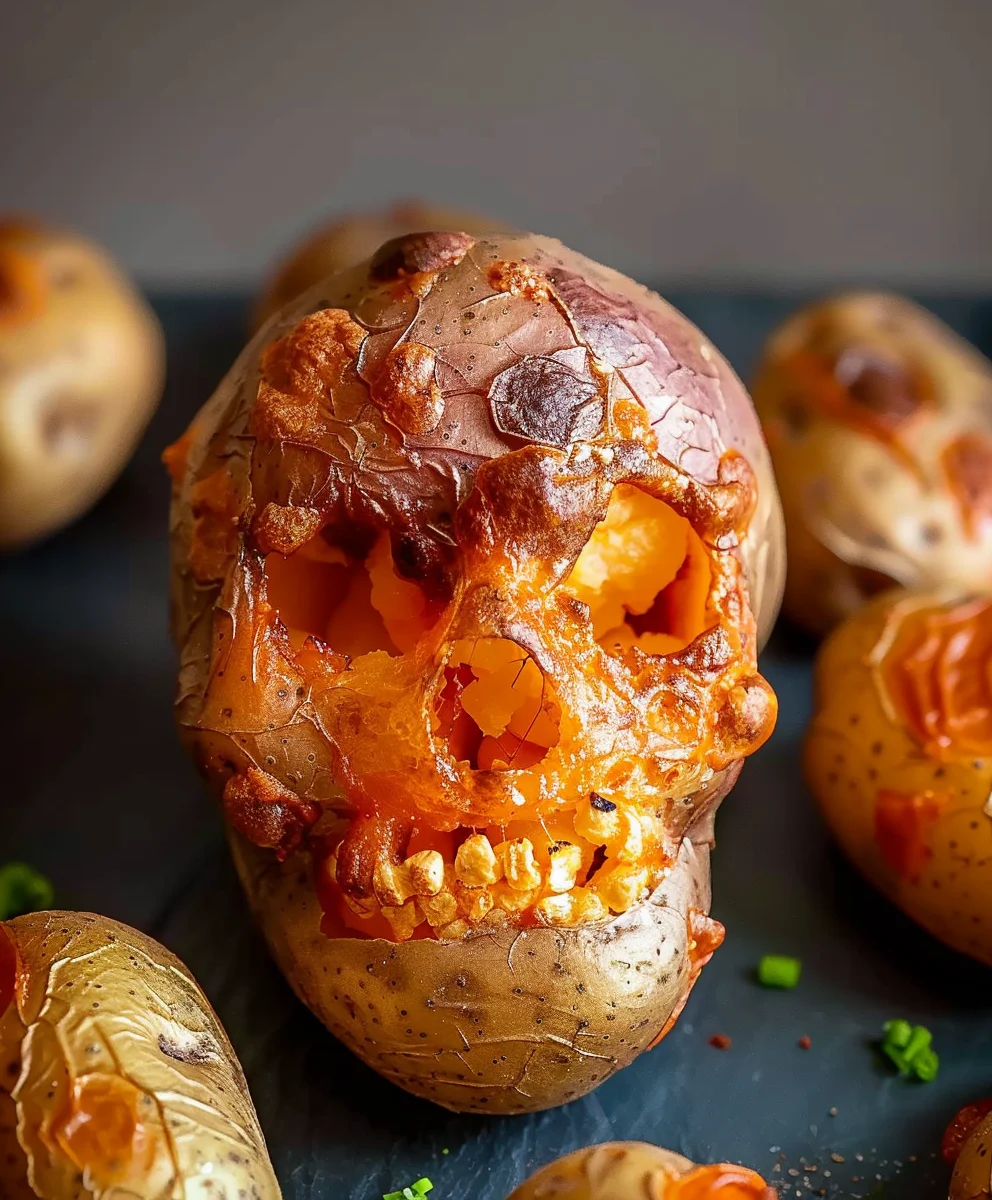
Creepy Halloween Skull Potatoes
Transform roasted mini creamer potatoes into delightfully spooky skull-shaped spuds, perfect for a Halloween feast. These impressive treats are seasoned to perfection, tender, and sure to be a conversation starter.
Ingredients
-
Mini creamer potatoes
-
2 tablespoons lemon juice
-
2 tablespoons olive oil
-
Salt
-
Freshly ground pepper
-
1 tsp onion powder
-
1 tsp garlic powder
-
1 tsp smoked paprika
-
Optional: chopped parsley
-
Optional: shredded cheese
-
Optional: beef bacon bits
-
Optional: green onions
Instructions
-
Step 1
Scrub mini creamer potatoes clean and pat dry. For larger creamer potatoes, you may slice a small portion off the bottom to create a stable base, or halve them. -
Step 2
In a bowl, toss potatoes with olive oil, lemon juice, salt, freshly ground pepper, onion powder, garlic powder, and smoked paprika until evenly coated. Spread the potatoes in a single layer on a baking sheet. -
Step 3
Roast in a preheated oven at 400°F (200°C) for 25-35 minutes, or until potatoes are tender and lightly golden. -
Step 4
If using, sprinkle shredded cheese and beef bacon bits over the potatoes during the last 5-10 minutes of baking, until the cheese is melted and bubbly. -
Step 5
Once roasted and slightly cooled, use a small knife or toothpick to gently etch simple skull features (like eye sockets, a nose cavity, and a mouth/teeth) onto the surface of the potatoes. -
Step 6
Garnish with optional chopped parsley or green onions. Serve warm as a spooky side dish.
Important Information
Nutrition Facts (Per Serving)
It is important to consider this information as approximate and not to use it as definitive health advice.
Allergy Information
Please check ingredients for potential allergens and consult a health professional if in doubt.
Leave a Comment