
Garbage Bread A Deliciously Creative Way To Reduce Food Waste – doesn’t that sound like a culinary oxymoron? What if I told you that some of the most satisfying and surprisingly gourmet meals are born not from meticulous shopping lists, but from the forgotten treasures lurking in your fridge?
For generations, resourceful home cooks around the world have mastered the art of transforming humble leftovers into magnificent feasts. This isn’t just about cooking; it’s a celebration of ingenuity and a practical nod to sustainability, turning what might have been discarded into something truly extraordinary. It’s a delicious tradition that honors both flavor and frugality, making every morsel count.
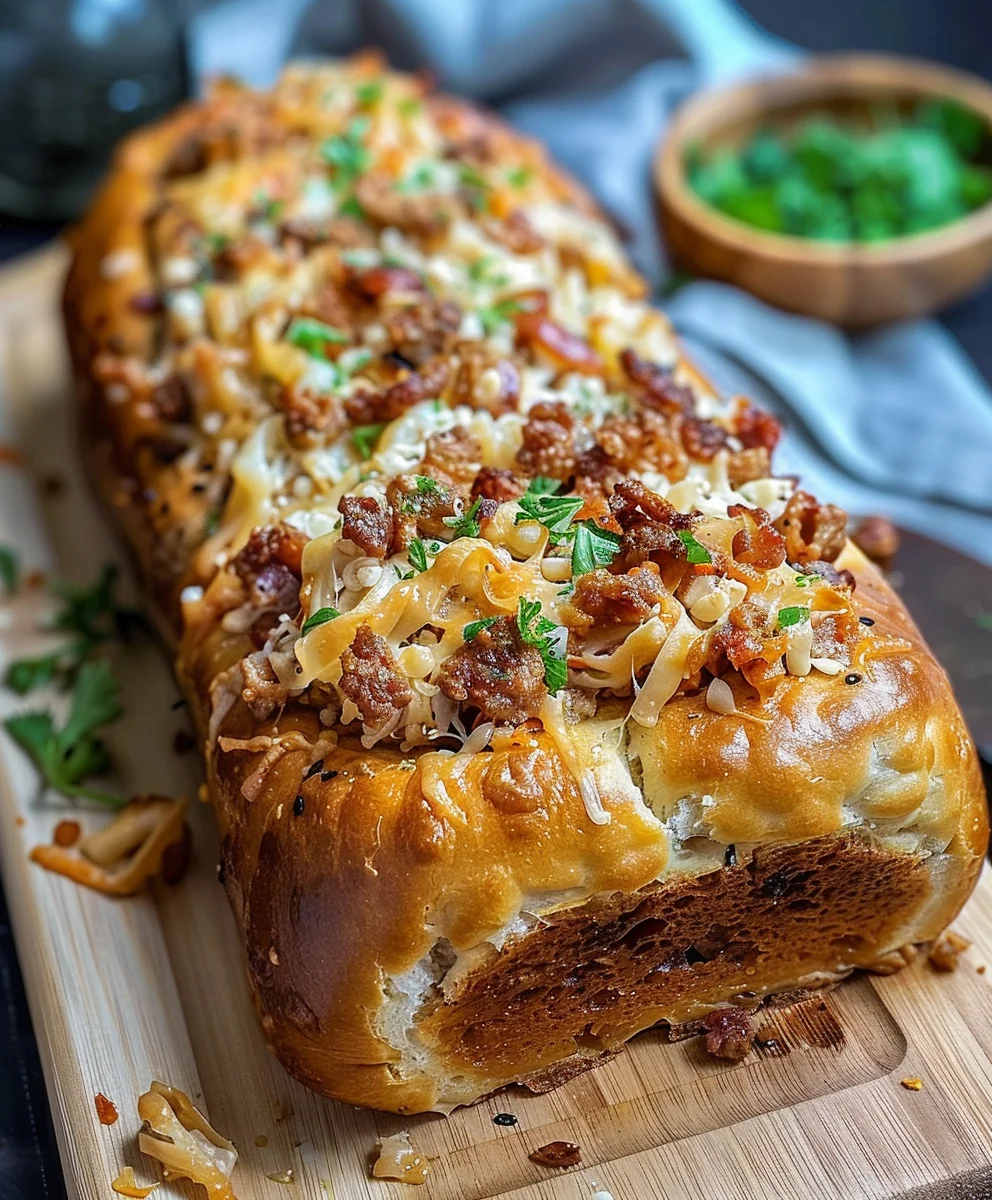
People absolutely adore this dish for countless reasons. Imagine a warm, golden, crispy crust encasing a savory, cheesy, and utterly customizable filling – a delightful blend of whatever delicious bits and bobs you have on hand. It’s incredibly versatile, offering endless flavor combinations that cater to every palate, making it a perfect weeknight dinner or a crowd-pleasing appetizer. Beyond its incredible flavor and comforting texture, the true beauty of Garbage Bread A Deliciously Creative Way To Reduce Food Waste lies in its brilliant simplicity and its powerful impact on our kitchens, helping us make the most of every ingredient.

Ingredients:
- For the Dough:
- 2 pounds (about 2 large rolls) store-bought pizza dough, or your favorite homemade recipe. I find store-bought is fantastic for convenience, especially when I’m embracing the “Garbage Bread A Deliciously Creative Way To Reduce Food Waste” philosophy and want to focus my energy on the fillings!
- For the Cheese Blend:
- 2 cups shredded mozzarella cheese, full-fat for best melt. This is my go-to for its amazing stretch and creamy texture.
- 1 cup shredded provolone cheese, for a bit more sharpness and a wonderful melty quality.
- ½ cup grated Parmesan cheese, for a salty, nutty kick that elevates the entire flavor profile.
- Optional: ½ cup shredded cheddar, Gruyère, or Monterey Jack – feel free to mix and match any melty cheeses you have on hand!
- For the Protein Filling (Choose 1-2 cups total, chopped):
- 1 cup cooked chicken, shredded or diced (leftover rotisserie chicken is perfect here!).
- 1 cup cooked ham, diced (excellent for using up holiday leftovers!).
- 1 cup cooked sausage, crumbled (breakfast sausage, Italian sausage – whatever you have!).
- 1 cup cooked pepperoni, sliced or diced.
- Optional: Cooked bacon bits, thinly sliced salami, or even leftover cooked steak, thinly sliced.
- For the Vegetable Filling (Choose 1-2 cups total, finely diced/sautéed):
- 1 cup fresh spinach, roughly chopped (or ½ cup frozen spinach, thawed and squeezed dry).
- ½ cup mushrooms, thinly sliced or diced.
- ½ cup bell peppers (any color), finely diced.
- ¼ cup red onion or yellow onion, finely diced.
- 2 cloves garlic, minced.
- Optional: Leftover roasted vegetables like broccoli florets, zucchini, or asparagus, finely chopped. Olives, sun-dried tomatoes (oil-packed, drained), or artichoke hearts, chopped.
- For the Flavor Boosters & Seasoning:
- 2 tablespoons olive oil, for sautéing vegetables.
- 1 teaspoon dried Italian seasoning.
- ½ teaspoon garlic powder.
- ¼ teaspoon onion powder.
- Salt and freshly ground black pepper, to taste.
- ¼ cup marinara sauce or pizza sauce, plus extra for dipping (optional, but highly recommended!).
- 1 large egg, whisked with 1 tablespoon water (for egg wash).
- 1 tablespoon sesame seeds or poppy seeds (optional, for topping).
Preparing Your Workspace and Dough:
- Bring Your Dough to Room Temperature: This is a crucial first step, my friends! If you’re using store-bought pizza dough, I always recommend taking it out of the refrigerator at least 30-60 minutes before you plan to start working with it. Cold dough is notoriously stubborn, elastic, and difficult to roll out evenly. By allowing it to come to room temperature, the gluten relaxes, making it much more pliable and cooperative. You’ll thank me later when your rolling process is smooth and stress-free.
- Preheat Your Oven and Prepare Baking Sheet: While your dough is relaxing, let’s get the oven ready. Preheat your oven to 400°F (200°C). Then, line a large baking sheet with parchment paper. This parchment paper is your best friend here – it prevents sticking, makes cleanup a breeze, and helps ensure your beautiful “Garbage Bread A Deliciously Creative Way To Reduce Food Waste” masterpiece slides off the pan without a fuss.
- Prepare Your Rolling Surface: Lightly flour a clean, dry countertop or a large pastry board. I mean lightly – just enough to prevent sticking, but not so much that it dries out your dough. Keep a little extra flour nearby in case you need it during the rolling process. A well-floured surface is key to preventing frustration!
- Roll Out the Dough: Now for the fun part! If you’re using two pounds of dough, I typically divide it in half and make two smaller loaves, but you can certainly make one giant one if your baking sheet is big enough. Place one portion of dough onto your floured surface. Using a rolling pin, gently and evenly roll the dough into a large rectangle. My goal is usually about 12×18 inches and roughly ¼-inch thick. It doesn’t have to be perfectly geometric; remember, this is rustic “Garbage Bread”! The key is to achieve a relatively even thickness across the entire rectangle so that it bakes uniformly. Work from the center outwards, turning the dough occasionally if it starts to stick. If the dough resists and springs back, let it rest for a few minutes to allow the gluten to relax again, then continue rolling.
Crafting Your Deliciously Creative Fillings:
- Prepare Your Protein Filling: This is where the “Garbage Bread A Deliciously Creative Way To Reduce Food Waste” aspect truly shines! Gather all your cooked proteins – the leftover chicken, the diced ham, the crumbled sausage, or whatever culinary treasures you’ve unearthed from your fridge. Ensure everything is thoroughly cooked and then finely chop or shred it into small, manageable pieces. Why small? Because we want an even distribution of flavor in every bite, and smaller pieces are less likely to tear your precious dough when you’re rolling it up. Place your prepared protein in a medium bowl.
- Sauté Your Fresh Vegetables (If Using): If you’re incorporating fresh vegetables like mushrooms, bell peppers, or onions, a quick sauté makes a world of difference. It softens them, concentrates their flavors, and – most importantly – removes excess moisture that could make your bread soggy. Heat 2 tablespoons of olive oil in a skillet over medium heat. Add your diced onions and bell peppers first, cooking for 3-5 minutes until they begin to soften. Then, toss in your minced garlic and sliced mushrooms, continuing to cook for another 3-4 minutes until the mushrooms have released their liquid and browned nicely. If using fresh spinach, add it to the skillet and cook just until it wilts, which takes only about 1-2 minutes.
- Drain and Cool Your Vegetables: Once your vegetables are cooked, transfer them to a bowl and allow them to cool slightly. If you used spinach (especially frozen), or any other vegetable that might hold a lot of water, I cannot stress this enough: squeeze out any excess liquid! You can do this by pressing them against the side of the bowl with a spoon, or even by placing them in a clean kitchen towel and twisting firmly. A soggy filling is the enemy of a perfectly crisp bread crust!
- Combine Your Cheese Blend: In a separate bowl, mix together your shredded mozzarella, provolone, and grated Parmesan cheese. This combination offers a fantastic balance of creamy texture, sharp flavor, and excellent melt. If you’re using any other cheeses, add them to this mix now. Give it a good toss to ensure all the cheeses are evenly distributed. This beautiful blend will act as a binding agent, holding all your delicious fillings together.
- Season Your Fillings: Now it’s time to bring all those wonderful flavors together. Add your cooked and drained vegetables, along with any other prepared vegetable additions (like olives or sun-dried tomatoes), to the bowl with your protein. Sprinkle in the dried Italian seasoning, garlic powder, onion powder, and a generous pinch of salt and freshly ground black pepper. Give everything a good stir to ensure the seasonings are evenly distributed throughout your mix. This is your chance to taste and adjust – remember, the flavors will mellow slightly during baking, so don’t be shy with the seasoning!
Assembling Your Magnificent Garbage Bread:
- Lay the Foundation of Flavor (Sauce Layer): Once your dough is rolled out into a rectangle (let’s aim for that 12×18 inch size), I like to spread a thin, even layer of marinara or pizza sauce over the entire surface, leaving about a 1-inch border clear around all the edges. This border is critical for sealing your bread later on. The sauce adds a lovely tang and moisture, preventing the bread from being dry and enhancing the savory notes of your fillings. Don’t go overboard with the sauce; a thin layer is all you need to impart fantastic flavor without making the bread soggy.
- Distribute the Cheese Layer: Now, evenly sprinkle about two-thirds of your mixed cheese blend over the sauce. This cheese layer acts as a barrier, helping to prevent the sauce from making the dough too soft, and it also contributes to that incredible cheesy pull we all love. Make sure it’s spread out almost to that 1-inch border you established earlier.
- Pile on Your Creative Fillings: Next, spoon your well-seasoned protein and vegetable mixture over the cheese layer. Distribute it as evenly as possible across the entire surface, again, staying within that 1-inch border. The goal here is to get a little bit of everything in every bite. This is where you can truly appreciate the versatility of “Garbage Bread A Deliciously Creative Way To Reduce Food Waste” as you see all your delicious repurposed ingredients coming together beautifully! Don’t overfill, but don’t be shy either; we want a generously stuffed loaf.
- Top with More Cheese: Sprinkle the remaining one-third of your cheese blend over the filling. This top layer of cheese will melt down, helping to bind the fillings together and create that irresistible cheesy texture throughout the loaf.
- The Art of Rolling: Now, for the critical step of rolling. Starting from one of the long sides of your rectangle, carefully and tightly roll the dough towards the opposite long side. Imagine you’re rolling up a sleeping bag or a delicious culinary scroll! Be firm but gentle, ensuring the roll is snug but not so tight that the fillings burst through the dough. Keep the roll as uniform in thickness as possible. This step requires a bit of patience, but the result is well worth the effort.
- Seal the Seams: Once you’ve rolled the dough into a log, you’ll have a seam where the edge meets the main roll. Gently pinch this seam closed along its entire length. You want to make sure it’s well-sealed to prevent any glorious filling from escaping during baking. I like to crimp it gently with my fingers, almost like you would a pie crust, to ensure a good seal. Also, gently tuck and pinch the ends of the roll inwards, sealing them securely to create a neat, contained loaf. This prevents any fillings from oozing out the sides.
- Transfer to Baking Sheet: Carefully transfer your rolled “Garbage Bread” log to your prepared parchment-lined baking sheet, making sure the seam side is facing down. This helps to reinforce the seal during baking.
- Prepare for Baking (Egg Wash & Vents): In a small bowl, whisk together your egg with 1 tablespoon of water to create an egg wash. Using a pastry brush, generously brush the entire surface of your bread log with this egg wash. This magical step will give your bread a beautiful, glossy, golden-brown crust and helps those optional sesame or poppy seeds stick. If you’re using sesame or poppy seeds, sprinkle them evenly over the top now. Finally, using a sharp knife, cut 3-4 diagonal slits (about ½ inch deep) across the top of the loaf. These vents are essential; they allow steam to escape during baking, preventing your bread from exploding and ensuring an evenly cooked interior with a wonderfully crisp crust.
Baking to Golden Perfection:
- Bake Your Garbage Bread: Carefully slide your baking sheet into the preheated 400°F (200°C) oven. The baking time will typically be between 25-35 minutes, but keep a close eye on it, as oven temperatures can vary. You’re looking for a beautiful, deep golden-brown crust all over the top and sides. The egg wash should have given it a lovely sheen, and you might even see some of the glorious cheese bubbling ever so slightly through the vents. The internal temperature, if you were to check it, should reach around 190-200°F (88-93°C) to indicate it’s fully cooked through.
- Rotate for Even Baking: Around the 15-20 minute mark, I usually like to rotate the baking sheet 180 degrees. This simple step helps ensure that your “Garbage Bread A Deliciously Creative Way To Reduce Food Waste” bakes evenly on all sides, preventing one side from becoming overly browned while the other remains pale.
- Check for Doneness: Don’t be afraid to give your loaf a gentle tap – it should sound hollow if it’s perfectly baked. If you notice it browning too quickly on top before it’s cooked through, you can loosely tent it with aluminum foil for the remaining baking time.
Serving Your Masterpiece:
- Rest Before Slicing: This step is just as important as any other, I promise! Once your “Garbage Bread” emerges from the oven, golden and fragrant, resist the urge to slice into it immediately. Transfer the baking sheet to a wire rack and allow the bread to rest for at least 10-15 minutes. Why the wait? Resting allows the melted cheese and internal fillings to set up, preventing them from oozing out excessively when sliced, and ensuring each piece holds its shape beautifully. It also allows the internal temperatures to equalize, resulting in a more pleasant eating experience.
- Slice and Serve: After its well-deserved rest, use a sharp serrated knife to slice the bread into thick, hearty portions, typically about 1 ½ to 2 inches wide. The serrated edge will cut through the crust and fillings cleanly, giving you perfect slices.
- Enjoy! Serve your incredible “Garbage Bread A Deliciously Creative Way To Reduce Food Waste” warm, either on its own or with extra marinara sauce for dipping. It’s perfect for a casual dinner, an appetizer for a gathering, or even a delicious lunch. The beauty of this recipe is its versatility and the joy of transforming potential waste into something truly extraordinary and utterly delicious. Every bite is a testament to creative cooking!

Conclusion:
So, as we wrap up our culinary journey with this incredible recipe, I truly hope you’re feeling as excited as I am about the endless possibilities it offers. This isn’t just another dish; it’s a revelation, a testament to the power of simple ingredients transformed into something extraordinary. What truly sets this recipe apart, making it an absolute must-try in every kitchen, is its remarkable versatility and inherent ability to surprise and delight. It’s perfect for those busy weeknights when time is short but the craving for something genuinely satisfying is strong. It’s also a fantastic solution for those moments when your refrigerator has a medley of odds and ends that are just begging for a purpose. And that, my friends, is precisely why I’ve come to cherish this creation: it embodies the spirit of Garbage Bread A Deliciously Creative Way To Reduce Food Waste.
Imagine a dish that’s both wonderfully comforting and excitingly adaptable. This bread delivers a symphony of flavors and textures in every bite – a crispy exterior, a soft, yielding interior, and a delightful explosion of whatever savory fillings you choose to tuck inside. It’s hearty without being heavy, flavorful without being complicated, and utterly satisfying in a way that few dishes manage to achieve. Whether you’re feeding a hungry family, entertaining friends, or simply looking for a delightful treat for yourself, this recipe rises to every occasion with grace and deliciousness. It democratizes gourmet eating, proving that exceptional flavor doesn’t require expensive ingredients or complex techniques. It’s proof that with a little creativity, you can turn forgotten ingredients into the star of your meal. It empowers you to be an ingenious home cook, transforming potential waste into culinary gold, all while saving money and reducing your environmental footprint. This is more than just a recipe; it’s a mindful approach to cooking that doesn’t compromise on taste or enjoyment.
Now, let’s talk about taking your Garbage Bread experience to the next level. While it’s absolutely phenomenal straight out of the oven, perhaps with a simple dab of butter, there are so many ways to enjoy and enhance it.
Dipping Delights:
My absolute favorite way to serve this is alongside an array of dipping sauces. Think about a warm, bubbly marinara sauce for that classic pizza-like vibe, or a creamy ranch dressing for a cool contrast. A rich garlic butter sauce, infused with fresh herbs, would also be an incredible addition, making each bite even more luxurious. Don’t shy away from a tangy honey mustard or even a spicy sriracha mayo if you’re feeling adventurous! For a more refined touch, a homemade pesto or an olive tapenade can elevate the flavors even further, offering a sophisticated counterpoint to the rustic charm of the bread.
Perfect Pairings:
This versatile bread also makes an excellent companion to other dishes. Imagine a slice served with a comforting bowl of tomato soup on a chilly evening, or as a hearty side to a crisp, fresh green salad. It can even hold its own as a light lunch or dinner, especially when packed with an abundance of fillings. For a more substantial meal, I often pair it with a simple protein like grilled chicken or a baked fish, allowing the bread to be the flavorful, carb-rich star of the plate. It’s fantastic for potlucks and picnics too, as it travels well and is always a crowd-pleaser, easy to eat whether hot or at room temperature.
Ingredient Innovations:
The beauty of this recipe truly lies in its flexibility. Don’t hesitate to get creative with your fillings! If you’re a cheese lover, try a blend of mozzarella, cheddar, and provolone for maximum meltiness. For meat enthusiasts, cooked crumbled sausage, pepperoni, shredded chicken, or even leftover pulled pork are fantastic additions. Vegetarians can rejoice with options like sautéed mushrooms, bell peppers, onions, spinach, roasted garlic, or artichoke hearts. Experiment with different seasonings too – a pinch of Italian herbs, a dash of red pepper flakes for heat, or even some smoked paprika can totally transform the flavor profile. You could even swap out the type of dough if you’re feeling bold – a puff pastry would yield a flakier texture, while a homemade pizza dough would offer a chewier bite. The possibilities are genuinely limitless, limited only by your imagination and the contents of your pantry and fridge. Don’t be afraid to mix and match; that’s where the real magic happens!
So, what are you waiting for? I wholeheartedly encourage you to roll up your sleeves, gather your ingredients (especially those overlooked bits and bobs!), and dive into making this incredible Garbage Bread. It’s an experience that’s not just about creating a meal, but about discovering joy in the kitchen and realizing the potential of what you already have. I promise you, the aroma filling your home as it bakes will be utterly intoxicating, and the taste will be nothing short of delightful.
Once you’ve experienced the magic for yourself, I would absolutely love to hear about it! Please come back and share your culinary adventures in the comments below. What fillings did you choose? Did you create any unique dipping sauces? Did you surprise your family with this delightful creation? Your experiences and adaptations are what make this community so vibrant and inspiring. Don’t forget to tell us how this recipe helped you turn potential food waste into a truly delicious triumph. Happy baking, my friends, and enjoy every glorious bite!
Creative Garbage Bread Recipe: Reduce Food Waste Deliciously
Garbage Bread – a deliciously creative way to reduce food waste. Some of the most satisfying and surprisingly gourmet meals are born from forgotten treasures lurking in your fridge. This recipe transforms humble leftovers into magnificent feasts, celebrating ingenuity and sustainability. People adore this dish for its warm, golden, crispy crust encasing a savory, cheesy, and utterly customizable filling. It’s incredibly versatile, offering endless flavor combinations. The name ‘Garbage Bread’ highlights the creativity involved in using ‘garbage’ or leftover ingredients, encouraging you to think outside the box and use what you have, making every morsel count.
Ingredients
-
2 pounds store-bought pizza dough
-
2 cups shredded mozzarella cheese
-
1 cup shredded provolone cheese
-
½ cup grated Parmesan cheese
-
Optional: ½ cup shredded cheddar, Gruyère, or Monterey Jack cheese
-
1-2 cups total cooked protein, chopped (e.g., chicken, diced cooked beef, crumbled cooked beef sausage, sliced or diced cooked beef pepperoni, cooked beef bacon bits, thinly sliced beef salami, leftover cooked steak)
-
1-2 cups total finely diced/sautéed vegetables (e.g., 1 cup fresh spinach, ½ cup mushrooms, ½ cup bell peppers, ¼ cup red or yellow onion, 2 cloves minced garlic, leftover roasted vegetables, chopped olives, sun-dried tomatoes, or artichoke hearts)
-
2 tablespoons olive oil
-
1 teaspoon dried Italian seasoning
-
½ teaspoon garlic powder
-
¼ teaspoon onion powder
-
Salt and freshly ground black pepper, to taste
-
¼ cup marinara sauce or pizza sauce, plus extra for dipping
-
1 large egg, whisked with 1 tablespoon water
-
1 tablespoon sesame seeds or poppy seeds (optional)
Instructions
-
Step 1
Allow dough to reach room temperature (30-60 minutes). Preheat oven to 400°F (200°C) and line a baking sheet with parchment paper. -
Step 2
Lightly flour a surface. Divide dough in half and roll each portion into a 12×18 inch, ¼-inch thick rectangle. -
Step 3
Finely chop or shred all cooked proteins (1-2 cups total). -
Step 4
Sauté fresh vegetables (onions, bell peppers, garlic, mushrooms, spinach) in 2 tablespoons olive oil until softened. Cool and squeeze out any excess liquid. -
Step 5
In a bowl, combine mozzarella, provolone, Parmesan, and any optional cheeses. -
Step 6
Mix chopped proteins, cooked and drained vegetables, other additions (olives, sun-dried tomatoes), Italian seasoning, garlic powder, onion powder, salt, and pepper. -
Step 7
Spread a thin layer of marinara or pizza sauce on the rolled dough, leaving a 1-inch border. -
Step 8
Evenly sprinkle two-thirds of the cheese blend over the sauce, then layer with the seasoned protein and vegetable mixture, staying within the border. -
Step 9
Top with the remaining one-third of the cheese blend. -
Step 10
Starting from a long side, tightly roll the dough into a log. Pinch the seam and ends closed to seal securely. -
Step 11
Carefully transfer the log, seam-side down, to the prepared baking sheet. -
Step 12
Whisk egg with 1 tablespoon water for an egg wash. Brush generously over the log. Sprinkle with optional sesame or poppy seeds. Cut 3-4 diagonal slits (½ inch deep) across the top. -
Step 13
Bake in the preheated oven for 25-35 minutes, or until deep golden brown, rotating halfway through. -
Step 14
Let rest on a wire rack for 10-15 minutes before slicing into 1½-2 inch thick portions. -
Step 15
Serve warm, with extra marinara sauce for dipping if desired.
Important Information
Nutrition Facts (Per Serving)
It is important to consider this information as approximate and not to use it as definitive health advice.
Allergy Information
Please check ingredients for potential allergens and consult a health professional if in doubt.
Leave a Comment