
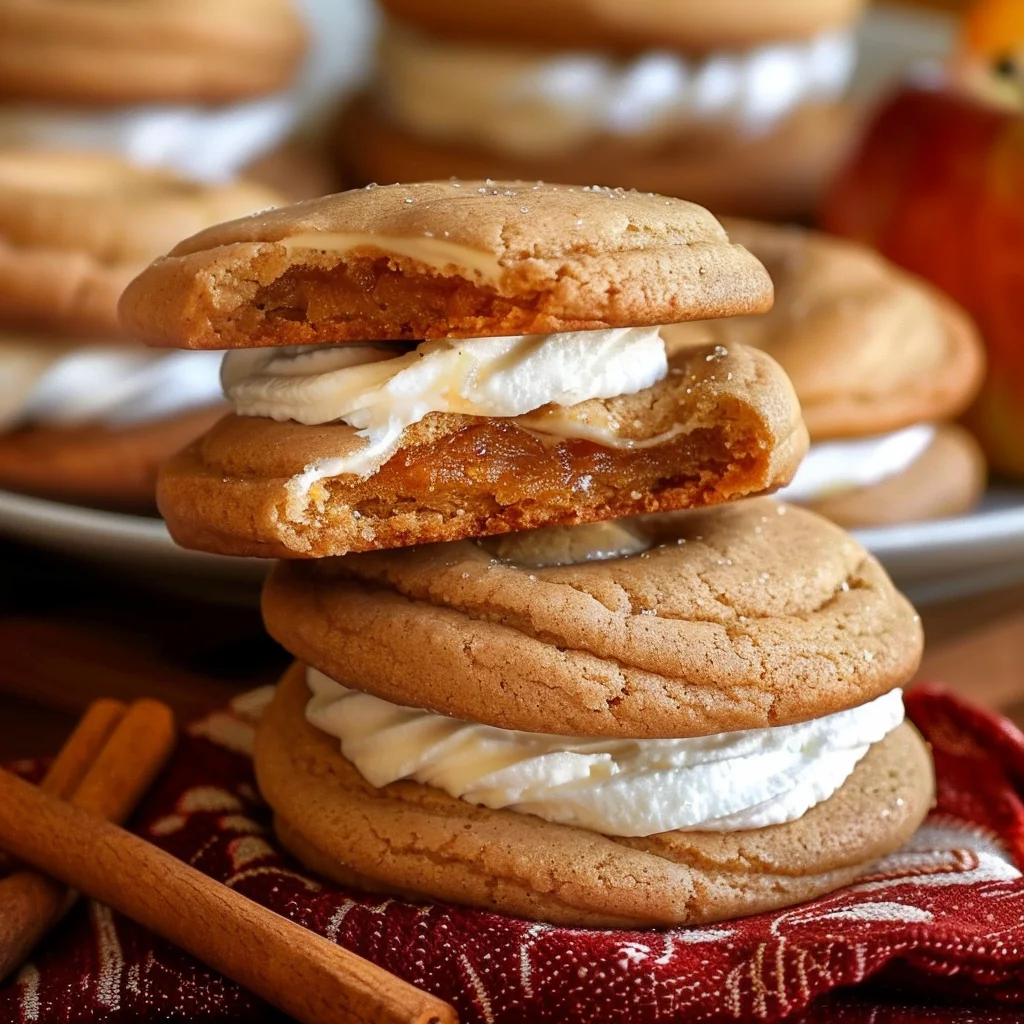
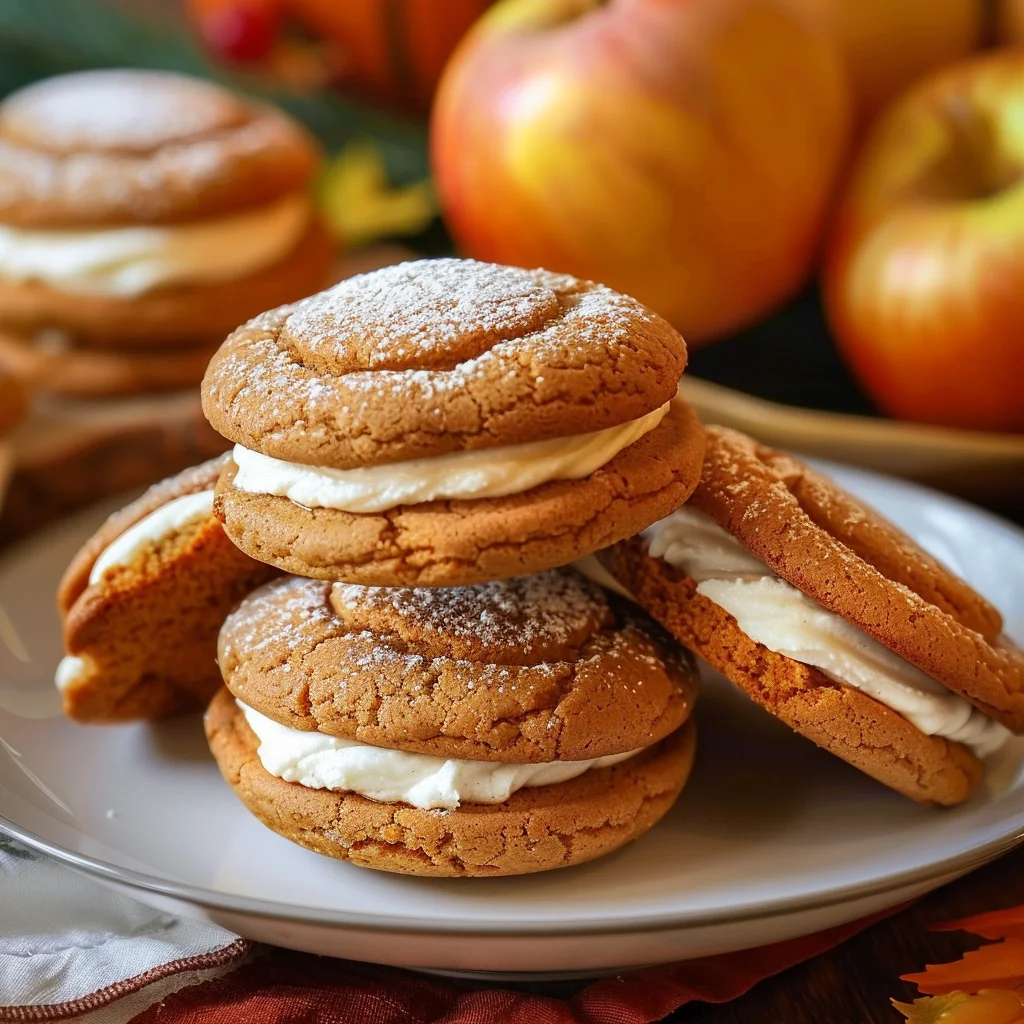
Apple Cider Whoopie Pie Cookies are truly a quintessential autumn treat that I am absolutely thrilled to share with you today. Imagine the crisp, vibrant taste of freshly pressed apple cider, perfectly encapsulated within two tender, cake-like cookies, generously filled with a velvety smooth, spiced cream cheese frosting. This delightful twist on a classic American dessert—traditionally hailing from New England and Pennsylvania Dutch country—brings together the nostalgic comfort of a homemade whoopie pie with the seasonal magic of fall. People adore this dish not only for its irresistible combination of tangy apple, warm spices, and sweet creaminess but also for its wonderfully soft and chewy texture.
Each bite offers a harmonious balance of flavors and sensations that instantly transports you to a cozy, autumn afternoon. The charm of these Apple Cider Whoopie Pie Cookies lies in their ability to evoke warmth and joy, making them a perfect addition to any seasonal gathering or a quiet moment of personal indulgence. They’re convenient, satisfying, and simply unforgettable.

Ingredients:
- For the Reduced Apple Cider Concentrate:
- 3 cups (720ml) unfiltered apple cider (I always prefer a good quality, cloudy cider for the best flavor!)
- For the Apple Cider Whoopie Pie Cookies:
- 2 ¾ cups (340g) all-purpose flour, spooned and leveled (Make sure it’s not too packed in there!)
- 1 teaspoon baking soda
- ½ teaspoon baking powder
- ½ teaspoon salt (Just enough to balance all that wonderful sweetness)
- 1 teaspoon ground cinnamon
- ½ teaspoon ground nutmeg
- ¼ teaspoon ground ginger (A little kick always makes things interesting!)
- ½ cup (113g) unsalted butter, softened to room temperature (This is crucial for a smooth batter, so plan ahead!)
- 1 cup (200g) granulated sugar
- ½ cup (100g) packed light brown sugar (The brown sugar adds a lovely depth of flavor and moisture.)
- 2 large eggs, also at room temperature
- 2 teaspoons pure vanilla extract (Don’t skimp on the good stuff here!)
- ½ cup (120ml) buttermilk (If you don’t have buttermilk, you can make your own by adding ½ tablespoon of lemon juice or white vinegar to regular milk and letting it sit for 5 minutes.)
- ¼ cup (60ml) reduced apple cider concentrate (from the preparation above)
- For the Apple Cider Cream Cheese Filling:
- 8 ounces (226g) full-fat cream cheese, softened to room temperature (Again, room temperature is key for a lump-free filling!)
- ½ cup (113g) unsalted butter, softened to room temperature
- 4 cups (480g) powdered sugar (confectioners’ sugar), sifted (Sifting helps immensely in avoiding a grainy filling.)
- 1 teaspoon pure vanilla extract
- 2 tablespoons reduced apple cider concentrate (from the preparation above)
- Pinch of ground cinnamon or nutmeg (optional, but highly recommended for an extra layer of flavor)
Phase 1: Preparing the Reduced Apple Cider Concentrate
-
Reduce the Apple Cider: Pour your 3 cups of unfiltered apple cider into a medium saucepan. Place it over medium-high heat and bring it to a gentle boil. Once it’s boiling, reduce the heat to medium-low and let it simmer.
Why do we do this?
We’re concentrating the apple cider flavor significantly. As the water evaporates, the natural sugars and robust apple notes become much more intense, which is exactly what we want for a truly “Apple Cider Whoopie Pie Cookie” experience! This is a step I never skip because it elevates the whole dish.
- Simmer Until Reduced: Continue to simmer the cider, stirring occasionally, until it has reduced to about ½ cup. This can take anywhere from 20 to 35 minutes, depending on your stovetop and the width of your saucepan. Keep a close eye on it, especially as it gets closer to the ½ cup mark, as it can go from perfect to overly thick very quickly. It should look syrupy and smell wonderfully fragrant.
- Cool Completely: Once reduced, remove the saucepan from the heat and carefully pour the concentrate into a heatproof bowl or measuring cup. Allow it to cool completely to room temperature before using it in the cookie batter and the filling. I sometimes even pop it in the fridge for a few minutes to speed things up if I’m in a hurry, but never add it warm to your batter or filling! We need it cool to maintain the integrity of our other ingredients.
Phase 2: Preparing the Apple Cider Whoopie Pie Cookie Batter
- Preheat and Prepare: First things first, preheat your oven to 350°F (175°C). Line two large baking sheets with parchment paper. This is essential for preventing sticking and ensuring easy cleanup. Trust me, nobody likes scrubbing sticky whoopie pie bottoms off a baking sheet!
- Whisk Dry Ingredients: In a medium bowl, combine your all-purpose flour, baking soda, baking powder, salt, ground cinnamon, ground nutmeg, and ground ginger. Use a whisk to thoroughly combine these ingredients. Whisking isn’t just mixing; it also helps to aerate the flour and distribute the leavening agents evenly, which leads to a lighter, more uniform cookie texture. This is a small but important detail!
- Cream Butter and Sugars: In a large mixing bowl, using an electric mixer (either a stand mixer with the paddle attachment or a handheld mixer), beat the softened unsalted butter on medium speed until it’s light and creamy, about 1-2 minutes. Then, add the granulated sugar and light brown sugar. Continue beating on medium-high speed for another 2-3 minutes, until the mixture is truly light, fluffy, and pale in color. This creaming process incorporates air, which is vital for the tender, cake-like texture of whoopie pies.
- Add Eggs and Vanilla: Scrape down the sides of the bowl with a rubber spatula. Add the two large eggs, one at a time, beating well after each addition until fully incorporated. Follow with the pure vanilla extract, beating just until combined. Your mixture should look smooth and cohesive at this point.
-
Alternate Wet and Dry Ingredients: Now, we’re going to combine the dry mixture and the wet mixture. This needs to be done carefully to avoid overmixing.
- Add about one-third of the dry ingredients to the butter mixture and beat on low speed until just combined.
- Next, add half of the buttermilk and half of the cooled apple cider concentrate to the bowl, beating on low speed until just incorporated.
- Repeat this process: add another third of the dry ingredients, then the remaining buttermilk and apple cider concentrate.
- Finally, add the last third of the dry ingredients. Beat on low speed just until no streaks of flour remain. It is absolutely crucial not to overmix the batter at this stage. Overmixing develops the gluten in the flour too much, leading to tough, dense cookies instead of the soft, pillowy whoopie pies we’re aiming for. A few lumps are fine!
Phase 3: Baking the Whoopie Pie Cookies
- Scoop the Batter: Using a medium cookie scoop (about 1.5 tablespoons capacity) or two spoons, drop rounded spoonfuls of batter onto the prepared baking sheets. Make sure to leave about 2 inches of space between each dollop of batter, as they will spread while baking. You want to aim for evenly sized cookies so they can be easily matched up for filling later. I like to make sure each cookie is relatively uniform for aesthetic appeal! If you’re feeling fancy, you can also use a piping bag with a round tip to create perfect, uniform circles.
- Bake to Perfection: Bake one baking sheet at a time in your preheated oven for 10-12 minutes. The exact baking time can vary depending on your oven, so keep an eye on them. The cookies are done when the edges are lightly golden and the tops spring back when gently touched. They should still feel quite soft to the touch, as they firm up as they cool. You definitely don’t want to overbake them, or they’ll lose that signature whoopie pie tenderness.
- Cooling Process: Once baked, remove the baking sheets from the oven and let the cookies cool on the sheets for about 5 minutes. This allows them to set slightly before you move them. After 5 minutes, carefully transfer the cookies to a wire rack to cool completely. It’s paramount that the cookies are completely cool before you attempt to fill them. If they’re even a little warm, your beautiful cream cheese filling will melt and create a messy situation! Patience is a virtue here.
Phase 4: Preparing the Apple Cider Cream Cheese Filling
- Beat Cream Cheese and Butter: In a large mixing bowl, using your electric mixer, beat the softened cream cheese and softened unsalted butter together on medium speed for 2-3 minutes. You want this mixture to be incredibly smooth, light, and free of any lumps. Starting with properly softened ingredients is non-negotiable for a silky-smooth filling.
-
Gradually Add Powdered Sugar: With the mixer on low speed, gradually add the sifted powdered sugar, one cup at a time. Beat until each addition is fully incorporated before adding the next. Once all the sugar is in, increase the speed to medium-high and beat for another 2-3 minutes. Scrape down the sides of the bowl often to ensure everything is mixed in evenly. The filling should become wonderfully light and fluffy.
Sifting the sugar is important!
Powdered sugar often contains tiny clumps, and sifting it prevents these from making your filling grainy. I learned this the hard way years ago, and now it’s a step I never skip for smooth, creamy fillings.
- Incorporate Flavorings: Add the pure vanilla extract and the 2 tablespoons of cooled reduced apple cider concentrate to the filling. If you’re using it, add a pinch of ground cinnamon or nutmeg now too. Beat on medium speed until everything is well combined and the filling is uniform in consistency and flavor.
- Achieve Lightness: Give the filling one last good whip on medium-high speed for about 30 seconds. This incorporates more air, making the filling extra light and fluffy, perfect for piping and spreading.
Phase 5: Assembling the Apple Cider Whoopie Pie Cookies
- Pair Up Your Cookies: Once your whoopie pie cookie halves are completely cooled, take a moment to pair them up by size. Try to find two halves that are roughly the same diameter. This makes for a neater and more professional-looking whoopie pie. I usually lay them all out and play a little matching game!
-
Fill the Whoopie Pies: You have a couple of options here. You can either use a spoon or an offset spatula to spread a generous amount of filling onto the flat side of one cookie half. Alternatively, for a neater and often more satisfying presentation, you can transfer the cream cheese filling to a piping bag fitted with a large round tip (or simply snip off the corner of a sturdy freezer bag). Pipe a generous swirl of filling onto the flat side of one cookie half, leaving a little space around the edge.
Don’t be shy with the filling!
A good whoopie pie needs a substantial layer of creamy deliciousness in the middle. This isn’t the time to be stingy, as the filling is a core component of the “Apple Cider Whoopie Pie Cookie” experience!
- Create the Sandwich: Gently place another cookie half on top of the filling, pressing down lightly until the filling spreads almost to the edges. Be careful not to press too hard, or you’ll squeeze all your wonderful filling out!
- Serve and Store: Your Apple Cider Whoopie Pie Cookies are now ready to be enjoyed! These are best stored in an airtight container in the refrigerator due to the cream cheese filling. They will keep well for up to 3-4 days. I find they’re often even better the next day once the flavors have had a chance to meld together fully. If you prefer a firmer filling, you can chill them for about 30 minutes before serving. Enjoy every single spiced, creamy, apple-cider infused bite!
Conclusion:
If there’s one recipe I urge you to try this season, it’s these incredible treats. We’ve journeyed through the creation of a dessert that isn’t just a simple cookie; it’s an experience, a delightful hug for your taste buds, perfectly encapsulating the warmth and spice of autumn. These aren’t just any cookies; they are a celebration of fall, a symphony of flavors that come together in perfect harmony. The moment you bite into one, you’ll understand why I’m so enthusiastic. The soft, cake-like texture of the cookies, infused with the subtle tang and fragrant spice of apple cider, provides the most exquisite foundation. Then comes that luscious, creamy filling – a sweet, slightly tangy counterpoint that melts in your mouth, creating a truly unforgettable sensation. It’s the kind of dessert that elicits happy sighs and immediate requests for the recipe, trust me. I’ve seen it happen! This isn’t merely about baking; it’s about crafting moments of joy, sharing warmth, and creating memories with every single delicious bite. The balance of the spiced cookie and the rich, smooth filling is what elevates these from a simple snack to a truly distinguished dessert, making them an absolute must-bake for anyone who appreciates the finer nuances of fall flavors.
Serving Suggestions & Creative Variations
Once you’ve mastered the classic version, the fun truly begins with how you choose to serve and adapt these delightful creations. While they are undeniably perfect on their own, perhaps with a steaming mug of coffee or a comforting cup of spiced tea, imagine elevating the experience even further. For a sophisticated autumnal gathering, consider serving them alongside small glasses of warm, mulled apple cider, allowing the flavors to beautifully echo each other. They also make an absolutely stunning dessert following a hearty Sunday roast or a cozy dinner party, offering a light yet satisfying end to your meal.
Elevate Your Apple Cider Whoopie Pie Cookies:
- Filling Twists: Don’t hesitate to experiment with the filling. A maple cream cheese frosting would introduce an extra layer of autumnal sweetness and a beautiful depth of flavor. Alternatively, a brown butter frosting would impart a nutty, caramelized note that complements the apple cider beautifully. Even a classic vanilla bean buttercream, prepared with high-quality vanilla, can offer a wonderfully rich contrast.
- Cookie Enhancements: For an added textural dimension, consider folding a handful of finely chopped pecans or walnuts into the cookie batter before baking. The slight crunch and nutty flavor would be a delightful surprise. A sprinkle of flaky sea salt on top of the finished pies before the filling sets can also enhance all the sweet notes. You could also swirl a little extra cinnamon sugar on top of the cookie before baking for a sparkling finish.
- Presentation Matters: A light dusting of cinnamon or nutmeg over the finished pies can add both aroma and visual appeal. For a truly decadent touch, a delicate drizzle of homemade caramel sauce over each assembled cookie would be absolutely divine, especially if you’re serving them as a plated dessert. Or, consider garnishing with a tiny, thinly sliced candied apple chip on top of the filling for an elegant touch.
These variations aren’t just about changing ingredients; they’re about personalizing your baking, making the recipe truly your own, and exploring new flavor profiles within a beloved framework.
Your Culinary Journey Awaits!
I truly hope you feel inspired to dive into your kitchen and give these a try. There’s an unparalleled joy in creating something so delicious from scratch, especially when the end result is as comforting and delightful as these. Imagine the aromas filling your home – that warm, inviting scent of apple and spice mingling in the air. It’s more than just baking; it’s crafting an atmosphere. So, preheat your oven, gather your ingredients, and prepare for a truly rewarding baking experience. I am genuinely excited for you to discover the magic of these treats. Once you’ve baked your batch of these incredible Apple Cider Whoopie Pie Cookies, I would absolutely love to hear about your experience. Did you stick to the classic recipe, or did you venture into some of the variations I suggested? Perhaps you came up with your own unique twist! Please, don’t keep your culinary triumphs to yourself. Share your thoughts, your photos, and any tips you discovered along the way. Your feedback truly brightens my day and helps to build our wonderful community of home bakers. Happy baking, and enjoy every single delightful bite!
Apple Cider Whoopie Pie Cookies
Apple Cider Whoopie Pie Cookies are truly a quintessential autumn treat. Imagine the crisp, vibrant taste of freshly pressed non-alcoholic apple cider, perfectly encapsulated within two tender, cake-like cookies, generously filled with a velvety smooth, spiced cream cheese buttercream frosting. This delightful twist on a classic American dessert brings together the nostalgic comfort of a homemade whoopie pie with the seasonal magic of fall. People adore this dish not only for its irresistible combination of tangy apple, warm spices, and sweet creaminess but also for its wonderfully soft and chewy texture.
Ingredients
-
For the Apple Cider Whoopie Pie Cookies:
-
2 ½ cups all-purpose flour
-
1 tsp baking soda
-
1 tsp baking powder
-
½ tsp salt
-
1 tsp ground cinnamon
-
½ tsp ground nutmeg
-
¼ tsp ground cloves
-
½ cup unsalted butter, softened
-
1 cup light brown sugar, packed
-
1 large egg, room temperature
-
1 tsp vanilla extract
-
¼ cup non-alcoholic apple cider concentrate (reduced from 1 cup non-alcoholic apple cider)
-
½ cup whole milk
-
For the Apple Cider Buttercream Filling:
-
8 oz (226g) full-fat cream cheese, softened
-
½ cup (113g) unsalted butter, softened
-
4 cups (480g) powdered sugar, sifted
-
1 tsp vanilla extract
-
2 tbsp non-alcoholic apple cider concentrate (from above)
-
Pinch ground cinnamon or nutmeg (optional)
Instructions
-
Step 1
Simmer 1 cup non-alcoholic apple cider in a medium saucepan over medium-low heat until reduced to ¼ cup (about 20-35 minutes). Cool concentrate completely to room temperature before use. -
Step 2
Preheat oven to 350°F (175°C). Line two large baking sheets with parchment paper. In a medium bowl, whisk together flour, baking soda, baking powder, salt, cinnamon, nutmeg, and cloves. -
Step 3
In a large mixing bowl, using an electric mixer, beat softened unsalted butter and light brown sugar until light, fluffy, and pale (2-3 minutes). Beat in the egg and vanilla extract until well combined. -
Step 4
Gradually add the dry ingredients alternately with the whole milk and the ¼ cup cooled non-alcoholic apple cider concentrate to the wet mixture, mixing on low speed until just combined. Do not overmix; a few lumps are acceptable. -
Step 5
Scoop rounded 1.5-tablespoon portions of batter onto the prepared baking sheets, leaving 2 inches between each. Bake one sheet at a time for 10-12 minutes, or until edges are lightly golden and tops spring back when gently touched. Cookies should still be soft. -
Step 6
Remove baking sheets from the oven and let cookies cool on the sheets for 5 minutes. Carefully transfer cookies to a wire rack to cool completely. Ensure cookies are entirely cool before filling. -
Step 7
In a large mixing bowl, beat softened full-fat cream cheese and softened unsalted butter with an electric mixer until very smooth and lump-free (2-3 minutes). Gradually add sifted powdered sugar, one cup at a time, on low speed, then increase to medium-high and beat until light and fluffy (2-3 minutes). -
Step 8
Beat in vanilla extract, the 2 tablespoons cooled non-alcoholic apple cider concentrate, and optional pinch of ground cinnamon or nutmeg until well combined and the filling is uniform and fluffy. -
Step 9
Pair cooled cookie halves by size. Spread or pipe a generous amount of filling onto the flat side of one cookie half. Gently place another cookie half on top, pressing lightly until the filling spreads almost to the edges. -
Step 10
Serve immediately or store assembled Apple Cider Whoopie Pie Cookies in an airtight container in the refrigerator for up to 3-4 days. Flavors often meld beautifully overnight.
Important Information
Nutrition Facts (Per Serving)
It is important to consider this information as approximate and not to use it as definitive health advice.
Allergy Information
Please check ingredients for potential allergens and consult a health professional if in doubt.
Leave a Comment