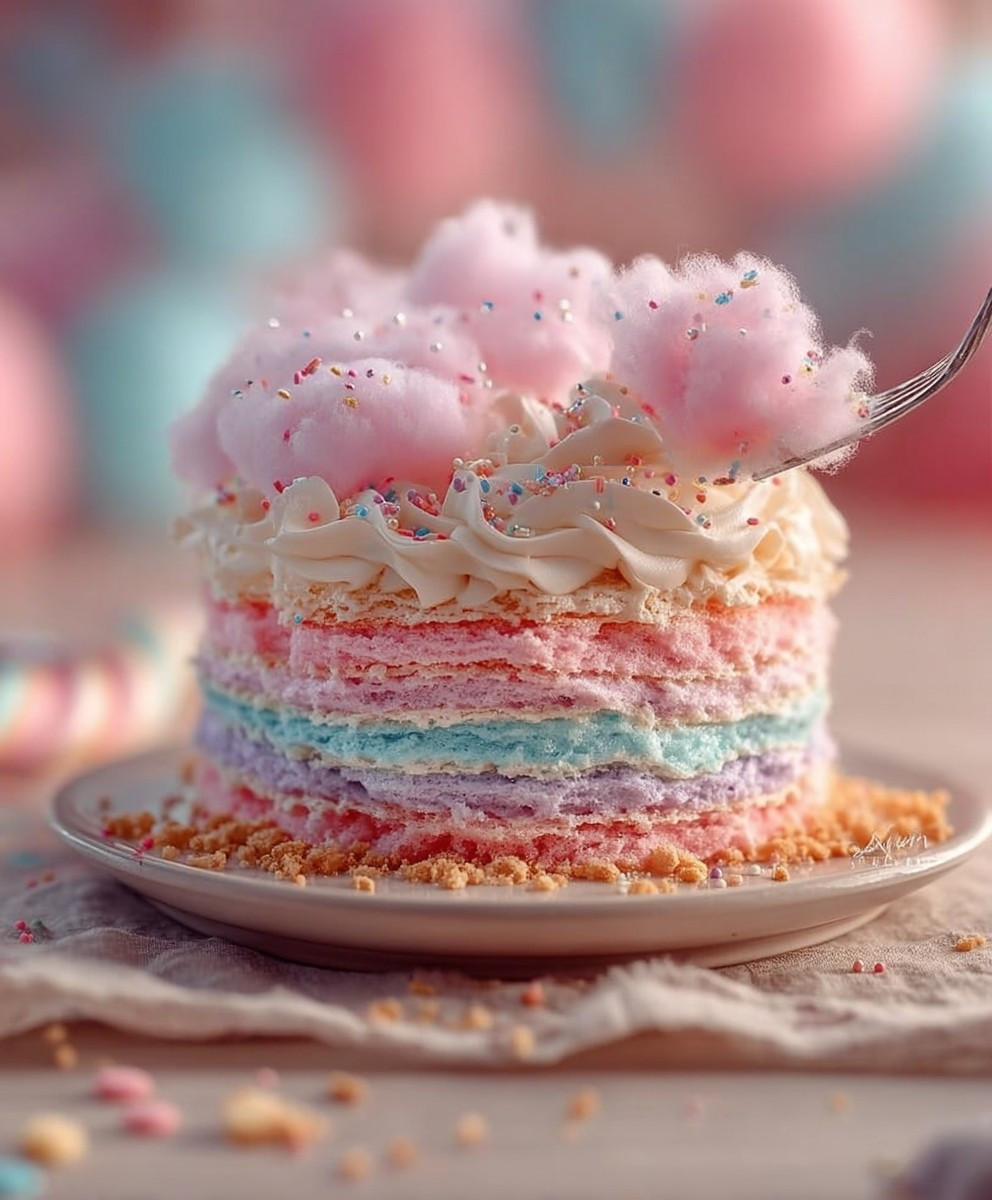
Cotton Candy Cake: just the name conjures up images of whimsical carnivals and sugary sweet delights, doesn’t it? But what if you could capture that fleeting, melt-in-your-mouth experience and transform it into a show-stopping dessert? I’m here to tell you, you absolutely can! Forget everything you thought you knew about cake because this recipe is about to redefine your definition of “delicious.”
While the exact origins of cotton candy are debated, its modern form gained popularity at the 1904 World’s Fair, instantly becoming a symbol of fun and carefree indulgence. This Cotton Candy Cake takes that nostalgic feeling and elevates it to a sophisticated, yet playful, treat. Imagine layers of light and airy cake, infused with the unmistakable flavor of cotton candy, all topped with a creamy, dreamy frosting.
People adore this cake for its unique flavor profile – it’s sweet without being cloying, and the airy texture is simply irresistible. It’s also incredibly fun to make and guaranteed to be a conversation starter at any gathering. Whether you’re celebrating a birthday, a special occasion, or simply craving a taste of childhood, this cake is sure to bring a smile to everyone’s face. Get ready to embark on a baking adventure that’s as delightful to create as it is to devour!
Ingredients:
- For the Cake Layers:
- 2 ½ cups all-purpose flour
- 1 ½ cups granulated sugar
- 3 ½ teaspoons baking powder
- 1 teaspoon salt
- ¾ cup (1 ½ sticks) unsalted butter, softened
- 1 ¼ cups milk
- 2 large eggs
- 1 teaspoon vanilla extract
- ½ teaspoon almond extract
- Pink gel food coloring
- Blue gel food coloring
- For the Cotton Candy Buttercream Frosting:
- 1 cup (2 sticks) unsalted butter, softened
- 6 cups powdered sugar
- ½ cup heavy cream
- 2 teaspoons vanilla extract
- 1 teaspoon cotton candy flavoring (optional, but highly recommended!)
- Pinch of salt
- Pink gel food coloring
- Blue gel food coloring
- For Decoration:
- Cotton candy (enough to generously cover the cake)
- Optional: Edible glitter, sprinkles
Preparing the Cake Layers:
- Preheat and Prepare: I always start by preheating my oven to 350°F (175°C). While it’s heating up, grease and flour three 8-inch round cake pans. This prevents the cakes from sticking and ensures they release cleanly. You can also use parchment paper rounds at the bottom of the pans for extra insurance.
- Combine Dry Ingredients: In a large bowl, whisk together the flour, sugar, baking powder, and salt. Make sure everything is evenly distributed for a consistent cake texture.
- Cream Butter and Add Milk: Add the softened butter to the dry ingredients and mix on low speed until the mixture resembles coarse crumbs. Gradually add the milk, mixing until just combined. Don’t overmix at this stage!
- Add Eggs and Extracts: Add the eggs one at a time, mixing well after each addition. Stir in the vanilla and almond extracts. These extracts really enhance the flavor profile of the cake.
- Divide and Color the Batter: Divide the batter evenly into three bowls. Leave one bowl of batter plain. Add pink gel food coloring to the second bowl and blue gel food coloring to the third bowl. Mix each bowl until you achieve your desired shade of pink and blue. Remember, a little gel food coloring goes a long way!
- Bake the Cakes: Pour the batter into the prepared cake pans. Bake for 25-30 minutes, or until a wooden skewer inserted into the center comes out clean. Keep a close eye on them, as baking times can vary depending on your oven.
- Cool the Cakes: Let the cakes cool in the pans for 10 minutes before inverting them onto a wire rack to cool completely. This prevents them from sticking and allows them to cool evenly. Make sure the cakes are completely cool before frosting!
Making the Cotton Candy Buttercream Frosting:
- Cream the Butter: In a large bowl (or the bowl of a stand mixer), beat the softened butter on medium speed until light and fluffy. This usually takes about 3-5 minutes.
- Add Powdered Sugar: Gradually add the powdered sugar, one cup at a time, beating on low speed until combined. Be careful not to add it all at once, or you’ll end up with a cloud of powdered sugar!
- Add Heavy Cream and Extracts: Add the heavy cream, vanilla extract, and cotton candy flavoring (if using). Beat on medium speed until the frosting is smooth and creamy.
- Add Salt: Add a pinch of salt to balance the sweetness.
- Divide and Color the Frosting: Divide the frosting into three bowls. Leave one bowl of frosting plain. Add pink gel food coloring to the second bowl and blue gel food coloring to the third bowl. Mix each bowl until you achieve your desired shade of pink and blue.
Assembling the Cotton Candy Cake:
- Level the Cakes (Optional): If your cake layers are uneven, use a serrated knife to level them. This will ensure a perfectly stacked cake.
- Frost the First Layer: Place one cake layer (I usually start with the plain one) on a cake stand or serving plate. Spread a generous layer of frosting on top. I like to use the plain frosting for the first layer.
- Add the Second Layer: Carefully place the second cake layer (pink) on top of the frosting. Spread a generous layer of pink frosting on top.
- Add the Third Layer: Carefully place the third cake layer (blue) on top of the frosting.
- Crumb Coat: Apply a thin layer of frosting (I usually use the remaining plain frosting) over the entire cake. This is called a crumb coat, and it seals in any loose crumbs, preventing them from getting into the final layer of frosting. Refrigerate the cake for 30 minutes to allow the crumb coat to set.
- Final Frosting: Apply the remaining frosting to the cake, using a spatula or piping bag to create your desired design. I like to swirl the pink and blue frosting together for a fun, whimsical look.
- Decorate with Cotton Candy: Gently press cotton candy onto the sides and top of the cake. Be generous! This is what makes it a Cotton Candy Cake! The cotton candy will start to dissolve slightly, so it’s best to add it just before serving.
- Add Optional Decorations: If desired, sprinkle edible glitter or sprinkles over the cake for extra sparkle.
- Chill and Serve: Refrigerate the cake for at least 30 minutes before serving. This will help the frosting set and make it easier to slice.
Tips for Success:
- Softened Butter is Key: Make sure your butter is properly softened for both the cake and the frosting. This will ensure a smooth and creamy texture.
- Don’t Overmix: Overmixing the cake batter can result in a tough cake. Mix until just combined.
- Cool Completely: Make sure the cakes are completely cool before frosting. Otherwise, the frosting will melt.
- Cotton Candy Timing: Add the cotton candy just before serving, as it will dissolve over time due to the moisture in the frosting.
- Flavoring Options: If you can’t find cotton candy flavoring, you can use a combination of vanilla and a tiny bit of bubblegum flavoring.
Storage Instructions:
Store the Cotton Candy Cake in the refrigerator in an airtight container. It’s best enjoyed within 2-3 days, as the cotton candy will continue to dissolve over time. You can also freeze the cake layers (unfrosted) for up to 2 months. Wrap them tightly in plastic wrap and then in foil.
Conclusion:
This Cotton Candy Cake isn’t just a dessert; it’s a trip down memory lane, a burst of pure, sugary joy in every single bite! If you’re looking for a show-stopping cake that will impress your friends and family, and leave everyone with a smile on their face, then you absolutely have to try this recipe. The delicate cotton candy flavor, combined with the moist cake and the creamy frosting, creates a symphony of textures and tastes that is simply irresistible.
But the best part? It’s surprisingly easy to make! Don’t let the whimsical appearance fool you. With clear, step-by-step instructions, even beginner bakers can achieve cotton candy cake perfection. I promise, the effort is well worth the reward. Imagine the look on your loved ones’ faces when you present them with this magical creation!
And the fun doesn’t stop there! Feel free to get creative with your serving suggestions and variations. For a truly decadent experience, try serving each slice with a scoop of vanilla bean ice cream and a drizzle of raspberry sauce. The tartness of the raspberry beautifully complements the sweetness of the cake. Or, if you’re feeling adventurous, you could even add a sprinkle of edible glitter for an extra touch of sparkle!
Looking for variations? Consider using different flavors of cotton candy to create a rainbow effect within the cake layers. Imagine a cake with layers of blue raspberry, pink vanilla, and green apple cotton candy – how fun would that be? You could also experiment with different frosting flavors. A cream cheese frosting would add a tangy twist, while a chocolate ganache would create a richer, more indulgent experience. Another fun idea is to incorporate crushed cotton candy into the frosting itself for an extra burst of flavor and texture.
For a more sophisticated presentation, try making individual mini cotton candy cakes. These are perfect for parties or special occasions, and they allow you to control the portion size. You could even decorate them with edible flowers or miniature cotton candy cones.
Don’t be afraid to experiment and make this recipe your own! The possibilities are endless. The key is to have fun and let your creativity shine.
I truly believe that this Cotton Candy Cake is a must-try for anyone who loves baking and wants to create something truly special. It’s a guaranteed crowd-pleaser that will bring joy to any occasion.
So, what are you waiting for? Gather your ingredients, preheat your oven, and get ready to embark on a baking adventure! I’m confident that you’ll love the results.
And most importantly, I’d love to hear about your experience! Once you’ve tried this recipe, please come back and share your thoughts in the comments below. Did you make any variations? What did your friends and family think? I’m eager to see your creations and hear your stories. Happy baking! Let me know if you have any questions, and I’ll do my best to help. I can’t wait to see your amazing cotton candy cakes!
Cotton Candy Cake: Recipe, Tips, and Delicious Variations
Colorful cake layers with cotton candy buttercream, topped with fluffy cotton candy. Perfect for celebrations!
Ingredients
Instructions
Recipe Notes
- Softened butter is key for both the cake and frosting.
- Don’t overmix the cake batter.
- Make sure the cakes are completely cool before frosting.
- Add the cotton candy just before serving, as it will dissolve over time.
- If you can’t find cotton candy flavoring, you can use a combination of vanilla and a tiny bit of bubblegum flavoring.
- Store the Cotton Candy Cake in the refrigerator in an airtight container for up to 2-3 days.
- You can freeze the cake layers (unfrosted) for up to 2 months, wrapped tightly in plastic wrap and then in foil.


Leave a Comment