
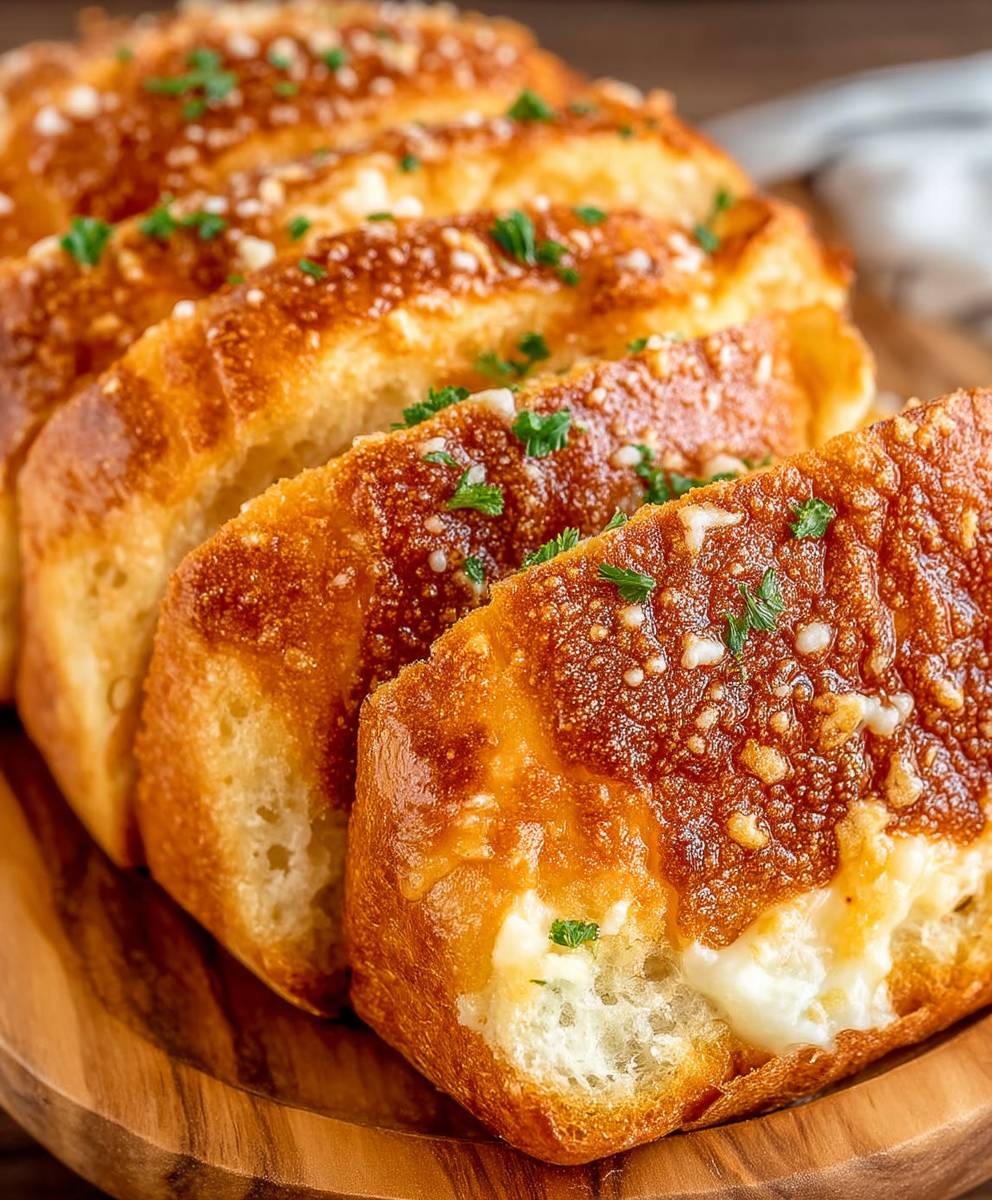
Copycat Raising Cane’s Bread: Is there anything more comforting than a warm, pillowy piece of bread, especially when it perfectly complements crispy chicken fingers and that iconic Cane’s sauce? I think not! For years, I’ve been obsessed with recreating the magic of Raising Cane’s Texas toast in my own kitchen, and after countless attempts, I’ve finally cracked the code. This recipe delivers that same soft, buttery, garlic-infused goodness you crave, all without leaving the comfort of your home.
While Raising Cane’s might not have invented Texas toast, they certainly perfected its fast-food iteration. Texas toast itself has humble beginnings, believed to have originated in (you guessed it!) Texas, as a way to use up slightly stale bread. The genius lies in transforming that bread into something utterly irresistible with butter, garlic, and a quick toasting.
People adore this style of bread for its simplicity and satisfying texture. The slight crispness on the outside gives way to a soft, almost melt-in-your-mouth interior. The buttery garlic flavor is undeniably addictive, making it the perfect accompaniment to just about any meal. Plus, let’s be honest, who can resist a quick and easy bread recipe that tastes this good? This copycat Raising Cane’s bread is sure to become a family favorite!

Ingredients:
- For the Dough:
- 3 1/4 cups (400g) all-purpose flour, plus more for dusting
- 1/4 cup (50g) granulated sugar
- 1 teaspoon salt
- 1 packet (2 1/4 teaspoons) active dry yeast
- 1 cup (240ml) warm milk (about 110°F/43°C)
- 1/4 cup (60ml) warm water (about 110°F/43°C)
- 1/4 cup (60ml) unsalted butter, melted
- 1 large egg, lightly beaten
- For the Garlic Butter Topping:
- 1/2 cup (1 stick, 113g) unsalted butter, softened
- 2 cloves garlic, minced
- 1/4 teaspoon garlic powder
- 1/4 teaspoon dried parsley
- Pinch of salt
Preparing the Dough:
- Activate the Yeast: In a small bowl, combine the warm milk, warm water, sugar, and active dry yeast. Gently stir to dissolve the yeast and sugar. Let it sit for 5-10 minutes, or until foamy. This indicates that the yeast is active and ready to use. If it doesn’t foam, your yeast might be old or your liquid wasn’t warm enough, and you’ll need to start again with fresh yeast.
- Combine Dry Ingredients: In a large mixing bowl, whisk together the flour and salt. Make sure the salt is evenly distributed throughout the flour.
- Add Wet Ingredients: Create a well in the center of the dry ingredients. Pour in the yeast mixture, melted butter, and lightly beaten egg.
- Mix the Dough: Using a wooden spoon or a stand mixer fitted with a dough hook, begin to mix the ingredients together. If using a wooden spoon, stir until a shaggy dough forms. If using a stand mixer, mix on low speed until the dough comes together.
- Knead the Dough:
- By Hand: Turn the dough out onto a lightly floured surface. Knead for 8-10 minutes, or until the dough is smooth, elastic, and no longer sticky. Add a little flour at a time if the dough is too sticky, but be careful not to add too much, as this can make the bread tough.
- With a Stand Mixer: Knead the dough on medium speed for 6-8 minutes, or until it is smooth and elastic. The dough should pull away from the sides of the bowl.
- First Rise: Place the dough in a lightly oiled bowl, turning to coat all sides. Cover the bowl with plastic wrap or a clean kitchen towel. Let the dough rise in a warm place for 1-1.5 hours, or until doubled in size. The warmer the environment, the faster the dough will rise. A good place is in a slightly warmed oven (turned off!) or on top of the refrigerator.
Shaping and Second Rise:
- Punch Down the Dough: Gently punch down the risen dough to release the air. Turn the dough out onto a lightly floured surface.
- Divide the Dough: Divide the dough into 12 equal pieces. I find it easiest to use a kitchen scale to ensure even portions, but you can also eyeball it.
- Shape the Rolls: Roll each piece of dough into a smooth ball. You can achieve this by cupping your hand over the dough and rolling it in a circular motion on the counter.
- Arrange the Rolls: Place the shaped rolls in a lightly greased 9×13 inch baking pan. Arrange them evenly, leaving a little space between each roll. This will allow them to rise and bake properly.
- Second Rise: Cover the pan with plastic wrap or a clean kitchen towel. Let the rolls rise in a warm place for 30-45 minutes, or until they have almost doubled in size.
Preparing the Garlic Butter Topping:
- Combine Ingredients: In a small bowl, combine the softened butter, minced garlic, garlic powder, dried parsley, and salt. Mix well until all ingredients are evenly incorporated. Make sure your butter is truly softened for easy mixing.
Baking the Bread:
- Preheat the Oven: Preheat your oven to 375°F (190°C). Make sure your oven is fully preheated before placing the rolls inside.
- Apply Garlic Butter: Once the rolls have finished their second rise, brush the tops generously with the garlic butter mixture. Be sure to get the butter into all the nooks and crannies.
- Bake: Bake for 20-25 minutes, or until the rolls are golden brown on top and cooked through. The internal temperature should reach around 200°F (93°C). If the tops are browning too quickly, you can tent the pan with aluminum foil.
- Cool Slightly: Remove the rolls from the oven and let them cool in the pan for a few minutes before serving. This will prevent them from falling apart.
- Serve: Serve warm and enjoy! These rolls are best enjoyed fresh.
Tips for Success:
- Use Fresh Yeast: Make sure your yeast is fresh and active for the best results. Expired yeast won’t rise properly.
- Don’t Overheat the Milk and Water: The milk and water should be warm, not hot. If they are too hot, they can kill the yeast.
- Don’t Overknead the Dough: Overkneading can result in tough bread. Knead until the dough is smooth and elastic, but not overly firm.
- Proper Rising Temperature: Find a warm, draft-free place for the dough to rise. A slightly warmed oven (turned off) or a spot on top of the refrigerator works well.
- Even Baking: Rotate the baking pan halfway through baking to ensure even browning.
- Garlic Butter Variations: Feel free to add other herbs or spices to the garlic butter, such as Italian seasoning, rosemary, or thyme.
- Storage: Store leftover rolls in an airtight container at room temperature for up to 2 days. You can also freeze them for longer storage.
Freezing Instructions:
These rolls freeze beautifully! To freeze, let them cool completely after baking. Wrap them tightly in plastic wrap and then place them in a freezer bag. They can be frozen for up to 2-3 months. To thaw, simply let them sit at room temperature for a few hours or overnight. You can also reheat them in a low oven (300°F/150°C) for a few minutes to warm them through.
Reheating Instructions:
If you have leftover rolls, you can reheat them in a few different ways:
- Oven: Preheat your oven to 350°F (175°C). Wrap the rolls in foil and bake for 5-10 minutes, or until warmed through.
- Microwave: Microwave the rolls for 15-30 seconds, or until warmed through. Be careful not to overheat them, as they can become tough.
- Air Fryer: Preheat your air fryer to 320°F (160°C). Place the rolls in the air fryer basket and cook for 3-5 minutes, or until warmed through.
Serving Suggestions:
These copycat Raising Cane’s bread rolls are delicious on their own, but they also pair well with a variety of dishes:
- Chicken Fingers: Of course, they’re perfect with chicken fingers, just like at Raising Cane’s!
- Soup: Serve them alongside your favorite soup for a comforting meal.
- Salad: They make a great addition to a salad.
- Pasta: Use them to soak up the sauce from your favorite pasta dish.
- Sandwiches: Slice them open and use them to make mini sandwiches.
Troubleshooting:
- Dough Not Rising: If your dough isn’t rising, make sure your yeast is fresh and that the milk and water are warm enough. Also, ensure that the room is warm enough for the dough to rise properly.
- Rolls Too Dense: If your
Conclusion:
So, there you have it! This Copycat Raising Cane’s Bread recipe is more than just a side dish; it’s a nostalgic trip to your favorite chicken finger joint, right in your own kitchen. I truly believe this recipe is a must-try for anyone who loves that soft, slightly sweet, and utterly addictive bread. It’s incredibly easy to make, requires minimal ingredients, and delivers maximum flavor. What’s not to love?
I know what you’re thinking: “Is it really *that* good?” And my answer is a resounding YES! The texture is spot-on – perfectly tender and moist, with a subtle sweetness that complements savory dishes beautifully. Plus, the aroma that fills your kitchen while it’s baking is simply divine. It’s the kind of bread that disappears in minutes, leaving everyone wanting more.
But the best part? You can customize it to your liking! While it’s absolutely perfect served warm with a pat of butter (or, let’s be honest, a generous slathering!), there are so many other ways to enjoy this bread.
Serving Suggestions and Variations:
* Alongside Chicken Fingers: Obviously! This bread is the perfect accompaniment to homemade or store-bought chicken fingers. Dip them in your favorite Cane’s sauce copycat recipe for the full experience.
* Sandwich Bread: Slice it up and use it for sandwiches! The soft texture and subtle sweetness make it a fantastic base for everything from deli meats and cheeses to grilled vegetables and spreads. Imagine a turkey and swiss on this bread – heavenly!
* Garlic Bread: Brush the slices with garlic butter and toast them in the oven for a delicious garlic bread alternative. The sweetness of the bread adds a unique twist to this classic side dish.
* Croutons: Cube the bread, toss it with olive oil and your favorite seasonings, and bake until crispy for homemade croutons. They’ll add a touch of sweetness and a delightful texture to your salads.
* Bread Pudding: Use this bread as the base for a decadent bread pudding. The soft texture soaks up the custard beautifully, creating a rich and comforting dessert.
* French Toast: Give your French toast a sweet upgrade by using this bread. The result is a custardy, flavorful breakfast that’s sure to impress.
* Herb Infusion: Add a tablespoon of dried herbs like rosemary, thyme, or oregano to the dough for a savory variation.
* Cheese Addition: Incorporate shredded cheddar or parmesan cheese into the dough for a cheesy and flavorful bread.I’m confident that you’ll love this recipe as much as I do. It’s a crowd-pleaser, a comfort food staple, and a guaranteed way to impress your friends and family. So, what are you waiting for? Gather your ingredients, preheat your oven, and get ready to bake some seriously delicious bread.
I can’t wait to hear about your experience making this Copycat Raising Cane’s Bread! Please, leave a comment below and let me know how it turned out. Did you try any of the variations? What did you serve it with? Share your tips and tricks – I’m always looking for new ways to enjoy this amazing bread. Happy baking!
Copycat Raising Canes Bread: The Ultimate Recipe Guide
Soft, fluffy, and buttery copycat Raising Cane's bread rolls, perfect for pairing with chicken fingers, soup, or any meal!
By: ShareyCategory: AppetizerDifficulty: EasyCuisine: AmericanYield: 12 rollsDietary: VegetarianIngredients
Instructions
Recipe Notes
- Use fresh yeast for the best results.
- Don’t overheat the milk and water; they should be warm, not hot.
- Don’t overknead the dough.
- Find a warm, draft-free place for the dough to rise.
- Rotate the baking pan halfway through baking to ensure even browning.
- Feel free to add other herbs or spices to the garlic butter.
- Store leftover rolls in an airtight container at room temperature for up to 2 days, or freeze for longer storage.
- To freeze, let them cool completely after baking. Wrap them tightly in plastic wrap and then place them in a freezer bag. They can be frozen for up to 2-3 months. To thaw, simply let them sit at room temperature for a few hours or overnight. You can also reheat them in a low oven (300°F/150°C) for a few minutes to warm them through.
Frequently Asked Questions
→ How do I ensure the bread stays moist?Use fresh, ripe ingredients and avoid overmixing the batter. Store in an airtight container.→ Can I substitute ingredients?Yes, you can substitute similar ingredients while maintaining the basic ratios for best results.→ How long does this bread keep?Store tightly wrapped at room temperature for 2-3 days, or refrigerate for up to a week.→ What if I don't have all the spices?You can adjust spices to taste or substitute with similar warming spices.→ Can I freeze this bread?Yes, wrap individual slices and freeze for up to 3 months. Thaw at room temperature before serving.
Leave a Comment