
Classic Apple Crumble isn’t just a dessert; it’s a culinary embrace, a fragrant promise of warmth and comfort that instantly fills your home with an irresistible aroma. I am absolutely delighted to share with you the secrets to mastering this timeless treat, a dish that has charmed generations with its rustic elegance and heartwarming simplicity. From the first spoonful, you’ll understand why this humble yet magnificent dessert holds such a special place in so many hearts.
This cherished British staple boasts a fascinating history, emerging as a beacon of culinary ingenuity during World War II. When ingredients for traditional pastry were scarce, resourceful home cooks ingeniously devised the crumble as a delicious and more accessible alternative to pies. This clever invention quickly soared in popularity, proving that necessity can indeed lead to some of the most enduring and beloved recipes.
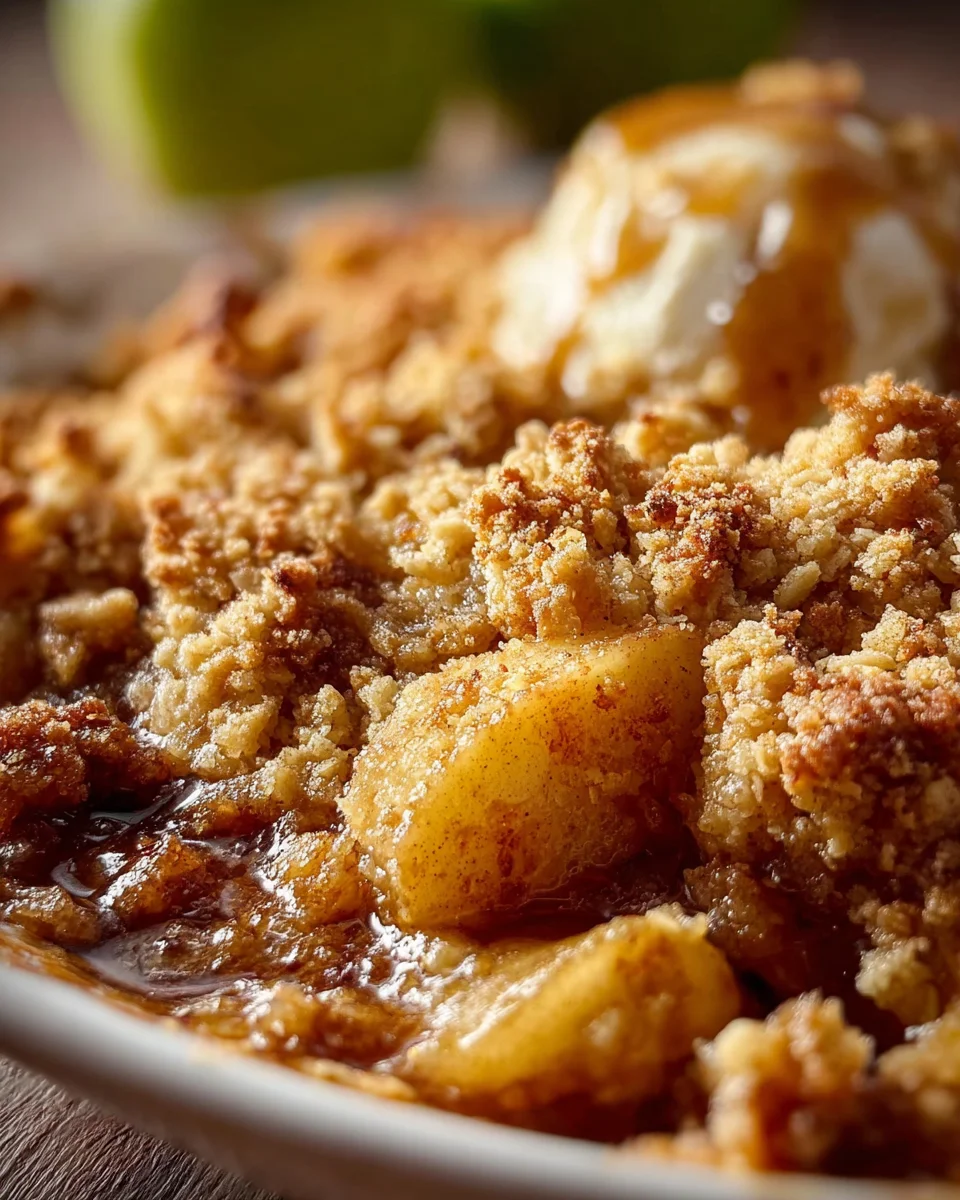
What is it about a perfectly executed Classic Apple Crumble that makes it so universally adored? For me, it’s the glorious contrast: the tender, sweet-tart apples, gently spiced and bubbling beneath a gloriously golden, buttery, and impossibly crisp topping. The satisfying crunch of the streusel against the yielding fruit is pure magic, creating a textural symphony that is simply divine. It’s a dessert that feels both profoundly comforting and effortlessly sophisticated, incredibly simple to prepare, yet always impressive. Prepare yourself for a dessert experience that truly hits all the right notes!

Ingredients:
Oh, gathering the ingredients for a Classic Apple Crumble is such a delightful part of the process! It feels like assembling the building blocks of pure comfort. I always make sure I have everything on hand before I begin, so there are no last-minute dashes to the store. Here’s what you’ll need to create this timeless dessert:
For the Irresistible Apple Filling:
- 6-8 medium-sized cooking apples: I typically reach for varieties like Granny Smith, Braeburn, Honeycrisp, or a mix of a few. Granny Smiths offer a lovely tartness that balances the sweetness, while Braeburns or Honeycrisps add a nice subtle sweetness and hold their shape well. Aim for about 2.5-3 pounds (approximately 1.1-1.4 kg) of apples in total.
- 1/2 cup (100g) granulated sugar: Adjust this amount based on the sweetness of your apples and your personal preference. If your apples are very tart, you might want to add a tablespoon or two more.
- 1/4 cup (50g) light brown sugar: This adds a wonderful caramel note and depth of flavor that granulated sugar alone can’t quite achieve.
- 1 tablespoon all-purpose flour: This acts as a thickener for the apple juices, ensuring your filling isn’t too watery.
- 1 teaspoon ground cinnamon: The quintessential spice for apples, it brings warmth and aroma.
- 1/4 teaspoon ground nutmeg: Just a hint of nutmeg enhances the cinnamon beautifully. Freshly grated is always superior if you have it!
- 1/4 teaspoon allspice (optional): I sometimes add this for an extra layer of complexity and holiday-like spice.
- 1 tablespoon fresh lemon juice: This brightens the flavor of the apples and also helps prevent them from browning too quickly after peeling.
- 2 tablespoons unsalted butter: Cut into small cubes, this gets dotted over the apples for richness and to help them soften deliciously.
For the Golden, Crumbly Topping – The Heart of a Classic Apple Crumble:
- 1 1/2 cups (180g) all-purpose flour: The foundation of our crumble. Sifting it isn’t strictly necessary but can help ensure a lighter texture.
- 1/2 cup (100g) granulated sugar: For sweetness in the topping.
- 1/4 cup (50g) light brown sugar: Again, for that lovely depth and a hint of caramelization in the topping.
- 1/2 teaspoon ground cinnamon (optional): A little cinnamon in the topping complements the filling and adds extra fragrance.
- 1/4 teaspoon salt: Crucial for balancing the sweetness and enhancing all the other flavors in the crumble. Don’t skip it!
- 1 stick (113g or 1/2 cup) unsalted butter: This is key: it absolutely must be very cold and cut into small cubes. Cold butter is what gives you that perfect, crumbly, tender texture.
- 1/2 cup (45g) rolled oats (optional): I often add oats for a slightly chewier texture and a rustic look, which I find adds a wonderful dimension to my Classic Apple Crumble.
- 1/2 cup (50g) chopped nuts (optional): Pecans or walnuts are fantastic additions if you like a bit of crunch.
Equipment I find helpful:
- A 9×13 inch (or similar 2-quart capacity) baking dish.
- Large mixing bowls.
- A vegetable peeler and corer.
- A pastry blender or your fingertips (my preferred tool for the crumble!).
Having everything ready truly sets the stage for a smooth and enjoyable baking experience. Now, let’s get to the fun part: bringing this Classic Apple Crumble to life!
- Preparing the Apple Filling – The Sweet, Tangy Core of Your Classic Apple Crumble
- Preheat Your Oven and Prepare Your Dish: First things first, let’s get the oven ready. Preheat your oven to 375°F (190°C). While it’s heating, lightly grease your 9×13 inch (or similar 2-quart capacity) baking dish with butter or a non-stick cooking spray. This just makes sure nothing sticks, and cleaning up is a breeze.
- Apple Preparation: Now for the apples! Grab your apples and your peeler. I always take a moment to admire the variety of apples I’ve chosen; each one brings something unique to the table. Carefully peel, core, and then slice your apples into roughly 1/4 to 1/2-inch thick pieces. I aim for slices that are uniform in thickness so they cook evenly. Don’t make them too thin, or they’ll turn to mush; too thick, and they won’t soften enough. As you slice them, immediately place them into a very large mixing bowl.
- Seasoning the Apples: Once all your apples are sliced and in the bowl, sprinkle them with the granulated sugar, light brown sugar, all-purpose flour, ground cinnamon, ground nutmeg, and optional allspice. Pour in the fresh lemon juice. Now, with clean hands or a sturdy spoon, gently toss everything together until the apple slices are thoroughly coated with the sugars and spices. You’ll notice the lemon juice starts to prevent browning, which is a neat little trick!
- A Gentle Pre-Cook (My Secret for No Soggy Bottoms): While this step is optional, I swear by it for the absolute best Classic Apple Crumble. Transfer the seasoned apples to a large pot or Dutch oven. Add the 2 tablespoons of cubed unsalted butter. Cook over medium heat for about 5-7 minutes, stirring occasionally, until the apples have softened slightly and released some of their juices. They should still be firm, not mushy, but they’ll look glossy and smell incredible. This brief cook helps to soften the apples just enough so they cook perfectly in the oven and prevents your crumble from having a watery, soggy bottom – a common pitfall! Plus, the flavors really start to meld. Remove from heat.
- Transfer to Baking Dish: Pour the warm, spiced apple filling into your prepared baking dish, spreading it out evenly. At this point, your kitchen will already be smelling heavenly, a true testament to the magic of a Classic Apple Crumble in the making!
- Crafting the Classic Apple Crumble Topping – The Golden Crown
- Combine Dry Ingredients for the Topping: In a separate, large mixing bowl, whisk together the all-purpose flour, granulated sugar, light brown sugar, optional ground cinnamon, and salt. Make sure these are well combined so the sweetness and salt are distributed evenly throughout the topping.
- Incorporate the Cold Butter: Now for the most important part! Add the very cold, cubed unsalted butter to the dry ingredients. You have a few options for incorporating it:
- Using Your Fingertips (My Preferred Method): This is my go-to because I can really feel the texture. Work the butter into the flour mixture by rubbing it between your thumbs and fingertips. You’re aiming for a mixture that resembles coarse breadcrumbs, with some pea-sized pieces of butter still visible. The key is to work quickly so the butter doesn’t get too warm from the heat of your hands.
- Using a Pastry Blender: If you prefer, a pastry blender works wonderfully. Cut the butter into the flour mixture until you reach the desired consistency of coarse crumbs.
- Using a Food Processor (Quickest Method): For a super-fast approach, you can pulse the dry ingredients with the cold butter in a food processor a few times until a coarse crumb forms. Be careful not to overmix, or you’ll end up with a paste instead of a crumble.
The goal is a textured mixture – don’t overwork it! Those little bits of butter are what will melt and create that irresistible crispiness as it bakes.
- Add Optional Oats and Nuts: If you’re including rolled oats or chopped nuts, stir them into the crumble mixture now. They add wonderful texture and flavor, making your Classic Apple Crumble even more substantial and appealing. I love the chewiness the oats bring!
- Assembling and Baking Your Classic Apple Crumble – The Grand Finale
- Top the Filling: Evenly sprinkle the prepared crumble topping over the warm apple filling in your baking dish. Make sure the topping covers the apples from edge to edge. Don’t press it down too firmly; you want it to remain light and crumbly. I like to leave it a bit mounded in the center to create a lovely rustic look.
- Bake to Golden Perfection: Place the baking dish on a baking sheet (to catch any potential drips, though with a good crumble, there shouldn’t be much!) and transfer it to your preheated oven. Bake for 40-50 minutes, or until the topping is a beautiful golden brown, and the apple filling is visibly bubbling around the edges. You should see those delicious juices thickening and bursting through the topping.
- Check for Doneness: If the topping starts to brown too quickly, you can loosely tent the dish with aluminum foil for the last 10-15 minutes of baking. To ensure the apples are perfectly tender, you can gently insert a thin knife or skewer through the crumble into the apples; it should meet little resistance. The aroma filling your kitchen will be your best indicator that something truly wonderful, a Classic Apple Crumble, is nearly ready!
- Serving Suggestions and Tips for Perfection – Enjoying Your Classic Apple Crumble
- Resting is Key: Once out of the oven, allow your Classic Apple Crumble to rest for at least 15-20 minutes before serving. This crucial step allows the filling to set and thicken properly, preventing it from being too runny when you scoop it. It also lets the intense heat dissipate slightly so you don’t burn your tongue in your eagerness!
- Serving Suggestions: This warm, comforting dessert is absolutely sublime on its own, but it truly shines when paired with certain accompaniments. My personal favorite way to serve a Classic Apple Crumble is with a generous scoop of vanilla bean ice cream, allowing it to melt slightly into the warm, spiced apples and crisp topping. Other fantastic options include:
- A dollop of freshly whipped cream.
- A drizzle of rich custard or crème anglaise.
- A spoonful of plain Greek yogurt for a slightly tangier counterpoint.
Don’t be shy with the toppings – they really complete the experience!
- Storage: If you happen to have any leftovers (a rare occurrence in my house!), you can store your Classic Apple Crumble covered in the refrigerator for up to 3-4 days. To reheat, I recommend warming individual portions gently in the microwave or popping the whole dish back into a 350°F (175°C) oven for about 15-20 minutes until heated through and the topping crisps up again.
- Troubleshooting for Your Classic Apple Crumble:
- Soggy Crumble: This usually happens if the butter wasn’t cold enough, or the topping was overworked. Ensure your butter is icy cold, and don’t press the topping down.
- Watery Filling: The pre-cook step for the apples helps immensely here. Also, ensure you don’t use too much liquid from the apples themselves. The flour in the filling also helps to thicken.
- Apples not tender enough: This means they either needed more time in the oven or a slightly longer pre-cook. Next time, give them a few more minutes during the initial stove-top cook.
Making a Classic Apple Crumble is truly a labor of love, and each time you make it, you’ll learn a little more about how to perfect it for your own taste. Enjoy every single bite of this wonderfully classic dessert!
This is where we begin transforming simple apples into a luscious, spiced filling that will bubble enticingly beneath our golden crumble. Taking a little time here ensures a perfectly tender and flavorful base.
This is where the “crumble” in Classic Apple Crumble truly comes to life! The texture of the topping is paramount, and it all hinges on how you work that cold butter into the dry ingredients. Patience and a light touch are key here.
The moment of truth! Bringing the filling and topping together before letting the oven work its magic. This is where the magic of a Classic Apple Crumble truly comes alive, transforming simple ingredients into a golden, bubbling masterpiece.
You’ve done it! You’ve created a magnificent Classic Apple Crumble. Now comes the best part: enjoying the fruits of your labor and making sure it’s absolutely perfect for serving.
Conclusion:
Well, we’ve reached the sweet end of our journey together, and I truly hope you’re feeling as inspired as I am about getting this magnificent dessert into your oven! This isn’t just another apple crumble recipe; it’s a gateway to pure, unadulterated comfort and joy, a culinary hug that warms you from the inside out. I often say that some dishes simply feel like home, and this particular creation absolutely embodies that sentiment. The moment those apples start bubbling gently under their golden, buttery blanket, and that incredible aroma wafts through your kitchen, you’ll understand exactly what I mean. It’s a scent that promises warmth, sweetness, and a perfect end to any day.
What makes this recipe an absolute must-try, in my humble opinion, is its beautiful simplicity married with its profound ability to deliver maximum flavor and textural delight. We’re talking about crisp-tender apples, perfectly spiced and juicy, beneath a crumbly topping that’s got just the right amount of crunch and chew. There’s a wonderful balance here, a symphony of sweet and tart that never overwhelms but always satisfies. It’s a timeless classic for a reason, but I truly believe my rendition has a little extra something, a certain je ne sais quoi that elevates it from good to truly unforgettable. This isn’t merely a dessert; it’s an experience waiting to happen in your very own kitchen.
Now, once you pull that golden masterpiece from the oven, still bubbling invitingly, the fun really begins with how you choose to serve it. While it’s absolutely divine on its own, a scoop of good quality vanilla bean ice cream melting into the warm fruit and crumble is a match made in heaven. The cold creaminess against the hot, sweet-tart apples and crunchy topping is a sensation you won’t soon forget. For those who prefer something a little richer, a generous pour of warm custard is another traditional and utterly delicious accompaniment. And if you’re looking for a lighter touch, a dollop of freshly whipped cream, perhaps infused with a hint of vanilla or a whisper of cinnamon, adds a delightful airy contrast. Don’t be shy about experimenting with these pairings!
Endless Possibilities for Your Culinary Canvas
One of the things I adore most about this recipe is its incredible versatility. While the apple version is undeniably classic and truly wonderful, don’t hesitate to play around with different fruits as the seasons change. Imagine this same glorious crumble topping over a mixture of seasonal berries in the summer, or perhaps pears and ginger in the cooler months. Rhubarb makes a fantastic, tart counterpoint, especially when mixed with strawberries for a touch of sweetness. You could also experiment with the crumble itself; a handful of chopped walnuts or pecans folded into the flour mixture adds a lovely nutty depth, or a sprinkle of rolled oats can provide an extra layer of texture. For those with dietary considerations, this recipe is quite adaptable; feel free to swap out regular flour for a gluten-free blend, or use a plant-based butter alternative to make it dairy-free. The core principles of flavor and texture will remain gloriously intact.
I truly encourage you to carve out some time this week, gather your ingredients, and immerse yourself in the simple pleasure of baking this incredible dessert. It’s more than just a recipe; it’s an invitation to create warmth, share smiles, and make memories around your table. This particular creation, what I fondly think of as the definitive Classic Apple Crum extractble, is designed to be effortlessly rewarding, proving that sometimes, the most comforting and satisfying dishes are also the most straightforward to prepare. You don’t need to be a pastry chef to achieve perfection here; just a willingness to follow a few simple steps and a love for truly good food.
Share Your Crumbly Creations!
When you do bake it, I would absolutely love to hear about your experience! What did you pair it with? Did you try any variations that became an instant hit? Please share your triumphs, your photos, and any creative twists you added in the comments below or on social media. Your culinary adventures inspire me and our entire community of home bakers. Let’s spread the joy of homemade goodness, one delicious, warm, and crumbly slice at a time. Happy baking, my friends!
Classic Apple Crumble
A comforting British dessert featuring tender, sweet-tart apples spiced with cinnamon, topped with a golden, buttery, and irresistibly crisp crumb. Easy to make and universally loved.
Ingredients
Instructions
Important Information
Nutrition Facts (Per Serving)
It is important to consider this information as approximate and not to use it as definitive health advice.
Allergy Information
Please check ingredients for potential allergens and consult a health professional if in doubt.
Leave a Comment