
Christmas Red Velvet Cheesecake Recipe Festive Delicious – are you ready to unlock the secret to the most show-stopping dessert of the holiday season? Imagine a stunning masterpiece gracing your Christmas table, its vibrant red hue peeking through a snowy white topping, promising a symphony of flavors with every delightful bite. This isn’t just any dessert; it’s a celebration encapsulated in a dish, meticulously crafted to bring joy and awe to all your festive gatherings. Prepare to captivate your guests with a dessert that looks as incredible as it tastes, truly embodying the spirit of holiday indulgence.
The classic red velvet cake, with its subtle cocoa notes and characteristic tang, has long held a special place in culinary history, often associated with grand occasions and a touch of Southern elegance. When this beloved cake meets the creamy indulgence of a rich cheesecake, something truly magical happens, especially when crafted for the most wonderful time of the year. People adore this creation for so many reasons: the incredibly moist red velvet cake base perfectly complements the luxuriously smooth, tangy cheesecake filling, creating a texture contrast that is simply irresistible. Each spoonful offers a harmonious blend of rich cocoa, sweet vanilla, and a bright cream cheese finish, culminating in an experience that is both sophisticated and incredibly comforting.
Why This Christmas Red Velvet Cheesecake Recipe Festive Delicious Creation Is a Must-Make
Beyond its incredible taste and texture, the visual appeal of this particular Christmas Red Velvet Cheesecake Recipe Festive Delicious creation is second to none. Its striking presentation makes it an instant centerpiece, a conversation starter, and a memorable highlight of any holiday meal. It’s the kind of dessert that leaves a lasting impression, embodying the warmth, generosity, and festive spirit of Christmas. Get ready to impress your loved ones and make this holiday season extra sweet and unbelievably delicious!

Ingredients:
Oh, this is where the magic begins! Gather all these wonderful components, and make sure everything that needs to be at room temperature truly is. Trust me, it makes a world of difference for that smooth, luscious texture we’re aiming for with our Christmas Red Velvet Cheesecake Recipe Festive Delicious.
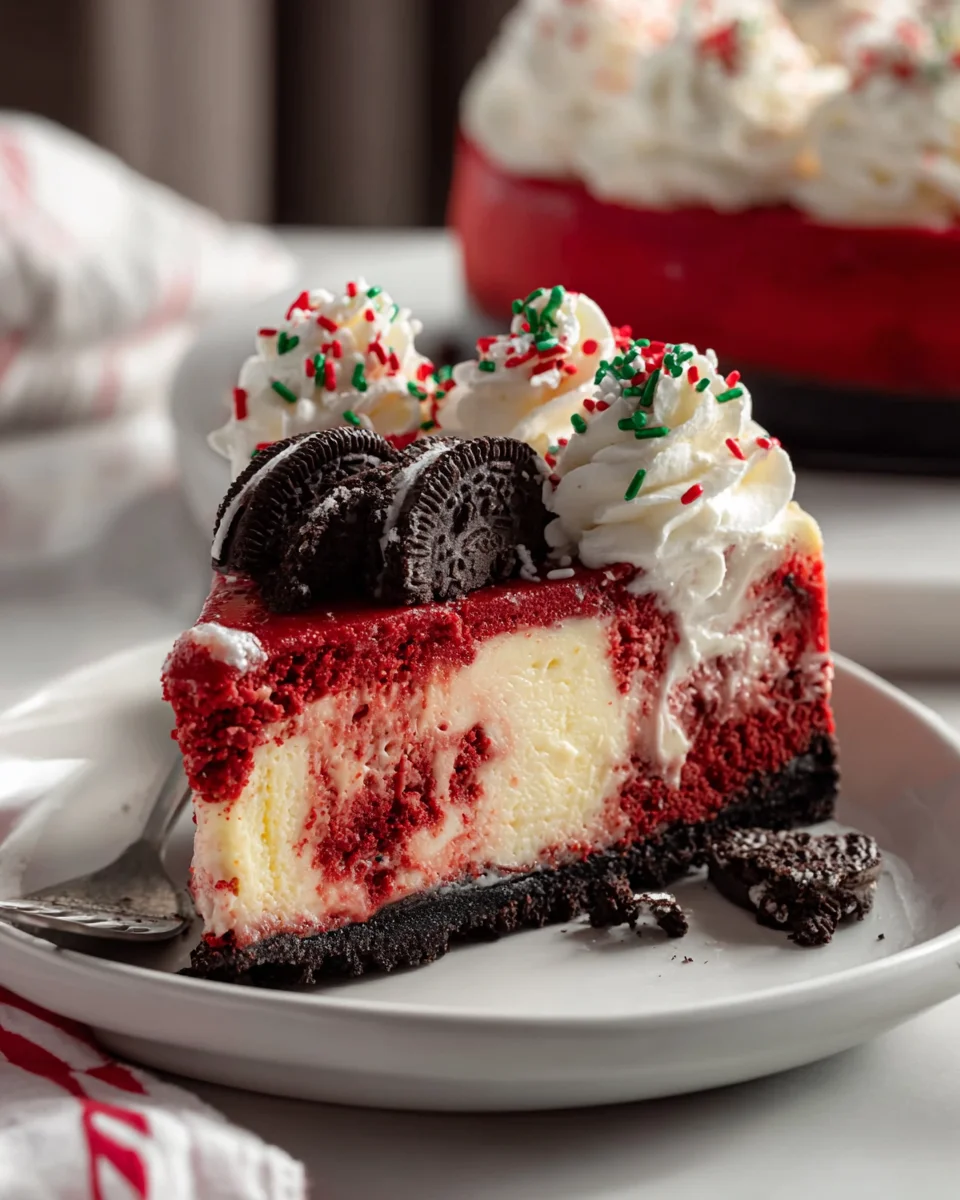
For the Decadent Oreo Crust:
- 1 ½ cups (approximately 18-20 cookies) chocolate sandwich cookies (like Oreos), finely crushed: I absolutely adore using the entire cookie, filling and all, for the richest, most chocolatey base. It creates a fantastic contrast with the tangy cheesecake.
- ¼ cup (56g) unsalted butter, melted: Make sure it’s good quality butter; it binds the crust beautifully and adds richness without any excess salt competing with our flavors.
- 1 tablespoon granulated sugar: Just a touch to enhance the sweetness and provide a slightly crispier texture to the crust once baked.
For the Festive Red Velvet Cheesecake Filling:
- 32 ounces (four 8-ounce blocks) full-fat cream cheese, softened to room temperature: This is the star of our show! Full-fat is non-negotiable for that classic, creamy cheesecake texture. Ensure it’s truly soft, or you’ll end up with lumps, and nobody wants lumpy cheesecake.
- 1 ½ cups (300g) granulated sugar: Providing just the right amount of sweetness to balance the tang of the cream cheese and the subtle cocoa.
- ¼ cup (21g) unsweetened natural cocoa powder: Not Dutch-processed! Natural cocoa powder reacts with the baking soda to give that authentic red velvet flavor and a deeper red hue.
- 2 tablespoons all-purpose flour: A little bit of flour acts as a stabilizer, helping prevent cracks and giving the cheesecake a wonderfully smooth, velvety texture.
- 1 teaspoon vanilla extract: Pure vanilla extract, please! It adds a warm, aromatic depth that complements the chocolate and cream cheese so perfectly.
- 1 teaspoon distilled white vinegar: This might sound odd, but it’s crucial for classic red velvet! It reacts with the cocoa and baking soda to enhance the red color and contributes to the signature tender crumb and slight tang.
- 1 teaspoon baking soda: The leavening agent that, when combined with the vinegar and cocoa, creates the characteristic red velvet reaction.
- 2 large eggs, plus 1 large egg yolk, all at room temperature: Room temperature eggs incorporate much more smoothly into the batter, preventing overmixing. The extra yolk adds richness and helps prevent a rubbery texture.
- 2-3 tablespoons liquid red food coloring: For that vibrant, show-stopping red! I usually start with 2 tablespoons and add more until I achieve that deep, rich crimson that screams “festive.” Gel food coloring works exceptionally well for a more intense color with less liquid.
For the Tangy Cream Cheese Frosting Topping:
- 8 ounces (one 8-ounce block) full-fat cream cheese, softened to room temperature: Again, softened cream cheese is key for a silky-smooth frosting with no lumps.
- ½ cup (113g) unsalted butter, softened to room temperature: The other essential for a rich, pipeable frosting.
- 2 ½ cups (300g) confectioners’ sugar (powdered sugar), sifted: Sifting is a must here to avoid any powdery lumps in your beautiful frosting.
- 1 teaspoon vanilla extract: Enhances the flavor of the cream cheese and butter beautifully.
- 1-2 tablespoons milk or heavy cream: Use as needed to achieve your desired consistency – thick for piping, slightly thinner for a smooth spread.
For Festive Decoration:
- Crushed candy canes: For that extra Christmas sparkle and a hint of minty freshness.
- White chocolate shavings: To mimic snow or add an elegant touch.
- Fresh cranberries and rosemary sprigs: A natural, beautiful, and aromatic garnish that truly brings the festive spirit to life.
Instructions:
Alright, let’s get baking! This is a labor of love, but every single step contributes to that breathtaking, delicious result. Patience is truly a virtue here, especially when it comes to cheesecake. Remember, we’re aiming for a Christmas Red Velvet Cheesecake Recipe Festive Delicious masterpiece!
Preparing the Crust:
The foundation of our magnificent cheesecake starts here. A good crust provides texture and flavor contrast, making each bite even more exciting.
- Preheat and Prepare: First things first, preheat your oven to 350°F (175°C). Grab a 9-inch springform pan. It’s a good idea to lightly grease the bottom and sides to ensure easy release later. I like to line the bottom with a circle of parchment paper for extra insurance against sticking.
- Crush the Cookies: Take your chocolate sandwich cookies and crush them into fine crumbs. You can do this in a food processor, which makes quick work of it, or by placing them in a Ziploc bag and crushing them with a rolling pin. Aim for a consistency similar to fine sand – no large chunks, please!
- Combine Ingredients: In a medium bowl, combine the finely crushed cookie crumbs, melted unsalted butter, and granulated sugar. Mix everything together thoroughly with a fork until the crumbs are evenly moistened and resemble wet sand.
- Press into Pan: Pour the crumb mixture into the prepared springform pan. Using the bottom of a flat glass or your fingers, press the mixture firmly and evenly onto the bottom of the pan. Make sure it’s compact and level. This is important for a sturdy crust!
- Pre-bake the Crust: Bake the crust in your preheated oven for 8-10 minutes. This step helps to set the crust, making it less likely to get soggy once the filling is added.
- Cool Down: Remove the pan from the oven and place it on a wire rack to cool completely while you prepare the filling. It’s crucial that the crust is cool to prevent it from warming the cheesecake batter prematurely.
Making the Red Velvet Cheesecake Filling:
This is where our cheesecake truly takes its vibrant, delicious form. Pay close attention to the order and temperature of ingredients; these details are key to a smooth, crack-free cheesecake.
- Prepare for Water Bath: While your crust cools, let’s get ready for the water bath – a non-negotiable step for creamy, un-cracked cheesecake! Wrap the bottom and sides of your springform pan with two layers of heavy-duty aluminum foil. Ensure it’s completely sealed to prevent any water from seeping in. I always wrap it up past the rim of the pan.
- Cream the Cream Cheese: In the bowl of a stand mixer fitted with the paddle attachment (or using a large bowl with an electric hand mixer), beat the softened cream cheese on medium speed for about 2-3 minutes. Beat until it’s completely smooth, light, and fluffy, scraping down the sides of the bowl frequently. This is arguably the most important step for a lump-free cheesecake!
- Add Sugar and Flour: Gradually add the granulated sugar to the creamed cream cheese, beating on low speed until just combined. Then, add the cocoa powder and all-purpose flour, mixing on low until just incorporated. Be careful not to overmix at this stage.
- Introduce Flavors and Color: In a small bowl, combine the vanilla extract, white vinegar, baking soda, and red food coloring. Stir this vibrant mixture gently until it’s well combined. The vinegar and baking soda will react a little, which is exactly what we want! Add this colorful concoction to the cream cheese mixture, mixing on low speed until the color is evenly distributed and the batter is a beautiful, consistent red velvet hue. Scrape the sides of the bowl again.
- Incorporate Eggs: Now for the delicate part. Add the eggs and the extra egg yolk one at a time, mixing on the absolute lowest speed possible after each addition, just until incorporated. Do not overmix! Overmixing introduces too much air, which can cause your cheesecake to puff up and then crack as it cools. The goal is to gently combine, not whip.
- Pour and Smooth: Pour the gloriously red cheesecake batter over the cooled Oreo crust in the springform pan. Gently tap the pan on the counter a few times to release any large air bubbles that might be lurking. Use an offset spatula to smooth the top of the batter.
Baking the Cheesecake:
The baking process is delicate. The water bath provides a moist, even heat, essential for a perfectly cooked, smooth-topped cheesecake. This is how we achieve that Christmas Red Velvet Cheesecake Recipe Festive Delicious texture.
- Prepare the Water Bath: Place the foil-wrapped springform pan into a larger roasting pan. Carefully pour hot water into the roasting pan until it comes halfway up the sides of the springform pan. Be very careful not to splash water into the cheesecake batter itself!
- Bake in Water Bath: Carefully transfer the roasting pan with the cheesecake to your preheated oven. Bake for 60-75 minutes. The cheesecake is done when the edges are set, but the center (about a 2-3 inch circle) still jiggles slightly when you gently nudge the pan. It will continue to cook and firm up as it cools.
- Gradual Cooling: Once baked, turn off the oven but leave the cheesecake inside with the oven door propped open a few inches (I use a wooden spoon). Let it sit in the cooling oven for 1 hour. This slow, gradual cooling helps prevent cracks caused by sudden temperature changes.
- Cool to Room Temperature: After an hour in the oven, carefully remove the springform pan from the water bath and the roasting pan. Remove the foil. Place the cheesecake on a wire rack and let it cool completely to room temperature. This can take another 2-3 hours.
Chilling the Cheesecake:
Patience, my friends! This step is absolutely essential for the cheesecake to fully set, develop its rich flavor, and achieve that perfect dense, creamy texture.
- Refrigerate Thoroughly: Once cooled to room temperature, cover the springform pan loosely with plastic wrap. Transfer the cheesecake to the refrigerator and chill for at least 6-8 hours, but ideally overnight. Resist the urge to cut into it early! The longer it chills, the better it sets and the cleaner your slices will be.
Preparing the Cream Cheese Frosting Topping:
The crowning glory! This luscious, tangy cream cheese frosting is the perfect counterpoint to the rich red velvet cheesecake.
- Whip Cream Cheese and Butter: In the bowl of your stand mixer (or using a hand mixer), beat the softened cream cheese and softened unsalted butter together on medium speed until the mixture is incredibly smooth and creamy, about 2-3 minutes. Again, scrape down the sides of the bowl regularly to ensure everything is incorporated.
- Add Sugar and Vanilla: Gradually add the sifted confectioners’ sugar to the cream cheese mixture, beating on low speed until fully incorporated. Then, add the vanilla extract and mix until just combined.
- Adjust Consistency: If your frosting is too thick, add milk or heavy cream, one tablespoon at a time, beating on low until you reach your desired consistency. For piping, I like it thick enough to hold its shape well. For spreading, a slightly thinner consistency is easier to work with. Be careful not to overbeat, or it can become too thin.
Decorating and Serving:
Now for the grand finale! Make your Christmas Red Velvet Cheesecake Recipe Festive Delicious truly shine with some festive garnishes.
- Unmold the Cheesecake: Once the cheesecake is thoroughly chilled, carefully run a thin knife around the edge of the pan before releasing the springform collar. This helps ensure a clean separation.
- Frost the Cheesecake: Spread the prepared cream cheese frosting evenly over the top of the chilled cheesecake using an offset spatula. Or, if you’re feeling fancy, pipe decorative swirls or borders using a piping bag fitted with a star tip.
- Add Festive Decorations: This is where you can let your creativity truly sparkle! Sprinkle crushed candy canes around the edge, or across the entire top. Arrange fresh cranberries and small sprigs of rosemary in a wreath pattern, or artfully scattered across the top. You could even add some delicate white chocolate shavings for an extra touch of elegance that resembles fresh snow.
- Slice and Serve: Use a sharp knife, wiping it clean with a warm, damp cloth between each slice, to cut beautiful, clean wedges.
- Enjoy! Serve your magnificent Christmas Red Velvet Cheesecake Recipe Festive Delicious to rave reviews. It’s best enjoyed chilled, and leftovers, if there are any, can be stored in an airtight container in the refrigerator for up to 3-4 days.
Conclusion:
This isn’t just any dessert; it’s the dessert to make your holiday season truly special. I truly believe this
Christmas Red Velvet Cheesecake Recipe Festive Delicious creation is a showstopper that will earn you rave reviews and become a cherished part of your holiday traditions. Its vibrant ruby hue, dramatically contrasted with the pristine white of the fluffy cream cheese frosting, is simply mesmerizing, making it a feast for the eyes even before the first tantalizing bite. But it’s the taste that truly seals the deal – that perfect, harmonious balance of tangy cream cheese, subtle cocoa notes, and a luscious sweetness that sings on the palate, all sitting atop a buttery, delightfully crumbly crust. Every single forkful is a celebration of textures and flavors, from the silky smooth and incredibly creamy filling to the satisfying crunch of the base, rich yet delightfully refreshing. It’s an indulgence that somehow feels light enough to enjoy wholeheartedly after even the grandest holiday meal, yet undeniably decadent enough to satisfy every deep-seated dessert craving you might have. I’ve personally made this incredible cheesecake countless times for various festive gatherings, and each time, without fail, it disappears quicker than I can even slice it! It’s consistently a magnificent crowd-pleaser, leaving everyone utterly delighted, and I promise you, dear reader, it’s worth every joyful moment spent preparing it.
Now, to truly elevate your cheesecake experience and make it uniquely yours, allow me to share a few serving suggestions and delightful variations that I’ve discovered along the way. For optimal flavor and that signature creamy texture, I always recommend serving this cheesecake perfectly chilled. However, for the absolute best melt-in-your-mouth experience, allow it to sit at room temperature for about 15 to 20 minutes before carefully slicing it. This brief rest ensures it achieves that perfect, almost ethereal consistency – not too cold and firm, and certainly not too soft. Garnish is truly where you can let your creativity shine and make this dessert an even more stunning presentation! A generous scattering of fresh cranberries or plump raspberries adds a beautiful, vibrant burst of color and provides a wonderful tart counterpoint to the cheesecake’s inherent sweetness. For an extra touch of sheer decadence, why not drizzle a little homemade raspberry coulis or a warm, rich chocolate ganache over individual slices? A few delicate curls of white chocolate or a light dusting of high-quality cocoa powder can also create a visually stunning effect. And never underestimate the simple elegance of a tiny sprig of fresh mint for that perfect pop of refreshing green! If you’re feeling a little adventurous and want to put your own spin on it, you could even experiment with different crusts – just imagine a crushed gingerbread cookie crust for an even more pronounced festive spice profile, or perhaps a deep, rich Oreo crust for a darker, more intensely chocolatey base. For a slight variation on the exquisite topping, consider whipping a little finely grated orange zest into the cream cheese frosting for a bright, invigorating citrusy lift, or even just a hint of almond extract for a subtle, sophisticated nutty note. Pair a glorious slice with a robust, dark coffee, a delicate and sweet dessert wine, or a steaming mug of luxurious hot cocoa enjoyed by a crackling fireplace for the ultimate cozy holiday treat that truly embraces the spirit of the season.
I genuinely hope you’re feeling incredibly inspired to bring this magnificent dessert to life in your very own kitchen this holiday season. There’s truly something so incredibly rewarding and deeply satisfying about baking a show-stopping dessert completely from scratch, especially one that promises to bring so much joy and delight to your beloved friends and family. Please don’t be intimidated by its elegant and sophisticated appearance; I assure you, the process itself is wonderfully straightforward, and the delicious results are utterly spectacular. Take the plunge, unleash your inner baker, and create this culinary masterpiece, and then simply watch the smiles light up around your dining table. More than anything, I would absolutely adore hearing about your experiences! Please, once you’ve baked and savored this delightful treat, come back and share your stories, proudly display your photos, and reveal any creative twists or brilliant modifications you added. Did you discover a new favorite garnish? Did you pair it with a particularly special drink that enhanced the flavors? Your feedback, your triumphs, and your culinary adventures inspire me and our entire wonderful community of home bakers. Let’s work together to make this holiday season the most delicious and memorable one yet! Happy baking, my dear friends!
Christmas Red Velvet Cheesecake
Unlock the secret to a show-stopping holiday dessert! This vibrant red velvet cheesecake, with its creamy texture and festive appeal, is meticulously crafted to bring joy and awe to all your Christmas gatherings. A beautiful centerpiece that looks as incredible as it tastes.
Ingredients
Instructions
Important Information
Nutrition Facts (Per Serving)
It is important to consider this information as approximate and not to use it as definitive health advice.
Allergy Information
Please check ingredients for potential allergens and consult a health professional if in doubt.
Leave a Comment