
Christmas Pinwheel Cookies
Oh, do I have a treat for your holiday baking this year! I’m so excited to share my recipe for Christmas Pinwheel Cookies. These aren’t just any cookies; they’re little spirals of pure holiday joy, perfect for bringing a smile to anyone’s face.
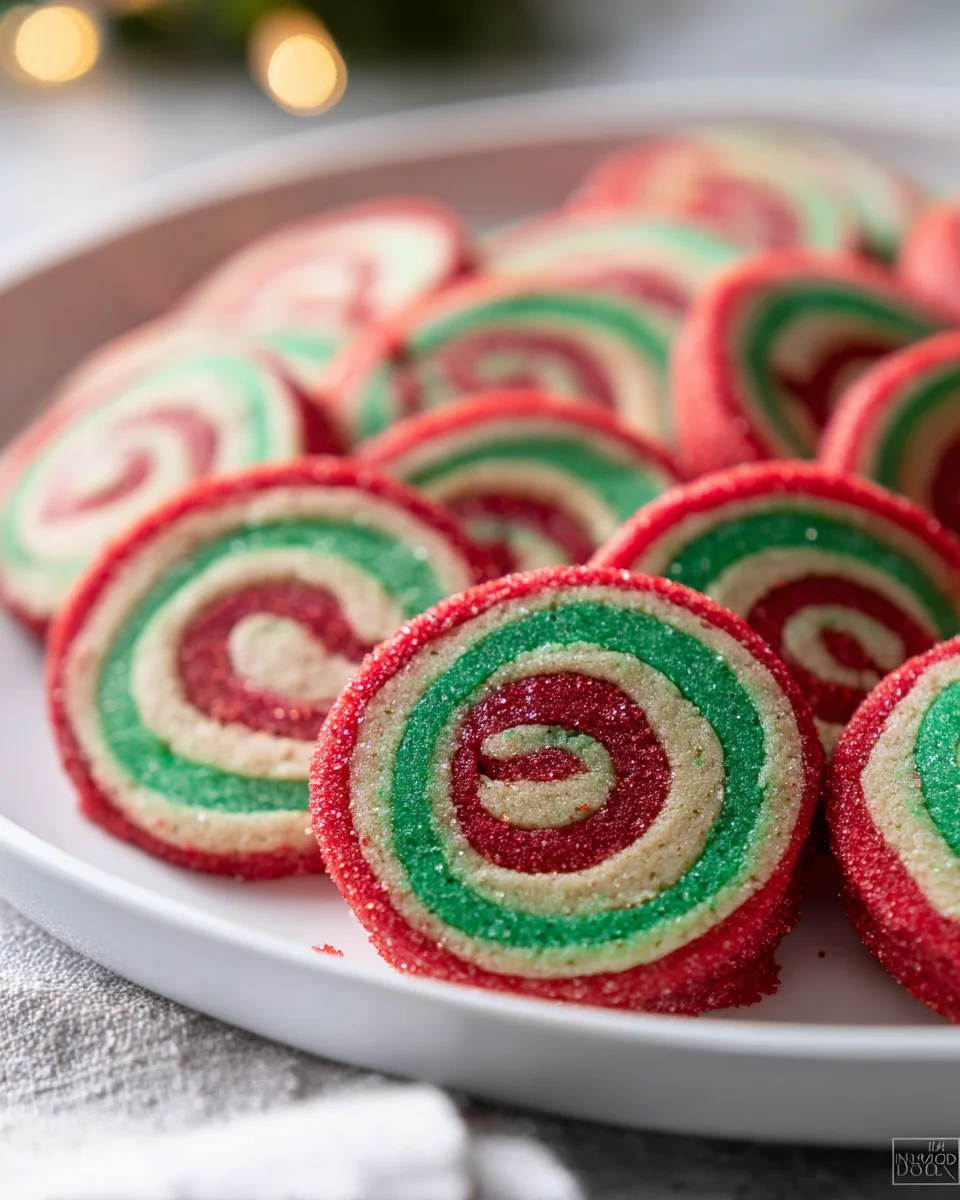
What makes these cookies so special, you ask? It’s all about that breathtaking visual! Imagine vibrant swirls of festive red and green, or perhaps a classic chocolate and vanilla, spiraling together in every bite. They truly embody the spirit of the season, adding an undeniable touch of sparkle and magic to your cookie platters. They look incredibly intricate and professional, giving you that “wow” factor without being overly complicated to create.
You’ll absolutely love making and sharing these because they’re the kind of cookie that gathers compliments and admiration! They’re delightfully buttery, perfectly sweet, and offer a wonderful textural experience. Whether you’re baking for a cookie exchange, a festive party, or simply to enjoy with your family by the fireplace, these pinwheels are guaranteed to be a hit and quickly become a cherished part of your holiday traditions.
So, what exactly are we diving into? We’re going to create two contrasting batches of soft, tender cookie dough – one plain or vanilla, and the other tinted a festive color (I adore a bright red or a cheerful green for Christmas!). We’ll roll them out, layer them beautifully, then carefully roll them into a neat log. After a brief chill, we’ll slice them to reveal their stunning pinwheel pattern before baking them to golden perfection. Get ready to impress everyone with these show-stopping beauties!

Ingredient Notes
Crafting the perfect batch of Christmas Pinwheel Cookies starts with understanding your ingredients. While the recipe might seem straightforward, each component plays a crucial role in achieving that beautiful spiral pattern and delightful flavor. I always recommend using high-quality ingredients, as they truly make a difference in the final product.
Flour
- All-Purpose Flour: This is the backbone of our cookie dough. It provides the necessary structure and chewiness. I recommend using unbleached all-purpose flour for a consistently tender crumb.
- Substitutions: While I haven’t personally experimented much with gluten-free flours for pinwheels due to the precise dough structure needed, if you’re looking for an alternative, a good gluten-free all-purpose baking blend (one that contains xanthan gum) might work, but be prepared for a slightly different texture and potentially a more delicate dough. You might need to add a touch more liquid or chill the dough even longer.
Fats
- Unsalted Butter: This is absolutely non-negotiable for me! Butter provides richness, flavor, and helps tenderize the cookies. Make sure your butter is at room temperature – not melted, not too cold – for proper creaming with the sugar. This creates air pockets, leading to lighter cookies.
- Substitutions: While some recipes might suggest shortening, I strongly advise against it for pinwheel cookies. Shortening lacks the flavor of butter and doesn’t yield the same tender texture. Plant-based butter alternatives can be used, but ensure they have a similar fat content and behave like dairy butter when creamed; chilling times might need adjustment as some tend to soften faster.
Sweeteners & Flavor
- Granulated Sugar: Our primary sweetener. It contributes to the cookie’s crispness and helps spread.
- Vanilla Extract: A classic and essential flavor enhancer. I always opt for pure vanilla extract for the best aroma and taste.
- Substitutions: For a festive twist, you could experiment with a touch of almond extract or even a few drops of peppermint extract for one of the doughs to create a candy cane effect. Just be mindful not to overdo strong extracts. For non-alcohol vanilla, look for alcohol-free vanilla flavoring, which performs just as well in baking.
Leavening & Color
- Baking Powder: Just a touch of baking powder helps the cookies rise slightly and contributes to a softer texture.
- Red Food Coloring: This is where the “Christmas” magic truly happens! I highly recommend using gel food coloring over liquid drops. Gel colors are much more concentrated, allowing you to achieve a vibrant, deep red without adding too much moisture to your dough, which can affect its texture. You’ll use this for one half of your dough.
Step-by-Step Instructions
Making Christmas Pinwheel Cookies is a fun and rewarding process, especially when you see those beautiful spirals emerge! Here’s how I tackle them, step by step, to ensure perfect results every time.
1. Prepare the Basic Dough
- In a large mixing bowl, cream together your softened unsalted butter and granulated sugar until the mixture is light and fluffy. This step is crucial for incorporating air, which contributes to the cookies’ texture.
- Beat in the egg and vanilla extract until well combined, scraping down the sides of the bowl as needed.
- In a separate bowl, whisk together your all-purpose flour, baking powder, and a pinch of salt. Gradually add the dry ingredients to the wet ingredients, mixing on low speed until just combined. Be careful not to overmix, as this can develop the gluten too much, leading to tough cookies.
2. Divide and Color the Dough
- Divide the dough in half as evenly as possible.
- Leave one half plain (this will be your white portion).
- To the other half, add your gel red food coloring. Start with a small amount and knead it into the dough until the color is consistent and vibrant. I find that wearing gloves helps prevent my hands from becoming stained. Continue adding color until you achieve your desired festive red.
3. Chill the Dough
- Flatten each portion of colored dough into a rectangular disc, wrap them tightly in plastic wrap, and refrigerate for at least 1 hour. This chilling step is absolutely essential! It allows the gluten to relax, making the dough easier to roll, and prevents the colors from bleeding too much during the subsequent steps.
4. Roll Out the Dough
- Once chilled, remove one dough disc (e.g., the white one) from the refrigerator. On a lightly floured surface (or between two sheets of parchment paper, which I prefer for easy handling and less added flour), roll the dough into a rectangle, approximately 1/8 to 1/4 inch thick. Aim for a rectangle about 9×12 inches, or whatever size you find manageable. Trim the edges to create a neat rectangle.
- Repeat the process with the red dough, trying your best to roll it to the exact same dimensions as the white dough. Consistency in size is key for uniform pinwheels.
5. Layer and Roll the Dough
- Carefully transfer one rolled-out dough rectangle (e.g., the white one) onto a clean sheet of parchment paper.
- Gently lay the other colored dough rectangle (the red one) directly on top of the first, aligning the edges as perfectly as possible. Lightly press them together to ensure they adhere.
- Starting from one of the longer sides, tightly roll the layered dough into a log. The tighter you roll, the fewer gaps you’ll have in your pinwheel pattern. Work slowly and evenly.
6. Chill the Log (Again!)
- Once your log is formed, wrap it very tightly in plastic wrap. You can gently reshape it with your hands to make it perfectly round if needed.
- Refrigerate the dough log for at least 2-3 hours, or preferably overnight. This firm chilling is critical for the cookies to hold their shape during slicing and baking.
7. Slice and Bake
- Preheat your oven to 350°F (175°C). Line baking sheets with parchment paper.
- Remove the chilled dough log from the refrigerator. Using a sharp knife, slice the log into rounds about 1/4 inch thick. For really clean cuts, some people swear by using unflavored dental floss!
- Place the sliced cookies on the prepared baking sheets, leaving about 1 inch between them.
- Bake for 8-12 minutes, or until the edges are lightly golden. The exact time will depend on your oven and the thickness of your cookies.
8. Cool
- Allow the cookies to cool on the baking sheets for a few minutes before transferring them to a wire rack to cool completely. This prevents them from breaking.
Tips & Suggestions
Achieving those perfectly swirled, festive Christmas Pinwheel Cookies takes a little bit of technique and patience. Over the years, I’ve picked up a few tricks that make all the difference. Here are my top tips to ensure your cookies are a showstopper!
- Don’t Skimp on Chilling Time: This is arguably the most critical step for pinwheel cookies. Chilling the dough initially makes it easier to roll without sticking or tearing. Chilling the log firmly before slicing ensures sharp, clean cuts and prevents the beautiful swirl from distorting in the oven. If your dough log isn’t firm enough, your slices will squash, and your pinwheels will look more like blobs. I often pop my dough log into the freezer for 15-20 minutes right before slicing for an extra firm result.
- Achieve Vibrant Colors: For that striking Christmas red, always opt for gel food coloring. Liquid food coloring can add too much moisture to your dough, altering its texture and requiring more flour, which can make cookies tough. Gel colors are concentrated, providing intense color with just a small amount, keeping your dough’s consistency perfect.
- Even Rolling is Key: When rolling out your two dough rectangles, strive for uniform thickness and identical dimensions. This ensures that when layered, the doughs are proportionate and that each slice will yield a balanced swirl. Using a rolling pin with adjustable guides can be incredibly helpful here, or simply measure with a ruler as you go.
- Roll Tightly and Evenly: When rolling the layered dough into a log, apply even pressure and roll as tightly as possible. A tight roll minimizes air pockets between the layers, giving you a dense, beautiful spiral. Work slowly and patiently from one end to the other.
- Sharp Knife for Slicing: A very sharp knife is essential for clean cuts. A dull knife will drag and distort your pinwheels. If your dough is extremely cold, let it sit for a minute or two at room temperature to prevent crumbling, but don’t let it get soft. For an extra clean cut, some bakers swear by using unflavored dental floss to slice the log!
- Control Spreading: To minimize spreading and keep those pinwheel shapes defined, ensure your baking sheets are cool before placing new batches of cookies on them. If your dough is softening while you’re slicing, pop the remaining log back into the fridge.
- Flavor Variations: Beyond classic vanilla, consider adding peppermint extract to the red dough for a candy cane effect, or a touch of almond extract to the white dough for a marzipan-like flavor. Just remember, a little goes a long way with strong extracts!
- Dusting for Visual Appeal: Before baking, you can lightly sprinkle the top of your sliced pinwheels with a touch of granulated sugar or sanding sugar for a beautiful sparkle, especially nice for Christmas.
Storage
Once you’ve put in all the effort to bake these beautiful Christmas Pinwheel Cookies, you’ll want to ensure they stay fresh and delicious for as long as possible. Proper storage is key, whether you’re planning to enjoy them immediately, save some for later, or even prepare the dough in advance.
Baked Cookies
- Room Temperature: Once completely cooled, store your baked Christmas Pinwheel Cookies in an airtight container at room temperature. They will maintain their freshness and texture for up to 5-7 days. To prevent them from sticking together or becoming overly soft, you can place a piece of parchment paper between layers of cookies in the container.
- Freezing Baked Cookies: These cookies freeze wonderfully! Once fully cooled, arrange them in a single layer on a baking sheet and flash freeze for about 30 minutes until solid. Then, transfer the frozen cookies to an airtight freezer-safe container or a heavy-duty freezer bag. They will keep well for up to 2-3 months. When you’re ready to enjoy them, simply thaw them at room temperature for an hour or two.
Unbaked Dough Log
- Refrigerator: The unbaked dough log is incredibly versatile for make-ahead baking. Tightly wrapped in plastic wrap, it can be stored in the refrigerator for up to 3-4 days. This is perfect if you want to prep the dough a few days before your holiday baking marathon. Just remember to allow it to firm up sufficiently in the fridge before slicing.
- Freezer: For longer-term storage, the unbaked dough log can be frozen for up to 2-3 months. Wrap the log tightly in several layers of plastic wrap, and then add an additional layer of aluminum foil to prevent freezer burn. When you’re ready to bake, transfer the frozen log to the refrigerator overnight to thaw. Once thawed, you can slice and bake as directed. If you’re short on time, you can even slice a partially frozen log (it will be harder to cut, but will hold its shape beautifully) and then extend the baking time by a few minutes.
By following these storage tips, you can enjoy your festive Christmas Pinwheel Cookies for days, weeks, or even months, making holiday entertaining or gift-giving a breeze!
Final Thoughts
There’s just something magical about holiday baking, and these Christmas Pinwheel Cookies truly embody that spirit. I absolutely love how their vibrant, swirling colors bring an instant cheer to any cookie platter, making them a feast for the eyes before they even reach your taste buds. Beyond their stunning looks, they offer that perfect melt-in-your-mouth buttery sweetness that everyone craves during the festive season. I find making them to be such a joyful activity, perfect for gathering loved ones in the kitchen and creating lasting memories. So, if you’re looking for a cookie that’s as delightful to look at as it is to eat, and truly captures the essence of Christmas, I wholeheartedly recommend giving these Christmas Pinwheel Cookies a try. They’re sure to become a cherished part of your holiday traditions!
Leave a Comment